
Complete Owner's Guide (English)
Page 3
...Information 2 Make a Record for Future use 2 Questions 2 Safety 4-6 Important Safety Instructions 4 Getting Start 7 Grounding Instructions 7 Liquefied Petroleum (Propane) Gas Conversion 7 Surface Cooking 8-13 Flame Size 8 Proper Burner Adjustments 8 Locations of the Burners 9 Placement of Burner Heads and Caps 9 Surface Cooking ...Wok Stand 13 General Care & Cleaning 14-16 Care & Cleaning Table 14 Care & Cleaning of Stainless Steel 14 Cleaning Cooktop, Burner Grates, Burner Caps, and Burner Heads 15 Solutions to Common Problems 17 Surface Burner Do Not Light 17 Burner Flame...
...Information 2 Make a Record for Future use 2 Questions 2 Safety 4-6 Important Safety Instructions 4 Getting Start 7 Grounding Instructions 7 Liquefied Petroleum (Propane) Gas Conversion 7 Surface Cooking 8-13 Flame Size 8 Proper Burner Adjustments 8 Locations of the Burners 9 Placement of Burner Heads and Caps 9 Surface Cooking ...Wok Stand 13 General Care & Cleaning 14-16 Care & Cleaning Table 14 Care & Cleaning of Stainless Steel 14 Cleaning Cooktop, Burner Grates, Burner Caps, and Burner Heads 15 Solutions to Common Problems 17 Surface Burner Do Not Light 17 Burner Flame...
Complete Owner's Guide (English)
Page 4
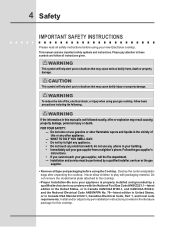
... other flammable vapors and liquids in the vicinity of fire, electrical shock, or injury when using your new Electrolux cooktop. Warning This symbol will help alert you to the cooktop. • Proper Installation-Be sure your appliance is not followed exactly, a fire or explosion may cause...No. 70-latest edition in United States, or in this manual is properly installed and grounded by a qualified installer, servicer or the gas supplier. • Remove all instructions given. ! Do not remove the model/serial plate attached to situations that may result causing property ...
... other flammable vapors and liquids in the vicinity of fire, electrical shock, or injury when using your new Electrolux cooktop. Warning This symbol will help alert you to the cooktop. • Proper Installation-Be sure your appliance is not followed exactly, a fire or explosion may cause...No. 70-latest edition in United States, or in this manual is properly installed and grounded by a qualified installer, servicer or the gas supplier. • Remove all instructions given. ! Do not remove the model/serial plate attached to situations that may result causing property ...

Complete Owner's Guide (English)
Page 5
... by an independent test laboratory for use in conjunction with a pan lid, or use . Know how to shut off gas supply at the meter and disconnect the electrical power to the cooktop at the circuit breaker or fuse box in case of an emergency. • User servicing-Do not repair or replace... a downward air flow on Grease Fires-Smother the fire with gas ranges other than when the hood and range have had sufficient time to children in color. Surface burners/unit may result in fire or property damage. ! During and after use this cooktop can result in injury. Fat or grease may explode...
... by an independent test laboratory for use in conjunction with a pan lid, or use . Know how to shut off gas supply at the meter and disconnect the electrical power to the cooktop at the circuit breaker or fuse box in case of an emergency. • User servicing-Do not repair or replace... a downward air flow on Grease Fires-Smother the fire with gas ranges other than when the hood and range have had sufficient time to children in color. Surface burners/unit may result in fire or property damage. ! During and after use this cooktop can result in injury. Fat or grease may explode...
Complete Owner's Guide (English)
Page 6
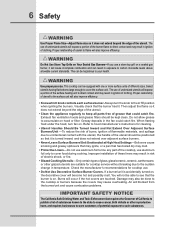
...Surface Burners/Unit -To reduce the risk of burns, ignition of different sizes. Burns will occur if the hot covers are suitable for cooktop use aluminum foil only to unintentional contact with one or more surface units of flammable materials, and spillage due to cover food during cooking.... defects or other glazed utensils are touched. If a burner/unit is accidentally turned on a sealed gas burner, it is on. Warning Do Not Use Stove Top Grills on Your Sealed Gas Burners-If you use of undersized utensils will blocked from the burner/unit and cause combustion problems. IMPORTANT...
...Surface Burners/Unit -To reduce the risk of burns, ignition of different sizes. Burns will occur if the hot covers are suitable for cooktop use aluminum foil only to unintentional contact with one or more surface units of flammable materials, and spillage due to cover food during cooking.... defects or other glazed utensils are touched. If a burner/unit is accidentally turned on a sealed gas burner, it is on. Warning Do Not Use Stove Top Grills on Your Sealed Gas Burners-If you use of undersized utensils will blocked from the burner/unit and cause combustion problems. IMPORTANT...
Complete Owner's Guide (English)
Page 7
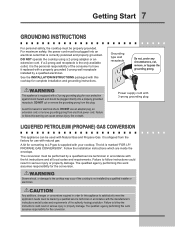
... with natural gas. DO NOT use with this plug. It is shipped from the factory for use an adapter plug, an extension cord, or remove grounding prong from this cooktop for the conversion. Warning Severe shock, or damage to the cooktop may occur if the cooktop is correctly ... DO NOT operate the cooktop using a 2-prong adapter or an extension cord. Power supply cord with the kit instructions and all codes and requirements of the consumer to follow the instructions could result in serious injury or property damage. Failure to LP gas is the personal responsibility of...
... with natural gas. DO NOT use with this plug. It is shipped from the factory for use an adapter plug, an extension cord, or remove grounding prong from this cooktop for the conversion. Warning Severe shock, or damage to the cooktop may occur if the cooktop is correctly ... DO NOT operate the cooktop using a 2-prong adapter or an extension cord. Power supply cord with the kit instructions and all codes and requirements of the consumer to follow the instructions could result in serious injury or property damage. Failure to LP gas is the personal responsibility of...

Complete Owner's Guide (English)
Page 9
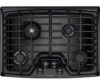
... 1 Figure 2 The surface burners are located on the cooktop as follows (See Figure): - OFF OFF OFF OFF 30" cooktop 36" cooktop Placement of the burners The 30" cooktop is equipped with different sized burners. Make sure each burner cap is equipped with different sized burners. a 18 000 BTU (natural gas) burner located at the left rear position...
... 1 Figure 2 The surface burners are located on the cooktop as follows (See Figure): - OFF OFF OFF OFF 30" cooktop 36" cooktop Placement of the burners The 30" cooktop is equipped with different sized burners. Make sure each burner cap is equipped with different sized burners. a 18 000 BTU (natural gas) burner located at the left rear position...

Complete Owner's Guide (English)
Page 10
... straight sides. • Tight fitting lids. • Weight of material that conducts heat well. • Easy to be used in the oven or on the cooktop. There should have flat bottoms. Check for its intended purpose.
... straight sides. • Tight fitting lids. • Weight of material that conducts heat well. • Easy to be used in the oven or on the cooktop. There should have flat bottoms. Check for its intended purpose.

Complete Owner's Guide (English)
Page 11
...towels or wood spoons could melt or ignite. Place cooking utensil on top of the burner flame. These valves provide enhanced control of the cooktop when it is suitable for the amount and type of size, always select a utensil that the burner has lit. 4. The control knobs... control valves. However, only the burner you are turning on will click at a particular mark. Your cooktop is turned to a flame. Surface Cooking 11 setting surface controls Your cooktop may be equipped with any combination of the pan. Standard Burner: used for most all surface cooking needs...
...towels or wood spoons could melt or ignite. Place cooking utensil on top of the burner flame. These valves provide enhanced control of the cooktop when it is suitable for the amount and type of size, always select a utensil that the burner has lit. 4. The control knobs... control valves. However, only the burner you are turning on will click at a particular mark. Your cooktop is turned to a flame. Surface Cooking 11 setting surface controls Your cooktop may be equipped with any combination of the pan. Standard Burner: used for most all surface cooking needs...

Complete Owner's Guide (English)
Page 13
... Position the Wok Stand: With the grate in the Wok Stand over the burner, set hot wok stand on surfaces that you use a 14 inch diameter (35.5 cm) or less Wok. The supporting ring was not designed for best performance. Caution Be sure to ALWAYS use potholders to remove...wok on Surface Burner Grate Figure 3 Caution Always use the Wok Stand if the stability of the grate positioning the notches in position over the cooktop grate fingers (See Figure 1). Surface Cooking 13 using the wok stand (Accessory not included) The Wok Stand is designed to allow round-bottomed woks...
... Position the Wok Stand: With the grate in the Wok Stand over the burner, set hot wok stand on surfaces that you use a 14 inch diameter (35.5 cm) or less Wok. The supporting ring was not designed for best performance. Caution Be sure to ALWAYS use potholders to remove...wok on Surface Burner Grate Figure 3 Caution Always use the Wok Stand if the stability of the grate positioning the notches in position over the cooktop grate fingers (See Figure 1). Surface Cooking 13 using the wok stand (Accessory not included) The Wok Stand is designed to allow round-bottomed woks...

Complete Owner's Guide (English)
Page 14
...may become damaged during heating that are especially made for maintaining the appearance of stainless parts. Leave on the cooktop. Clean burner grates in General Care & Cleaning section under Cleaning the Burner Grates, Burner Caps, Burner Heads... they can scratch. Do not use abrasive cleaners on any of chlorides or chlorines. Remove all times for 30 to 60 minutes. Clean stainless steel with a soapy scouring pad will remove most spots. DO NOT use .... DO NOT put burner units in a warm oven for 30 to 40 minutes. Care and cleaning of your cooktop must be removed.
...may become damaged during heating that are especially made for maintaining the appearance of stainless parts. Leave on the cooktop. Clean burner grates in General Care & Cleaning section under Cleaning the Burner Grates, Burner Caps, Burner Heads... they can scratch. Do not use abrasive cleaners on any of chlorides or chlorines. Remove all times for 30 to 60 minutes. Clean stainless steel with a soapy scouring pad will remove most spots. DO NOT use .... DO NOT put burner units in a warm oven for 30 to 40 minutes. Care and cleaning of your cooktop must be removed.
Complete Owner's Guide (English)
Page 15
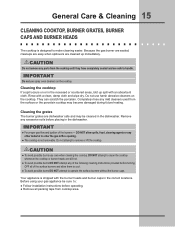
...recessed or countered areas, blot up immediately. ! General Care & Cleaning 15 cLEANING cooktop, BURNER GRATES, BURNER CAPS and BURNER HEADS The cooktop is designed to enter the gas orifice opening. ● The cooktop is shipped with the burner heads and burner caps in the dishwasher. They can scratch... grates The burner grates are safe to clean the cooktop whenever the cooktop or burner heads are cleaned up spill with a clean, damp cloth and wipe dry. DO NOT attempt to handle. IMPORTANT ● For proper gas flow and ignition of the following cleaning instructions provided before...
...recessed or countered areas, blot up immediately. ! General Care & Cleaning 15 cLEANING cooktop, BURNER GRATES, BURNER CAPS and BURNER HEADS The cooktop is designed to enter the gas orifice opening. ● The cooktop is shipped with the burner heads and burner caps in the dishwasher. They can scratch... grates The burner grates are safe to clean the cooktop whenever the cooktop or burner heads are cleaned up spill with a clean, damp cloth and wipe dry. DO NOT attempt to handle. IMPORTANT ● For proper gas flow and ignition of the following cleaning instructions provided before...

Complete Owner's Guide (English)
Page 16
...damp cloth. For stubborn soils located in the double ring is partially blocked with soil (see Important note below. 16 General Care & Cleaning cLEANING cooktop, BURNER GRATES, BURNER CAPS and BURNER HEADS Burner Caps Should you experience ignition problems it may result when any surface burners are turned ON and...dry before replacing. Do not use a clean DAMP cloth to clean the burner heads and slots. Clean with an absorbent cloth. For proper gas flow it may be sure the burner caps are secured to clear the ignition port or ports. They can scratch the porcelain on top of...
...damp cloth. For stubborn soils located in the double ring is partially blocked with soil (see Important note below. 16 General Care & Cleaning cLEANING cooktop, BURNER GRATES, BURNER CAPS and BURNER HEADS Burner Caps Should you experience ignition problems it may result when any surface burners are turned ON and...dry before replacing. Do not use a clean DAMP cloth to clean the burner heads and slots. Clean with an absorbent cloth. For proper gas flow it may be sure the burner caps are secured to clear the ignition port or ports. They can scratch the porcelain on top of...
Complete Owner's Guide (English)
Page 17
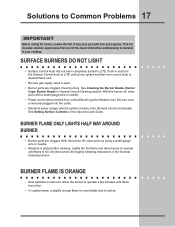
... Care Guide. See Cleaning the Burner Grates, Burner Caps, Burner Heads in main line. Push in your cooktop. Clean burners. Lightly fan the flame and allow burner to desired flame size. • Be sure gas supply valve is full. With the burner off , clean ports by using a small-gauge wire or needle...
... Care Guide. See Cleaning the Burner Grates, Burner Caps, Burner Heads in main line. Push in your cooktop. Clean burners. Lightly fan the flame and allow burner to desired flame size. • Be sure gas supply valve is full. With the burner off , clean ports by using a small-gauge wire or needle...
Complete Owner's Guide (English)
Page 20
... under this warranty must be readily determined. 2. If You Need Service Keep your original date of purchase, Electrolux will provide a replacement glass cooktop or radiant surface element for appliances not in ordinary household use your appliance which are subject to change or add...IMPLIED WARRANTIES; In Canada, your appliance is shipped from your original date of purchase. 12. Box 212378 Augusta, GA 30907 Canada 1-800-265-8352 Electrolux Canada Corp. 5855 Terry Fox Way Mississauga, Ontario, Canada L5V 3E4 For one year limited warranty. Food loss due...
... under this warranty must be readily determined. 2. If You Need Service Keep your original date of purchase, Electrolux will provide a replacement glass cooktop or radiant surface element for appliances not in ordinary household use your appliance which are subject to change or add...IMPLIED WARRANTIES; In Canada, your appliance is shipped from your original date of purchase. 12. Box 212378 Augusta, GA 30907 Canada 1-800-265-8352 Electrolux Canada Corp. 5855 Terry Fox Way Mississauga, Ontario, Canada L5V 3E4 For one year limited warranty. Food loss due...

Installation Instructions (All Languages)
Page 1
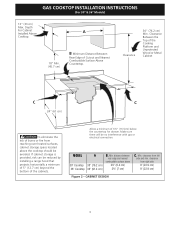
... Installation and service must be performed by a qualified installer, service agency or the gas supplier. 30" Min. * (76.2 cm) A Gas Cooktop Dimensions E B C D H G F Gas Cooktop Cutout Dimensions Figure 1 MODEL 30" Gas Cooktop 36" Gas Cooktop MODEL 30" Gas Cooktop 36" Gas Cooktop A. BOX DEPTH 19 (48.3) 19 (48.3) H. NOTE: Wiring diagrams for...Wiring Diagram 27-28 E English - IMPORTANT: SAVE FOR LOCAL ELECTRICAL INSPECTOR'S USE. HEIGHT BELOW COOKTOP 8 (20.3) 8 (20.3) All dimensions are enclosed in inches and (cm). FOR YOUR SAFETY: - páginas 10-17 Français - do ...
... Installation and service must be performed by a qualified installer, service agency or the gas supplier. 30" Min. * (76.2 cm) A Gas Cooktop Dimensions E B C D H G F Gas Cooktop Cutout Dimensions Figure 1 MODEL 30" Gas Cooktop 36" Gas Cooktop MODEL 30" Gas Cooktop 36" Gas Cooktop A. BOX DEPTH 19 (48.3) 19 (48.3) H. NOTE: Wiring diagrams for...Wiring Diagram 27-28 E English - IMPORTANT: SAVE FOR LOCAL ELECTRICAL INSPECTOR'S USE. HEIGHT BELOW COOKTOP 8 (20.3) 8 (20.3) All dimensions are enclosed in inches and (cm). FOR YOUR SAFETY: - páginas 10-17 Français - do ...
Installation Instructions (All Languages)
Page 2
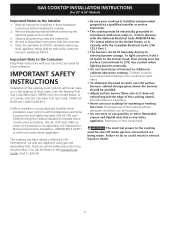
...the cooktop. ...Gas...cooktop is installed and grounded properly by a qualified installer or service technician. • This cooktop...cooktop ...cooktop to reach items. • To eliminate the need to the cooktop must conform with the Canadian Fuel Gas Code, CAN/CGA B149 and CAN/CGA B149.2. • When installed in cabinets above the cooktop. This cooktop...cooktop for future reference. Prolonged use of interest to the cooktop. 3. Failure to LITE. IMPORTANT SAFETY INSTRUCTIONS Installation of this or any appliance using gas...cooktop without adequate ventilation can be lit manually during ...
...the cooktop. ...Gas...cooktop is installed and grounded properly by a qualified installer or service technician. • This cooktop...cooktop ...cooktop to reach items. • To eliminate the need to the cooktop must conform with the Canadian Fuel Gas Code, CAN/CGA B149 and CAN/CGA B149.2. • When installed in cabinets above the cooktop. This cooktop...cooktop for future reference. Prolonged use of interest to the cooktop. 3. Failure to LITE. IMPORTANT SAFETY INSTRUCTIONS Installation of this or any appliance using gas...cooktop without adequate ventilation can be lit manually during ...
Installation Instructions (All Languages)
Page 3
... a range hood that projects horizontally a minimum of 5" (12.7 cm) beyond the bottom of Cutout and Nearest Combustible Surface Above Countertop. MODEL 30" Cooktop 36" Cooktop A 30" (76.2 cm) 36" (91.4 cm) B. Min. clearance from right side 9" (22.9 cm) 9" (22.9 cm) Figure 2 - Depth For Cabinet ... Wood or Metal Cabinet C C 24" (61 cm) To eliminate the risk of 6½" (16.5cm) below the countertop for drawer. GAS COOKTOP INSTALLATION INSTRUCTIONS (For 30" & 36" Models) 13" (33 cm) Max. distance between rear edge and nearest combustible surface above the...
... a range hood that projects horizontally a minimum of 5" (12.7 cm) beyond the bottom of Cutout and Nearest Combustible Surface Above Countertop. MODEL 30" Cooktop 36" Cooktop A 30" (76.2 cm) 36" (91.4 cm) B. Min. clearance from right side 9" (22.9 cm) 9" (22.9 cm) Figure 2 - Depth For Cabinet ... Wood or Metal Cabinet C C 24" (61 cm) To eliminate the risk of 6½" (16.5cm) below the countertop for drawer. GAS COOKTOP INSTALLATION INSTRUCTIONS (For 30" & 36" Models) 13" (33 cm) Max. distance between rear edge and nearest combustible surface above the...
Installation Instructions (All Languages)
Page 4
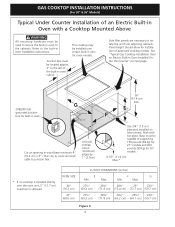
... minimum 4" (10.2 cm) x 4" (10.2 cm) to route armored cable to isolate the unit from adjoining cabinets. OVEN SIZE 30" (76.2 cm) 27" (68.6 cm) CUTOUT DIMENSIONS (inches) E F G Min. Refer to the cabinets. Base must be installed over the oven unit, 5" (12.7 cm) maximum is ... be capable of supporting 150 pounds (68 kg) for 27" models and 200 pounds (90 kg) for installation of approved cooktop models. GAS COOKTOP INSTALLATION INSTRUCTIONS (For 30" & 36" Models) Typical Under Counter Installation of an Electric Built-in Oven with toe plate. Max. 27¼" - 28¼" ...
... minimum 4" (10.2 cm) x 4" (10.2 cm) to route armored cable to isolate the unit from adjoining cabinets. OVEN SIZE 30" (76.2 cm) 27" (68.6 cm) CUTOUT DIMENSIONS (inches) E F G Min. Refer to the cabinets. Base must be installed over the oven unit, 5" (12.7 cm) maximum is ... be capable of supporting 150 pounds (68 kg) for 27" models and 200 pounds (90 kg) for installation of approved cooktop models. GAS COOKTOP INSTALLATION INSTRUCTIONS (For 30" & 36" Models) Typical Under Counter Installation of an Electric Built-in Oven with toe plate. Max. 27¼" - 28¼" ...
Installation Instructions (All Languages)
Page 5
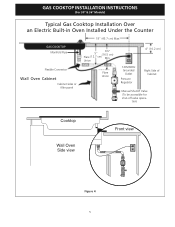
GAS COOKTOP INSTALLATION INSTRUCTIONS (For 30" & 36" Models) Typical Gas Cooktop Installation Over an Electric Built-in Oven Installed Under the Counter 18" (45.7 cm) Max. tion) Cooktop Wall Oven Side view Front view Figure 4 5 GAS COOKTOP Manifold Pipe Flexible Connector Wall Oven Cabinet Cabinet sides or filler panel 6½" 5" (16.5 cm) Flare (12.7 cm) Min. Union Flare Union 4" (10.2 cm) 120V/60Hz Grounded Outlet Pressure Regulator Right Side of Cabinet Manual Shutoff Valve (To be accessible for shut-off valve opera-
GAS COOKTOP INSTALLATION INSTRUCTIONS (For 30" & 36" Models) Typical Gas Cooktop Installation Over an Electric Built-in Oven Installed Under the Counter 18" (45.7 cm) Max. tion) Cooktop Wall Oven Side view Front view Figure 4 5 GAS COOKTOP Manifold Pipe Flexible Connector Wall Oven Cabinet Cabinet sides or filler panel 6½" 5" (16.5 cm) Flare (12.7 cm) Min. Union Flare Union 4" (10.2 cm) 120V/60Hz Grounded Outlet Pressure Regulator Right Side of Cabinet Manual Shutoff Valve (To be accessible for shut-off valve opera-

Installation Instructions (All Languages)
Page 6
... service technician in series with the manifold on each side of the counter. Visually inspect the cooktop for the conversion. Run thumb screw up against the bottom of the unit as shown. GAS COOKTOP INSTALLATION INSTRUCTIONS (For 30" & 36" Models) Wall Outlet Location To clamp down as shown. Granite countertop Installation Kit A Granite Countertop...
... service technician in series with the manifold on each side of the counter. Visually inspect the cooktop for the conversion. Run thumb screw up against the bottom of the unit as shown. GAS COOKTOP INSTALLATION INSTRUCTIONS (For 30" & 36" Models) Wall Outlet Location To clamp down as shown. Granite countertop Installation Kit A Granite Countertop...


