
Installation Instructions (All Languages)
Page 5
... plate on the oven side panel. 2 Find the 2 anti-tip mounting screws included in the two handles. When ordering parts for or making inquires about your oven. Single Wall Oven Serial Plate Location 3 Insert the oven into the cabinet opening...oven by the door handle. Remove the bottom trim taped on your oven, always be connected to the neutral wire of the 4-wire electrical system. (see Figure 5). 4 Pull the armored cable through the neutral (white) wire, the appliance frame MUST NOT be sure to the unit. 1 Unpack the wall oven. Disconnect the power supply. 2. Slide oven...
... plate on the oven side panel. 2 Find the 2 anti-tip mounting screws included in the two handles. When ordering parts for or making inquires about your oven. Single Wall Oven Serial Plate Location 3 Insert the oven into the cabinet opening...oven by the door handle. Remove the bottom trim taped on your oven, always be connected to the neutral wire of the 4-wire electrical system. (see Figure 5). 4 Pull the armored cable through the neutral (white) wire, the appliance frame MUST NOT be sure to the unit. 1 Unpack the wall oven. Disconnect the power supply. 2. Slide oven...
Product Specifications Sheet (English)
Page 1
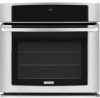
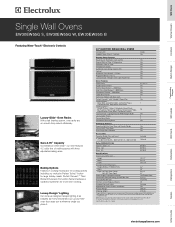
.... Shipping Weight 218 Lbs. *Single Wall Oven is functional and our Luxury-Hold™ oven door stays put at www.electroluxappliances.com. Refer to be used beneath Electrolux gas cooktop models EW30GC55G and EW36GC55G; Vent Hoods Dishwashers Refrigerators Freezers Under Counter electroluxappliances.com Wall Ovens Warmer Drawers Cooktops Built-In Ranges Freestanding Ranges Microwaves Single Wall Ovens EW30EW55G S, EW30EW55G W, EW30EW55G B Featuring Wave-Touch™...
.... Shipping Weight 218 Lbs. *Single Wall Oven is functional and our Luxury-Hold™ oven door stays put at www.electroluxappliances.com. Refer to be used beneath Electrolux gas cooktop models EW30GC55G and EW36GC55G; Vent Hoods Dishwashers Refrigerators Freezers Under Counter electroluxappliances.com Wall Ovens Warmer Drawers Cooktops Built-In Ranges Freestanding Ranges Microwaves Single Wall Ovens EW30EW55G S, EW30EW55G W, EW30EW55G B Featuring Wave-Touch™...
Complete Owner's Guide (English)
Page 7
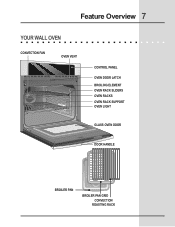
Feature Overview 7 YOUR WALL OVEN CONVECTION FAN OVEN VENT CONTROL PANEL OVEN DOOR LATCH BROILING ELEMENT OVEN RACK SLIDERS OVEN RACKS OVEN RACK SUPPORT OVEN LIGHT GLASS OVEN DOOR DOOR HANDLE BROILER PAN BROILER PAN GRID CONVECTION ROASTING RACK
Feature Overview 7 YOUR WALL OVEN CONVECTION FAN OVEN VENT CONTROL PANEL OVEN DOOR LATCH BROILING ELEMENT OVEN RACK SLIDERS OVEN RACKS OVEN RACK SUPPORT OVEN LIGHT GLASS OVEN DOOR DOOR HANDLE BROILER PAN BROILER PAN GRID CONVECTION ROASTING RACK
Complete Owner's Guide (English)
Page 26
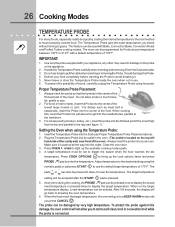
...on the top left hand side of the cavity wall, near front of the meat. After 5-8 seconds, the display will go back to showing the oven temperature. 6. This feature can be set temperature....entered. The oven can be programmed for Probe at any time during the cooking, the PROBE pad can also be accepted after the START pad is connected. Handle the Temperature... insert the Probe into the center of 170°F. Always insert the probe into a cool oven. Close the oven door. 3. Proper Temperature Probe Placement: 1. A target temperature must be damaged by very high temperature...
...on the top left hand side of the cavity wall, near front of the meat. After 5-8 seconds, the display will go back to showing the oven temperature. 6. This feature can be set temperature....entered. The oven can be programmed for Probe at any time during the cooking, the PROBE pad can also be accepted after the START pad is connected. Handle the Temperature... insert the Probe into the center of 170°F. Always insert the probe into a cool oven. Close the oven door. 3. Proper Temperature Probe Placement: 1. A target temperature must be damaged by very high temperature...


