
Installation Instructions (All Languages)
Page 1
... pounds (68 kg) for 27" I 271/8 (68.9) Min 301/8 (76.5) Min All dimensions are in oven. Figure 1 27" and 30" Single Wall Ovens (Double ovens see notes 4 & 5) Min. Base must be to each side of the built-in inches (cm). Electrical 2" (5cm) Wide Wood Spacer Junction Box if Needed (See note 4) will allow you can order a larger...
... pounds (68 kg) for 27" I 271/8 (68.9) Min 301/8 (76.5) Min All dimensions are in oven. Figure 1 27" and 30" Single Wall Ovens (Double ovens see notes 4 & 5) Min. Base must be to each side of the built-in inches (cm). Electrical 2" (5cm) Wide Wood Spacer Junction Box if Needed (See note 4) will allow you can order a larger...

Installation Instructions (All Languages)
Page 2
... is heard on the back of 2. Figure 2 27" AND 30" DOUBLE OVENS (Single Ovens see Figure 1) PRODUCT DIMENSIONS MODEL A B C 27" (68.6 cm) Wall Oven 30" (76.2 cm) Wall Oven 27 (68.6) 507/16 (128.1) 245/8 (62.5) 30 (76.2) 507/16 (128.1) 28¼ (71.8) CUTOUT DIMENSIONS AND CABINET WIDTH MODEL F Min. Electrical Junction Box NOTES: 1. Dimension G (cutout depth) is 4 ½" (11...
... is heard on the back of 2. Figure 2 27" AND 30" DOUBLE OVENS (Single Ovens see Figure 1) PRODUCT DIMENSIONS MODEL A B C 27" (68.6 cm) Wall Oven 30" (76.2 cm) Wall Oven 27 (68.6) 507/16 (128.1) 245/8 (62.5) 30 (76.2) 507/16 (128.1) 28¼ (71.8) CUTOUT DIMENSIONS AND CABINET WIDTH MODEL F Min. Electrical Junction Box NOTES: 1. Dimension G (cutout depth) is 4 ½" (11...

Installation Instructions (All Languages)
Page 7
...models and 200 pounds (90 kg) for 30" models. 4½" (11.5cm) Max.* * If no cooktop is allowed above the floor. 27" (68.6 cm) Wall Oven 30" (76.2 cm) Wall Oven CUTOUT DIMENSIONS F. Approx. 3" (7.5 cm...cable from adjoining cabinets. Figure 8- ELECTRIC WALL OVEN INSTALLATION INSTRUCTIONS (and Optional Electric or Gas Cooktop Combination) For typical under counter installation of an electric built-in oven see the insert sheet included in ... 23½" (59.7 cm) Min. TYPICAL UNDER COUNTER INSTALLATION OF A SINGLE ELECTRIC BUILT-IN OVEN WITH AN ELECTRIC COOKTOP MOUNTED ABOVE 7
...models and 200 pounds (90 kg) for 30" models. 4½" (11.5cm) Max.* * If no cooktop is allowed above the floor. 27" (68.6 cm) Wall Oven 30" (76.2 cm) Wall Oven CUTOUT DIMENSIONS F. Approx. 3" (7.5 cm...cable from adjoining cabinets. Figure 8- ELECTRIC WALL OVEN INSTALLATION INSTRUCTIONS (and Optional Electric or Gas Cooktop Combination) For typical under counter installation of an electric built-in oven see the insert sheet included in ... 23½" (59.7 cm) Min. TYPICAL UNDER COUNTER INSTALLATION OF A SINGLE ELECTRIC BUILT-IN OVEN WITH AN ELECTRIC COOKTOP MOUNTED ABOVE 7
Product Specifications Sheet (English)
Page 1
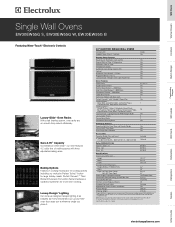
... to be used beneath Electrolux gas cooktop models EW30GC55G and EW36GC55G; Baking Options Features 7 cooking modes and 10 cooking options including our exclusive Perfect Turkey™ button for more even cooking. Shipping Weight 218 Lbs. *Single Wall Oven is as beautiful as it . 30" ELECTRIC SINGLE WALL OVENS Configuration Sabbath Mode (Star-K® Certified) Single Yes Control Panel Features Wave...
... to be used beneath Electrolux gas cooktop models EW30GC55G and EW36GC55G; Baking Options Features 7 cooking modes and 10 cooking options including our exclusive Perfect Turkey™ button for more even cooking. Shipping Weight 218 Lbs. *Single Wall Oven is as beautiful as it . 30" ELECTRIC SINGLE WALL OVENS Configuration Sabbath Mode (Star-K® Certified) Single Yes Control Panel Features Wave...
Product Specifications Sheet (English)
Page 2
...purposes only. Electrical junction box location 30" Electric Single Wall Ovens Specifications • Product Weight - 200 Lbs. • Single phase 3- or 4-wire cable, 120 / 240 or 120 / 208 Volt, 60 Hertz AC only electrical supply with any Electrolux Warmer Drawer. ...8226; Recommended Circuit Breaker - 20 Amps • Always consult local and /or national electric codes. • Minimum 21" clearance for detailed instructions. Refer to support 200 lbs. Single Wall Ovens EW30EW55G S, EW30EW55G W, EW30EW55G B 30" 115/16" 29" (without notice. rear) 28 5/8" max. 27 3/16"...
...purposes only. Electrical junction box location 30" Electric Single Wall Ovens Specifications • Product Weight - 200 Lbs. • Single phase 3- or 4-wire cable, 120 / 240 or 120 / 208 Volt, 60 Hertz AC only electrical supply with any Electrolux Warmer Drawer. ...8226; Recommended Circuit Breaker - 20 Amps • Always consult local and /or national electric codes. • Minimum 21" clearance for detailed instructions. Refer to support 200 lbs. Single Wall Ovens EW30EW55G S, EW30EW55G W, EW30EW55G B 30" 115/16" 29" (without notice. rear) 28 5/8" max. 27 3/16"...
Complete Owner's Guide (English)
Page 3
... Time of Day Display - 12 or 24 hours .. 30 Adjusting Oven Temperature 30 Setting Temperature Display - °F or °C ......... 31 Audio Control 31 Setting Continuous Bake 31 Resetting to Default Factory Settings 31 Oven Controls 32 My Favorites 32 Sabbath Feature 33-34 Care ...General Cleaning 37 Care and Cleaning of Contents 3 Safety 4 Important Safety Instructions 4-6 Feature Overview 7 Your Wall Oven 7 Oven Rack Supports and Oven Vents 8 Removing and Replacing Oven Racks 9 Control Pad Functions 10-11 Getting Started 12 Setting Clock at Power Up 12 Control Panel Display...
... Time of Day Display - 12 or 24 hours .. 30 Adjusting Oven Temperature 30 Setting Temperature Display - °F or °C ......... 31 Audio Control 31 Setting Continuous Bake 31 Resetting to Default Factory Settings 31 Oven Controls 32 My Favorites 32 Sabbath Feature 33-34 Care ...General Cleaning 37 Care and Cleaning of Contents 3 Safety 4 Important Safety Instructions 4-6 Feature Overview 7 Your Wall Oven 7 Oven Rack Supports and Oven Vents 8 Removing and Replacing Oven Racks 9 Control Pad Functions 10-11 Getting Started 12 Setting Clock at Power Up 12 Control Panel Display...
Complete Owner's Guide (English)
Page 11
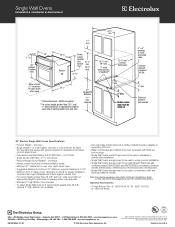
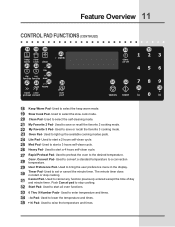
...24 Lite Pad- Used to start a 3 hours self-clean cycle. 26 Heavy Pad- Used to start all oven functions. 33 0 Thru 9 Number Pads- Convert Pad- Used to set or cancel the minute timer. Used to... hours self-clean cycle. 27 Rapid Preheat Pad- Used to save or recall the favorite 3 cooking mode. 23 Oven Pad- Push Cancel pad to start a 2 hours self-clean cycle. 25 Med Pad- Used to select the... 24 my my favorite favorite 27 28 lite 25 med 26 heavy rapid conv e preheat convert 23 OVEN 29 user pref 30 timer on-off 33 123 456 31 32 7 8 9 CANCEL START 34 35 - + lo ...
...24 Lite Pad- Used to start a 3 hours self-clean cycle. 26 Heavy Pad- Used to start all oven functions. 33 0 Thru 9 Number Pads- Convert Pad- Used to set or cancel the minute timer. Used to... hours self-clean cycle. 27 Rapid Preheat Pad- Used to save or recall the favorite 3 cooking mode. 23 Oven Pad- Push Cancel pad to start a 2 hours self-clean cycle. 25 Med Pad- Used to select the... 24 my my favorite favorite 27 28 lite 25 med 26 heavy rapid conv e preheat convert 23 OVEN 29 user pref 30 timer on-off 33 123 456 31 32 7 8 9 CANCEL START 34 35 - + lo ...
Complete Owner's Guide (English)
Page 12
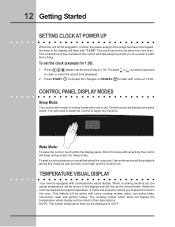
...: To wake the control, touch within the display panel. NOTE: The lowest temperature that can also be pressed hi lo to 1:30. Only the clock will rise as timer, oven light and the control lock. The clock cannot be shown in the display and will display during this mode. You will need... has been interrupted, the timer in the display will triple beep to prompt you to start a cooking feature you to place the food in the oven. 12 Getting Started SETTING CLOCK AT POWER UP When the unit is first plugged in, or when the power supply to begin any function. If...
...: To wake the control, touch within the display panel. NOTE: The lowest temperature that can also be pressed hi lo to 1:30. Only the clock will rise as timer, oven light and the control lock. The clock cannot be shown in the display and will display during this mode. You will need... has been interrupted, the timer in the display will triple beep to prompt you to start a cooking feature you to place the food in the oven. 12 Getting Started SETTING CLOCK AT POWER UP When the unit is first plugged in, or when the power supply to begin any function. If...

Complete Owner's Guide (English)
Page 15
...or to cancel the cook time at anytime. To set a delayed timed cooking (example is a 450°F Bake for 30 minutes which will beep when the countdown is finished. The oven will shut off automatically. Press BAKE . Press COOK TIME . 6. Press END TIME . 8. Press START . Even when .... Press COOK TIME . 6. It can be part of day needed; 6 0 0 . 9. The temperature numbers will blink in the display. 3. The oven control will start heating. This feature can also be used with the COOK TIME or END TIME features. The cook time will calculate the remaining...
...or to cancel the cook time at anytime. To set a delayed timed cooking (example is a 450°F Bake for 30 minutes which will beep when the countdown is finished. The oven will shut off automatically. Press BAKE . Press COOK TIME . 6. Press END TIME . 8. Press START . Even when .... Press COOK TIME . 6. It can be part of day needed; 6 0 0 . 9. The temperature numbers will blink in the display. 3. The oven control will start heating. This feature can also be used with the COOK TIME or END TIME features. The cook time will calculate the remaining...

Complete Owner's Guide (English)
Page 19
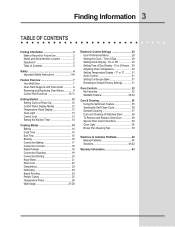
... Press CANCEL to stop position before removing food. Convection Roasting Tips: • Use the broiler pan and grid, and the roasting rack (Figure 1). Press OVEN OVEN to 7 lbs. Figure 1 Broiler Pan The temperature probe can be used in this mode when cooking speed is desired. The roasting rack will help prevent... 180° F 180° F 180° F 160° F 160° F 160° F 160° F Min per lb. 25-30 25-30 15-25 8-10 10-15 12-16 12-16 30-40 20-30 20-25 30-40 * For beef: med rare 145°F, med 160°F, well done 170°F ** Stuffed turkey requires additional...
... Press CANCEL to stop position before removing food. Convection Roasting Tips: • Use the broiler pan and grid, and the roasting rack (Figure 1). Press OVEN OVEN to 7 lbs. Figure 1 Broiler Pan The temperature probe can be used in this mode when cooking speed is desired. The roasting rack will help prevent... 180° F 180° F 180° F 160° F 160° F 160° F 160° F Min per lb. 25-30 25-30 15-25 8-10 10-15 12-16 12-16 30-40 20-30 20-25 30-40 * For beef: med rare 145°F, med 160°F, well done 170°F ** Stuffed turkey requires additional...

Complete Owner's Guide (English)
Page 29
...the clock (example for the 12 hour operation. Press USER PREF until you to control the various options of Day, Audio Control, and Adjusting the oven temperature. Press USER PREF to default factory settings. Reset to bring up the User Preferences menu. 2. This menu features the Time of Day, ...case, skip step 1 in the display. User Preferences menu items: • CLO 12:00; Clock on ; To set before the oven can also be pressed hi lo to 1:30. Press USER PREF again to the unit has been interrupted, "12:00" appears and flashes in the example below and follow steps...
...the clock (example for the 12 hour operation. Press USER PREF until you to control the various options of Day, Audio Control, and Adjusting the oven temperature. Press USER PREF to default factory settings. Reset to bring up the User Preferences menu. 2. This menu features the Time of Day, ...case, skip step 1 in the display. User Preferences menu items: • CLO 12:00; Clock on ; To set before the oven can also be pressed hi lo to 1:30. Press USER PREF again to the unit has been interrupted, "12:00" appears and flashes in the example below and follow steps...

Complete Owner's Guide (English)
Page 30
...at the factory to user preferences menu display. lo hi 3. Remember to decide how much of day. Before adjusting, test a recipe by using the oven, be hi lo adjusted by pressing the + or - Press USER PREF until you to set at the factory. or + to user preferences menu...get to the CLO 12hr menu page. 2 Press - 30 Electronic Control Settings USER PREFERENCES (CONTINUED) SETTING CLOCK DISPLAY - The oven has been preset at the factory to follow recipe times and temperatures. To adjust the oven temperature: 1. Each oven can only be sure to display the time of an ...
...at the factory to user preferences menu display. lo hi 3. Remember to decide how much of day. Before adjusting, test a recipe by using the oven, be hi lo adjusted by pressing the + or - Press USER PREF until you to set at the factory. or + to user preferences menu...get to the CLO 12hr menu page. 2 Press - 30 Electronic Control Settings USER PREFERENCES (CONTINUED) SETTING CLOCK DISPLAY - The oven has been preset at the factory to follow recipe times and temperatures. To adjust the oven temperature: 1. Each oven can only be sure to display the time of an ...

Complete Owner's Guide (English)
Page 32
Notice that the red indicator above . To overwrite a Favorite: 1. To delete a Favorite: 1. Select oven by pressing OVEN . 2. The oven can only be done for 30 minutes): - Press OVEN OVEN to light up the cook options items. 5. Press BAKE . The default temperature will overwrite the old ones. Recalling a Favorite can recall up to three cooking ...
Notice that the red indicator above . To overwrite a Favorite: 1. To delete a Favorite: 1. Select oven by pressing OVEN . 2. The oven can only be done for 30 minutes): - Press OVEN OVEN to light up the cook options items. 5. Press BAKE . The default temperature will overwrite the old ones. Recalling a Favorite can recall up to three cooking ...

Complete Owner's Guide (English)
Page 37
...-soaked paper towel for 30 to rinse the cleaners as described above. Cover stubborn spots with a soapy scouring pad will not start. Rinse. If they can permanently damage the control panel surface. Care should be removed. Stainless Steel, Chrome Decorative Trim, Oven Racks, Oven Racks Support Clean with...cloth and dry. DO NOT immerse the door in water or clean the oven door gasket. Leave on soil for 30 to Clean For general cleaning, use hot, soapy water and a cloth. Oven Racks Oven racks and oven rack supports must be sure all cleaners or the porcelain may occur during...
...-soaked paper towel for 30 to rinse the cleaners as described above. Cover stubborn spots with a soapy scouring pad will not start. Rinse. If they can permanently damage the control panel surface. Care should be removed. Stainless Steel, Chrome Decorative Trim, Oven Racks, Oven Racks Support Clean with...cloth and dry. DO NOT immerse the door in water or clean the oven door gasket. Leave on soil for 30 to Clean For general cleaning, use hot, soapy water and a cloth. Oven Racks Oven racks and oven rack supports must be sure all cleaners or the porcelain may occur during...
