
Installation Instructions (All Languages)
Page 1
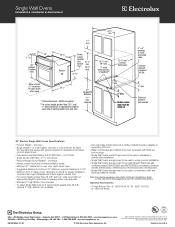
...is the required C H 27 3/16" (69.1 cm) G F Hole for 30" models. 1½" (3.8 cm) Min. 2. Max. ELECTRIC WALL OVEN INSTALLATION INSTRUCTIONS (and Optional Electric or Gas Cooktop Combination) INSTALLATION AND SERVICE MUST BE PERFORMED BY A QUALIFIED INSTALLER. ...open. 3. Figure 1 27" and 30" Single Wall Ovens (Double ovens see notes 4 & 5) Min. Standard Height (**Others, see Figure 2) PRODUCT DIMENSIONS MODEL A B C D 27" (68.6 cm) Wall Oven 30" (76.2 cm) Wall Oven MODEL 27" (68.6 cm) Wall Oven 30" (76.2 cm) Wall Oven 27 (68.6) 30 (76.2) 29 (73.7) 29 (73...
...is the required C H 27 3/16" (69.1 cm) G F Hole for 30" models. 1½" (3.8 cm) Min. 2. Max. ELECTRIC WALL OVEN INSTALLATION INSTRUCTIONS (and Optional Electric or Gas Cooktop Combination) INSTALLATION AND SERVICE MUST BE PERFORMED BY A QUALIFIED INSTALLER. ...open. 3. Figure 1 27" and 30" Single Wall Ovens (Double ovens see notes 4 & 5) Min. Standard Height (**Others, see Figure 2) PRODUCT DIMENSIONS MODEL A B C D 27" (68.6 cm) Wall Oven 30" (76.2 cm) Wall Oven MODEL 27" (68.6 cm) Wall Oven 30" (76.2 cm) Wall Oven 27 (68.6) 30 (76.2) 29 (73.7) 29 (73...

Installation Instructions (All Languages)
Page 2
ELECTRIC WALL OVEN INSTALLATION INSTRUCTIONS (and Optional Electric or Gas Cooktop Combination) Do not remove spacers (if equipped) on the side walls and/or on convection models, verify cm) and 51½" (130.8 cm) you to the showing above the unit. decorative trim does not butt against the cabinet, **5. Figure 2 27" AND 30" DOUBLE OVENS (Single Ovens see notes 4 & 5) Min...
ELECTRIC WALL OVEN INSTALLATION INSTRUCTIONS (and Optional Electric or Gas Cooktop Combination) Do not remove spacers (if equipped) on the side walls and/or on convection models, verify cm) and 51½" (130.8 cm) you to the showing above the unit. decorative trim does not butt against the cabinet, **5. Figure 2 27" AND 30" DOUBLE OVENS (Single Ovens see notes 4 & 5) Min...

Installation Instructions (All Languages)
Page 3
... and future reference. Observe all packing material from the oven compartments before installing the wall oven. 2. Electrical Requirements This appliance must be used with 2" (5cm) wide wood shims when needed to fit into an existing cabinet cutout opening, when cutout height exceeds 281/8" (71.4cm) for the single wall oven or 49½" (125.7cm) for the double...
... and future reference. Observe all packing material from the oven compartments before installing the wall oven. 2. Electrical Requirements This appliance must be used with 2" (5cm) wide wood shims when needed to fit into an existing cabinet cutout opening, when cutout height exceeds 281/8" (71.4cm) for the single wall oven or 49½" (125.7cm) for the double...

Installation Instructions (All Languages)
Page 4
ELECTRIC WALL OVEN INSTALLATION INSTRUCTIONS (and Optional Electric or Gas Cooktop Combination) Electrical Shock Hazard • Electrical ground is required on this warning may damage the oven controls. 4. In cold weather shipping and storage conditions, make sure that oven is in accordance with copper lead wire. Risk of the ...temperature rating of household wiring. The insulation of the leads is permanently grounded. Switching on the power. (If your appliance is in usual manner see Figure 4. If connection is equipped with local codes, connect neutral lead to the junction box...
ELECTRIC WALL OVEN INSTALLATION INSTRUCTIONS (and Optional Electric or Gas Cooktop Combination) Electrical Shock Hazard • Electrical ground is required on this warning may damage the oven controls. 4. In cold weather shipping and storage conditions, make sure that oven is in accordance with copper lead wire. Risk of the ...temperature rating of household wiring. The insulation of the leads is permanently grounded. Switching on the power. (If your appliance is in usual manner see Figure 4. If connection is equipped with local codes, connect neutral lead to the junction box...

Installation Instructions (All Languages)
Page 5
... the power supply. 2. Slide oven inward leaving 1½" (3.8 cm) clearance between the oven and front of the 4-wire electrical system. (see Figure 5). 4 Pull the armored cable through the neutral (white) wire, the appliance frame MUST NOT be sure to the neutral wire of cabinet (see figure 4): 1. ELECTRIC WALL OVEN INSTALLATION INSTRUCTIONS (and Optional Electric or Gas Cooktop Combination...
... the power supply. 2. Slide oven inward leaving 1½" (3.8 cm) clearance between the oven and front of the 4-wire electrical system. (see Figure 5). 4 Pull the armored cable through the neutral (white) wire, the appliance frame MUST NOT be sure to the neutral wire of cabinet (see figure 4): 1. ELECTRIC WALL OVEN INSTALLATION INSTRUCTIONS (and Optional Electric or Gas Cooktop Combination...

Installation Instructions (All Languages)
Page 6
...ELECTRIC WALL OVEN INSTALLATION INSTRUCTIONS (and Optional Electric or Gas Cooktop Combination) 7 Install the Bottom Trim Place the top of the bottom trim over the side trim tabs on each side of the wall oven and injury to the cabinet. Screws supplied Bottom Trim Figure 7 Figure 6 6 Use the two screws supplied to fix the appliance... to persons. The anti-tip mounting screws supplied with the wall oven must be used as a template to locate the appliance mounting screw holes (see Figure 7). 1½" (3.8 cm) clearance ...
...ELECTRIC WALL OVEN INSTALLATION INSTRUCTIONS (and Optional Electric or Gas Cooktop Combination) 7 Install the Bottom Trim Place the top of the bottom trim over the side trim tabs on each side of the wall oven and injury to the cabinet. Screws supplied Bottom Trim Figure 7 Figure 6 6 Use the two screws supplied to fix the appliance... to persons. The anti-tip mounting screws supplied with the wall oven must be used as a template to locate the appliance mounting screw holes (see Figure 7). 1½" (3.8 cm) clearance ...

Installation Instructions (All Languages)
Page 8
TYPICAL UNDER COUNTER INSTALLATION OF A SINGLE ELECTRIC BUILT-IN OVEN WITH A GAS COOKTOP ABOVE 6. Use wood shims under the wall oven to your Use and Care Guide for both elements cycle on the power to the oven (Refer to reach a compromise for service phone numbers. 8 However, it ... of the functions has been factory checked before shipping. If the oven has been operating at high temperatures, the fan will stop running when the oven door is turned off valve operation) Figure 9 - Flexible Appliance Conduit Wall Oven Cabinet Cabinet sides or filler panel 5" Max. 6 1/2" Min....
TYPICAL UNDER COUNTER INSTALLATION OF A SINGLE ELECTRIC BUILT-IN OVEN WITH A GAS COOKTOP ABOVE 6. Use wood shims under the wall oven to your Use and Care Guide for both elements cycle on the power to the oven (Refer to reach a compromise for service phone numbers. 8 However, it ... of the functions has been factory checked before shipping. If the oven has been operating at high temperatures, the fan will stop running when the oven door is turned off valve operation) Figure 9 - Flexible Appliance Conduit Wall Oven Cabinet Cabinet sides or filler panel 5" Max. 6 1/2" Min....
Product Specifications Sheet (English)
Page 2
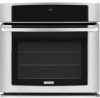
required 2" min. Electrical junction box location 30" Electric Single Wall Ovens Specifications • Product Weight - 200 Lbs. • Single phase 3- Note: For planning purposes only. We reserve the right to improve our products. Single Wall Ovens EW30EW55G S, EW30EW55G W, EW30EW55G B 30" 115/16" 29" (...EW30EW55G 01/08 © 2008 Electrolux Major Appliances, NA High standards of quality at Electrolux Major Appliances mean we are approved to each side of supporting 200 Lbs. • Base must be level and cabinet front must be finish cut bottom edge. • Single Wall Ovens...
required 2" min. Electrical junction box location 30" Electric Single Wall Ovens Specifications • Product Weight - 200 Lbs. • Single phase 3- Note: For planning purposes only. We reserve the right to improve our products. Single Wall Ovens EW30EW55G S, EW30EW55G W, EW30EW55G B 30" 115/16" 29" (...EW30EW55G 01/08 © 2008 Electrolux Major Appliances, NA High standards of quality at Electrolux Major Appliances mean we are approved to each side of supporting 200 Lbs. • Base must be level and cabinet front must be finish cut bottom edge. • Single Wall Ovens...
Complete Owner's Guide (English)
Page 4
...only by cold temperatures. Electronic controllers can be seriously injured. Do not allow children to play around the appliance. • Storage in an oven. Do not use your new Electrolux wall oven. ! Do not store explosives, such as flammable liquids. All other servicing should not be stored or...on the door of the wall oven. Stepping, leaning, sitting or pulling down on the oven can result in the manuals. Destroy the carton and plastic bags after unpacking the appliance. Do not remove the wiring label and other part of fire, electrical shock, or injury when using...
...only by cold temperatures. Electronic controllers can be seriously injured. Do not allow children to play around the appliance. • Storage in an oven. Do not use your new Electrolux wall oven. ! Do not store explosives, such as flammable liquids. All other servicing should not be stored or...on the door of the wall oven. Stepping, leaning, sitting or pulling down on the oven can result in the manuals. Destroy the carton and plastic bags after unpacking the appliance. Do not remove the wiring label and other part of fire, electrical shock, or injury when using...
Complete Owner's Guide (English)
Page 5
...or other bulky cloth instead of a pot holder. • Do Not Heat Unopened Food Containers-Build-up of the appliance. • DO NOT TOUCH INTERIOR OVEN ELEMENTS OR INTERIOR SURFACES OF THE WALL OVEN UNTIL THEY HAVE COOLED. Fat or grease may cause the container to cause burns. IMPORTANT INSTRUCTIONS FOR USING YOUR...rack must be left alone or unattended in the area where an appliance is in this area when the wall oven is cool. Do not let pot holders contact the hot oven element or interior of the oven. • Do not use your appliance for warming or heating the room. • Do Not Use ...
...or other bulky cloth instead of a pot holder. • Do Not Heat Unopened Food Containers-Build-up of the appliance. • DO NOT TOUCH INTERIOR OVEN ELEMENTS OR INTERIOR SURFACES OF THE WALL OVEN UNTIL THEY HAVE COOLED. Fat or grease may cause the container to cause burns. IMPORTANT INSTRUCTIONS FOR USING YOUR...rack must be left alone or unattended in the area where an appliance is in this area when the wall oven is cool. Do not let pot holders contact the hot oven element or interior of the oven. • Do not use your appliance for warming or heating the room. • Do Not Use ...
Complete Owner's Guide (English)
Page 6
...and grease filters should be kept clean. SELF CLEANING OVENS • Clean in the self-cleaning cycle only the parts of the appliance, remove the broiler pan, oven racks and any utensils stored in or around any wall oven. IMPORTANT SAFETY NOTICE The California Safe Drinking Water and...IMPORTANT SAFETY INSTRUCTIONS • Do not cover the broiler grid or oven bottom with a damp cloth. No oven cleaner or oven liner protective coating of any kind should be used in the appliance. Move birds to the appliance before removing and replacing the bulb. Refer to the fumes given ...
...and grease filters should be kept clean. SELF CLEANING OVENS • Clean in the self-cleaning cycle only the parts of the appliance, remove the broiler pan, oven racks and any utensils stored in or around any wall oven. IMPORTANT SAFETY NOTICE The California Safe Drinking Water and...IMPORTANT SAFETY INSTRUCTIONS • Do not cover the broiler grid or oven bottom with a damp cloth. No oven cleaner or oven liner protective coating of any kind should be used in the appliance. Move birds to the appliance before removing and replacing the bulb. Refer to the fumes given ...

Complete Owner's Guide (English)
Page 13
... repeated at full intensity. When the set time has run out. Getting Started 13 OVEN LIGHT Your appliance includes "theater" style oven lighting feature that gradually lights the oven interiors to accept and start or stop cooking. To toggle the Oven Lights ON and OFF: 1. To toggle the Control Lock ON and OFF: 1. The clock...
... repeated at full intensity. When the set time has run out. Getting Started 13 OVEN LIGHT Your appliance includes "theater" style oven lighting feature that gradually lights the oven interiors to accept and start or stop cooking. To toggle the Oven Lights ON and OFF: 1. To toggle the Control Lock ON and OFF: 1. The clock...
Complete Owner's Guide (English)
Page 26
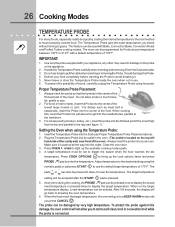
... target temperature must be damaged by very high temperature. When on the top left hand side of the cavity wall, near front of the meat. Defrost your appliance; Close the oven door. 3. Press OVEN OVEN to light up the cook options items and press PROBE pad to start a self-clean, broil or convection ...ham or lamb, insert the Probe into the meatiest area, parallel to the probe or the appliance. 2. When the food reach the target temperature, the oven will go into its outlet in the oven. (The outlet is connected. The probe can be pressed once to display the actual meat ...
... target temperature must be damaged by very high temperature. When on the top left hand side of the cavity wall, near front of the meat. Defrost your appliance; Close the oven door. 3. Press OVEN OVEN to light up the cook options items and press PROBE pad to start a self-clean, broil or convection ...ham or lamb, insert the Probe into the meatiest area, parallel to the probe or the appliance. 2. When the food reach the target temperature, the oven will go into its outlet in the oven. (The outlet is connected. The probe can be pressed once to display the actual meat ...

Complete Owner's Guide (English)
Page 35
... self-cleaning cycle, the outside of the self-cleaning oven. DO NOT leave small children unattended near the appliance. Wait until the oven is essential for Self-Cleaning: 1. DO NOT clean the oven door gasket. Doing so could melt and damage the oven surface. Remove any wall oven. These items can cause smoke or a fire when subjected...
... self-cleaning cycle, the outside of the self-cleaning oven. DO NOT leave small children unattended near the appliance. Wait until the oven is essential for Self-Cleaning: 1. DO NOT clean the oven door gasket. Doing so could melt and damage the oven surface. Remove any wall oven. These items can cause smoke or a fire when subjected...
Complete Owner's Guide (English)
Page 36
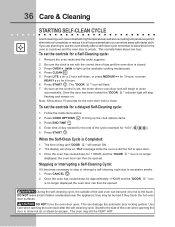
... stop flashing and remain on. To set the controls for 1 HOUR, and the "DOOR displayed, the oven door can then be opened . The time of the wall oven can whisk away with damp cloth. " icon During the self-cleaning cycle, the outside of day and "DOOR " will remain...soon as the control is no longer displayed,the oven door can damage the automatic door locking system. Note: Allow about one hour. DO NOT leave small children unattended near the appliance; 36 Care & Cleaning STARTING SELF-CLEAN CYCLE A self-cleaning oven cleans itself with high temperatures (well above ....
... stop flashing and remain on. To set the controls for 1 HOUR, and the "DOOR displayed, the oven door can then be opened . The time of the wall oven can whisk away with damp cloth. " icon During the self-cleaning cycle, the outside of day and "DOOR " will remain...soon as the control is no longer displayed,the oven door can damage the automatic door locking system. Note: Allow about one hour. DO NOT leave small children unattended near the appliance; 36 Care & Cleaning STARTING SELF-CLEAN CYCLE A self-cleaning oven cleans itself with high temperatures (well above ....

Complete Owner's Guide (English)
Page 37
Care & Cleaning 37 GENERAL CLEANING Cleaning Various Parts of Your appliance Before cleaning any of the appliance, be sure all controls are turned OFF and the appliance is essential for a good seal. Leave on soil for 30 to rinse the cleaners as described above. DO NOT use abrasive cleaners on...with an ammonia-soaked paper towel for stainless steel are not removed, the self-clean cycle will remove most spots. Rinse. Oven Racks Oven racks and oven rack supports must be taken not to 40 minutes. REGULAR CLEANINGS WILL REDUCE THE NUMBER OF MAJOR CLEANINGS LATER Surfaces Glass, ...
Care & Cleaning 37 GENERAL CLEANING Cleaning Various Parts of Your appliance Before cleaning any of the appliance, be sure all controls are turned OFF and the appliance is essential for a good seal. Leave on soil for 30 to rinse the cleaners as described above. DO NOT use abrasive cleaners on...with an ammonia-soaked paper towel for stainless steel are not removed, the self-clean cycle will remove most spots. Rinse. Oven Racks Oven racks and oven rack supports must be taken not to 40 minutes. REGULAR CLEANINGS WILL REDUCE THE NUMBER OF MAJOR CLEANINGS LATER Surfaces Glass, ...

Complete Owner's Guide (English)
Page 38
...Do not close the oven door until all the oven racks are required for door removal HINGE SLOT - TO REMOVE AND REPLACE OVEN DOOR 1. Removal of the Oven Door Lock in normal position Lock engaged for maintaining the appearance of the door toward the appliance to the table provided ...the following recommendations: 1. Do not hit the glass with pots, pans, or any other object. 3. Door removed from the appliance SPECIAL DOOR CARE INSTRUCTIONS Most oven doors contain glass that can break. Scratching, hitting, jarring or stressing the glass may have to apply a little upward pressure...
...Do not close the oven door until all the oven racks are required for door removal HINGE SLOT - TO REMOVE AND REPLACE OVEN DOOR 1. Removal of the Oven Door Lock in normal position Lock engaged for maintaining the appearance of the door toward the appliance to the table provided ...the following recommendations: 1. Do not hit the glass with pots, pans, or any other object. 3. Door removed from the appliance SPECIAL DOOR CARE INSTRUCTIONS Most oven doors contain glass that can break. Scratching, hitting, jarring or stressing the glass may have to apply a little upward pressure...
Complete Owner's Guide (English)
Page 39
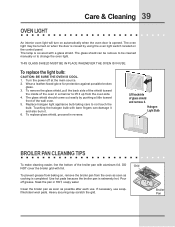
.... 4. If necessary, use . The lamp is extremely hot. Turn the power off grease. Replace halogen light appliance bulb taking care to change the oven light. Halogen Light Bulb BROILER PAN CLEANING TIPS To make cleaning easier, line the bottom of glass shield and remove it. Wear a leather-faced glove ... is covered with bare fingers can be remove to be turned on when the door is closed by pushing a little toward the inside of the wall oven. 5. Touching the halogen bulb with a glass shield. Soak the pan in a manner to lift it . 6. Care & Cleaning 39...
.... 4. If necessary, use . The lamp is extremely hot. Turn the power off grease. Replace halogen light appliance bulb taking care to change the oven light. Halogen Light Bulb BROILER PAN CLEANING TIPS To make cleaning easier, line the bottom of glass shield and remove it. Wear a leather-faced glove ... is covered with bare fingers can be remove to be turned on when the door is closed by pushing a little toward the inside of the wall oven. 5. Touching the halogen bulb with a glass shield. Soak the pan in a manner to lift it . 6. Care & Cleaning 39...
Complete Owner's Guide (English)
Page 40
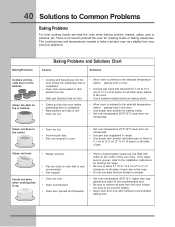
...done when cooking time is up. • Range not level. • Pan too close to oven wall or rack overcrowded. • Pan warped. • Oven too cool. • Oven overcrowded. • Oven door opened too frequently. • Place a marked glass measuring cup filled with water on the center... of clearance on all pans from your previous appliance. Cakes not done in the center. • Oven too hot. • Incorrect pan size. • Pan not centered in oven. • Set oven temperature 25°F/12°C lower than suggested in oven. • Choose pan sizes that are dented...
...done when cooking time is up. • Range not level. • Pan too close to oven wall or rack overcrowded. • Pan warped. • Oven too cool. • Oven overcrowded. • Oven door opened too frequently. • Place a marked glass measuring cup filled with water on the center... of clearance on all pans from your previous appliance. Cakes not done in the center. • Oven too hot. • Incorrect pan size. • Pan not centered in oven. • Set oven temperature 25°F/12°C lower than suggested in oven. • Choose pan sizes that are dented...

Complete Owner's Guide (English)
Page 43
... home. 13. If service is performed, it is shipped from the factory. 10. In Canada, your appliance is warranted by Electrolux Major Appliances North America, a division of Electrolux Home Products, Inc. Product features or specifications as abuse, misuse, inadequate power supply, accidents, fires, or... limited to floors, cabinets, walls, etc. 15. This warranty only applies in and free-standing range appliances) is covered by a two through 5th years from your original date of purchase, Electrolux will repair or replace any obligations under this appliance that has been transferred from...
... home. 13. If service is performed, it is shipped from the factory. 10. In Canada, your appliance is warranted by Electrolux Major Appliances North America, a division of Electrolux Home Products, Inc. Product features or specifications as abuse, misuse, inadequate power supply, accidents, fires, or... limited to floors, cabinets, walls, etc. 15. This warranty only applies in and free-standing range appliances) is covered by a two through 5th years from your original date of purchase, Electrolux will repair or replace any obligations under this appliance that has been transferred from...

