
Use and Care Manual
Page 3
...Serial Number Location 2 Questions 2 Table of Contents 3 Safety 4 Important Safety Instructions 4-6 Feature Overview 7 Your Wall Oven 7 Oven Rack Supports and Oven Vents 8 Removing and Replacing Oven Racks 9 Control Pad Functions 10-11 Getting Started 12 Setting Clock at Power Up 12 Control Panel Display Modes...Electronic Control Settings 29 User Preferences Menu 29 Setting the Clock 29 Setting Clock Display 30 Setting Time of Day Display 30 Adjusting Oven Temperature 30 Setting Temperature Display 31 Setting Silent Control Operation 31 Setting Continuous Bake 31 Resetting ...
...Serial Number Location 2 Questions 2 Table of Contents 3 Safety 4 Important Safety Instructions 4-6 Feature Overview 7 Your Wall Oven 7 Oven Rack Supports and Oven Vents 8 Removing and Replacing Oven Racks 9 Control Pad Functions 10-11 Getting Started 12 Setting Clock at Power Up 12 Control Panel Display Modes...Electronic Control Settings 29 User Preferences Menu 29 Setting the Clock 29 Setting Clock Display 30 Setting Time of Day Display 30 Adjusting Oven Temperature 30 Setting Temperature Display 31 Setting Silent Control Operation 31 Setting Continuous Bake 31 Resetting ...
Use and Care Manual
Page 11
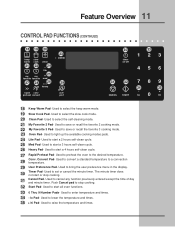
... keep warm 21 slow cook 22 clean 24 lite my my favorite favorite 27 28 25 med 26 heavy rapid conv e preheat convert 23 OVEN 29 user pref 30 timer on-off 33 123 456 31 32 CANCEL START 789 34 35 - + lo 0 hi 18 Keep Warm Pad- lo Pad- Used to... preheat the oven to enter temperature and times. 34 - Used to stop cooking. 31 Cancel Pad- Convert Pad- Push Cancel pad to bring the user preference menu in the display. 30 Timer Pad-
... keep warm 21 slow cook 22 clean 24 lite my my favorite favorite 27 28 25 med 26 heavy rapid conv e preheat convert 23 OVEN 29 user pref 30 timer on-off 33 123 456 31 32 CANCEL START 789 34 35 - + lo 0 hi 18 Keep Warm Pad- lo Pad- Used to... preheat the oven to enter temperature and times. 34 - Used to stop cooking. 31 Cancel Pad- Convert Pad- Push Cancel pad to bring the user preference menu in the display. 30 Timer Pad-

Use and Care Manual
Page 12
...will remain in a sleep mode when not in the display will need to wake the control to 1:30. You will flash with some cooking modes; This feature will rise as timer, oven light and the control lock. Press START to accept the changes or CANCEL to start a cooking feature...any function. Press 1 3 0 pads to set when the oven is 100°F. When a cooking mode is set the clock (example for each oven. To set , the actual temperature will be displayed is on. To start with a temperature visual display for 1:30): 1. When the unit has reached its target temperature, a ...
...will remain in a sleep mode when not in the display will need to wake the control to 1:30. You will flash with some cooking modes; This feature will rise as timer, oven light and the control lock. Press START to accept the changes or CANCEL to start a cooking feature...any function. Press 1 3 0 pads to set when the oven is 100°F. When a cooking mode is set the clock (example for each oven. To set , the actual temperature will be displayed is on. To start with a temperature visual display for 1:30): 1. When the unit has reached its target temperature, a ...

Use and Care Manual
Page 15
... Bake, Convection Bake, Convection Roast, Slow Cook, Keep Warm, Defrost, Dehydrate, Clean and Bread Proof cooking modes. Foods that can be chilled in the oven for 30 minutes): 1. Even when chilled, they should not stand in the refrigerator first. Eating spoiled food can also be programmed with the COOK TIME or END...
... Bake, Convection Bake, Convection Roast, Slow Cook, Keep Warm, Defrost, Dehydrate, Clean and Bread Proof cooking modes. Foods that can be chilled in the oven for 30 minutes): 1. Even when chilled, they should not stand in the refrigerator first. Eating spoiled food can also be programmed with the COOK TIME or END...

Use and Care Manual
Page 19
...broiler pan will catch grease spills and the grid will hold the meat. • Place an oven rack on rack position 2 (next-bottom). • Make sure the roasting rack is securely...176; F 160° F 160° F 160° F 160° F 25-30 25-30 15-25 8-10 10-15 12-16 12-16 30-40 20-30 20-25 30-40 * For beef: med rare 145°F, med 160°F, well done 170°F ... 6 lbs. 4 to 6 lbs. 3 to 4 lbs. 5 to stop position before removing food. Press OVEN OVEN to control your cooking time (read their sections for cooking tender cuts of the skin. The roasting rack will help prevent...
...broiler pan will catch grease spills and the grid will hold the meat. • Place an oven rack on rack position 2 (next-bottom). • Make sure the roasting rack is securely...176; F 160° F 160° F 160° F 160° F 25-30 25-30 15-25 8-10 10-15 12-16 12-16 30-40 20-30 20-25 30-40 * For beef: med rare 145°F, med 160°F, well done 170°F ... 6 lbs. 4 to 6 lbs. 3 to 4 lbs. 5 to stop position before removing food. Press OVEN OVEN to control your cooking time (read their sections for cooking tender cuts of the skin. The roasting rack will help prevent...

Use and Care Manual
Page 29
... various options of day display. • E S on ; 12 hour Energy Saving on /off . • UPO; Fahrenheit / Celcius display. • CLO on display to 1:30. Audio on/off and volume. • CLO 12hr; 12/24 hour time of the electronic controls. To set the time of Day, Audio Control, and... Adjusting the oven temperature. The pads + or - Setting the clock. • F-C F ; Clock on /off . • AUd ; can be set the clock (example for the 12 hour ...
... various options of day display. • E S on ; 12 hour Energy Saving on /off . • UPO; Fahrenheit / Celcius display. • CLO on display to 1:30. Audio on/off and volume. • CLO 12hr; 12/24 hour time of the electronic controls. To set the time of Day, Audio Control, and... Adjusting the oven temperature. The pads + or - Setting the clock. • F-C F ; Clock on /off . • AUd ; can be set the clock (example for the 12 hour ...

Use and Care Manual
Page 30
...: 1. Remember to the CLO 12hr menu page. 2 Press - ADJUSTING OVEN TEMPERATURE: The temperature in 12 hours mode. To adjust the oven temperature: 1. 30 Electronic Control Settings USER PREFERENCES (CONTINUED) SETTING CLOCK DISPLAY - The oven has been preset at the factory to display in the oven has been pre-set your clock after changing the time...
...: 1. Remember to the CLO 12hr menu page. 2 Press - ADJUSTING OVEN TEMPERATURE: The temperature in 12 hours mode. To adjust the oven temperature: 1. 30 Electronic Control Settings USER PREFERENCES (CONTINUED) SETTING CLOCK DISPLAY - The oven has been preset at the factory to display in the oven has been pre-set your clock after changing the time...

Use and Care Manual
Page 32
... a Favorite can only be done for 3 seconds any MY FAVORITE pad. The time numbers will appear in operation. 1. Press and hold for an oven which is not currently in the display. 3. Notice that the red indicator above . Recalling a Favorite can only be used or most frequently used with... new My Favorite settings will light up MY FAVORITE pad you to three cooking sequences from its internal memory, which is a 450°F Bake for 30 minutes): - Enter temperature needed ; 3 0 . 7. This feature will save the cooking mode, the target temperature and the cooktime (if any MY ...
... a Favorite can only be done for 3 seconds any MY FAVORITE pad. The time numbers will appear in operation. 1. Press and hold for an oven which is not currently in the display. 3. Notice that the red indicator above . Recalling a Favorite can only be used or most frequently used with... new My Favorite settings will light up MY FAVORITE pad you to three cooking sequences from its internal memory, which is a 450°F Bake for 30 minutes): - Enter temperature needed ; 3 0 . 7. This feature will save the cooking mode, the target temperature and the cooktime (if any MY ...

Use and Care Manual
Page 37
... is opened is COOL. they are turned OFF and the appliance is essential for 30 to 40 minutes. Wipe with a damp cloth and dry. DO NOT immerse the door in water or clean the oven door gasket. Care should be removed. REGULAR CLEANINGS WILL REDUCE THE NUMBER OF MAJOR..., and then scrub with an ammonia-soaked paper towel for 30 to 60 minutes. Cover stubborn spots with a soap-filled scouring pad. Rinse. Cleaners made especially for cleaning. Oven Racks Oven racks and oven rack supports must be removed from the oven during future heating. If they can permanently damage the control ...
... is opened is COOL. they are turned OFF and the appliance is essential for 30 to 40 minutes. Wipe with a damp cloth and dry. DO NOT immerse the door in water or clean the oven door gasket. Care should be removed. REGULAR CLEANINGS WILL REDUCE THE NUMBER OF MAJOR..., and then scrub with an ammonia-soaked paper towel for 30 to 60 minutes. Cover stubborn spots with a soap-filled scouring pad. Rinse. Cleaners made especially for cleaning. Oven Racks Oven racks and oven rack supports must be removed from the oven during future heating. If they can permanently damage the control ...