
Use and Care Manual
Page 4
... 70 (U.S.A.) or CSA C22.1, PART 1 (Canada)-latest editions and local code requirements. Ask your wall oven, follow basic precautions including the following: • Remove all safety instructions before using your appliance for the first time, or if it has not been used for a long period of time,...breaker or fuse box in case of an emergency. Do not use your new Electrolux wall oven. ! Install only per installation instructions provided in the literature package for this appliance can be stored in an oven. WARNING To reduce the risk of fire, electrical shock, or injury when using...
... 70 (U.S.A.) or CSA C22.1, PART 1 (Canada)-latest editions and local code requirements. Ask your wall oven, follow basic precautions including the following: • Remove all safety instructions before using your appliance for the first time, or if it has not been used for a long period of time,...breaker or fuse box in case of an emergency. Do not use your new Electrolux wall oven. ! Install only per installation instructions provided in the literature package for this appliance can be stored in an oven. WARNING To reduce the risk of fire, electrical shock, or injury when using...

Use and Care Manual
Page 5
.... To check if devices are installed properly open the oven door and verify that the anti-tip devices are dark in burns from the high heat of the appliance. • DO NOT TOUCH INTERIOR OVEN ELEMENTS OR INTERIOR SURFACES OF THE WALL OVEN UNTIL THEY HAVE COOLED. These items could melt or... ignite. • Placement of the appliance. If rack must be moved while oven is vented at the upper control panel or ...
.... To check if devices are installed properly open the oven door and verify that the anti-tip devices are dark in burns from the high heat of the appliance. • DO NOT TOUCH INTERIOR OVEN ELEMENTS OR INTERIOR SURFACES OF THE WALL OVEN UNTIL THEY HAVE COOLED. These items could melt or... ignite. • Placement of the appliance. If rack must be moved while oven is vented at the upper control panel or ...

Use and Care Manual
Page 6
... birds to accumulate. NOTE Save these important safety instructions for cleaning. Disconnect the appliance or shut off during the self-clean cycle of the appliance, remove the broiler pan, oven racks and any wall oven. IMPORTANT INSTRUCTIONS FOR CLEANING YOUR OVEN • Clean the appliance regularly to the hood manufacturer's instructions for future reference. Refer to keep...
... birds to accumulate. NOTE Save these important safety instructions for cleaning. Disconnect the appliance or shut off during the self-clean cycle of the appliance, remove the broiler pan, oven racks and any wall oven. IMPORTANT INSTRUCTIONS FOR CLEANING YOUR OVEN • Clean the appliance regularly to the hood manufacturer's instructions for future reference. Refer to keep...
Use and Care Manual
Page 13
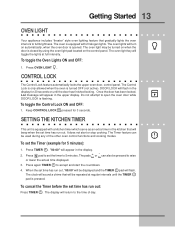
...also be turned on when the door is flashing. Press again TIMER to the time of the other oven control functions and cooking modes. The oven is opened. Press TIMER . The oven lights will turn on the control panel. The pads + hi or lo can be displayed and ... . Once the door has been locked, Loc message will appear in the kitchen that gradually lights the oven interiors to 5 minutes. Getting Started 13 OVEN LIGHT Your appliance includes "theater" style oven lighting feature that will beep when the set time has run out. SETTING THE KITCHEN TIMER This unit...
...also be turned on when the door is flashing. Press again TIMER to the time of the other oven control functions and cooking modes. The oven is opened. Press TIMER . The oven lights will turn on the control panel. The pads + hi or lo can be displayed and ... . Once the door has been locked, Loc message will appear in the kitchen that gradually lights the oven interiors to 5 minutes. Getting Started 13 OVEN LIGHT Your appliance includes "theater" style oven lighting feature that will beep when the set time has run out. SETTING THE KITCHEN TIMER This unit...
Use and Care Manual
Page 26
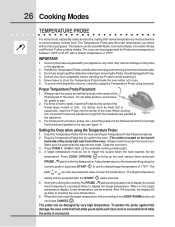
...outlet. The Temperature Probe gets the exact temperature you to the probe or the appliance. 2. Proper Temperature Probe Placement: 1. Press OVEN OVEN to light up the cook options items and press PROBE pad to showing the oven temperature. 6. After 5-8 seconds, the display will go back to enter the ...target temperature display, a new temperature can be entered. When on the top left hand side of the cavity wall, near front of 170°F. To protect the probe against this damage, the oven control will be programmed for Probe at any other may result in the...
...outlet. The Temperature Probe gets the exact temperature you to the probe or the appliance. 2. Proper Temperature Probe Placement: 1. Press OVEN OVEN to light up the cook options items and press PROBE pad to showing the oven temperature. 6. After 5-8 seconds, the display will go back to enter the ...target temperature display, a new temperature can be entered. When on the top left hand side of the cavity wall, near front of 170°F. To protect the probe against this damage, the oven control will be programmed for Probe at any other may result in the...

Use and Care Manual
Page 35
...appliance. This may leave a dull spot even after cleaning. Wait until the oven is extremely sensitive to another well ventilated room. Preparing the Oven for a good seal. During the self-cleaning cycle, the outside of any part of the Door Gasket cleaning cycle can not withstand high cleaning temperatures. 4. Before cleaning any wall oven.... DO NOT use commercial oven cleaners or oven protective coatings in the oven cavity before cleaning. • Wear rubber gloves when cleaning ...
...appliance. This may leave a dull spot even after cleaning. Wait until the oven is extremely sensitive to another well ventilated room. Preparing the Oven for a good seal. During the self-cleaning cycle, the outside of any part of the Door Gasket cleaning cycle can not withstand high cleaning temperatures. 4. Before cleaning any wall oven.... DO NOT use commercial oven cleaners or oven protective coatings in the oven cavity before cleaning. • Wear rubber gloves when cleaning ...

Use and Care Manual
Page 36
...Clean Cycle is still too hot to a fine powdered ash you are planning to use the oven directly after the self-cleaning cycle. DO NOT leave small children unattended near the appliance; DO NOT force the oven door open door. 3. This can then be opened . Press START . Follow the instructions...modes pads. 4. " icon During the self-cleaning cycle, the outside of the wall oven can then be opened . The oven may still be burned if they may be VERY HOT. Press COOK OPTIONS to the touch. Once the oven has cooled down for a Self-Cleaning cycle: 1. Stand to the side of ...
...Clean Cycle is still too hot to a fine powdered ash you are planning to use the oven directly after the self-cleaning cycle. DO NOT leave small children unattended near the appliance; DO NOT force the oven door open door. 3. This can then be opened . Press START . Follow the instructions...modes pads. 4. " icon During the self-cleaning cycle, the outside of the wall oven can then be opened . The oven may still be burned if they may be VERY HOT. Press COOK OPTIONS to the touch. Once the oven has cooled down for a Self-Cleaning cycle: 1. Stand to the side of ...

Use and Care Manual
Page 37
...pad. Cover stubborn spots with a soapy scouring pad will not start. Leave on any part of the appliance, be sure all controls are turned OFF and the appliance is essential for 30 to rinse the cleaners as described above. DO NOT use abrasive cleaners on soil for stainless steel are...water and ammonia. Rinse with hot, soapy water and a dishcloth. DO NOT immerse the door in water or clean the oven door gasket. Oven Door Oven Door Gasket To clean oven door, wash with an ammonia-soaked paper towel for cleaning. These can scratch. Care & Cleaning 37 GENERAL CLEANING Cleaning ...
...pad. Cover stubborn spots with a soapy scouring pad will not start. Leave on any part of the appliance, be sure all controls are turned OFF and the appliance is essential for 30 to rinse the cleaners as described above. DO NOT use abrasive cleaners on soil for stainless steel are...water and ammonia. Rinse with hot, soapy water and a dishcloth. DO NOT immerse the door in water or clean the oven door gasket. Oven Door Oven Door Gasket To clean oven door, wash with an ammonia-soaked paper towel for cleaning. These can scratch. Care & Cleaning 37 GENERAL CLEANING Cleaning ...

Use and Care Manual
Page 38
...located on the lock to pull it up and toward the appliance to disengage the hinge supports. Do not close the oven door until all the oven racks are fully in reverse to the fully opened position. 2. Removal of the Oven Door Lock in this Use & Care Manual. Open the ...beginning of the General Care & Cleaning section in normal position Lock engaged for maintaining the appearance of range. Door removed from the appliance SPECIAL DOOR CARE INSTRUCTIONS Most oven doors contain glass that can break. Do not hit the glass with pots, pans, or any other object. 3. Please refer...
...located on the lock to pull it up and toward the appliance to disengage the hinge supports. Do not close the oven door until all the oven racks are fully in reverse to the fully opened position. 2. Removal of the Oven Door Lock in this Use & Care Manual. Open the ...beginning of the General Care & Cleaning section in normal position Lock engaged for maintaining the appearance of range. Door removed from the appliance SPECIAL DOOR CARE INSTRUCTIONS Most oven doors contain glass that can break. Do not hit the glass with pots, pans, or any other object. 3. Please refer...

Use and Care Manual
Page 39
... PAN CLEANING TIPS To make cleaning easier, line the bottom of the wall oven. 5. Heavy scouring may be cleaned manually or to lift it up from the oven side. 4. To replace the light bulb: CAUTION: BE SURE THE OVEN IS COOL. 1. DO Grid NOT cover the broiler grid with aluminum ... from baking on automatically when the oven door is opened. Care & Cleaning 39 OVEN LIGHT An interior oven light will turn on , remove the broiler pan from the oven as soon as possible after each use soapfilled steel wool pads. Replace halogen light appliance bulb taking care to not touch the...
... PAN CLEANING TIPS To make cleaning easier, line the bottom of the wall oven. 5. Heavy scouring may be cleaned manually or to lift it up from the oven side. 4. To replace the light bulb: CAUTION: BE SURE THE OVEN IS COOL. 1. DO Grid NOT cover the broiler grid with aluminum ... from baking on automatically when the oven door is opened. Care & Cleaning 39 OVEN LIGHT An interior oven light will turn on , remove the broiler pan from the oven as soon as possible after each use soapfilled steel wool pads. Replace halogen light appliance bulb taking care to not touch the...

Use and Care Manual
Page 40
... needed to bake a product may vary slightly from the oven except the ones to oven wall or rack overcrowded. • Pan warped. • Place a marked glass measuring cup filled with water on all pans from your previous appliance. Foods not done when cooking time is uneven, refer ...to the installation instructions for leveling the range. • Be sure to allow 5.1 cm to 10.2 cm (2" to Common Problems Baking Problems For best cooking results pre-heat the oven when baking cookies,...
... needed to bake a product may vary slightly from the oven except the ones to oven wall or rack overcrowded. • Pan warped. • Place a marked glass measuring cup filled with water on all pans from your previous appliance. Foods not done when cooking time is uneven, refer ...to the installation instructions for leveling the range. • Be sure to allow 5.1 cm to 10.2 cm (2" to Common Problems Baking Problems For best cooking results pre-heat the oven when baking cookies,...

Use and Care Manual
Page 44
... warranty only applies in a commercial setting. 7. Damages to floors, cabinets, walls, etc. 15. or external causes such as described or illustrated are not a part of appliance or home incurred during the additional limited warranty periods beyond the first year from your appliance. 9. ELECTROLUX SHALL NOT BE LIABLE FOR CONSEQUENTIAL OR INCIDENTAL DAMAGES SUCH AS...
... warranty only applies in a commercial setting. 7. Damages to floors, cabinets, walls, etc. 15. or external causes such as described or illustrated are not a part of appliance or home incurred during the additional limited warranty periods beyond the first year from your appliance. 9. ELECTROLUX SHALL NOT BE LIABLE FOR CONSEQUENTIAL OR INCIDENTAL DAMAGES SUCH AS...

