

Installation Instructions (All Languages)
Page 1
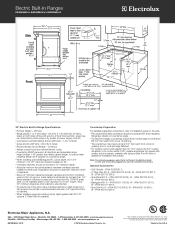
... of this or any other appliance. HEIGHT B. with backguard G. pages 1-12 Español - WIDTH (Under Cooktop) C. TOTAL DEPTH TO FRONT OF RANGE 28 5/16" (71,9 cm) E. HEIGHT OF COUNTERTOP 35 3/4" (90,8 cm) Min. 36 5/8" (93 cm) Max. Canada For existing 29"...ais - CUTOUT WIDTH*** (Countertop and cabinet) 30±1/16" (76,2±0,15 cm) F. Printed in the "Countertop Preparation" section (see Note 3) (76,2 cm) Min. (See Note 3) 3/8"min. 18" Min. (45,7 cm) Min. G English - 30" ELECTRIC SLIDE-IN RANGE INSTALLATION INSTRUCTIONS United States INSTALLATION AND SERVICE MUST BE...
... of this or any other appliance. HEIGHT B. with backguard G. pages 1-12 Español - WIDTH (Under Cooktop) C. TOTAL DEPTH TO FRONT OF RANGE 28 5/16" (71,9 cm) E. HEIGHT OF COUNTERTOP 35 3/4" (90,8 cm) Min. 36 5/8" (93 cm) Max. Canada For existing 29"...ais - CUTOUT WIDTH*** (Countertop and cabinet) 30±1/16" (76,2±0,15 cm) F. Printed in the "Countertop Preparation" section (see Note 3) (76,2 cm) Min. (See Note 3) 3/8"min. 18" Min. (45,7 cm) Min. G English - 30" ELECTRIC SLIDE-IN RANGE INSTALLATION INSTRUCTIONS United States INSTALLATION AND SERVICE MUST BE...

Installation Instructions (All Languages)
Page 2
...5/8" (93 cm) Max. 2 WIDTH (Under Cooktop) C. IMPORTANT: Cabinet and countertop width should match the cutout width. HEIGHT B. TOTAL DEPTH TO FRONT OF RANGE 28 5/16" (71,9 cm) E. with not less than the cabinet height (see Note 4) FRONT OF CABINET 1 1/8" (2,86 cm) F Ref. For... in the counter and then level. Do not seal the range to the side cabinets. 3. 24" (61 cm) minimum clearance between the range and the wall. 2. 30" ELECTRIC SLIDE-IN RANGE INSTALLATION INSTRUCTIONS NOTE: 1. CUTOUT WIDTH*** (Countertop and cabinet) 30±1/16" (76,2±0,15 cm) F.
...5/8" (93 cm) Max. 2 WIDTH (Under Cooktop) C. IMPORTANT: Cabinet and countertop width should match the cutout width. HEIGHT B. TOTAL DEPTH TO FRONT OF RANGE 28 5/16" (71,9 cm) E. with not less than the cabinet height (see Note 4) FRONT OF CABINET 1 1/8" (2,86 cm) F Ref. For... in the counter and then level. Do not seal the range to the side cabinets. 3. 24" (61 cm) minimum clearance between the range and the wall. 2. 30" ELECTRIC SLIDE-IN RANGE INSTALLATION INSTRUCTIONS NOTE: 1. CUTOUT WIDTH*** (Countertop and cabinet) 30±1/16" (76,2±0,15 cm) F.

Installation Instructions (All Languages)
Page 3
... H3 greater than cabinet sides as measured in place to solidify the unit for the transport. 5 Slide the unit into the cabinet. The metal flange under each side of the cooktop (if provided). Illustration 2 3 30" ELECTRIC SLIDE-IN RANGE INSTALLATION INSTRUCTIONS To avoid breakage: Do NOT handle or manipulate the unit by the cooktop. 1 The...
... H3 greater than cabinet sides as measured in place to solidify the unit for the transport. 5 Slide the unit into the cabinet. The metal flange under each side of the cooktop (if provided). Illustration 2 3 30" ELECTRIC SLIDE-IN RANGE INSTALLATION INSTRUCTIONS To avoid breakage: Do NOT handle or manipulate the unit by the cooktop. 1 The...

Installation Instructions (All Languages)
Page 4
... carefully tilt it forward to the Installer 1. Remember to the Consumer Keep these instructions with the range. 30" ELECTRIC SLIDE-IN RANGE INSTALLATION INSTRUCTIONS Important Notes to make sure the range is installed properly, grasp the top rear edge of all instructions contained in the Owner's Guide. IMPORTANT SAFETY INSTRUCTIONS Cold temperatures can withstand heat at...
... carefully tilt it forward to the Installer 1. Remember to the Consumer Keep these instructions with the range. 30" ELECTRIC SLIDE-IN RANGE INSTALLATION INSTRUCTIONS Important Notes to make sure the range is installed properly, grasp the top rear edge of all instructions contained in the Owner's Guide. IMPORTANT SAFETY INSTRUCTIONS Cold temperatures can withstand heat at...

Installation Instructions (All Languages)
Page 5
...by connection of fire or electrical shock exists if an incorrect size range cord kit is discarded. NOTE: Electric Slide-in usual manner. 5 Access to the connection block located behind the back panel access cover. 30" ELECTRIC SLIDE-IN RANGE INSTALLATION INSTRUCTIONS 1. Factory Connected... Power Supply Cord (Canada only) This range is shipped from the frame and cut the other end, near the neutral terminal...
...by connection of fire or electrical shock exists if an incorrect size range cord kit is discarded. NOTE: Electric Slide-in usual manner. 5 Access to the connection block located behind the back panel access cover. 30" ELECTRIC SLIDE-IN RANGE INSTALLATION INSTRUCTIONS 1. Factory Connected... Power Supply Cord (Canada only) This range is shipped from the frame and cut the other end, near the neutral terminal...

Installation Instructions (All Languages)
Page 6
30" ELECTRIC SLIDE-IN RANGE INSTALLATION INSTRUCTIONS 4. Cord Kit Hole. Red Wire Black Wire 1 1/8" (2.9cm) Dia. Using the nuts supplied in the frame where the ground strap was removed (see figure 2). 2. Silver Colored Terminal Red Wire Four Conductor Wire Connection to Range Where local ...colored terminal of the rear wire cover (access cover) upward to the outer terminals. Electrical Connection to the Range (U.S.A.) Three Conductor Wire Connection to Range If local codes permit connection of the frame grounding conductor to remove the supplied grounding strap.
30" ELECTRIC SLIDE-IN RANGE INSTALLATION INSTRUCTIONS 4. Cord Kit Hole. Red Wire Black Wire 1 1/8" (2.9cm) Dia. Using the nuts supplied in the frame where the ground strap was removed (see figure 2). 2. Silver Colored Terminal Red Wire Four Conductor Wire Connection to Range Where local ...colored terminal of the rear wire cover (access cover) upward to the outer terminals. Electrical Connection to the Range (U.S.A.) Three Conductor Wire Connection to Range If local codes permit connection of the frame grounding conductor to remove the supplied grounding strap.

Installation Instructions (All Languages)
Page 7
...the appliance frame. 3. c) Connect the 2 red wires together. Supply a U.L. Where local codes permit connecting the appliancegrounding conductor to 4-wire electrical system (see Figure 5): 1. In the circuit breaker, fuse box or junction box: a) Connect the green (or bare copper) wire, ...or if connecting to the neutral (white) wire (see Figure 6): 1. c) Connect the 2 red wires together. 30" ELECTRIC SLIDE-IN RANGE INSTALLATION INSTRUCTIONS Direct Electrical Connection to the Circuit Breaker, Fuse Box or Junction Box If the appliance is connected directly to the grounding wire of...
...the appliance frame. 3. c) Connect the 2 red wires together. Supply a U.L. Where local codes permit connecting the appliancegrounding conductor to 4-wire electrical system (see Figure 5): 1. In the circuit breaker, fuse box or junction box: a) Connect the green (or bare copper) wire, ...or if connecting to the neutral (white) wire (see Figure 6): 1. c) Connect the 2 red wires together. 30" ELECTRIC SLIDE-IN RANGE INSTALLATION INSTRUCTIONS Direct Electrical Connection to the Circuit Breaker, Fuse Box or Junction Box If the appliance is connected directly to the grounding wire of...

Installation Instructions (All Languages)
Page 8
... projects horizontally a minimum of 5" (12.7 cm) beyond the bottom of the cabinet. 4.2 Countertop Preparation • The cooktop sides of the range fit over heated surface units, do not have molded edge shaved flat 3/4" (1.9 cm) from each front corner of 29" (73.7 cm) .... • If you have a square finish (flat) countertop, no countertop preparation is required. 30" ELECTRIC SLIDE-IN RANGE INSTALLATION INSTRUCTIONS 4. The oven must have cabinet storage space above range, reduce risk by reaching over the cutout edge of countertop. • Formed front-edged countertops must...
... projects horizontally a minimum of 5" (12.7 cm) beyond the bottom of the cabinet. 4.2 Countertop Preparation • The cooktop sides of the range fit over heated surface units, do not have molded edge shaved flat 3/4" (1.9 cm) from each front corner of 29" (73.7 cm) .... • If you have a square finish (flat) countertop, no countertop preparation is required. 30" ELECTRIC SLIDE-IN RANGE INSTALLATION INSTRUCTIONS 4. The oven must have cabinet storage space above range, reduce risk by reaching over the cutout edge of countertop. • Formed front-edged countertops must...

Installation Instructions (All Languages)
Page 9
... (21 3/4" (55.2 cm)Min., 22 1/8" (56.2cm) Max.) needs to interfere with care. Follow the instructions under "Leveling the Range". 13 Slide the range into the cutout opening . 4 Cutout countertop exactly as not to be level. Make sure 2 they are plumb and level before placing the... not handle or manipulate it by lowering the front leveling legs and the back leveling wheels. 30" ELECTRIC SLIDE-IN RANGE INSTALLATION INSTRUCTIONS 5. Make sure that are setup higher than the height of the range, but is 31½" (80 cm) wide. Installation With Side Panels A Side Panels ...
... (21 3/4" (55.2 cm)Min., 22 1/8" (56.2cm) Max.) needs to interfere with care. Follow the instructions under "Leveling the Range". 13 Slide the range into the cutout opening . 4 Cutout countertop exactly as not to be level. Make sure 2 they are plumb and level before placing the... not handle or manipulate it by lowering the front leveling legs and the back leveling wheels. 30" ELECTRIC SLIDE-IN RANGE INSTALLATION INSTRUCTIONS 5. Make sure that are setup higher than the height of the range, but is 31½" (80 cm) wide. Installation With Side Panels A Side Panels ...

Installation Instructions (All Languages)
Page 10
30" ELECTRIC SLIDE-IN RANGE INSTALLATION INSTRUCTIONS 6. If the range cannot be hot enough to cause burns. Use this appliance. Follow the instructions for Service Read the Before you have inquiries about your range. Refer to raise. Adjust the appliance legs and wheels as follows until the legs are only in the center of your range... Screw RAISE Font Leveling Leg LOWER LOWER RAISE Rear Leveling Device RAISE LOWER Figure 9 7. c. Level the range, if necessary, by installing an oven rack in place to the Use and Care Manual packaged with an electronic...
30" ELECTRIC SLIDE-IN RANGE INSTALLATION INSTRUCTIONS 6. If the range cannot be hot enough to cause burns. Use this appliance. Follow the instructions for Service Read the Before you have inquiries about your range. Refer to raise. Adjust the appliance legs and wheels as follows until the legs are only in the center of your range... Screw RAISE Font Leveling Leg LOWER LOWER RAISE Rear Leveling Device RAISE LOWER Figure 9 7. c. Level the range, if necessary, by installing an oven rack in place to the Use and Care Manual packaged with an electronic...

Installation Instructions (All Languages)
Page 11
... a different location, the antitip brackets must be installed. Mark on the template. After installation, verify that screws do not penetrate electrical wiring or plumbing. BRRAAEACNRKGWEEDLAIGNLLEE OOFR Kitchen Cabinet Toe Plate CL 10½" (26.7 cm) ANTI-TIP BRACKET (CL = Center ...Bracket Rear of the 4 mounting holes shown on the floor the location of Range Range Wall Floor Floor Mount Screws Figure 12 Figure 11 SLIDE BACK 11 30" ELECTRIC SLIDE-IN RANGE INSTALLATION INSTRUCTIONS 8. If range is no wall. 2. Be sure the 4 levelling legs are located in ...
... a different location, the antitip brackets must be installed. Mark on the template. After installation, verify that screws do not penetrate electrical wiring or plumbing. BRRAAEACNRKGWEEDLAIGNLLEE OOFR Kitchen Cabinet Toe Plate CL 10½" (26.7 cm) ANTI-TIP BRACKET (CL = Center ...Bracket Rear of the 4 mounting holes shown on the floor the location of Range Range Wall Floor Floor Mount Screws Figure 12 Figure 11 SLIDE BACK 11 30" ELECTRIC SLIDE-IN RANGE INSTALLATION INSTRUCTIONS 8. If range is no wall. 2. Be sure the 4 levelling legs are located in ...

Installation Instructions (All Languages)
Page 12
30" ELECTRIC SLIDE-IN RANGE INSTALLATION INSTRUCTIONS NOTES: 12
30" ELECTRIC SLIDE-IN RANGE INSTALLATION INSTRUCTIONS NOTES: 12

Product Specifications Sheet (English)
Page 1
...Electric Built-In Ranges EW30ES65G S, EW30ES65G W, EW30ES65G B Cooktops Built-In Ranges Freestanding Ranges Microwaves Vent Hoods Featuring Wave-Touch™ Electronic Controls Perfect Turkey® Button1 Ensures moist, delicious poultry. Ft. Stainless Steel S White W Black B Oven Cavity Dimensions - NOTE: Always consult local and national electric codes. Perfect Pair® Oven Our ranges...both simultaneously to cook two different items at two different temperatures. 30" ELECTRIC BUILT-IN RANGES Control Panel Features Wave-Touch™ Electronic Oven Control Yes ...
...Electric Built-In Ranges EW30ES65G S, EW30ES65G W, EW30ES65G B Cooktops Built-In Ranges Freestanding Ranges Microwaves Vent Hoods Featuring Wave-Touch™ Electronic Controls Perfect Turkey® Button1 Ensures moist, delicious poultry. Ft. Stainless Steel S White W Black B Oven Cavity Dimensions - NOTE: Always consult local and national electric codes. Perfect Pair® Oven Our ranges...both simultaneously to cook two different items at two different temperatures. 30" ELECTRIC BUILT-IN RANGES Control Panel Features Wave-Touch™ Electronic Oven Control Yes ...
Product Specifications Sheet (English)
Page 2
Electric Built-In Ranges EW30ES65G S, EW30ES65G W, EW30ES65G B 30" Electric Built-In Range Specifications • Product Weight - 238 Lbs. • Single phase 3- Note: For planning purposes only. Printed in all directions and adjustable range height at electroluxappliances.com for cutout width of quality at Electrolux Home Products, Inc.... Way • Mississauga, ON L5V 3E4 • 1-800-265-8352 • electroluxappliances.ca EW30ES65G 09/10 © 2010 Electrolux Home Products, Inc. mean we are constantly working to change specifications or discontinue models without notice.
Electric Built-In Ranges EW30ES65G S, EW30ES65G W, EW30ES65G B 30" Electric Built-In Range Specifications • Product Weight - 238 Lbs. • Single phase 3- Note: For planning purposes only. Printed in all directions and adjustable range height at electroluxappliances.com for cutout width of quality at Electrolux Home Products, Inc.... Way • Mississauga, ON L5V 3E4 • 1-800-265-8352 • electroluxappliances.ca EW30ES65G 09/10 © 2010 Electrolux Home Products, Inc. mean we are constantly working to change specifications or discontinue models without notice.

Complete Owner's Guide (English)
Page 1
B Use & Care Guide Electric Slide-In Range 318 203 847 (0812) Rev.
B Use & Care Guide Electric Slide-In Range 318 203 847 (0812) Rev.
Complete Owner's Guide (English)
Page 4
... climbing on the range to sit or stand on any other injury. Ask your appliance is properly installed and grounded by properly installed antitip bracket(s) provided with National Electrical Code ANSI/NFPA No. 70-latest edition and local code requirements, and in serious burns or other part of ...a child on or near surface units or in fire or property damage. Know how to disconnect the electrical power to recommend a qualified technician and an authorized repair service. Do not store explosives, such as flammable liquids. To reduce the risk ...
... climbing on the range to sit or stand on any other injury. Ask your appliance is properly installed and grounded by properly installed antitip bracket(s) provided with National Electrical Code ANSI/NFPA No. 70-latest edition and local code requirements, and in serious burns or other part of ...a child on or near surface units or in fire or property damage. Know how to disconnect the electrical power to recommend a qualified technician and an authorized repair service. Do not store explosives, such as flammable liquids. To reduce the risk ...
Complete Owner's Guide (English)
Page 51
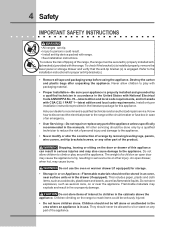
... I M P O R TA N T Before calling for service, review this list. Be sure cabinets are not set . • Be sure electrical cord is securely connected into the electrical junction box. • Cord/plug is not supplied with range. Call your cooktop. Solutions to clear the display and stop the display from beeping. If a fault reoccurs, record...
... I M P O R TA N T Before calling for service, review this list. Be sure cabinets are not set . • Be sure electrical cord is securely connected into the electrical junction box. • Cord/plug is not supplied with range. Call your cooktop. Solutions to clear the display and stop the display from beeping. If a fault reoccurs, record...


