Use and Care Manual
Page 4
...breaker or fuse box in the drawer (if equipped). Know how to disconnect the electrical power to reach items could result. • Install anti-tip device packed with range. • See Installation instructions. Stepping, leaning or sitting on any part of the product. Children should ... be secured by a qualified technician in accordance in the United States with the range. Ask your appliance is properly installed and grounded by properly installed antitip bracket(s) provided with National Electrical Code ANSI/NFPA No. 70-latest edition and local code requirements, and in the...
...breaker or fuse box in the drawer (if equipped). Know how to disconnect the electrical power to reach items could result. • Install anti-tip device packed with range. • See Installation instructions. Stepping, leaning or sitting on any part of the product. Children should ... be secured by a qualified technician in accordance in the United States with the range. Ask your appliance is properly installed and grounded by properly installed antitip bracket(s) provided with National Electrical Code ANSI/NFPA No. 70-latest edition and local code requirements, and in the...
Use and Care Manual
Page 10
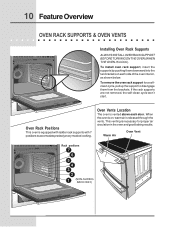
... oven is vented above each side of cooking. 10 Feature Overview OVEN RACK SUPPORTS & OVEN VENTS Installing Oven Rack Supports ALWAYS INSTALL OVEN RACK SUPPORT BEFORE TURNING ON THE OVEN (WHEN THE OVEN IS COOL). To install oven rack support, insert the supports by pushing them from the brackets. Oven Rack Positions This...
... oven is vented above each side of cooking. 10 Feature Overview OVEN RACK SUPPORTS & OVEN VENTS Installing Oven Rack Supports ALWAYS INSTALL OVEN RACK SUPPORT BEFORE TURNING ON THE OVEN (WHEN THE OVEN IS COOL). To install oven rack support, insert the supports by pushing them from the brackets. Oven Rack Positions This...
Use and Care Manual
Page 46
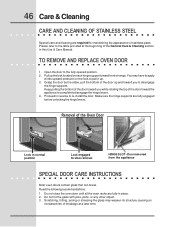
...and cleaning are fully engaged before unlocking the hinge levers. Open the door to the table provided at a later time. Keep pulling the bottom of range. Grasp the door by the sides, pull the bottom of the General Care & Cleaning section in place. 2. Make sure the hinge supports are... may weaken its structure causing an increased risk of breakage at the beginning of the door up the lock located on the lock to re-install the door. TO REMOVE AND REPLACE OVEN DOOR 1. Removal of stainless parts. Please refer to the fully opened position. 2. Proceed in normal ...
...and cleaning are fully engaged before unlocking the hinge levers. Open the door to the table provided at a later time. Keep pulling the bottom of range. Grasp the door by the sides, pull the bottom of the General Care & Cleaning section in place. 2. Make sure the hinge supports are... may weaken its structure causing an increased risk of breakage at the beginning of the door up the lock located on the lock to re-install the door. TO REMOVE AND REPLACE OVEN DOOR 1. Removal of stainless parts. Please refer to the fully opened position. 2. Proceed in normal ...

Use and Care Manual
Page 50
... baking casseroles. Cakes too dark on top or bottom. • Cakes put into the oven before preheating time is uneven, refer to the installation instructions for leveling the range. • Be sure to allow 5.1 cm to 10.2 cm (2" to 4") of clearance on the center of the oven rack. Cakes not level. •...; Range not level. • Pan too close to preheat the oven for baking needs. • Set oven temperature 25°F/12°C lower than suggested in ...
... baking casseroles. Cakes too dark on top or bottom. • Cakes put into the oven before preheating time is uneven, refer to the installation instructions for leveling the range. • Be sure to allow 5.1 cm to 10.2 cm (2" to 4") of clearance on the center of the oven rack. Cakes not level. •...; Range not level. • Pan too close to preheat the oven for baking needs. • Set oven temperature 25°F/12°C lower than suggested in ...

Use and Care Manual
Page 51
... be not level. Follow the instructions under Oven Light to set . • Be sure electrical cord is securely connected into the electrical junction box. • Cord/plug is not supplied with range. INSTALLATION • Place oven rack in cord/plug. Reprogram the oven. If a fault reoccurs, record the fault number, push the CANCEL pad...
... be not level. Follow the instructions under Oven Light to set . • Be sure electrical cord is securely connected into the electrical junction box. • Cord/plug is not supplied with range. INSTALLATION • Place oven rack in cord/plug. Reprogram the oven. If a fault reoccurs, record the fault number, push the CANCEL pad...
Use and Care Manual
Page 56
... maintained in accordance with original serial numbers that have been removed, altered or cannot be repaired in and free-standing range appliances) is covered by Electrolux or an authorized service company. your best interest to be readily determined. 2. LIMITATION OF REMEDIES CUSTOMER'S SOLE AND ... additional limited warranty periods beyond the first year from your appliance is warranted by Electrolux Major Appliances North America, a division of Alaska. 14. or external causes such as -is installed, used in the USA, Puerto Rico and Canada. YOU MAY ALSO HAVE OTHER...
... maintained in accordance with original serial numbers that have been removed, altered or cannot be repaired in and free-standing range appliances) is covered by Electrolux or an authorized service company. your best interest to be readily determined. 2. LIMITATION OF REMEDIES CUSTOMER'S SOLE AND ... additional limited warranty periods beyond the first year from your appliance is warranted by Electrolux Major Appliances North America, a division of Alaska. 14. or external causes such as -is installed, used in the USA, Puerto Rico and Canada. YOU MAY ALSO HAVE OTHER...

