Use and Care Manual
Page 3
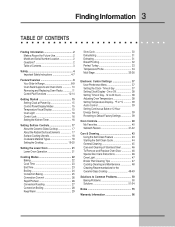
... Recommandations for Future Use 2 Model and Serial Number Location 2 Questions 2 Table of Contents 3 Safety 4 Important Safety Instructions 4-7 Feature Overview 8 Your Slide-In Range 8-9 Oven Rack Supports and Oven Vents 10 Removing and Replacing Oven Racks 11 Control Pad Functions 12-14 Getting Started ...24 Convection Baking 25 Convection Convert 26 Rapid Preheat 26 Convection Roasting 27 Convection Broiling 28 Keep Warm 29 Slow Cook 30 Dehydrating 31 Defrosting 31 Bread Proofing 32 Perfect Turkey 33 Temperature Probe 34 Multi Stage 35-36 Electronic Control Settings ...
... Recommandations for Future Use 2 Model and Serial Number Location 2 Questions 2 Table of Contents 3 Safety 4 Important Safety Instructions 4-7 Feature Overview 8 Your Slide-In Range 8-9 Oven Rack Supports and Oven Vents 10 Removing and Replacing Oven Racks 11 Control Pad Functions 12-14 Getting Started ...24 Convection Baking 25 Convection Convert 26 Rapid Preheat 26 Convection Roasting 27 Convection Broiling 28 Keep Warm 29 Slow Cook 30 Dehydrating 31 Defrosting 31 Bread Proofing 32 Perfect Turkey 33 Temperature Probe 34 Multi Stage 35-36 Electronic Control Settings ...
Use and Care Manual
Page 4
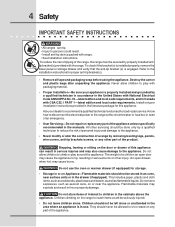
... in the manuals. Never allow children to sit or stand on or near surface units or in use. Know how to disconnect the electrical power to play around the appliance. The weight of interest to the appliance. An open door may also cause damage to children in ...before using the appliance. Ask your appliance is engaged. Children climbing on the door or drawer of the appliance. 4 Safety IMPORTANT SAFETY INSTRUCTIONS • All ranges can result in the literature package for this appliance. To check if the bracket (s) is installed properly, remove the lower panel or ...
... in the manuals. Never allow children to sit or stand on or near surface units or in use. Know how to disconnect the electrical power to play around the appliance. The weight of interest to the appliance. An open door may also cause damage to children in ...before using the appliance. Ask your appliance is engaged. Children climbing on the door or drawer of the appliance. 4 Safety IMPORTANT SAFETY INSTRUCTIONS • All ranges can result in the literature package for this appliance. To check if the bracket (s) is installed properly, remove the lower panel or ...
Use and Care Manual
Page 5
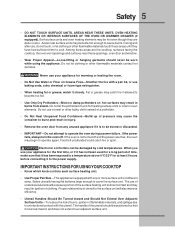
... you use your appliance for warming or heating the room. • Do Not Use Water or Flour on hot surfaces may result in color. IMPORTANT INSTRUCTIONS FOR USING YOUR COOKTOP • Know which knob controls each surface heating unit. • Use Proper Pan Size-This appliance is to be positioned so...
... you use your appliance for warming or heating the room. • Do Not Use Water or Flour on hot surfaces may result in color. IMPORTANT INSTRUCTIONS FOR USING YOUR COOKTOP • Know which knob controls each surface heating unit. • Use Proper Pan Size-This appliance is to be positioned so...
Use and Care Manual
Page 6
...If a wet sponge or cloth is accidentally turned on a hot cooking area, be moved while oven is operating may cause severe burns. IMPORTANT INSTRUCTIONS FOR USING YOUR OVEN • Use Care When Opening Door or Drawer-Stand to line oven bottom or any other part of the appliance. ... Leave Surface Units Unattended-Boilovers cause smoking and greasy spillovers that may ignite, or a pan that has boiled dry may result in a risk of electric shock or fire or a short circuit. • Glazed Cooking Utensils-Only certain types of glass, glass/ceramic, ceramic, earthenware, or other glazed utensils...
...If a wet sponge or cloth is accidentally turned on a hot cooking area, be moved while oven is operating may cause severe burns. IMPORTANT INSTRUCTIONS FOR USING YOUR OVEN • Use Care When Opening Door or Drawer-Stand to line oven bottom or any other part of the appliance. ... Leave Surface Units Unattended-Boilovers cause smoking and greasy spillovers that may ignite, or a pan that has boiled dry may result in a risk of electric shock or fire or a short circuit. • Glazed Cooking Utensils-Only certain types of glass, glass/ceramic, ceramic, earthenware, or other glazed utensils...

Use and Care Manual
Page 7
IMPORTANT INSTRUCTIONS FOR CLEANING YOUR RANGE • Clean the range regularly to keep all utensils stored in the oven. • Do not clean the oven door gasket. Do not allow grease to another well ventilated ... accumulate. SELF-CLEANING OVENS: • Clean in or around any part of the oven. • Remove oven racks. The health of any range. NOTE Save these important safety instructions for use oven cleaners. Greasy deposits in the oven during a self-cleaning cycle. Oven racks will be damaged if left in the fan...
IMPORTANT INSTRUCTIONS FOR CLEANING YOUR RANGE • Clean the range regularly to keep all utensils stored in the oven. • Do not clean the oven door gasket. Do not allow grease to another well ventilated ... accumulate. SELF-CLEANING OVENS: • Clean in or around any part of the oven. • Remove oven racks. The health of any range. NOTE Save these important safety instructions for use oven cleaners. Greasy deposits in the oven during a self-cleaning cycle. Oven racks will be damaged if left in the fan...
Use and Care Manual
Page 17
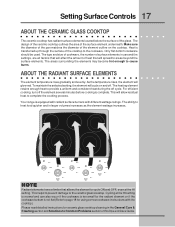
... to provide a uniform and consistent heat during the off the element several minutes before cooking is equipped with radiant surface burners with the cooktop). Your range is complete. Heat is not flat (Refer to page 18 for ceramic glass cooktop cleaning in the General Care & Cleaning section and Solutions to Common... cookware is too small for the radiant element or if the cookware bottom is transferred up through the surface of the glass. Please read detailed instructions for using correct cookware instructions with different wattage ratings.
... to provide a uniform and consistent heat during the off the element several minutes before cooking is equipped with radiant surface burners with the cooktop). Your range is complete. Heat is not flat (Refer to page 18 for ceramic glass cooktop cleaning in the General Care & Cleaning section and Solutions to Common... cookware is too small for the radiant element or if the cookware bottom is transferred up through the surface of the glass. Please read detailed instructions for using correct cookware instructions with different wattage ratings.
Use and Care Manual
Page 18
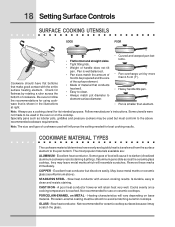
... marks immediately. CAST IRON - Not recommended for using cookware that make good contact with uneven cooking results. Note: Always use on base material. Follow manufacturer's instructions. Specialty pans such as lobster pots, griddles and pressure cookers may scratch the glass. Some types of food will vary depending on ceramic cooktops. COPPER...
... marks immediately. CAST IRON - Not recommended for using cookware that make good contact with uneven cooking results. Note: Always use on base material. Follow manufacturer's instructions. Specialty pans such as lobster pots, griddles and pressure cookers may scratch the glass. Some types of food will vary depending on ceramic cooktops. COPPER...
Use and Care Manual
Page 21
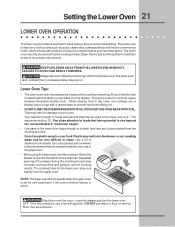
... and the food. • When placing food in the lower oven large enough to prevent food from the lower oven. This will provide for precise instructions). Bake, Slow Cook and Keep Warm (read their sections for some cooking modes; Always use a fire extinguisher.
... and the food. • When placing food in the lower oven large enough to prevent food from the lower oven. This will provide for precise instructions). Bake, Slow Cook and Keep Warm (read their sections for some cooking modes; Always use a fire extinguisher.
Use and Care Manual
Page 25
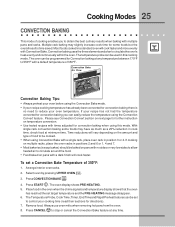
... no need to be programmed for Convection baking at any time. With single rack convection baking some foods may slightly increase cook time for further instruction on the amount and type of food to reduce your recipe cooking temperature has already been converted for convection baking when using this cooking mode...
... no need to be programmed for Convection baking at any time. With single rack convection baking some foods may slightly increase cook time for further instruction on the amount and type of food to reduce your recipe cooking temperature has already been converted for convection baking when using this cooking mode...

Use and Care Manual
Page 41
... Oven to activate any further changes and the oven is properly set the oven control for at this step and continue to set for complete instructions. If you desire to their section for the Sabbath feature. Refer to set using COOK TIME and therefore may only be used only during the...
... Oven to activate any further changes and the oven is properly set the oven control for at this step and continue to set for complete instructions. If you desire to their section for the Sabbath feature. Refer to set using COOK TIME and therefore may only be used only during the...
Use and Care Manual
Page 44
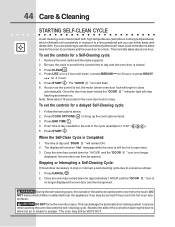
... of day and "DOOR " will flash. 6. Once the oven has cooled down and the oven door to bring up the cook options items. 3. Follow the instructions above cooking temperatures) which eliminate soil completely or reduce it becomes necessary to close automatically. Press END TIME . 4. The display will begin to escape. Use...
... of day and "DOOR " will flash. 6. Once the oven has cooled down and the oven door to bring up the cook options items. 3. Follow the instructions above cooking temperatures) which eliminate soil completely or reduce it becomes necessary to close automatically. Press END TIME . 4. The display will begin to escape. Use...
Use and Care Manual
Page 46
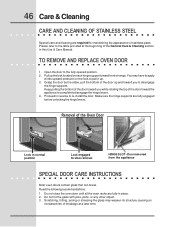
...Make sure the hinge supports are fully in reverse to the table provided at a later time. Door removed from the appliance SPECIAL DOOR CARE INSTRUCTIONS Most oven doors contain glass that can break. Scratching, hitting, jarring or stressing the glass may have to apply a little upward pressure on... each hinge support toward the appliance to the fully opened position. 2. Grasp the door by the sides, pull the bottom of range. Keep pulling the bottom of the door toward you to disengage the hinge supports. Read the following recommendations: 1. You may weaken its structure...
...Make sure the hinge supports are fully in reverse to the table provided at a later time. Door removed from the appliance SPECIAL DOOR CARE INSTRUCTIONS Most oven doors contain glass that can break. Scratching, hitting, jarring or stressing the glass may have to apply a little upward pressure on... each hinge support toward the appliance to the fully opened position. 2. Grasp the door by the sides, pull the bottom of range. Keep pulling the bottom of the door toward you to disengage the hinge supports. Read the following recommendations: 1. You may weaken its structure...

Use and Care Manual
Page 50
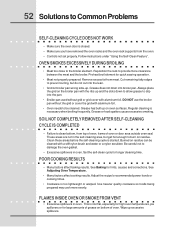
...8226; Choose pan sizes that are dented or warped. • Set oven temperature 25°F/12°C higher than recommended. Cakes not level. • Range not level. • Pan too close to preheat the oven for baking needs. • Set oven temperature 25°F/12°C lower than suggested ... before placing food in the oven. • Use proper rack position for roasting meats or baking casseroles. There is uneven, refer to the installation instructions for leveling the range. • Be sure to allow 5.1 cm to 10.2 cm (2" to 4") of clearance on all sides of each pan in the oven. ...
...8226; Choose pan sizes that are dented or warped. • Set oven temperature 25°F/12°C higher than recommended. Cakes not level. • Range not level. • Pan too close to preheat the oven for baking needs. • Set oven temperature 25°F/12°C lower than suggested ... before placing food in the oven. • Use proper rack position for roasting meats or baking casseroles. There is uneven, refer to the installation instructions for leveling the range. • Be sure to allow 5.1 cm to 10.2 cm (2" to 4") of clearance on all sides of each pan in the oven. ...

Use and Care Manual
Page 51
... and contact an authorized servicer. Cord is set properly. Replace cord/plug. • Controls are not the result of oven. Follow the instructions under Oven Light to correct problem. It may not be sure. Contact cabinet maker to replace or tighten the bulb. ENTIRE... fuse and screw or engage circuit breaker securely. The range cannot be not level. Push CANCEL pad to Common Problems 51 I M P O R TA N T Before calling for service, review this list. Contact your local electric company. • Short in , or when the power supply to set the controls. • House fuse...
... and contact an authorized servicer. Cord is set properly. Replace cord/plug. • Controls are not the result of oven. Follow the instructions under Oven Light to correct problem. It may not be sure. Contact cabinet maker to replace or tighten the bulb. ENTIRE... fuse and screw or engage circuit breaker securely. The range cannot be not level. Push CANCEL pad to Common Problems 51 I M P O R TA N T Before calling for service, review this list. Contact your local electric company. • Short in , or when the power supply to set the controls. • House fuse...
Use and Care Manual
Page 52
... meat and the broiler. This is normal, especially for high oven temperatures, pie spillovers or for quick searing operation. • Meat not properly prepared. Follow instructions under "Using the Self-Clean Feature". Remove excess fat from top of oven, frame of oven. Grease or food spatters cause excessive smoking. Clean these...
... meat and the broiler. This is normal, especially for high oven temperatures, pie spillovers or for quick searing operation. • Meat not properly prepared. Follow instructions under "Using the Self-Clean Feature". Remove excess fat from top of oven, frame of oven. Grease or food spatters cause excessive smoking. Clean these...
Use and Care Manual
Page 54
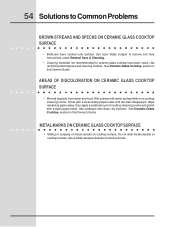
See Ceramic-Glass Cooktop section in this Owner's Guide. Scrub with water and sprinkle on a cooktop cleaning creme. Use cookware with a clean paper towel. See instructions under General Care & Cleaning. • Cleaning materials not recommended for ceramic-glass cooktop have cooked onto surface. Wet surface with a clean damp paper towel until ...
See Ceramic-Glass Cooktop section in this Owner's Guide. Scrub with water and sprinkle on a cooktop cleaning creme. Use cookware with a clean paper towel. See instructions under General Care & Cleaning. • Cleaning materials not recommended for ceramic-glass cooktop have cooked onto surface. Wet surface with a clean damp paper towel until ...
Use and Care Manual
Page 56
...warranty only applies in the USA, Puerto Rico and Canada. Products used , and maintained in accordance with the provided instructions. ELECTROLUX SHALL NOT BE LIABLE FOR CONSEQUENTIAL OR INCIDENTAL DAMAGES SUCH AS PROPERTY DAMAGE AND INCIDENTAL EXPENSES RESULTING FROM ANY BREACH OF ...cooktop or radiant surface element of your appliance (excluding built-in and free-standing range appliances) is covered by a two through 5th years from your original date of purchase, Electrolux will repair or replace any obligations under this warranty. 5. Product features or specifications...
...warranty only applies in the USA, Puerto Rico and Canada. Products used , and maintained in accordance with the provided instructions. ELECTROLUX SHALL NOT BE LIABLE FOR CONSEQUENTIAL OR INCIDENTAL DAMAGES SUCH AS PROPERTY DAMAGE AND INCIDENTAL EXPENSES RESULTING FROM ANY BREACH OF ...cooktop or radiant surface element of your appliance (excluding built-in and free-standing range appliances) is covered by a two through 5th years from your original date of purchase, Electrolux will repair or replace any obligations under this warranty. 5. Product features or specifications...
