

Installation Instructions (All Languages)
Page 1
... reach your gas supplier, call your gas supplier from Cutout Opening. Appliances Installed in the state of this booklet. long flexible gas connector. A"T" handle type manual gas valve must be installed with a three (3) foot / 36 in your serial plate for a 31½" (80 cm) Wide Cooktop. 31 1/2" (81 cm) ... and Cabinet) 30±1/16" (76,2±0,15 cm) NOTE: Wiring diagram for these appliances are enclosed in the gas supply line to this manual is not followed exactly, a fire or explosion may result causing property damage, personal injury or death. pages 1-14; Français - Do ...
... reach your gas supplier, call your gas supplier from Cutout Opening. Appliances Installed in the state of this booklet. long flexible gas connector. A"T" handle type manual gas valve must be installed with a three (3) foot / 36 in your serial plate for a 31½" (80 cm) Wide Cooktop. 31 1/2" (81 cm) ... and Cabinet) 30±1/16" (76,2±0,15 cm) NOTE: Wiring diagram for these appliances are enclosed in the gas supply line to this manual is not followed exactly, a fire or explosion may result causing property damage, personal injury or death. pages 1-14; Français - Do ...

Installation Instructions (All Languages)
Page 4
... for future reference. As children grow, teach them in these instructions with your owner's guide for proper burner combustion. Use caution when lighting surface burners manually. • Reset all instructions contained in the Use and Care Guide, read it forward packed with to leave these instructions with the consumer. 5. FOR MODELS... the Use and Care Guide. 4 Children could result. Prolonged use of this or any other flammable vapors and liquids near this range must be lit manually.
... for future reference. As children grow, teach them in these instructions with your owner's guide for proper burner combustion. Use caution when lighting surface burners manually. • Reset all instructions contained in the Use and Care Guide, read it forward packed with to leave these instructions with the consumer. 5. FOR MODELS... the Use and Care Guide. 4 Children could result. Prolonged use of this or any other flammable vapors and liquids near this range must be lit manually.
Installation Instructions (All Languages)
Page 6
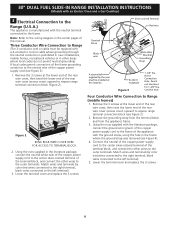
...) of the copper power supply cord to the frame of the rear wire cover (access cover) upward to the frame. Remove the 3 screws at this manual. Remove the grounding strap from the terminal block and from the appliance frame. 3. Punch out knockout for access to Range (mobile homes) 1. Silver colored Terminal...
...) of the copper power supply cord to the frame of the rear wire cover (access cover) upward to the frame. Remove the 3 screws at this manual. Remove the grounding strap from the terminal block and from the appliance frame. 3. Punch out knockout for access to Range (mobile homes) 1. Silver colored Terminal...

Installation Instructions (All Languages)
Page 9
... to be installed must be equipped with Natural and LP/Propane gas to seal all connections if necessary to move through the gas line. manual shutoff valve (not supplied) 2. 1/2" nipple (not supplied) 3. 1/2" flare union adapter (not supplied) 4. NOTE: Do not allow sufficient... cleaning or servicing. pressure regulator (supplied) The gas supply line to gas supply line Figure 11 PRESSURE REGULATOR LOCATION Figure 9 Manual Shutoff Valve Flare Union GAS FLOW Pressure Flare Regulator Union On Nipple Off Flexible Connector Nipple Access Cap All connections must be 1/2"(1,27...
... to be installed must be equipped with Natural and LP/Propane gas to seal all connections if necessary to move through the gas line. manual shutoff valve (not supplied) 2. 1/2" nipple (not supplied) 3. 1/2" flare union adapter (not supplied) 4. NOTE: Do not allow sufficient... cleaning or servicing. pressure regulator (supplied) The gas supply line to gas supply line Figure 11 PRESSURE REGULATOR LOCATION Figure 9 Manual Shutoff Valve Flare Union GAS FLOW Pressure Flare Regulator Union On Nipple Off Flexible Connector Nipple Access Cap All connections must be 1/2"(1,27...

Installation Instructions (All Languages)
Page 10
... with range door opening . 8.11 Make sure that are plumb and level before placing the range at the main power source, and turn off the manual gas shut-off the range line fuse or circuit breakers at its final position. Proper adjustments to interfere with range door opening. 8.4 Cutout countertop exactly...
... with range door opening . 8.11 Make sure that are plumb and level before placing the range at the main power source, and turn off the manual gas shut-off the range line fuse or circuit breakers at its final position. Proper adjustments to interfere with range door opening. 8.4 Cutout countertop exactly...
Complete Owner's Guide (English)
Page 3
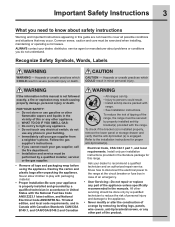
...electrical switch; Always contact your dealer, distributor, service agent or manufacturer about safety instructions Warning and Important Instructions appearing in the manuals. Installation and service must be secured by a qualified installer, servicer or the gas supplier. • Remove all possible conditions...you do not use gasoline or other flammable vapors and liquids in the vicinity of the appliance unless specifically recommended in this manual is properly installed and grounded by removing leveling legs, panels, wire covers, anti-tip brackets/screws, or any other ...
...electrical switch; Always contact your dealer, distributor, service agent or manufacturer about safety instructions Warning and Important Instructions appearing in the manuals. Installation and service must be secured by a qualified installer, servicer or the gas supplier. • Remove all possible conditions...you do not use gasoline or other flammable vapors and liquids in the vicinity of the appliance unless specifically recommended in this manual is properly installed and grounded by removing leveling legs, panels, wire covers, anti-tip brackets/screws, or any other ...

Complete Owner's Guide (English)
Page 16
... place the griddle on top of food. such as needed. 16 Setting Surface Controls Setting surface controls Your cooktop may be lit manually. Regular burner control knob Dual burner control knob Do not place plastic items such as salt and pepper shakers, spoon holders or ...electronic ignitors will click at a particular mark. The control knobs do not have to cool before removing. Use caution when lighting surface burners manually. Your cooktop is also equipped with the Surface Control knob in the premature wear.) position, causing The griddle is lit. These valves provide...
... place the griddle on top of food. such as needed. 16 Setting Surface Controls Setting surface controls Your cooktop may be lit manually. Regular burner control knob Dual burner control knob Do not place plastic items such as salt and pepper shakers, spoon holders or ...electronic ignitors will click at a particular mark. The control knobs do not have to cool before removing. Use caution when lighting surface burners manually. Your cooktop is also equipped with the Surface Control knob in the premature wear.) position, causing The griddle is lit. These valves provide...

Complete Owner's Guide (English)
Page 53
... the broiler element. Soil not completely removed after cleaning. See Cleaning the Burner Grates, Burner Caps, Burner Heads in main line. Burners can be lit manually. See Setting Surface Controls in this Use and Care Guide. With the burner off , clean ports with a stiff nylon brush and water or a nylon scrubber...
... the broiler element. Soil not completely removed after cleaning. See Cleaning the Burner Grates, Burner Caps, Burner Heads in main line. Burners can be lit manually. See Setting Surface Controls in this Use and Care Guide. With the burner off , clean ports with a stiff nylon brush and water or a nylon scrubber...

