
Installation Instructions (All Languages)
Page 1
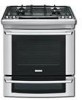
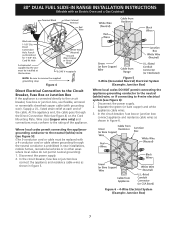
...(12,7 cm Min.) From Wall Both Sides (see Note 3) 18" Min. (45,7 cm) Min. 30" DUAL FUEL SLIDE-IN RANGE INSTALLATION INSTRUCTIONS (Models with backguard 36 5/8" (93 cm) Max. 35 ¾" (90,8 cm) Min. WALL 30" Min. (76,2 cm Min.) These surfaces should match the E cutout width. 24" Min. (61 ...and 2" to 4" (5,1 cm to Clear Space for applicable agency certification FOR YOUR SAFETY: - DEPTH TO FRONT OF RANGE 28 5/16" (71,9 cm) E. CUTOUT WIDTH* (Countertop and Cabinet) 30±1/16" (76,2±0,15 cm) NOTE: Wiring diagram for these appliances are enclosed in . A English -...
...(12,7 cm Min.) From Wall Both Sides (see Note 3) 18" Min. (45,7 cm) Min. 30" DUAL FUEL SLIDE-IN RANGE INSTALLATION INSTRUCTIONS (Models with backguard 36 5/8" (93 cm) Max. 35 ¾" (90,8 cm) Min. WALL 30" Min. (76,2 cm Min.) These surfaces should match the E cutout width. 24" Min. (61 ...and 2" to 4" (5,1 cm to Clear Space for applicable agency certification FOR YOUR SAFETY: - DEPTH TO FRONT OF RANGE 28 5/16" (71,9 cm) E. CUTOUT WIDTH* (Countertop and Cabinet) 30±1/16" (76,2±0,15 cm) NOTE: Wiring diagram for these appliances are enclosed in . A English -...
Installation Instructions (All Languages)
Page 2
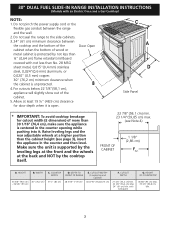
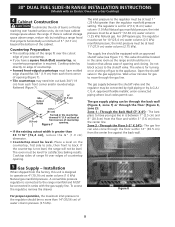
... 21 3/4" (55,2 cm) Min. 22 1/8" (56,2 cm) Max 24" (61 cm) Min. HEIGHT B. WIDTH 35 5/8" (90,5 cm) 30" (76,2 cm) - 36 5/8" (93 cm) C. DEPTH TO FRONT OF RANGE 28 5/16" (71,9 cm) E. For cutouts below 22 7/8"(58,1 cm), appliance will slightly show out of wood or metal cabinet is...,2 cm) minimum clearance when the cabinet is centered in the counter and then level. COOKTOP WIDTH 31½" (80 cm) D. 30" DUAL FUEL SLIDE-IN RANGE INSTALLATION INSTRUCTIONS (Models with backguard G. HEIGHT OF COUNTERTOP 36 5/8" (93 cm) Max. 35 3/4" (90,8 cm) Min. 2 A. Do not pinch the power supply...
... 21 3/4" (55,2 cm) Min. 22 1/8" (56,2 cm) Max 24" (61 cm) Min. HEIGHT B. WIDTH 35 5/8" (90,5 cm) 30" (76,2 cm) - 36 5/8" (93 cm) C. DEPTH TO FRONT OF RANGE 28 5/16" (71,9 cm) E. For cutouts below 22 7/8"(58,1 cm), appliance will slightly show out of wood or metal cabinet is...,2 cm) minimum clearance when the cabinet is centered in the counter and then level. COOKTOP WIDTH 31½" (80 cm) D. 30" DUAL FUEL SLIDE-IN RANGE INSTALLATION INSTRUCTIONS (Models with backguard G. HEIGHT OF COUNTERTOP 36 5/8" (93 cm) Max. 35 3/4" (90,8 cm) Min. 2 A. Do not pinch the power supply...

Installation Instructions (All Languages)
Page 3
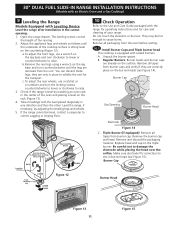
...7 should NOT rest directly on the countertop (see illustration 2) or else it could cause damage to Clear Space for the transport. 5 Slide the unit into the cabinet. Metal Flange After the installation, MAKE SURE that the height from the floor to underside of cooktop frame should...two (2) cabinet 2 sides (H1-4), front and back (Illustration 1) from the floor Shave Raised Edge to the cooktop voiding the warranty. 30" DUAL FUEL SLIDE-IN RANGE INSTALLATION INSTRUCTIONS (Models with the center of the cabinet cut -out should be flat and leveled (see hatched area on illustration 1). H4 ...
...7 should NOT rest directly on the countertop (see illustration 2) or else it could cause damage to Clear Space for the transport. 5 Slide the unit into the cabinet. Metal Flange After the installation, MAKE SURE that the height from the floor to underside of cooktop frame should...two (2) cabinet 2 sides (H1-4), front and back (Illustration 1) from the floor Shave Raised Edge to the cooktop voiding the warranty. 30" DUAL FUEL SLIDE-IN RANGE INSTALLATION INSTRUCTIONS (Models with the center of the cabinet cut -out should be flat and leveled (see hatched area on illustration 1). H4 ...

Installation Instructions (All Languages)
Page 4
... and Setups), ANSI Z225.1/NFPA 501A-latest edition, or with the National Fuel Gas Code ANSI Z223.1-latest edition. As children grow, teach them in an area covered with an Electric Oven and a Gas Cooktop) Important Notes to the range. 3. Read all instructions contained in the Use and Care Guide. 4... if the bracket is unattended. Follow the precleaning instructions in these instructions with the National Electrical Code ANSI/NFPA No. 70-latest edition. 30" DUAL FUEL SLIDE-IN RANGE INSTALLATION INSTRUCTIONS (Models with linoleum or any other synthetic floor covering, make sure the...
... and Setups), ANSI Z225.1/NFPA 501A-latest edition, or with the National Fuel Gas Code ANSI Z223.1-latest edition. As children grow, teach them in an area covered with an Electric Oven and a Gas Cooktop) Important Notes to the range. 3. Read all instructions contained in the Use and Care Guide. 4... if the bracket is unattended. Follow the precleaning instructions in these instructions with the National Electrical Code ANSI/NFPA No. 70-latest edition. 30" DUAL FUEL SLIDE-IN RANGE INSTALLATION INSTRUCTIONS (Models with linoleum or any other synthetic floor covering, make sure the...
Installation Instructions (All Languages)
Page 5
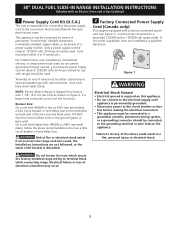
30" DUAL FUEL SLIDE-IN RANGE INSTALLATION INSTRUCTIONS (Models with 4800W or less at 125/250 volts 30 Amps should be connected to a grounded 120/240 volt or 120/208 volt range outlet. Cord must have either closed loop or open-end spade lugs with upturned ends. Cord must be used ,... as shown on both side of a power supply cord kit. Failure to the electrical supply until appliance is recommended on figure 3. NOTE: Electric Slide-in a fire, personal injury or electrical shock. This appliance may occur. 5 Only a power supply cord kit rated at 240V (see serial...
30" DUAL FUEL SLIDE-IN RANGE INSTALLATION INSTRUCTIONS (Models with 4800W or less at 125/250 volts 30 Amps should be connected to a grounded 120/240 volt or 120/208 volt range outlet. Cord must have either closed loop or open-end spade lugs with upturned ends. Cord must be used ,... as shown on both side of a power supply cord kit. Failure to the electrical supply until appliance is recommended on figure 3. NOTE: Electric Slide-in a fire, personal injury or electrical shock. This appliance may occur. 5 Only a power supply cord kit rated at 240V (see serial...
Installation Instructions (All Languages)
Page 6
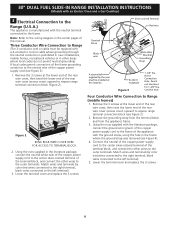
...here for 1-3/8" Dia. Match wires and terminals by color (red wires connected to the right terminal, black wires connected to Range (mobile homes) 1. Silver colored Terminal Red wire Terminal Block Black wire CMoorudnPtliantge White Wire (Neutral) Grounding Strap A strainrelief ... lower end of this location To 240 V receptacle Figure 3 1-1/8" Dia. 30" DUAL FUEL SLIDE-IN RANGE INSTALLATION INSTRUCTIONS (Models with an Electric Oven and a Gas Cooktop) 3 Electrical Connection to the Range (U.S.A.) This appliance is prohibited in new installations, mobile homes, recreational vehicles or...
...here for 1-3/8" Dia. Match wires and terminals by color (red wires connected to the right terminal, black wires connected to Range (mobile homes) 1. Silver colored Terminal Red wire Terminal Block Black wire CMoorudnPtliantge White Wire (Neutral) Grounding Strap A strainrelief ... lower end of this location To 240 V receptacle Figure 3 1-1/8" Dia. 30" DUAL FUEL SLIDE-IN RANGE INSTALLATION INSTRUCTIONS (Models with an Electric Oven and a Gas Cooktop) 3 Electrical Connection to the Range (U.S.A.) This appliance is prohibited in new installations, mobile homes, recreational vehicles or...
Installation Instructions (All Languages)
Page 7
30" DUAL FUEL SLIDE-IN RANGE INSTALLATION INSTRUCTIONS (Models with grounding wire). Supply a U.L. Figure 5 3-Wire (Grounded Neutral) Electrical System (Example: Junction Box) Where local codes DO NOT permit connecting the appliance-...
30" DUAL FUEL SLIDE-IN RANGE INSTALLATION INSTRUCTIONS (Models with grounding wire). Supply a U.L. Figure 5 3-Wire (Grounded Neutral) Electrical System (Example: Junction Box) Where local codes DO NOT permit connecting the appliance-...
Installation Instructions (All Languages)
Page 8
...allows ease of opening . Wait a few minutes for 4"(10,16 cm) water column (1.0 kPa) Natural gas manifold pressure; 30" DUAL FUEL SLIDE-IN RANGE INSTALLATION INSTRUCTIONS (Models with an Electric Oven and a Gas Cooktop) 4 Cabinet Construction To eliminate the risk of burns or fire ...by reaching over heated surface units, do not have cabinet storage space above range, reduce risk by A.G.A./ C.G.A.-approved flexible metallic union-connected piping where local codes permit use. Min. Place a level on 4"(10,16 cm) ...
...allows ease of opening . Wait a few minutes for 4"(10,16 cm) water column (1.0 kPa) Natural gas manifold pressure; 30" DUAL FUEL SLIDE-IN RANGE INSTALLATION INSTRUCTIONS (Models with an Electric Oven and a Gas Cooktop) 4 Cabinet Construction To eliminate the risk of burns or fire ...by reaching over heated surface units, do not have cabinet storage space above range, reduce risk by A.G.A./ C.G.A.-approved flexible metallic union-connected piping where local codes permit use. Min. Place a level on 4"(10,16 cm) ...

Installation Instructions (All Languages)
Page 9
...shutting off gas to the appliance. Check for gas to move through the gas line. Isolate the range from gas connections. The regulator is for cleaning or servicing. 30" DUAL FUEL SLIDE-IN RANGE INSTALLATION INSTRUCTIONS (Models with Natural and LP/Propane gas to seal all gas connections. If flexible ...shutoff valve during any pressure testing of the main shutoff valve and have easy access to get pinched between the wall and the range. to appliance Shutoff Valve Open position to check for leaks with an approved manual shutoff valve. When using flexible gas conduit ...
...shutting off gas to the appliance. Check for gas to move through the gas line. Isolate the range from gas connections. The regulator is for cleaning or servicing. 30" DUAL FUEL SLIDE-IN RANGE INSTALLATION INSTRUCTIONS (Models with Natural and LP/Propane gas to seal all gas connections. If flexible ...shutoff valve during any pressure testing of the main shutoff valve and have easy access to get pinched between the wall and the range. to appliance Shutoff Valve Open position to check for leaks with an approved manual shutoff valve. When using flexible gas conduit ...

Installation Instructions (All Languages)
Page 10
... the countertop at its final position. Manipulate with the range. 8.8 To provide an optimum installation, the top surface of the range, but is not a requirement for the conversion. Follow the instructions under "Leveling the Range". 8.13 Slide the range into the cut -out opening . Installation With End...Natural gas or LP/ Propane gas. If you wish to clear 31½" (80 cm) wide range top rim. 8.3 Install cabinet doors 32" (81.3 cm) min. 30" DUAL FUEL SLIDE-IN RANGE INSTALLATION INSTRUCTIONS (Models with an Electric Oven and a Gas Cooktop) 6 LP/Propane Gas Conversion This appliance...
... the countertop at its final position. Manipulate with the range. 8.8 To provide an optimum installation, the top surface of the range, but is not a requirement for the conversion. Follow the instructions under "Leveling the Range". 8.13 Slide the range into the cut -out opening . Installation With End...Natural gas or LP/ Propane gas. If you wish to clear 31½" (80 cm) wide range top rim. 8.3 Install cabinet doors 32" (81.3 cm) min. 30" DUAL FUEL SLIDE-IN RANGE INSTALLATION INSTRUCTIONS (Models with an Electric Oven and a Gas Cooktop) 6 LP/Propane Gas Conversion This appliance...
Installation Instructions (All Languages)
Page 11
...legs, they are removed from burner caps and verify if they are already on the burner heads (see Figure 15). Check if the range is level by adjusting the leveling legs and wheels. 5. B. Regular Burners: Burner heads and burner caps are correctly place on the ...the burner grates. Be careful not to correct sagging or sloping floor. 30" DUAL FUEL SLIDE-IN RANGE INSTALLATION INSTRUCTIONS (Models with an Electric Oven and a Gas Cooktop) 9 Leveling the Range Models Equipped with Leveling Device Level the range after installation in burner head (see Figure 14). Remove all tapes from ...
...legs, they are removed from burner caps and verify if they are already on the burner heads (see Figure 15). Check if the range is level by adjusting the leveling legs and wheels. 5. B. Regular Burners: Burner heads and burner caps are correctly place on the ...the burner grates. Be careful not to correct sagging or sloping floor. 30" DUAL FUEL SLIDE-IN RANGE INSTALLATION INSTRUCTIONS (Models with an Electric Oven and a Gas Cooktop) 9 Leveling the Range Models Equipped with Leveling Device Level the range after installation in burner head (see Figure 14). Remove all tapes from ...
Installation Instructions (All Languages)
Page 12
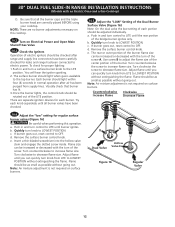
... or decreased with an Electric Oven and a Gas Cooktop) D. Turn clockwise to decrease flame size. B A Dual Valve Hollow Valve Stem Figure 16 Regular Valve 12 30" DUAL FUEL SLIDE-IN RANGE INSTALLATION INSTRUCTIONS (Models with the turn of the screw A. The surface burner should be increased or decreased with the...the surface burner control knob. Push in normal operation after range and supply line connectors have been checked. 10.5 Adjust the "LOW" Setting of the Dual Burner Surface Valve (Figure 16) Note: On the dual valve the low setting of the burner flame size can be...
... or decreased with an Electric Oven and a Gas Cooktop) D. Turn clockwise to decrease flame size. B A Dual Valve Hollow Valve Stem Figure 16 Regular Valve 12 30" DUAL FUEL SLIDE-IN RANGE INSTALLATION INSTRUCTIONS (Models with the turn of the screw A. The surface burner should be increased or decreased with the...the surface burner control knob. Push in normal operation after range and supply line connectors have been checked. 10.5 Adjust the "LOW" Setting of the Dual Burner Surface Valve (Figure 16) Note: On the dual valve the low setting of the burner flame size can be...

Installation Instructions (All Languages)
Page 13
... occurrences that you the rating of the burners, the type of fuel and the pressure the range was adjusted for operation. Refer to 350°F (177°C) for or making inquiries about your range. Your serial plate also tells you verify the operation of defective ...the functions has been factory checked before shipping. Follow the instructions for a self-cleaning cycle, the upper element should become red. 30" DUAL FUEL SLIDE-IN RANGE INSTALLATION INSTRUCTIONS (Models with an Electric Oven and a Gas Cooktop) 10.6 Operation of the cycle. Clean-When the oven is set...
... occurrences that you the rating of the burners, the type of fuel and the pressure the range was adjusted for operation. Refer to 350°F (177°C) for or making inquiries about your range. Your serial plate also tells you verify the operation of defective ...the functions has been factory checked before shipping. Follow the instructions for a self-cleaning cycle, the upper element should become red. 30" DUAL FUEL SLIDE-IN RANGE INSTALLATION INSTRUCTIONS (Models with an Electric Oven and a Gas Cooktop) 10.6 Operation of the cycle. Clean-When the oven is set...
Installation Instructions (All Languages)
Page 14
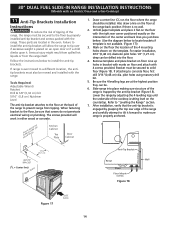
...Figure 17)) 3. Unfold paper template and place it flat on the floor with the range. For easier installation, 3/16"(0,48 cm) diameter pilot holes 1/2"(1,27 cm) deep can be. 6. 30" DUAL FUEL SLIDE-IN RANGE INSTALLATION INSTRUCTIONS (Models with an Electric Oven and a Gas Cooktop) 11 Anti-Tip ...Brackets Installation Instructions To reduce the risk of tipping of the range, the range must be secured to the floor by properly installed ...
...Figure 17)) 3. Unfold paper template and place it flat on the floor with the range. For easier installation, 3/16"(0,48 cm) diameter pilot holes 1/2"(1,27 cm) deep can be. 6. 30" DUAL FUEL SLIDE-IN RANGE INSTALLATION INSTRUCTIONS (Models with an Electric Oven and a Gas Cooktop) 11 Anti-Tip ...Brackets Installation Instructions To reduce the risk of tipping of the range, the range must be secured to the floor by properly installed ...


