
Use and Care Manual
Page 29
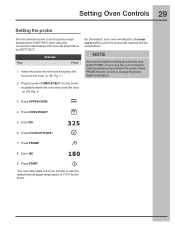
... default internal target temperature of 170°F for 325°F/162°C. Press START *You may skip steps 6-9 if you may press PROBE once to review or change the probe target temperature. 2. Setting Oven Controls 29 Setting the probe See the example below to the keep warm setting once the probe...
... default internal target temperature of 170°F for 325°F/162°C. Press START *You may skip steps 6-9 if you may press PROBE once to review or change the probe target temperature. 2. Setting Oven Controls 29 Setting the probe See the example below to the keep warm setting once the probe...

Use and Care Manual
Page 33
... place the turkey in the oven -p. 28 Fig 1. 2. Plug the probe into the thickest part of the skin. Doing so may press PROBE once to review the probe set temperature, the oven will not start until the probe has been plugged in juices and flavors. Setting Oven Controls 33 About Perfect...
... place the turkey in the oven -p. 28 Fig 1. 2. Plug the probe into the thickest part of the skin. Doing so may press PROBE once to review the probe set temperature, the oven will not start until the probe has been plugged in juices and flavors. Setting Oven Controls 33 About Perfect...
Use and Care Manual
Page 37
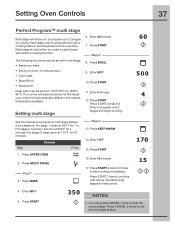
...with a cooking feature, set from 150°F/66°C to the nearest temperature available. If you enter a temperature beyond this range your control will allow you to program up to continue with review. Press START 11. For stage 1, bake at 350°F for 15 minutes. For stage 3, keep warm after a cooking ...For stage 2, to clear the current stage. Press BAKE Stage 3 13. Press KEEP WARM 14. Press START a total of 2 times to start cooking immediately. See Reviewing stages for instructions. 4. Press START NOTES • You may be set temperature and a cook time.
...with a cooking feature, set from 150°F/66°C to the nearest temperature available. If you enter a temperature beyond this range your control will allow you to program up to continue with review. Press START 11. For stage 1, bake at 350°F for 15 minutes. For stage 3, keep warm after a cooking ...For stage 2, to clear the current stage. Press BAKE Stage 3 13. Press KEEP WARM 14. Press START a total of 2 times to start cooking immediately. See Reviewing stages for instructions. 4. Press START NOTES • You may be set temperature and a cook time.

Use and Care Manual
Page 38
...programmed. See the example below to view the total cooking time for all stages programmed press MULTI STAGE once. To return to the review screen to review/edit the cooking feature, set temperature and cook time. Enter new temperature and cook time. 4. Step Example Press 1. Use numeric... key pad, select stage to begin cooking. Fig. 1 Select new cooking feature 3. Press START 2 times to review. 2. Press START 1 time to return back to the review screen to a review screen -Fig. 1. After you will be directed to edit other stages.
...programmed. See the example below to view the total cooking time for all stages programmed press MULTI STAGE once. To return to the review screen to review/edit the cooking feature, set temperature and cook time. Enter new temperature and cook time. 4. Step Example Press 1. Use numeric... key pad, select stage to begin cooking. Fig. 1 Select new cooking feature 3. Press START 2 times to review. 2. Press START 1 time to return back to the review screen to a review screen -Fig. 1. After you will be directed to edit other stages.
Use and Care Manual
Page 59
...is not level Cannot move appliance easily. Contact builder or installer to make range appear not level. See "Cleaning cooktop and parts" in this appliance. Be sure cabinets are square & have sufficient room for service, review the following list. Surface burner flame burns half way around. • ...for service Surface burners do not light Before you call Solution • Be sure floor is level, strong & stable enough to adequately support range. • If floor is full. With the burners OFF, use a small-gauge wire or needle to clean ports. Provide sufficient space ...
...is not level Cannot move appliance easily. Contact builder or installer to make range appear not level. See "Cleaning cooktop and parts" in this appliance. Be sure cabinets are square & have sufficient room for service, review the following list. Surface burner flame burns half way around. • ...for service Surface burners do not light Before you call Solution • Be sure floor is level, strong & stable enough to adequately support range. • If floor is full. With the burners OFF, use a small-gauge wire or needle to clean ports. Provide sufficient space ...
