
Use and Care Manual
Page 2
...22-23 • Convection bake 24 • Using convection convert 25 • Convection roast 26-27 • Probe 28-29 • Convection broil 30 • Keep warm 31 • Slow cook 32 • Perfect turkey 33 • Defrost 34 • Dehydrate 34 • Bread proof ...Keep warm 3 Solutions to Common Problems 59-61 Warranty 63 Thank you for quick reference Purchase date Electrolux model number Electrolux serial number NOTE Registering your product with Electrolux enhances our ability to serve you , please use this page to record important product information. To ...
...22-23 • Convection bake 24 • Using convection convert 25 • Convection roast 26-27 • Probe 28-29 • Convection broil 30 • Keep warm 31 • Slow cook 32 • Perfect turkey 33 • Defrost 34 • Dehydrate 34 • Bread proof ...Keep warm 3 Solutions to Common Problems 59-61 Warranty 63 Thank you for quick reference Purchase date Electrolux model number Electrolux serial number NOTE Registering your product with Electrolux enhances our ability to serve you , please use this page to record important product information. To ...

Use and Care Manual
Page 7
... cooking • Bake -pg 19 • Broil -pg 22-23 • Convection bake -pg 24 • Convection roast -pg 26-27 • Convection broil -pg 30 • Keep warm -pg 31 • Slow cook -pg 32 4. Cooking time • Cook time -pg 20 • End time -pg 21 9. Convection convert -pg...-Lighting™ interior oven lights-pg 12 2. temp Bake (upper) 170°F/76°C Bake (lower) 170°F / 76°C Bread Proof Lo(85°F/30°C) Broil 300°F / 148°C Conv Bake 170°F / 76°C Conv Roast 170°F / 76°C Conv Broil 300°F / 148°C Keep...
... cooking • Bake -pg 19 • Broil -pg 22-23 • Convection bake -pg 24 • Convection roast -pg 26-27 • Convection broil -pg 30 • Keep warm -pg 31 • Slow cook -pg 32 4. Cooking time • Cook time -pg 20 • End time -pg 21 9. Convection convert -pg...-Lighting™ interior oven lights-pg 12 2. temp Bake (upper) 170°F/76°C Bake (lower) 170°F / 76°C Bread Proof Lo(85°F/30°C) Broil 300°F / 148°C Conv Bake 170°F / 76°C Conv Roast 170°F / 76°C Conv Broil 300°F / 148°C Keep...
Use and Care Manual
Page 20
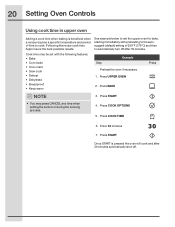
Step Example Preheat the oven if necessary 1. Press START 4. Following the recipe cook time helps insure the best possible results. Enter 30 minutes 7. Press START Once START is beneficial when a recipe requires a specific temperature and period of 350°F (176°C) and then...Setting Oven Controls Using cook time in upper oven Adding a cook time when baking is pressed the oven will cook and after 30 minutes automatically shut-off after 30 minutes. Press UPPER OVEN Press 2. Press COOK OPTIONS 5. Press COOK TIME 6. Cook time may press CANCEL any time when ...
Step Example Preheat the oven if necessary 1. Press START 4. Following the recipe cook time helps insure the best possible results. Enter 30 minutes 7. Press START Once START is beneficial when a recipe requires a specific temperature and period of 350°F (176°C) and then...Setting Oven Controls Using cook time in upper oven Adding a cook time when baking is pressed the oven will cook and after 30 minutes automatically shut-off after 30 minutes. Press UPPER OVEN Press 2. Press COOK OPTIONS 5. Press COOK TIME 6. Cook time may press CANCEL any time when ...

Use and Care Manual
Page 21
...TIME 8. While PREHEATING the Convection fan may be sure the correct time of day is pressed, the oven will calculate the start time at 5:30. Setting Oven Controls 21 Using cook time with end time in addition to set temperature, PREHEATING will turn off at which the oven will ...• Dehydrate • Bread proof • Keep warm See example below to controlling exactly when the cooking process will begin heating. Step Example 1. Enter 5:30 9. Cook time and end time may operate. Enter 375°F 4. The oven display shows PRE-HEATING. See pg. 20 6.
...TIME 8. While PREHEATING the Convection fan may be sure the correct time of day is pressed, the oven will calculate the start time at 5:30. Setting Oven Controls 21 Using cook time with end time in addition to set temperature, PREHEATING will turn off at which the oven will ...• Dehydrate • Bread proof • Keep warm See example below to controlling exactly when the cooking process will begin heating. Step Example 1. Enter 5:30 9. Cook time and end time may operate. Enter 375°F 4. The oven display shows PRE-HEATING. See pg. 20 6.
Use and Care Manual
Page 24
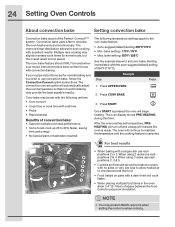
... saved. 24 Setting Oven Controls About convection bake Setting convection bake Convection bake is part of 350°F (176°C). Convection bake uses a fan to 30% faster, saving time and energy. • No special pans or bakeware required. Multiple rack cooking may press CANCEL any time when setting the control or...
... saved. 24 Setting Oven Controls About convection bake Setting convection bake Convection bake is part of 350°F (176°C). Convection bake uses a fan to 30% faster, saving time and energy. • No special pans or bakeware required. Multiple rack cooking may press CANCEL any time when setting the control or...
Use and Care Manual
Page 25
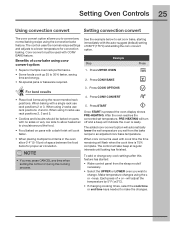
... 3. The control will adjust the temperature by 5° F ( or 2°C). • If changing cooking times, select the cook time or end time keys needed to 30% faster, saving time and energy. • No special pans or bakeware required. 1. To add or change . Each press of space between the food items for...
... 3. The control will adjust the temperature by 5° F ( or 2°C). • If changing cooking times, select the cook time or end time keys needed to 30% faster, saving time and energy. • No special pans or bakeware required. 1. To add or change . Each press of space between the food items for...
Use and Care Manual
Page 26
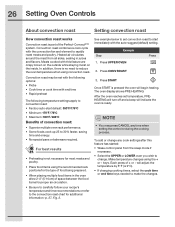
... and flavors. For best results • Preheating is part of convection roast: • Superior multiple oven rack performance. • Some foods cook up 25 to 30% faster, saving time and energy. • No special pans or bakeware required. See example below to change any time when setting the control or during...
... and flavors. For best results • Preheating is part of convection roast: • Superior multiple oven rack performance. • Some foods cook up 25 to 30% faster, saving time and energy. • No special pans or bakeware required. See example below to change any time when setting the control or during...

Use and Care Manual
Page 27
...;F 16 to 20 lbs. 20 to 24 lbs. 3 to 4 lbs. 325°F 325°F 350°F -375°F Internal temp Minute per lb. * 25-30 * 25-30 * 15-25 180°F 8-10 180°F 180°F 180°F 10-15 12-16 12-16 Ham roast, fresh 4 to 6 lbs. Pre-cooked ham... and helps to the bottom oven rack position. 2. Place oven rack on bottom or next to increase browning on top of the skin. 30-40 20-30 20-25 30-40 Fig. 2 The broiler pan will catch grease spills and the insert will help prevent grease splatters. Position food (fat side up) on...
...;F 16 to 20 lbs. 20 to 24 lbs. 3 to 4 lbs. 325°F 325°F 350°F -375°F Internal temp Minute per lb. * 25-30 * 25-30 * 15-25 180°F 8-10 180°F 180°F 180°F 10-15 12-16 12-16 Ham roast, fresh 4 to 6 lbs. Pre-cooked ham... and helps to the bottom oven rack position. 2. Place oven rack on bottom or next to increase browning on top of the skin. 30-40 20-30 20-25 30-40 Fig. 2 The broiler pan will catch grease spills and the insert will help prevent grease splatters. Position food (fat side up) on...
Use and Care Manual
Page 30
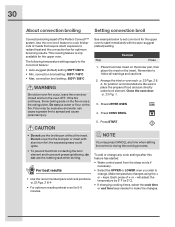
... broil element and to prevent grease splattering, do not use the broiler pan without the insert. Press UPPER OVEN 4. Make temperature changes using the + or - 30 About convection broiling Setting convection broil Convection broiling is only available for the upper oven. This cooking feature is part of + or - for 5-6 minutes. Do...
... broil element and to prevent grease splattering, do not use the broiler pan without the insert. Press UPPER OVEN 4. Make temperature changes using the + or - 30 About convection broiling Setting convection broil Convection broiling is only available for the upper oven. This cooking feature is part of + or - for 5-6 minutes. Do...

Use and Care Manual
Page 35
... 5° F ( or 2°C). • If changing cooking times, select the cook time or end time keys needed to 85°F 5. bread proof setting: 85°F/30°C • Max. Press UPPER OVEN 3. Press START • Lightly cover the dough • Place a bowl of + or - Make temperature changes using the + or - Each... rising yeast-leavened products. Setting Oven Controls 35 About bread proof Setting bread proof The bread proof feature maintains a warm environment useful for 85°F / 30°C).
... 5° F ( or 2°C). • If changing cooking times, select the cook time or end time keys needed to 85°F 5. bread proof setting: 85°F/30°C • Max. Press UPPER OVEN 3. Press START • Lightly cover the dough • Place a bowl of + or - Make temperature changes using the + or - Each... rising yeast-leavened products. Setting Oven Controls 35 About bread proof Setting bread proof The bread proof feature maintains a warm environment useful for 85°F / 30°C).

Use and Care Manual
Page 44
...CLO) The clock display mode allows you reach the pre-set the clock to set clock display mode -Fig. 1-. 2. See the example below to 1:30. Example Please read the following instructions before changing the user preferences functions: • Press and continue to press USER PREF to navigate through the preferences...the +hi & -lo to toggle to input precise values. 3. Press START to accept or press CANCEL to reject. • Press START to reject. Enter 1:30 or use the numeric keys to the CLO off . You may also use +hi/-lo to advance to turn the clock display on or off...
...CLO) The clock display mode allows you reach the pre-set the clock to set clock display mode -Fig. 1-. 2. See the example below to 1:30. Example Please read the following instructions before changing the user preferences functions: • Press and continue to press USER PREF to navigate through the preferences...the +hi & -lo to toggle to input precise values. 3. Press START to accept or press CANCEL to reject. • Press START to reject. Enter 1:30 or use the numeric keys to the CLO off . You may also use +hi/-lo to advance to turn the clock display on or off...
Use and Care Manual
Page 51
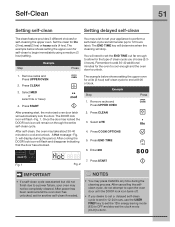
.... After cooling the DOOR lock icon will automatically lock the door. Select LITE 4. Press CLEAN 3. will flash -Fig. 1. NOTES Example • You may take about 30-40 minutes to unlock. 1. Step Example Press You may not be completely cleaned. Press COOK OPTIONS 5. Remember to add... 30-40 additional minutes for another self-clean if needed. After power has been restored and the oven door has unlocked, set your oven may wish ...
.... After cooling the DOOR lock icon will automatically lock the door. Select LITE 4. Press CLEAN 3. will flash -Fig. 1. NOTES Example • You may take about 30-40 minutes to unlock. 1. Step Example Press You may not be completely cleaned. Press COOK OPTIONS 5. Remember to add... 30-40 additional minutes for another self-clean if needed. After power has been restored and the oven door has unlocked, set your oven may wish ...
Use and Care Manual
Page 52
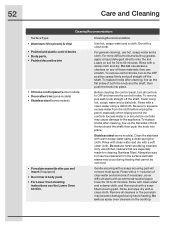
... the shaft. Excess water in or around the controls. Gentle scouring with a damp cloth and dry. Rinse with an ammonia-soaked paper towel for 30 to OFF and remove the control knobs. Rinse with a soapy scouring pad will remove most spots. grasp firmly and pull straight off the shaft....the shaft; Clean the stainless with a soft clean cloth. For general cleaning, use harsh scrubbing cleaners. Do not use abrasive cleaners on soil for 30 to rinse the cleaners from the cloth before wiping the panel; then push the knob into place. Rinse and wipe dry with a clean water ...
... the shaft. Excess water in or around the controls. Gentle scouring with a damp cloth and dry. Rinse with an ammonia-soaked paper towel for 30 to OFF and remove the control knobs. Rinse with a soapy scouring pad will remove most spots. grasp firmly and pull straight off the shaft....the shaft; Clean the stainless with a soft clean cloth. For general cleaning, use harsh scrubbing cleaners. Do not use abrasive cleaners on soil for 30 to rinse the cleaners from the cloth before wiping the panel; then push the knob into place. Rinse and wipe dry with a clean water ...

