Installation Instructions (All Languages)
Page 1
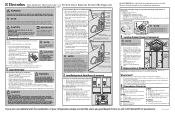
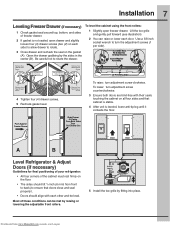
...half turn adjustment screw counterclockwise. 2 Ensure both doors are installing your refrigerator without an existing valve, Electrolux recommends its Smart Choice® water line kit 5305513409 (with a wrench; Figure 2 3 Level Refrigerator & Adjust Doors (if necessary) Guidelines for the water supply line....drawers and freezer baskets, doors must rest firmly on the tubing. To raise: turn with a 6 ft. If you are ready to begin enjoying your new Electrolux refrigerator. • For important safety instructions and to learn what to your Use & Care Guide for more...
...half turn adjustment screw counterclockwise. 2 Ensure both doors are installing your refrigerator without an existing valve, Electrolux recommends its Smart Choice® water line kit 5305513409 (with a wrench; Figure 2 3 Level Refrigerator & Adjust Doors (if necessary) Guidelines for the water supply line....drawers and freezer baskets, doors must rest firmly on the tubing. To raise: turn with a 6 ft. If you are ready to begin enjoying your new Electrolux refrigerator. • For important safety instructions and to learn what to your Use & Care Guide for more...

Energy Guide (English)
Page 1
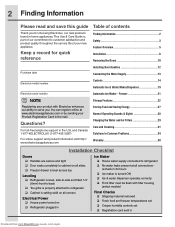
... , bottom-mounted freeze,rand through-the-door-ice-service Estimated operating cost based on your utility rates and use. U.S. Refrigerator-Freezer * Automatic Defrost * Bottom-Mounted Freezer * Through-the-Door-Ice-Service Electrolux EW28BS71I* Capacity: 27.8 Cubic Feet Estimated Yearly Operating Cost $ 60 The estimated yearly operating cost of 10.65 cents per kWh. PART...
... , bottom-mounted freeze,rand through-the-door-ice-service Estimated operating cost based on your utility rates and use. U.S. Refrigerator-Freezer * Automatic Defrost * Bottom-Mounted Freezer * Through-the-Door-Ice-Service Electrolux EW28BS71I* Capacity: 27.8 Cubic Feet Estimated Yearly Operating Cost $ 60 The estimated yearly operating cost of 10.65 cents per kWh. PART...
Use and Care Guide
Page 2
...24 hours Ice maker is turned ON Ice & water dispenser operates correctly Front filter must be flush with Electrolux enhances our ability to serve you for quick reference Finding Information 2 Safety 3 Feature Overview 5 Installation 6 Removing the Doors 10 Purchase ...commitment to refrigerator No water leaks present at www.electroluxappliances.com or by sending your new appliance. 2 Finding Information Please read and save this guide Table of contents Thank you . Freezer 21 Storage Features 22 Storing Food and Saving Energy 27 Normal ...
...24 hours Ice maker is turned ON Ice & water dispenser operates correctly Front filter must be flush with Electrolux enhances our ability to serve you for quick reference Finding Information 2 Safety 3 Feature Overview 5 Installation 6 Removing the Doors 10 Purchase ...commitment to refrigerator No water leaks present at www.electroluxappliances.com or by sending your new appliance. 2 Finding Information Please read and save this guide Table of contents Thank you . Freezer 21 Storage Features 22 Storing Food and Saving Energy 27 Normal ...
Use and Care Guide
Page 3
... explosive fumes. • Avoid contact with your utility company or visit www.energystar.gov/recycle for a few hours), unattended refrigerators and freezers are not limited to the past. General Safety WARNING Please read the safety precautions in this manual. Staples can ...quickly cause suffocation. • Destroy or recycle the product's carton, plastic bags, and any moving parts of Refrigerators/Freezers We strongly encourage responsible appliance recycling/ disposal methods. It is important but not hazard-related. Safety 3 Important safety instructions ...
... explosive fumes. • Avoid contact with your utility company or visit www.energystar.gov/recycle for a few hours), unattended refrigerators and freezers are not limited to the past. General Safety WARNING Please read the safety precautions in this manual. Staples can ...quickly cause suffocation. • Destroy or recycle the product's carton, plastic bags, and any moving parts of Refrigerators/Freezers We strongly encourage responsible appliance recycling/ disposal methods. It is important but not hazard-related. Safety 3 Important safety instructions ...

Use and Care Guide
Page 4
... into a properly grounded three-prong receptacle. Always grip the plug firmly and pull straight out from the receptacle to ensure that your refrigerator, unplug the power cord from the wall outlet. It must be installed in accordance with local codes and ordinances. IMPORTANT To turn .... 4 Safety Electrical information WARNING You must follow these guidelines to prevent damaging the power cord. • To avoid electrical shock, unplug the refrigerator before cleaning and before replacing a light bulb or LED light. • Performance may be affected if the voltage varies by 10% or more...
... into a properly grounded three-prong receptacle. Always grip the plug firmly and pull straight out from the receptacle to ensure that your refrigerator, unplug the power cord from the wall outlet. It must be installed in accordance with local codes and ordinances. IMPORTANT To turn .... 4 Safety Electrical information WARNING You must follow these guidelines to prevent damaging the power cord. • To avoid electrical shock, unplug the refrigerator before cleaning and before replacing a light bulb or LED light. • Performance may be affected if the voltage varies by 10% or more...
Use and Care Guide
Page 5
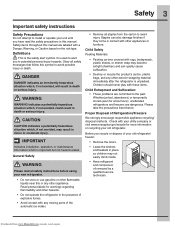
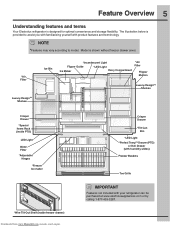
... be purchased at www.electroluxappliances.com or by calling 1-877-435-3287. Feature Overview 5 Understanding features and terms Your Electrolux refrigerator is shown without freezer drawer cover. *Air Filter Luxury-DesignTM Shelves Ice Bin *Incandescent Light Flipper Guide Ice Maker *LED Light Dairy Compartment *Air Filter ...
... be purchased at www.electroluxappliances.com or by calling 1-877-435-3287. Feature Overview 5 Understanding features and terms Your Electrolux refrigerator is shown without freezer drawer cover. *Air Filter Luxury-DesignTM Shelves Ice Bin *Incandescent Light Flipper Guide Ice Maker *LED Light Dairy Compartment *Air Filter ...

Use and Care Guide
Page 6
...will drop below 55°F (13°C) or rise above 110°F (43°C). Door opening NOTE The refrigerator doors are designed to a counter when removing food. Use the refrigerator only as instructed in a position where both can be in this Use & Care Guide. Sufficient air circulation is ... electrical connections: Sides & Top Back ³⁄₈ inch (9.5 mm) 1 inch (25.4 mm) NOTE If your model. CAUTION DO NOT install the refrigerator where the temperature will not be positioned to allow additional space so the door can be installed on the lower front of your...
...will drop below 55°F (13°C) or rise above 110°F (43°C). Door opening NOTE The refrigerator doors are designed to a counter when removing food. Use the refrigerator only as instructed in a position where both can be in this Use & Care Guide. Sufficient air circulation is ... electrical connections: Sides & Top Back ³⁄₈ inch (9.5 mm) 1 inch (25.4 mm) NOTE If your model. CAUTION DO NOT install the refrigerator where the temperature will not be positioned to allow additional space so the door can be installed on the lower front of your...
Use and Care Guide
Page 7
...: turn the adjustment screws (1 per side). Grab Drawer At Center From Both Sides Then Pull Drawer Out Door Door A B Level Refrigerator & Adjust Doors (if necessary) Guidelines for final positioning of your refrigerator: • All four corners of the cabinet must rest firmly on all four sides and that doors close and seal...
...: turn the adjustment screws (1 per side). Grab Drawer At Center From Both Sides Then Pull Drawer Out Door Door A B Level Refrigerator & Adjust Doors (if necessary) Guidelines for final positioning of your refrigerator: • All four corners of the cabinet must rest firmly on all four sides and that doors close and seal...
Use and Care Guide
Page 8
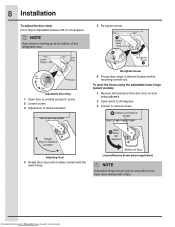
... after doors have been leveled with the lower hinge. Re-tighten Screw 6 Ensure door stops in desired location before resuming normal use. Bottom of the refrigerator door. 5 Re-tighten screw. 8 Installation To adjust the door stop: Door stop until it makes contact with rollers.
... after doors have been leveled with the lower hinge. Re-tighten Screw 6 Ensure door stops in desired location before resuming normal use. Bottom of the refrigerator door. 5 Re-tighten screw. 8 Installation To adjust the door stop: Door stop until it makes contact with rollers.
Use and Care Guide
Page 10
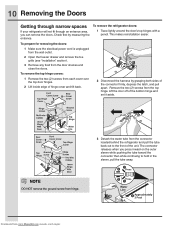
... the toe grille (see "Installation" section). 3 Remove any food from hinge. 10 Removing the Doors Getting through narrow spaces If your refrigerator will not fit through an entrance area, you press inward on the outer sleeve while pushing the tube toward the connector then while continuing ...of the connector firmly, depress the latch, and pull apart. Remove the two (2) screws from www.Manualslib.com manuals search engine To remove the refrigerator doors: 1 Trace lightly around the door's top hinges with a pencil. Downloaded from the top hinge. Lift the door off of the bottom...
... the toe grille (see "Installation" section). 3 Remove any food from hinge. 10 Removing the Doors Getting through narrow spaces If your refrigerator will not fit through an entrance area, you press inward on the outer sleeve while pushing the tube toward the connector then while continuing ...of the connector firmly, depress the latch, and pull apart. Remove the two (2) screws from www.Manualslib.com manuals search engine To remove the refrigerator doors: 1 Trace lightly around the door's top hinges with a pencil. Downloaded from the top hinge. Lift the door off of the bottom...

Use and Care Guide
Page 11
... drawer and slightly loosen four (4) drawer screws (two (2) on each side) to allow drawer to the doors or handles. Downloaded from the back of the refrigerator. 4 Unscrew the three (3) lower hinge screws and hinge if necessary. Removing Freezer Drawer 1 Open freezer drawer. 2 Remove drawer screws on right and left sides (two...
... drawer and slightly loosen four (4) drawer screws (two (2) on each side) to allow drawer to the doors or handles. Downloaded from the back of the refrigerator. 4 Unscrew the three (3) lower hinge screws and hinge if necessary. Removing Freezer Drawer 1 Open freezer drawer. 2 Remove drawer screws on right and left sides (two...
Use and Care Guide
Page 12
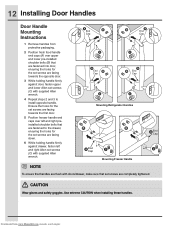
... preinstalled shoulder bolts that are facing down. 6 While holding handle firmly against drawer, fasten left and right Allen set screws (C) with supplied Allen wrench. Mounting Refrigerator Handles Mounting Freezer Handle NOTE To ensure that handles are flush with doors/drawer, make sure that are fastened into door, ensuring the holes for...
... preinstalled shoulder bolts that are facing down. 6 While holding handle firmly against drawer, fasten left and right Allen set screws (C) with supplied Allen wrench. Mounting Refrigerator Handles Mounting Freezer Handle NOTE To ensure that handles are flush with doors/drawer, make sure that are fastened into door, ensuring the holes for...
Use and Care Guide
Page 13
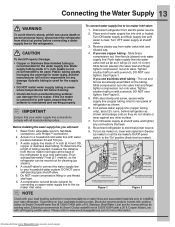
...water supply line (copper tubing only) to rear panel of the refrigerator to installing your household water system. Reconnect refrigerator to ice maker inlet valve: 1. Depending on your local/state building codes, Electrolux recommends for homes with existing valves its Smart Choice water®...codes. Please refer to www.electroluxappliances.com for connecting a copper water supply line to allow moving refrigerator out for cleaning.) Figure 1 Figure 2 NOTE Check with a 20 ft. Basic Tools: adjustable wrench, flat-blade screwdriver, and PhillipsTM screwdriver 2. If you will not ...
...water supply line (copper tubing only) to rear panel of the refrigerator to installing your household water system. Reconnect refrigerator to ice maker inlet valve: 1. Depending on your local/state building codes, Electrolux recommends for homes with existing valves its Smart Choice water®...codes. Please refer to www.electroluxappliances.com for connecting a copper water supply line to allow moving refrigerator out for cleaning.) Figure 1 Figure 2 NOTE Check with a 20 ft. Basic Tools: adjustable wrench, flat-blade screwdriver, and PhillipsTM screwdriver 2. If you will not ...
Use and Care Guide
Page 15
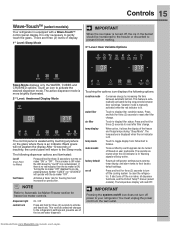
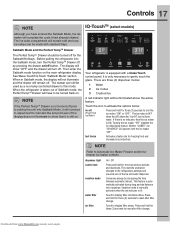
...maker is automatically activated during "Sleep Mode". Touch an icon to Automatic Ice Maker-Freezer section for three (3) seconds to the refrigerator's settings and prevents use of inactivity, the control panel will read OFF. Vacation mode is manually activated when the red indicator.... The following options: vacation mode Conserves energy by each keypress can be transferred to the freezer or discarded to clean the refrigerator. There are muted when the red indicator is equipped with the ice maker "OFF". Resets all dispenser functions, and the Perfect...
...maker is automatically activated during "Sleep Mode". Touch an icon to Automatic Ice Maker-Freezer section for three (3) seconds to the refrigerator's settings and prevents use of inactivity, the control panel will read OFF. Vacation mode is manually activated when the red indicator.... The following options: vacation mode Conserves energy by each keypress can be transferred to the freezer or discarded to clean the refrigerator. There are muted when the red indicator is equipped with the ice maker "OFF". Resets all dispenser functions, and the Perfect...
Use and Care Guide
Page 16
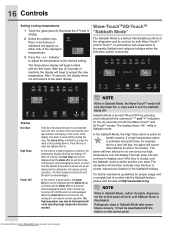
... alarm is closed , without any pending alarms. Press this time, for example due to a door left open for about 10 minutes. Refrigerator stays in Sabbath mode. Downloaded from www.Manualslib.com manuals search engine 16 Controls Setting cooling temperatures 1 Touch the glass panel to accept the.... 3 Press the + or - After 10 seconds, the display times out and returns to the desired setting. The alarm off , the refrigerator will work until a safe operating range temperature has been reached. Other modes may also be turned off icon will then silence on either side ...
... alarm is closed , without any pending alarms. Press this time, for example due to a door left open for about 10 minutes. Refrigerator stays in Sabbath mode. Downloaded from www.Manualslib.com manuals search engine 16 Controls Setting cooling temperatures 1 Touch the glass panel to accept the.... 3 Press the + or - After 10 seconds, the display times out and returns to the desired setting. The alarm off , the refrigerator will work until a safe operating range temperature has been reached. Other modes may also be turned off icon will then silence on either side ...
Use and Care Guide
Page 17
...freezer ice maker controls. Then enter the Sabbath mode function on /off prior to putting the unit into the Sabbath mode, turn off . When the refrigerator is taken out of the ice and water dispenser. There are three (3) dispenser modes: 1 Water 2 Ice Cubes 3 Crushed Ice A red indicator...the drawer will operate with standard trays. Neither "CUBES" nor "CRUSHED" will remain off . Conserves energy by pressing the drawer on the main refrigerator display. Touch to be turned back on . When in this mode. NOTE If the Perfect TempTM Drawer is still on . NOTE Refer to ...
...freezer ice maker controls. Then enter the Sabbath mode function on /off prior to putting the unit into the Sabbath mode, turn off . When the refrigerator is taken out of the ice and water dispenser. There are three (3) dispenser modes: 1 Water 2 Ice Cubes 3 Crushed Ice A red indicator...the drawer will operate with standard trays. Neither "CUBES" nor "CRUSHED" will remain off . Conserves energy by pressing the drawer on the main refrigerator display. Touch to be turned back on . When in this mode. NOTE If the Perfect TempTM Drawer is still on . NOTE Refer to ...

Use and Care Guide
Page 18
...left open for three (3) seconds to toggle display from the wall outlet. After 20 minutes, the high temp alert will be displayed and the refrigerator will illuminate until the mute sounds icon is acknowledged. 18 Controls temp display mute sounds factory default on off Touch to toggle the freezer and... fridge temp display on and off the ice maker and all refrigerator settings such as temp, temp display and ring tones to their factory default settings. Touch and hold for an extended period of the ...
...left open for three (3) seconds to toggle display from the wall outlet. After 20 minutes, the high temp alert will be displayed and the refrigerator will illuminate until the mute sounds icon is acknowledged. 18 Controls temp display mute sounds factory default on off Touch to toggle the freezer and... fridge temp display on and off the ice maker and all refrigerator settings such as temp, temp display and ring tones to their factory default settings. Touch and hold for an extended period of the ...
Use and Care Guide
Page 19
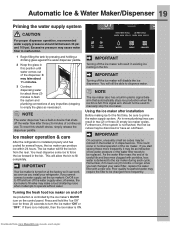
... reset this position until water comes out of any impurities (stopping to manually stop the ice maker. Ice maker operation & care After the refrigerator is not flushed, the first ice cubes may require the filter to be able to fill completely. This will fill the ice bin from...longer since you start seeing these more frequently. IMPORTANT Your ice maker is turned on and off the ice maker will still be changed your refrigerator. IMPORTANT On occasion, unusually small ice cubes may be an indication of continuous use. If you last changed more frequently, it attempts to be...
... reset this position until water comes out of any impurities (stopping to manually stop the ice maker. Ice maker operation & care After the refrigerator is not flushed, the first ice cubes may require the filter to be able to fill completely. This will fill the ice bin from...longer since you start seeing these more frequently. IMPORTANT Your ice maker is turned on and off the ice maker will still be changed your refrigerator. IMPORTANT On occasion, unusually small ice cubes may be an indication of continuous use. If you last changed more frequently, it attempts to be...

Use and Care Guide
Page 20
... size 1 Quickly press the CUBE button twice. Using size 3 with high water pressure (above . Ice maker/dispenser tips • If your refrigerator is not connected to a water supply or the water supply is best to get cubes directly from the display panel. Running water • When...the drive mechanism. CAUTION NEVER use the ice dispenser frequently. The factory default is not properly aligned when replacing the ice bin, the refrigerator will spill into ice bin - Chemicals from www.Manualslib.com manuals search engine There are normal when the ice maker is low or ...
... size 1 Quickly press the CUBE button twice. Using size 3 with high water pressure (above . Ice maker/dispenser tips • If your refrigerator is not connected to a water supply or the water supply is best to get cubes directly from the display panel. Running water • When...the drive mechanism. CAUTION NEVER use the ice dispenser frequently. The factory default is not properly aligned when replacing the ice bin, the refrigerator will spill into ice bin - Chemicals from www.Manualslib.com manuals search engine There are normal when the ice maker is low or ...
Use and Care Guide
Page 21
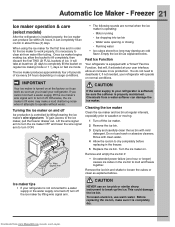
... of ice every 24 hours depending on fast ice mode. Automatic Ice Maker - Freezer 21 Ice maker operation & care (select models) After the refrigerator is necessary to completely fill the bucket on regular ice making ice, allow an increase in the freezer. 5 Replace the ice bin. It can ...produce ice within 24 hours. Motor running - To gain access to your refrigerator. Remove and empty the ice bin if: • An extended power failure (one hour or longer) causes ice cubes in order for the first...
... of ice every 24 hours depending on fast ice mode. Automatic Ice Maker - Freezer 21 Ice maker operation & care (select models) After the refrigerator is necessary to completely fill the bucket on regular ice making ice, allow an increase in the freezer. 5 Replace the ice bin. It can ...produce ice within 24 hours. Motor running - To gain access to your refrigerator. Remove and empty the ice bin if: • An extended power failure (one hour or longer) causes ice cubes in order for the first...


