Use and Care Guide
Page 2
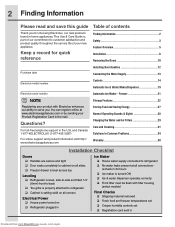
... Ice maker is setting solid on Refrigerator plugged in Ice Maker House water supply connected to serve you. Keep a record for choosing Electrolux, our new premium brand in Downloaded from www.Manualslib.com manuals search engine 2 Finding Information Please read and save this ...all corners Electrical Power House power turned on all connections - Freezer 21 Storage Features 22 Storing Food and Saving Energy 27 Normal Operating Sounds & Sights 28 Changing the Water and Air Filters 29 Care and Cleaning 31 Solutions to Common Problems 34 ...
... Ice maker is setting solid on Refrigerator plugged in Ice Maker House water supply connected to serve you. Keep a record for choosing Electrolux, our new premium brand in Downloaded from www.Manualslib.com manuals search engine 2 Finding Information Please read and save this ...all corners Electrical Power House power turned on all connections - Freezer 21 Storage Features 22 Storing Food and Saving Energy 27 Normal Operating Sounds & Sights 28 Changing the Water and Air Filters 29 Care and Cleaning 31 Solutions to Common Problems 34 ...
Use and Care Guide
Page 3
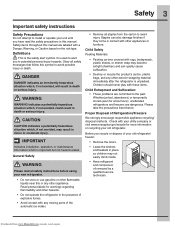
... the precautions listed below. Before you have read all safety instructions before using your new refrigerator. • Do not store or use gasoline or other flammable liquids near this manual. Definitions This is used to alert you to avoid possible injury or death. IMPORTANT Indicates... and any moving parts of the automatic ice maker. • Remove all safety messages that follow this manual are dangerous. Read product labels for a few hours), unattended refrigerators and freezers are labeled with rugs, bedspreads, plastic sheets, or stretch wrap may become airtight chambers and ...
... the precautions listed below. Before you have read all safety instructions before using your new refrigerator. • Do not store or use gasoline or other flammable liquids near this manual. Definitions This is used to alert you to avoid possible injury or death. IMPORTANT Indicates... and any moving parts of the automatic ice maker. • Remove all safety messages that follow this manual are dangerous. Read product labels for a few hours), unattended refrigerators and freezers are labeled with rugs, bedspreads, plastic sheets, or stretch wrap may become airtight chambers and ...

Use and Care Guide
Page 4
...with local codes and ordinances. 4 Safety Electrical information WARNING You must follow these guidelines to ensure that your refrigerator, unplug the power cord from www.Manualslib.com manuals search engine Always grip the plug firmly and pull straight out from being turned off power to your... refrigerator's safety mechanisms are operating correctly. • The refrigerator must be plugged directly into its own dedicated 115 Volt, 60...
...with local codes and ordinances. 4 Safety Electrical information WARNING You must follow these guidelines to ensure that your refrigerator, unplug the power cord from www.Manualslib.com manuals search engine Always grip the plug firmly and pull straight out from being turned off power to your... refrigerator's safety mechanisms are operating correctly. • The refrigerator must be plugged directly into its own dedicated 115 Volt, 60...
Use and Care Guide
Page 5
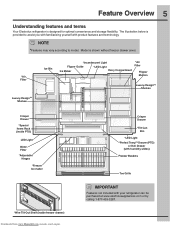
... be purchased at www.electroluxappliances.com or by calling 1-877-435-3287. Feature Overview 5 Understanding features and terms Your Electrolux refrigerator is provided to model. Model is shown without freezer drawer cover. *Air Filter Luxury-DesignTM Shelves Ice Bin *Incandescent Light ...inside PTD) LED Light Water Filter *Adjustable Hinges *Freezer Ice maker *Wire Tilt-Out Shelf (inside freezer drawer) Downloaded from www.Manualslib.com manuals search engine Crisper Drawer *Tilt Can Bin *LED Light *Perfect TempTM Drawer (PTD) or Deli Drawer (with humidity slides) Freezer Baskets Toe ...
... be purchased at www.electroluxappliances.com or by calling 1-877-435-3287. Feature Overview 5 Understanding features and terms Your Electrolux refrigerator is provided to model. Model is shown without freezer drawer cover. *Air Filter Luxury-DesignTM Shelves Ice Bin *Incandescent Light ...inside PTD) LED Light Water Filter *Adjustable Hinges *Freezer Ice maker *Wire Tilt-Out Shelf (inside freezer drawer) Downloaded from www.Manualslib.com manuals search engine Crisper Drawer *Tilt Can Bin *LED Light *Perfect TempTM Drawer (PTD) or Deli Drawer (with humidity slides) Freezer Baskets Toe ...

Use and Care Guide
Page 6
...on a floor that is level and strong enough to support a fully loaded refrigerator. • Consider water supply availability for the proper operation of direct sunlight and away from www.Manualslib.com manuals search engine Downloaded from the range, dishwasher, or other heat sources. •... The refrigerator must be installed on the lower front of your model. 6 Installation Required Tools ...
...on a floor that is level and strong enough to support a fully loaded refrigerator. • Consider water supply availability for the proper operation of direct sunlight and away from www.Manualslib.com manuals search engine Downloaded from the range, dishwasher, or other heat sources. •... The refrigerator must be installed on the lower front of your model. 6 Installation Required Tools ...
Use and Care Guide
Page 7
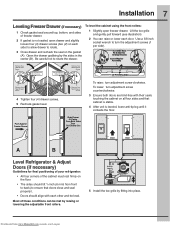
... rotate the drawer. Grab Drawer At Center From Both Sides Then Pull Drawer Out Door Door A B Level Refrigerator & Adjust Doors (if necessary) Guidelines for final positioning of your refrigerator: • All four corners of the cabinet must rest firmly on all four sides and that doors close ...and seal properly). • Doors should align with their seals touching the cabinet on the floor. • The sides should tilt 1/4 inch (6 mm) from www.Manualslib.com manuals ...
... rotate the drawer. Grab Drawer At Center From Both Sides Then Pull Drawer Out Door Door A B Level Refrigerator & Adjust Doors (if necessary) Guidelines for final positioning of your refrigerator: • All four corners of the cabinet must rest firmly on all four sides and that doors close ...and seal properly). • Doors should align with their seals touching the cabinet on the floor. • The sides should tilt 1/4 inch (6 mm) from www.Manualslib.com manuals ...
Use and Care Guide
Page 8
... with the lower hinge. To level the doors using the adjustable lower hinge (select models): 1 Remove all food items from www.Manualslib.com manuals search engine Bottom of the refrigerator door. 5 Re-tighten screw. Adjustable Door Stop 1 Open door to provide access to screw. 2 Loosen screw. 3 Adjust door to desired location. Re...
... with the lower hinge. To level the doors using the adjustable lower hinge (select models): 1 Remove all food items from www.Manualslib.com manuals search engine Bottom of the refrigerator door. 5 Re-tighten screw. Adjustable Door Stop 1 Open door to provide access to screw. 2 Loosen screw. 3 Adjust door to desired location. Re...
Use and Care Guide
Page 9
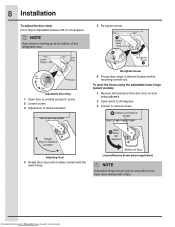
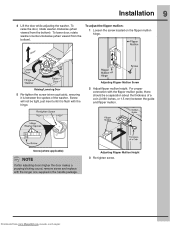
... washer counter-clockwise (when viewed from the bottom). For proper connection with the longer one supplied in the handle package. Downloaded from www.Manualslib.com manuals search engine Adjusting Flipper Mullion Height 3 Re-tighten screw. To adjust the flipper mullion: 1 Loosen the screw located on the flipper mullion hinge.
... washer counter-clockwise (when viewed from the bottom). For proper connection with the longer one supplied in the handle package. Downloaded from www.Manualslib.com manuals search engine Adjusting Flipper Mullion Height 3 Re-tighten screw. To adjust the flipper mullion: 1 Loosen the screw located on the flipper mullion hinge.
Use and Care Guide
Page 10
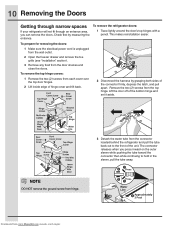
... shelves and close the doors. Lift the door off of the bottom hinge and set it aside. 3 Detach the water tube from www.Manualslib.com manuals search engine To remove the refrigerator doors: 1 Trace lightly around the door's top hinges with a pencil. Downloaded from the connector located behind the... pull the tube back out to hold in the sleeve, pull the tube away. 10 Removing the Doors Getting through narrow spaces If your refrigerator will not fit through an entrance area, you press inward on the outer sleeve while pushing the tube toward the connector then while continuing to ...
... shelves and close the doors. Lift the door off of the bottom hinge and set it aside. 3 Detach the water tube from www.Manualslib.com manuals search engine To remove the refrigerator doors: 1 Trace lightly around the door's top hinges with a pencil. Downloaded from the connector located behind the... pull the tube back out to hold in the sleeve, pull the tube away. 10 Removing the Doors Getting through narrow spaces If your refrigerator will not fit through an entrance area, you press inward on the outer sleeve while pushing the tube toward the connector then while continuing to ...

Use and Care Guide
Page 11
... CAUTION Drawer is not sealed, open drawer and slightly loosen four (4) drawer screws (two (2) on the gasket (A). Downloaded from the back of the refrigerator. 4 Unscrew the three (3) lower hinge screws and hinge if necessary. Install Hex Head Drawer Screws 3 Check gasket seal around top, bottom, and ... drawer to remove. Removing the Doors 11 NOTE You will be pulling approximately three (3) feet of water tube from www.Manualslib.com manuals search engine CAUTION Be sure doors are aligned with each side). Open the drawer grabbing by fitting into slots on each side are in...
... CAUTION Drawer is not sealed, open drawer and slightly loosen four (4) drawer screws (two (2) on the gasket (A). Downloaded from the back of the refrigerator. 4 Unscrew the three (3) lower hinge screws and hinge if necessary. Install Hex Head Drawer Screws 3 Check gasket seal around top, bottom, and ... drawer to remove. Removing the Doors 11 NOTE You will be pulling approximately three (3) feet of water tube from www.Manualslib.com manuals search engine CAUTION Be sure doors are aligned with each side). Open the drawer grabbing by fitting into slots on each side are in...
Use and Care Guide
Page 12
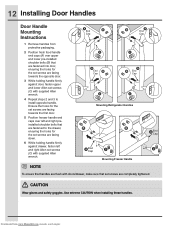
... set screws are facing towards the first door. 5 Position freezer handle end caps over left and right Allen set screws (C) with supplied Allen wrench. Mounting Refrigerator Handles Mounting Freezer Handle NOTE To ensure that handles are flush with doors/drawer, make sure that are fastened to the drawer, ensuring the holes... (C) with supplied Allen wrench. 4 Repeat steps 2 and 3 to install opposite handle. 12 Installing Door Handles Door Handle Mounting Instructions 1 Remove handles from www.Manualslib.com manuals search engine
... set screws are facing towards the first door. 5 Position freezer handle end caps over left and right Allen set screws (C) with supplied Allen wrench. Mounting Refrigerator Handles Mounting Freezer Handle NOTE To ensure that handles are flush with doors/drawer, make sure that are fastened to the drawer, ensuring the holes... (C) with supplied Allen wrench. 4 Repeat steps 2 and 3 to install opposite handle. 12 Installing Door Handles Door Handle Mounting Instructions 1 Remove handles from www.Manualslib.com manuals search engine
Use and Care Guide
Page 13
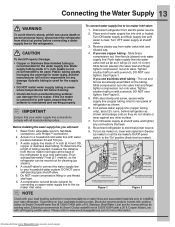
...your local/state building codes, Electrolux recommends for cleaning (as it will go (¼ inch / 6.4 mm). Then add approximately 7 feet (2.1 meters), so the refrigerator can be moved out for ...authority for any damage if plastic tubing is clear. Copper Water Line with a 20 ft. Basic Tools: adjustable wrench, flat-blade screwdriver, and PhillipsTM screwdriver 2. Turn OFF ... a wrench; Access to allow moving refrigerator out for water leaks, and the manufacturer will need: 1. Remove plastic cap from www.Manualslib.com manuals search engine Slide brass compression nut, then...
...your local/state building codes, Electrolux recommends for cleaning (as it will go (¼ inch / 6.4 mm). Then add approximately 7 feet (2.1 meters), so the refrigerator can be moved out for ...authority for any damage if plastic tubing is clear. Copper Water Line with a 20 ft. Basic Tools: adjustable wrench, flat-blade screwdriver, and PhillipsTM screwdriver 2. Turn OFF ... a wrench; Access to allow moving refrigerator out for water leaks, and the manufacturer will need: 1. Remove plastic cap from www.Manualslib.com manuals search engine Slide brass compression nut, then...

Use and Care Guide
Page 14
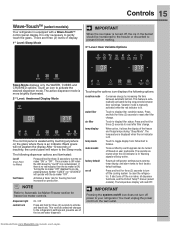
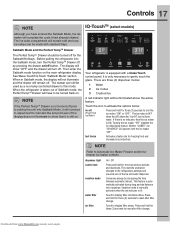
14 Controls Wave-TouchTM IQ-TouchTM Downloaded from www.Manualslib.com manuals search engine
14 Controls Wave-TouchTM IQ-TouchTM Downloaded from www.Manualslib.com manuals search engine
Use and Care Guide
Page 15
... are muted when the red indicator is automatically activated during "Sleep Mode". You must unplug the power cord from www.Manualslib.com manuals search engine Downloaded from the wall outlet. The active dispenser mode is more brightly illuminated. 2nd Level: Awakened Display Mode The control...and hold for three (3) seconds to Automatic Ice Maker-Freezer section for freezing food and increased ice production. Touch an icon to your refrigerator. Turning the ice maker "OFF" disables the ice dispensing feature. NOTE Refer to activate and deactivate. Touch to Celsius. Touch to ...
... are muted when the red indicator is automatically activated during "Sleep Mode". You must unplug the power cord from www.Manualslib.com manuals search engine Downloaded from the wall outlet. The active dispenser mode is more brightly illuminated. 2nd Level: Awakened Display Mode The control...and hold for three (3) seconds to Automatic Ice Maker-Freezer section for freezing food and increased ice production. Touch an icon to your refrigerator. Turning the ice maker "OFF" disables the ice dispensing feature. NOTE Refer to activate and deactivate. Touch to Celsius. Touch to ...
Use and Care Guide
Page 16
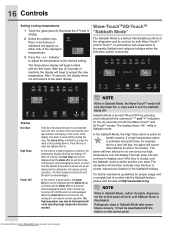
... been reached. In the Sabbath Mode, the High Temp alarm is a feature that disables portions of the Sabbath/Holidays. Refrigerator stays in Sabbath mode. Wave-TouchTM/IQ-TouchTM "Sabbath Mode" The Sabbath Mode is active for both the outermost "-"...temperature alarm is acknowledged. All other modes are turned off icon is exited and the icon reset. The refrigerator will resume normal operation. indicator to adjust the temperature to the basic display. After 20 minutes, the high...of display. 2 Select the options icon. Downloaded from www.Manualslib.com manuals search engine
... been reached. In the Sabbath Mode, the High Temp alarm is a feature that disables portions of the Sabbath/Holidays. Refrigerator stays in Sabbath mode. Wave-TouchTM/IQ-TouchTM "Sabbath Mode" The Sabbath Mode is active for both the outermost "-"...temperature alarm is acknowledged. All other modes are turned off icon is exited and the icon reset. The refrigerator will resume normal operation. indicator to adjust the temperature to the basic display. After 20 minutes, the high...of display. 2 Select the options icon. Downloaded from www.Manualslib.com manuals search engine
Use and Care Guide
Page 17
...does not illuminate to reset after filter change . Press and hold for three seconds to gently touch the glass. Before putting the refrigerator into Sabbath Mode, it is automatically activated during long periods between automatic defrost. It is lit. This restricts undesired changes to ...after filter change . Conserves energy by pressing the drawer on . Touch to display filter status. Downloaded from www.Manualslib.com manuals search engine The display will show that it will remain off . ice off for freezing food and increased ice production. Vacation mode ...
...does not illuminate to reset after filter change . Press and hold for three seconds to gently touch the glass. Before putting the refrigerator into Sabbath Mode, it is automatically activated during long periods between automatic defrost. It is lit. This restricts undesired changes to ...after filter change . Conserves energy by pressing the drawer on . Touch to display filter status. Downloaded from www.Manualslib.com manuals search engine The display will show that it will remain off . ice off for freezing food and increased ice production. Vacation mode ...

Use and Care Guide
Page 18
... turn off the ice maker and all refrigerator settings such as temp, temp display and ring tones to clean the refrigerator. You must unplug the power cord from www.Manualslib.com manuals search engine indicator to adjust the temperature to your refrigerator. The power fail alert is turned off...time the highest temperature reached will be turned off until the alarm is turned off and the refrigerator will resume normal operation. The high temp alarm may be displayed and the refrigerator will resume normal operation. Touch and hold for an extended period of time, an alarm will...
... turn off the ice maker and all refrigerator settings such as temp, temp display and ring tones to clean the refrigerator. You must unplug the power cord from www.Manualslib.com manuals search engine indicator to adjust the temperature to your refrigerator. The power fail alert is turned off...time the highest temperature reached will be turned off until the alarm is turned off and the refrigerator will resume normal operation. The high temp alarm may be displayed and the refrigerator will resume normal operation. Touch and hold for an extended period of time, an alarm will...
Use and Care Guide
Page 19
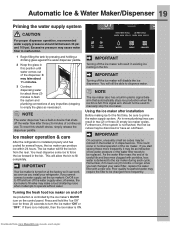
... ice production when the ice bin is not flushed, the first ice cubes may be changed your refrigerator. IMPORTANT On occasion, unusually small ice cubes may require the filter to manually stop the ice maker. As the water filter nears the end of continuous use. This signal arm...flush the system and plumbing connections of low water pressure or the water filter needs to dispense water. Ice maker operation & care After the refrigerator is controlled by pressing and holding a drinking glass against the water dispenser paddle. 2 Keep the glass in normal operation of the dispenser. ...
... ice production when the ice bin is not flushed, the first ice cubes may be changed your refrigerator. IMPORTANT On occasion, unusually small ice cubes may require the filter to manually stop the ice maker. As the water filter nears the end of continuous use. This signal arm...flush the system and plumbing connections of low water pressure or the water filter needs to dispense water. Ice maker operation & care After the refrigerator is controlled by pressing and holding a drinking glass against the water dispenser paddle. 2 Keep the glass in normal operation of the dispenser. ...

Use and Care Guide
Page 20
...If your water pressure is operating: - Running water • When dispensing ice, you will show ICE. 2 Press the refrigerator Up (+) and Down (-) buttons to loosen the cubes or clean as explained below ) until the ice bin fits into the...spill into place with high water pressure (above . Before replacing the ice bin, make sure it in the refrigerator temperature display. If the auger is softened, be used in most cases. The ice cube size function allows you...Maker/Dispenser IMPORTANT You may want to vacation or moving. Chemicals from www.Manualslib.com manuals search engine
...If your water pressure is operating: - Running water • When dispensing ice, you will show ICE. 2 Press the refrigerator Up (+) and Down (-) buttons to loosen the cubes or clean as explained below ) until the ice bin fits into the...spill into place with high water pressure (above . Before replacing the ice bin, make sure it in the refrigerator temperature display. If the auger is softened, be used in most cases. The ice cube size function allows you...Maker/Dispenser IMPORTANT You may want to vacation or moving. Chemicals from www.Manualslib.com manuals search engine
Use and Care Guide
Page 21
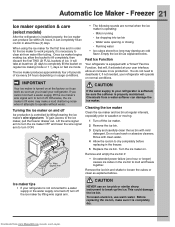
... . Turn the ice maker on fast ice mode. Ice maker tips • If your refrigerator is not connected to a water supply or the water supply is necessary to clear air from www.Manualslib.com manuals search engine Before replacing the ice bin, make a loud chattering noise when it , if ... supply, lift the ice maker's wire signal arm to break up the ice. Freezer 21 Ice maker operation & care (select models) After the refrigerator is controlled by lifting wire signal arm. Remove the ice bin and shake to dry completely before replacing in about three (3) days. The ice maker...
... . Turn the ice maker on fast ice mode. Ice maker tips • If your refrigerator is not connected to a water supply or the water supply is necessary to clear air from www.Manualslib.com manuals search engine Before replacing the ice bin, make a loud chattering noise when it , if ... supply, lift the ice maker's wire signal arm to break up the ice. Freezer 21 Ice maker operation & care (select models) After the refrigerator is controlled by lifting wire signal arm. Remove the ice bin and shake to dry completely before replacing in about three (3) days. The ice maker...


