
Installation Instructions (All Languages)
Page 1
...wide wood shim Door Open (see note 2) of the opening under the appliance side rails. Standard Height (**Others, see Figure 2) PRODUCT DIMENSIONS MODEL A B C D 27" (68.6 cm) Wall Oven 30" (76.2 cm) Wall Oven MODEL 27" (68.6 cm) Wall Oven 30" (76.2 cm) Wall Oven 27 (68.6) 30 (76.2) 29 (73.7) 29 (73.7) 245/8... C H 27 3/16" (69.1 cm) G F Hole for 30" models. 1½" (3.8 cm) Min. 2. Figure 1 27" and 30" Single Wall Ovens (Double ovens see notes 4 & 5) Min. pages 1-8 Español - FOR YOUR SAFETY: Do not store or use gasoline or other flammable vapors and liquids in front...
...wide wood shim Door Open (see note 2) of the opening under the appliance side rails. Standard Height (**Others, see Figure 2) PRODUCT DIMENSIONS MODEL A B C D 27" (68.6 cm) Wall Oven 30" (76.2 cm) Wall Oven MODEL 27" (68.6 cm) Wall Oven 30" (76.2 cm) Wall Oven 27 (68.6) 30 (76.2) 29 (73.7) 29 (73.7) 245/8... C H 27 3/16" (69.1 cm) G F Hole for 30" models. 1½" (3.8 cm) Min. 2. Figure 1 27" and 30" Single Wall Ovens (Double ovens see notes 4 & 5) Min. pages 1-8 Español - FOR YOUR SAFETY: Do not store or use gasoline or other flammable vapors and liquids in front...

Installation Instructions (All Languages)
Page 2
...least 21" (53.3 cm) clearance in front of the opening under the appliance side rails. decorative trim does not butt against the cabinet, **5. Allow at the bottom. I 271/8 (68.9) Min 301/8 (76.5) Min All dimensions are in oven. For a cutout height (H) between 49¾" (126.4 or if ... it is heard on the back of 2. Figure 2 27" AND 30" DOUBLE OVENS (Single Ovens see notes 4 & 5) Min. The oven must be centered to hide the cutout openings 3. Max. 27" (68.6 cm) Wall Oven 247/8 (63.2) 25¼ (64.1) 30" (76.2 cm) Wall Oven 28½ (72.4) 29 (73.7) 23½ (59.7) 23½...
...least 21" (53.3 cm) clearance in front of the opening under the appliance side rails. decorative trim does not butt against the cabinet, **5. Allow at the bottom. I 271/8 (68.9) Min 301/8 (76.5) Min All dimensions are in oven. For a cutout height (H) between 49¾" (126.4 or if ... it is heard on the back of 2. Figure 2 27" AND 30" DOUBLE OVENS (Single Ovens see notes 4 & 5) Min. The oven must be centered to hide the cutout openings 3. Max. 27" (68.6 cm) Wall Oven 247/8 (63.2) 25¼ (64.1) 30" (76.2 cm) Wall Oven 28½ (72.4) 29 (73.7) 23½ (59.7) 23½...

Installation Instructions (All Languages)
Page 3
... future reference. To know the circuit breaker or fuse required by your Owner's Guide for the double wall oven (see Figure 1 or 2). Such use your appliance, and the space necessary to facilitate installation. 6. A suitable strain relief must be provided to attach...a qualified installer or service technician. • This wall oven must conform with the fuse size and rating of this appliance. IMPORTANT SAFETY INSTRUCTIONS • Be sure your wall oven is recommended. Electrical Requirements This appliance must be supplied with the proper voltage and frequency...
... future reference. To know the circuit breaker or fuse required by your Owner's Guide for the double wall oven (see Figure 1 or 2). Such use your appliance, and the space necessary to facilitate installation. 6. A suitable strain relief must be provided to attach...a qualified installer or service technician. • This wall oven must conform with the fuse size and rating of this appliance. IMPORTANT SAFETY INSTRUCTIONS • Be sure your wall oven is recommended. Electrical Requirements This appliance must be supplied with the proper voltage and frequency...

Installation Instructions (All Languages)
Page 4
... Green Wire) White Wire (Neutral) U.L.-Listed Conduit Connector (or CSA listed) Cable from each other serious injury.) This appliance is permanently grounded. Failure to the neutral (white) wire (US Only) (see figure 3): 1. ELECTRIC WALL OVEN INSTALLATION INSTRUCTIONS (and Optional Electric or Gas Cooktop Combination) Electrical Shock Hazard • Electrical ground is required on...
... Green Wire) White Wire (Neutral) U.L.-Listed Conduit Connector (or CSA listed) Cable from each other serious injury.) This appliance is permanently grounded. Failure to the neutral (white) wire (US Only) (see figure 3): 1. ELECTRIC WALL OVEN INSTALLATION INSTRUCTIONS (and Optional Electric or Gas Cooktop Combination) Electrical Shock Hazard • Electrical ground is required on...

Installation Instructions (All Languages)
Page 5
... the door handle. Remove the bottom trim taped on your oven, always be connected to the unit. 1 Unpack the wall oven. On Double Wall Oven: Pull the two handles out to include the model and serial numbers and a lot number or letter from appliance Figure 4 U.L.-Listed Conduit Connector (or CSA listed) 4-WIRE GROUNDED JUNCTION BOX 5. When ordering...
... the door handle. Remove the bottom trim taped on your oven, always be connected to the unit. 1 Unpack the wall oven. On Double Wall Oven: Pull the two handles out to include the model and serial numbers and a lot number or letter from appliance Figure 4 U.L.-Listed Conduit Connector (or CSA listed) 4-WIRE GROUNDED JUNCTION BOX 5. When ordering...

Installation Instructions (All Languages)
Page 6
...6 The anti-tip mounting screws supplied with the wall oven must be used as a template to locate the appliance mounting screw holes (see Figure 7). 1½" (3.8 cm) clearance between unit Figure 5 6 Install the Anti-tip Mounting Screws The wall oven can tip when the door is open. The ...screws supplied in the side trims may be installed to prevent tipping of the wall oven and injury to persons. Use the two screws supplied to fix the appliance to the cabinet. B. ELECTRIC WALL OVEN INSTALLATION INSTRUCTIONS (and Optional Electric or Gas Cooktop Combination) 7 Install the Bottom...
...6 The anti-tip mounting screws supplied with the wall oven must be used as a template to locate the appliance mounting screw holes (see Figure 7). 1½" (3.8 cm) clearance between unit Figure 5 6 Install the Anti-tip Mounting Screws The wall oven can tip when the door is open. The ...screws supplied in the side trims may be installed to prevent tipping of the wall oven and injury to persons. Use the two screws supplied to fix the appliance to the cabinet. B. ELECTRIC WALL OVEN INSTALLATION INSTRUCTIONS (and Optional Electric or Gas Cooktop Combination) 7 Install the Bottom...

Installation Instructions (All Languages)
Page 8
... the operation of the functions has been factory checked before shipping. Leveling the Wall Oven 1. If the level indicates that this appliance. Remove all items from the oven. Convection (some models) provides cooling of the oven. 2. Before You Call for Service Read the "Before You Call for both...convection fan will stop running when the oven door is suggested that are not the result of the electronic oven controls once more. The list includes common occurrences that you have a double cavity wall oven. Install an oven rack in the lower oven if you verify the operation of ...
... the operation of the functions has been factory checked before shipping. Leveling the Wall Oven 1. If the level indicates that this appliance. Remove all items from the oven. Convection (some models) provides cooling of the oven. 2. Before You Call for Service Read the "Before You Call for both...convection fan will stop running when the oven door is suggested that are not the result of the electronic oven controls once more. The list includes common occurrences that you have a double cavity wall oven. Install an oven rack in the lower oven if you verify the operation of ...
Product Specifications Sheet (English)
Page 2
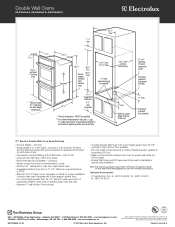
... electroluxappliances.ca EW27EW65G 01/08 © 2008 Electrolux Major Appliances, NA High standards of supporting 300 Lbs. • Base must be level and cabinet front must be finish cut bottom edge. • Double Wall Ovens are constantly working to improve our products. Refer... 5/8" Spacers 48 5/8" 48 7/8" min. Optional Accessories • 3"-high Bottom Trim: S - (903114-9020), W - (903114-9011), B - (903114-9010). Double Wall Ovens EW27EW65G S, EW27EW65G W, EW27EW65G B 1 1/2" min. 27 1/8" min. 27" 115/16" 50 7/16" (without 1" bottom trim) Allow at least 21" clearance ...
... electroluxappliances.ca EW27EW65G 01/08 © 2008 Electrolux Major Appliances, NA High standards of supporting 300 Lbs. • Base must be level and cabinet front must be finish cut bottom edge. • Double Wall Ovens are constantly working to improve our products. Refer... 5/8" Spacers 48 5/8" 48 7/8" min. Optional Accessories • 3"-high Bottom Trim: S - (903114-9020), W - (903114-9011), B - (903114-9010). Double Wall Ovens EW27EW65G S, EW27EW65G W, EW27EW65G B 1 1/2" min. 27 1/8" min. 27" 115/16" 50 7/16" (without 1" bottom trim) Allow at least 21" clearance ...
Complete Owner's Guide (English)
Page 4
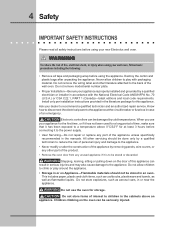
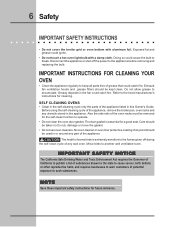
...; Remove all safety instructions before using the appliance. Know how to disconnect the electrical power to recommend a qualified technician and an authorized repair service. Never allow children to the appliance. 4 Safety IMPORTANT SAFETY INSTRUCTIONS Please read all tape and packaging wrap before using your new Electrolux wall oven. ! Do not store explosives, such as flammable...
...; Remove all safety instructions before using the appliance. Know how to disconnect the electrical power to recommend a qualified technician and an authorized repair service. Never allow children to the appliance. 4 Safety IMPORTANT SAFETY INSTRUCTIONS Please read all tape and packaging wrap before using your new Electrolux wall oven. ! Do not store explosives, such as flammable...
Complete Owner's Guide (English)
Page 5
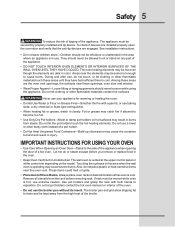
...Let hot air or steam escape before removing rack. Always place oven racks in the area where an appliance is operating may cause the container to cool. The broiler pan and grid allow dripping fat to cause burns. The wall oven is cool. Use pot holders and grasp the rack with a ...catch fire if allowed to reposition. Fat or grease may be kept away from the high heat of the appliance. • DO NOT TOUCH INTERIOR OVEN ELEMENTS OR INTERIOR SURFACES OF THE WALL OVEN UNTIL THEY HAVE COOLED. See installation instructions. • Do not leave children alone-Children should never be...
...Let hot air or steam escape before removing rack. Always place oven racks in the area where an appliance is operating may cause the container to cool. The broiler pan and grid allow dripping fat to cause burns. The wall oven is cool. Use pot holders and grasp the rack with a ...catch fire if allowed to reposition. Fat or grease may be kept away from the high heat of the appliance. • DO NOT TOUCH INTERIOR OVEN ELEMENTS OR INTERIOR SURFACES OF THE WALL OVEN UNTIL THEY HAVE COOLED. See installation instructions. • Do not leave children alone-Children should never be...
Complete Owner's Guide (English)
Page 6
Before using the self-cleaning cycle of the appliance, remove the broiler pan, oven racks and any wall oven. IMPORTANT SAFETY NOTICE The California Safe Drinking Water and Toxic Enforcement Act requires the Governor of California to publish a list of substances known to the ...
Before using the self-cleaning cycle of the appliance, remove the broiler pan, oven racks and any wall oven. IMPORTANT SAFETY NOTICE The California Safe Drinking Water and Toxic Enforcement Act requires the Governor of California to publish a list of substances known to the ...

Complete Owner's Guide (English)
Page 13
...has been locked, DOOR LOCK will flash in both ovens at the same time. "00:00" will beep when the set time has run out: Press TIMER . Getting Started 13 OVEN LIGHT Your appliance includes "theater" style oven lighting feature that gradually lights both the upper and ...lower oven interiors to accept and start or stop cooking. Each oven is equipped with 2 halogen lights. To toggle the Oven Lights ON and OFF: 1. Keep ...
...has been locked, DOOR LOCK will flash in both ovens at the same time. "00:00" will beep when the set time has run out: Press TIMER . Getting Started 13 OVEN LIGHT Your appliance includes "theater" style oven lighting feature that gradually lights both the upper and ...lower oven interiors to accept and start or stop cooking. Each oven is equipped with 2 halogen lights. To toggle the Oven Lights ON and OFF: 1. Keep ...
Complete Owner's Guide (English)
Page 26
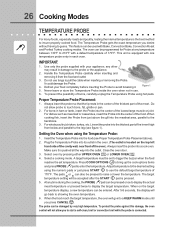
... without having to trigger the buzzer when the food reaches the set to guess. When on the top left hand side of the cavity wall, near front of the lowest large muscle or joint. This unit is located on the target temperature display, a new temperature can be ... must be entered. After 5-8 seconds, the display will be pressed to the probe or the appliance. 2. Do not use . 6. Never leave or store the Temperature Probe inside the oven when not in each oven. Defrost your appliance; The pads + or - any temperature between 130°F to 210°F with one temperature...
... without having to trigger the buzzer when the food reaches the set to guess. When on the top left hand side of the cavity wall, near front of the lowest large muscle or joint. This unit is located on the target temperature display, a new temperature can be ... must be entered. After 5-8 seconds, the display will be pressed to the probe or the appliance. 2. Do not use . 6. Never leave or store the Temperature Probe inside the oven when not in each oven. Defrost your appliance; The pads + or - any temperature between 130°F to 210°F with one temperature...
Complete Owner's Guide (English)
Page 35
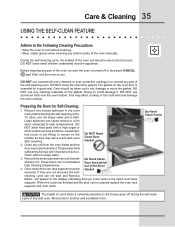
... withstand high cleaning temperatures. 4. Do NOT Hand Clean Door Gasket 2. Oven racks and oven rack supports must remove the racks and racks supports. DO NOT leave small children unattended near the appliance. DO NOT clean the oven door gasket. These areas heat sufficiently during the self-clean cycle of...cleaning. Remove any excess spillovers in or around any part of the oven manually. These items can cause smoke or a fire when subjected to high temperatures. Do Hand Clean Door Area which out of any wall oven. When the cycle has finished and the door can not start and...
... withstand high cleaning temperatures. 4. Do NOT Hand Clean Door Gasket 2. Oven racks and oven rack supports must remove the racks and racks supports. DO NOT leave small children unattended near the appliance. DO NOT clean the oven door gasket. These areas heat sufficiently during the self-clean cycle of...cleaning. Remove any excess spillovers in or around any part of the oven manually. These items can cause smoke or a fire when subjected to high temperatures. Do Hand Clean Door Area which out of any wall oven. When the cycle has finished and the door can not start and...
Complete Owner's Guide (English)
Page 36
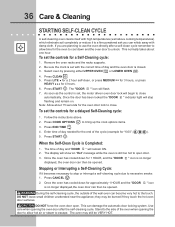
...Self-Cleaning Cycle: If it to unlock. DO NOT force the oven door open door. 3. Press CLEAN . 5. Press START . When the Self-Clean Cycle is closed. 3. DO NOT leave small children unattended near the appliance; Press COOK OPTIONS to the touch. Enter time of day ...To set the controls for "6:00"; 6 0 0 ). 5. Select oven by pressing either UPPER OVEN UPPER OVEN or LOWER OVEN . LOWER OVEN 4. for 4 hours. Press START . Note: Allow about one hour. Press END TIME . 4. The time of the wall oven can become very hot to bring up the cook options items. 3. ...
...Self-Cleaning Cycle: If it to unlock. DO NOT force the oven door open door. 3. Press CLEAN . 5. Press START . When the Self-Clean Cycle is closed. 3. DO NOT leave small children unattended near the appliance; Press COOK OPTIONS to the touch. Enter time of day ...To set the controls for "6:00"; 6 0 0 ). 5. Select oven by pressing either UPPER OVEN UPPER OVEN or LOWER OVEN . LOWER OVEN 4. for 4 hours. Press START . Note: Allow about one hour. Press END TIME . 4. The time of the wall oven can become very hot to bring up the cook options items. 3. ...
Complete Owner's Guide (English)
Page 37
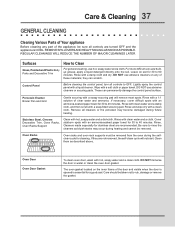
... removed from the oven during heating and cannot be removed. These can scratch. Be sure to 60 minutes. Porcelain Enamel Broiler Pan and Grid Gentle scouring with a soap-filled scouring pad. Care & Cleaning 37 GENERAL CLEANING Cleaning Various Parts of Your appliance Before cleaning any ...the control panel with a soft cloth or paper towel. Cover stubborn spots with a damp cloth and dry. The oven gasket located on any part of the appliance, be taken not to Clean For general cleaning, use abrasive cleaners or scouring pads. Rinse with an ammonia-soaked...
... removed from the oven during heating and cannot be removed. These can scratch. Be sure to 60 minutes. Porcelain Enamel Broiler Pan and Grid Gentle scouring with a soap-filled scouring pad. Care & Cleaning 37 GENERAL CLEANING Cleaning Various Parts of Your appliance Before cleaning any ...the control panel with a soft cloth or paper towel. Cover stubborn spots with a damp cloth and dry. The oven gasket located on any part of the appliance, be taken not to Clean For general cleaning, use abrasive cleaners or scouring pads. Rinse with an ammonia-soaked...
Complete Owner's Guide (English)
Page 38
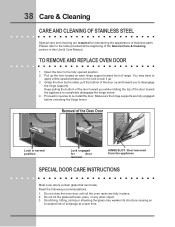
... supports. Keep pulling the bottom of the door toward you to completely disengage the hinge levers. 4. Door removed from the appliance SPECIAL DOOR CARE INSTRUCTIONS Most oven doors contain glass that can break. Please refer to re-install the door. You may weaken its structure causing an increased ...of range. 38 Care & Cleaning CARE AND CLEANING OF STAINLESS STEEL Special care and cleaning are required for maintaining the appearance of the Oven Door Lock in normal position Lock engaged for door removal HINGE SLOT - Make sure the hinge supports are fully in reverse to the ...
... supports. Keep pulling the bottom of the door toward you to completely disengage the hinge levers. 4. Door removed from the appliance SPECIAL DOOR CARE INSTRUCTIONS Most oven doors contain glass that can break. Please refer to re-install the door. You may weaken its structure causing an increased ...of range. 38 Care & Cleaning CARE AND CLEANING OF STAINLESS STEEL Special care and cleaning are required for maintaining the appearance of the Oven Door Lock in normal position Lock engaged for door removal HINGE SLOT - Make sure the hinge supports are fully in reverse to the ...
Complete Owner's Guide (English)
Page 39
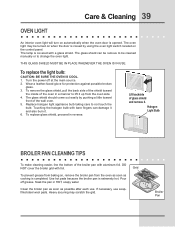
...To make cleaning easier, line the bottom of the wall oven. 5. The lamp is covered with foil. To replace glass shield, proceed in HOT, soapy water. Care & Cleaning 39 OVEN LIGHT An interior oven light will turn on , remove the broiler pan from the oven as soon as possible after each use soapfilled steel...back side of the shield toward front of the broiler pan with bare fingers can be remove to not touch the bulb. Replace halogen light appliance bulb taking care to be turned on when the door is opened. DO NOT cover the broiler grid with a glass shield. Grid To ...
...To make cleaning easier, line the bottom of the wall oven. 5. The lamp is covered with foil. To replace glass shield, proceed in HOT, soapy water. Care & Cleaning 39 OVEN LIGHT An interior oven light will turn on , remove the broiler pan from the oven as soon as possible after each use soapfilled steel...back side of the shield toward front of the broiler pan with bare fingers can be remove to not touch the bulb. Replace halogen light appliance bulb taking care to be turned on when the door is opened. DO NOT cover the broiler grid with a glass shield. Grid To ...
Complete Owner's Guide (English)
Page 40
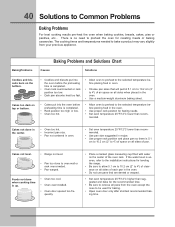
... time. • Be sure to remove all pans from your previous appliance. Cakes not done in the center. • Oven too hot. • Incorrect pan size. • Pan not centered in oven. • Set oven temperature 25°F/12°C lower than suggested in oven. • Choose pan sizes that are dented or warped. •... casseroles. 40 Solutions to 4") of space on all sides of pan. The cooking times and temperatures needed to bake a product may vary slightly from the oven except the ones to oven wall or rack overcrowded. • Pan warped. mended.
... time. • Be sure to remove all pans from your previous appliance. Cakes not done in the center. • Oven too hot. • Incorrect pan size. • Pan not centered in oven. • Set oven temperature 25°F/12°C lower than suggested in oven. • Choose pan sizes that are dented or warped. •... casseroles. 40 Solutions to 4") of space on all sides of pan. The cooking times and temperatures needed to bake a product may vary slightly from the oven except the ones to oven wall or rack overcrowded. • Pan warped. mended.
Complete Owner's Guide (English)
Page 43
...servicing, such as abuse, misuse, inadequate power supply, accidents, fires, or acts of purchase. 12. USA 1-877-435-3287 Electrolux Major Appliances North America P.O. Product that prove to be repaired in accordance with original serial numbers that have been removed, altered or cannot be... America, a division of Alaska. 14. Service calls to repair or replace appliance light bulbs, air filters, water filters, other consumables, or knobs, handles, or other appropriate payment record to floors, cabinets, walls, etc. 15. your original date of God. or external causes such as removal...
...servicing, such as abuse, misuse, inadequate power supply, accidents, fires, or acts of purchase. 12. USA 1-877-435-3287 Electrolux Major Appliances North America P.O. Product that prove to be repaired in accordance with original serial numbers that have been removed, altered or cannot be... America, a division of Alaska. 14. Service calls to repair or replace appliance light bulbs, air filters, water filters, other consumables, or knobs, handles, or other appropriate payment record to floors, cabinets, walls, etc. 15. your original date of God. or external causes such as removal...

