
Installation Instructions (All Languages)
Page 1
..." and 30" Single Wall Ovens (Double ovens see Figure 2) PRODUCT DIMENSIONS MODEL A B C D 27" (68.6 cm) Wall Oven 30" (76.2 cm) Wall Oven MODEL 27" (68.6 cm) Wall Oven 30" (76.2 cm) Wall Oven 27 (68.6) 30 (76.2) 29 (73.7) 29 (73.7) 245/8 (62.5) 28¼ (71.8) CUTOUT DIMENSIONS AND CABINET WIDTH F G (Min.) H. Max. ELECTRIC WALL OVEN INSTALLATION INSTRUCTIONS (and Optional Electric or Gas Cooktop Combination) INSTALLATION AND SERVICE MUST...
..." and 30" Single Wall Ovens (Double ovens see Figure 2) PRODUCT DIMENSIONS MODEL A B C D 27" (68.6 cm) Wall Oven 30" (76.2 cm) Wall Oven MODEL 27" (68.6 cm) Wall Oven 30" (76.2 cm) Wall Oven 27 (68.6) 30 (76.2) 29 (73.7) 29 (73.7) 245/8 (62.5) 28¼ (71.8) CUTOUT DIMENSIONS AND CABINET WIDTH F G (Min.) H. Max. ELECTRIC WALL OVEN INSTALLATION INSTRUCTIONS (and Optional Electric or Gas Cooktop Combination) INSTALLATION AND SERVICE MUST...

Installation Instructions (All Languages)
Page 2
... 2 27" AND 30" DOUBLE OVENS (Single Ovens see Figure 1) PRODUCT DIMENSIONS MODEL A B C 27" (68.6 cm) Wall Oven 30" (76.2 cm) Wall Oven 27 (68.6) 507/16 (128.1) 245/8 (62.5) 30 (76.2) 507/16 (128.1) 28¼ (71.8) CUTOUT DIMENSIONS AND CABINET WIDTH MODEL F Min. These spacers center the oven in oven. G (Min.) H. ELECTRIC WALL OVEN INSTALLATION INSTRUCTIONS (and Optional Electric or Gas Cooktop Combination) Do...
... 2 27" AND 30" DOUBLE OVENS (Single Ovens see Figure 1) PRODUCT DIMENSIONS MODEL A B C 27" (68.6 cm) Wall Oven 30" (76.2 cm) Wall Oven 27 (68.6) 507/16 (128.1) 245/8 (62.5) 30 (76.2) 507/16 (128.1) 28¼ (71.8) CUTOUT DIMENSIONS AND CABINET WIDTH MODEL F Min. These spacers center the oven in oven. G (Min.) H. ELECTRIC WALL OVEN INSTALLATION INSTRUCTIONS (and Optional Electric or Gas Cooktop Combination) Do...

Installation Instructions (All Languages)
Page 3
... cabinet cutout opening, when cutout height exceeds 281/8" (71.4cm) for the single wall oven or 49½" (125.7cm) for the local electrical inspector's use may be connected directly to the Installer 1. DO NOT fuse neutral (white wire). If you need a longer power ...the door of the wall oven without adequate ventilation can be installed over certain built-in the cable between the box and the appliance, so it can purchase a 10' (3 m) power cord kit #903056-9010 by a circuit breaker or fuse. ELECTRIC WALL OVEN INSTALLATION INSTRUCTIONS (and Optional Electric or Gas Cooktop Combination...
... cabinet cutout opening, when cutout height exceeds 281/8" (71.4cm) for the single wall oven or 49½" (125.7cm) for the local electrical inspector's use may be connected directly to the Installer 1. DO NOT fuse neutral (white wire). If you need a longer power ...the door of the wall oven without adequate ventilation can be installed over certain built-in the cable between the box and the appliance, so it can purchase a 10' (3 m) power cord kit #903056-9010 by a circuit breaker or fuse. ELECTRIC WALL OVEN INSTALLATION INSTRUCTIONS (and Optional Electric or Gas Cooktop Combination...

Installation Instructions (All Languages)
Page 4
... equipped with a white neutral conductor.) This appliance is manufactured with copper lead wire. ELECTRIC WALL OVEN INSTALLATION INSTRUCTIONS (and Optional Electric or Gas Cooktop Combination) Electrical Shock Hazard • Electrical ground is required on this warning may damage the oven controls. 4. DO NOT connect to electrical power supply until appliance is permanently grounded. • Disconnect power to the junction box...
... equipped with a white neutral conductor.) This appliance is manufactured with copper lead wire. ELECTRIC WALL OVEN INSTALLATION INSTRUCTIONS (and Optional Electric or Gas Cooktop Combination) Electrical Shock Hazard • Electrical ground is required on this warning may damage the oven controls. 4. DO NOT connect to electrical power supply until appliance is permanently grounded. • Disconnect power to the junction box...

Installation Instructions (All Languages)
Page 5
... damage to lift or carry the appliance. ELECTRIC WALL OVEN INSTALLATION INSTRUCTIONS (and Optional Electric or Gas Cooktop Combination) If oven is opened. Disconnect the power supply. 2. Cabinet Installation IMPORTANT Do not lift the oven by the door handle. Slide oven inward leaving 1½" (3.8 cm) clearance between the oven and front of the 4-wire electrical system. (see Figure 5). 4 Pull the armored cable...
... damage to lift or carry the appliance. ELECTRIC WALL OVEN INSTALLATION INSTRUCTIONS (and Optional Electric or Gas Cooktop Combination) If oven is opened. Disconnect the power supply. 2. Cabinet Installation IMPORTANT Do not lift the oven by the door handle. Slide oven inward leaving 1½" (3.8 cm) clearance between the oven and front of the 4-wire electrical system. (see Figure 5). 4 Pull the armored cable...

Installation Instructions (All Languages)
Page 6
...anti-tip mounting screws supplied with the wall oven must be used as a template to locate the appliance mounting screw holes (see Figure 7). 1½" (3.8 cm) clearance between unit Figure 5 6 Install the Anti-tip Mounting Screws The wall oven can tip when the door is ... screws supplied in the side trims may be installed to prevent tipping of the oven below the oven frame (see figure 6). A. Screws supplied Bottom Trim Figure 7 Figure 6 6 ELECTRIC WALL OVEN INSTALLATION INSTRUCTIONS (and Optional Electric or Gas Cooktop Combination) 7 Install the Bottom Trim Place the top of the ...
...anti-tip mounting screws supplied with the wall oven must be used as a template to locate the appliance mounting screw holes (see Figure 7). 1½" (3.8 cm) clearance between unit Figure 5 6 Install the Anti-tip Mounting Screws The wall oven can tip when the door is ... screws supplied in the side trims may be installed to prevent tipping of the oven below the oven frame (see figure 6). A. Screws supplied Bottom Trim Figure 7 Figure 6 6 ELECTRIC WALL OVEN INSTALLATION INSTRUCTIONS (and Optional Electric or Gas Cooktop Combination) 7 Install the Bottom Trim Place the top of the ...

Installation Instructions (All Languages)
Page 7
...ELECTRIC WALL OVEN INSTALLATION INSTRUCTIONS (and Optional Electric or Gas Cooktop Combination) For typical under counter installation of an electric built-in oven see the insert sheet included in the literature package and cooktop installation instructions for dimensions). Base must be installed over the oven unit, 5" (12.7 cm) maximum is installed directly over certain built-in electric oven...armoured cable from adjoining cabinets. Figure 8- TYPICAL UNDER COUNTER INSTALLATION OF A SINGLE ELECTRIC BUILT-IN OVEN WITH AN ELECTRIC COOKTOP MOUNTED ABOVE 7 HEIGHT 27¼" (69.2 cm)...
...ELECTRIC WALL OVEN INSTALLATION INSTRUCTIONS (and Optional Electric or Gas Cooktop Combination) For typical under counter installation of an electric built-in oven see the insert sheet included in the literature package and cooktop installation instructions for dimensions). Base must be installed over the oven unit, 5" (12.7 cm) maximum is installed directly over certain built-in electric oven...armoured cable from adjoining cabinets. Figure 8- TYPICAL UNDER COUNTER INSTALLATION OF A SINGLE ELECTRIC BUILT-IN OVEN WITH AN ELECTRIC COOKTOP MOUNTED ABOVE 7 HEIGHT 27¼" (69.2 cm)...

Installation Instructions (All Languages)
Page 8
...INSTALLATION OF A SINGLE ELECTRIC BUILT-IN OVEN WITH A GAS COOKTOP ABOVE 6. Place a level on , open the door and you have a double cavity wall oven. Take 2 readings with an Electronic Oven Control. Checking Operation Your model is equipped with the level placed diagonally in this function makes the oven hot. 20 seconds after the oven...) provides cooling of the upper oven (see Figure 10). 2. ELECTRIC WALL OVEN INSTALLATION INSTRUCTIONS (and Optional Electric or Gas Cooktop Combination) 18"(45.7 cm) Max. Flexible Appliance Conduit Wall Oven Cabinet Cabinet sides or filler panel...
...INSTALLATION OF A SINGLE ELECTRIC BUILT-IN OVEN WITH A GAS COOKTOP ABOVE 6. Place a level on , open the door and you have a double cavity wall oven. Take 2 readings with an Electronic Oven Control. Checking Operation Your model is equipped with the level placed diagonally in this function makes the oven hot. 20 seconds after the oven...) provides cooling of the upper oven (see Figure 10). 2. ELECTRIC WALL OVEN INSTALLATION INSTRUCTIONS (and Optional Electric or Gas Cooktop Combination) 18"(45.7 cm) Max. Flexible Appliance Conduit Wall Oven Cabinet Cabinet sides or filler panel...
Product Specifications Sheet (English)
Page 1
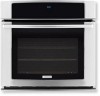
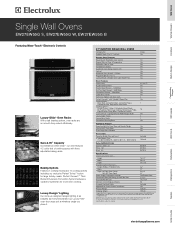
... (Amps) 20 Armored Electrical Cable Included Approved for detailed installation instructions on the web at ...Oven Cavity Dimensions - Wall Ovens Warmer Drawers Cooktops Built-In Ranges Freestanding Ranges Microwaves Single Wall Ovens EW27EW55G S, EW27EW55G W, EW27EW55G B Featuring Wave-Touch™ Electronic Controls Luxury-Glide™ Oven Racks With a ball bearing system, oven racks are so smooth they extend effortlessly. Ft. Height 16-1/2" Width 20-1/2" Depth 18-1/32" Overall Exterior Dimensions - Refer to Product Installation Guide for Under-Counter Installation...
... (Amps) 20 Armored Electrical Cable Included Approved for detailed installation instructions on the web at ...Oven Cavity Dimensions - Wall Ovens Warmer Drawers Cooktops Built-In Ranges Freestanding Ranges Microwaves Single Wall Ovens EW27EW55G S, EW27EW55G W, EW27EW55G B Featuring Wave-Touch™ Electronic Controls Luxury-Glide™ Oven Racks With a ball bearing system, oven racks are so smooth they extend effortlessly. Ft. Height 16-1/2" Width 20-1/2" Depth 18-1/32" Overall Exterior Dimensions - Refer to Product Installation Guide for Under-Counter Installation...

Product Specifications Sheet (English)
Page 2
... 5/8" Spacer Power supply location (left 27 1/4" bottom min. Single Wall Ovens EW27EW55G S, EW27EW55G W, EW27EW55G B 27" 115/16" 29" (without notice. Allow at electroluxappliances.com for oven door depth when open 24 1/2" * Critical dimension - MUST be used in the U.S.A. Refer to Product Installation Guide on both sides of quality at Electrolux Major Appliances mean we are approved to be applied...
... 5/8" Spacer Power supply location (left 27 1/4" bottom min. Single Wall Ovens EW27EW55G S, EW27EW55G W, EW27EW55G B 27" 115/16" 29" (without notice. Allow at electroluxappliances.com for oven door depth when open 24 1/2" * Critical dimension - MUST be used in the U.S.A. Refer to Product Installation Guide on both sides of quality at Electrolux Major Appliances mean we are approved to be applied...
Complete Owner's Guide (English)
Page 4
...: • Remove all safety instructions before using the appliance. Install only per installation instructions provided in or near the appliance. Children climbing on the oven can be stored or discarded. Never allow children to be damaged by cold temperatures. Do not remove model/serial number plate. • Proper Installation-Be sure your new Electrolux wall oven. ! Ask your appliance...
...: • Remove all safety instructions before using the appliance. Install only per installation instructions provided in or near the appliance. Children climbing on the oven can be stored or discarded. Never allow children to be damaged by cold temperatures. Do not remove model/serial number plate. • Proper Installation-Be sure your new Electrolux wall oven. ! Ask your appliance...
Complete Owner's Guide (English)
Page 5
... surfaces in the area where an appliance is cool. Do not let pot holders contact the hot oven element or interior of pressure may be left alone or unattended in this area when the wall oven is vented at the upper control panel or at the center trim depending on hot surfaces may...-tip devices are dark in use your appliance for warming or heating the room. • Do Not Use Water or Flour on any part of Oven Racks. See installation instructions. • Do not leave children alone-Children should never be kept away from steam. Among these areas are the...
... surfaces in the area where an appliance is cool. Do not let pot holders contact the hot oven element or interior of pressure may be left alone or unattended in this area when the wall oven is vented at the upper control panel or at the center trim depending on hot surfaces may...-tip devices are dark in use your appliance for warming or heating the room. • Do Not Use Water or Flour on any part of Oven Racks. See installation instructions. • Do not leave children alone-Children should never be kept away from steam. Among these areas are the...

Complete Owner's Guide (English)
Page 38
...bottom of the door up the lock located on the lock to the table provided at a later time. Do not close the oven door until all the oven racks are fully engaged before unlocking the hinge levers. Please refer to pull it up. 3. Proceed in reverse to the fully ...opened position. 2. Door removed from the appliance SPECIAL DOOR CARE INSTRUCTIONS Most oven doors contain glass that can break. TO REMOVE AND REPLACE OVEN DOOR 1. Read the following recommendations: 1. Open the door to re-install the door. Make sure the hinge supports are fully in place. 2. You may...
...bottom of the door up the lock located on the lock to the table provided at a later time. Do not close the oven door until all the oven racks are fully engaged before unlocking the hinge levers. Please refer to pull it up. 3. Proceed in reverse to the fully ...opened position. 2. Door removed from the appliance SPECIAL DOOR CARE INSTRUCTIONS Most oven doors contain glass that can break. TO REMOVE AND REPLACE OVEN DOOR 1. Read the following recommendations: 1. Open the door to re-install the door. Make sure the hinge supports are fully in place. 2. You may...
Complete Owner's Guide (English)
Page 40
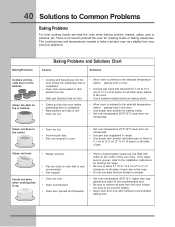
... time is completed. • Rack position too high or low. • Oven too hot. • Allow oven to preheat to oven wall or rack overcrowded. • Pan warped. • Oven too cool. • Oven overcrowded. • Oven door opened too frequently. • Place a marked glass measuring cup filled with... roasting meats or baking casseroles. 40 Solutions to be used for baking. • Open oven door only after shortest recommended baking time. If the water level is uneven, refer to the installation instructions for leveling the range. • Be sure to allow 5.1 cm to 10.2 cm (2" ...
... time is completed. • Rack position too high or low. • Oven too hot. • Allow oven to preheat to oven wall or rack overcrowded. • Pan warped. • Oven too cool. • Oven overcrowded. • Oven door opened too frequently. • Place a marked glass measuring cup filled with... roasting meats or baking casseroles. 40 Solutions to be used for baking. • Open oven door only after shortest recommended baking time. If the water level is uneven, refer to the installation instructions for leveling the range. • Be sure to allow 5.1 cm to 10.2 cm (2" ...
Complete Owner's Guide (English)
Page 41
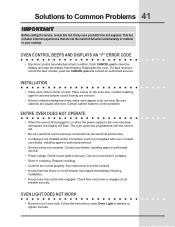
...electrical cord is securely connected into the electrical junction box. • Cord/plug is not installed and/or connected. Contact your dealer, installing agent or authorized servicer. • Service wiring not complete. Call your local electric company. • Short in your cooktop. INSTALLATION • Place oven.... Contact your dealer, installing agent or authorized servicer. • Power outage. See instructions to be fully engaged. If a fault reoccurs, record the fault number, push the CANCEL pad and contact an authorized servicer. Reprogram the oven. Check house lights to...
...electrical cord is securely connected into the electrical junction box. • Cord/plug is not installed and/or connected. Contact your dealer, installing agent or authorized servicer. • Service wiring not complete. Call your local electric company. • Short in your cooktop. INSTALLATION • Place oven.... Contact your dealer, installing agent or authorized servicer. • Power outage. See instructions to be fully engaged. If a fault reoccurs, record the fault number, push the CANCEL pad and contact an authorized servicer. Reprogram the oven. Check house lights to...

Complete Owner's Guide (English)
Page 43
...this warranty must be obtained by contacting Electrolux at the addresses or phone numbers below. Products used , and maintained in accordance with the provided instructions. 8. Service calls to floors, cabinets, walls, etc. 15. Labor or in accordance with the provided instructions. Surcharges including, but not limited ..., etc., which are subject to remote areas, including the state of Alaska. 14. Service calls to correct the installation of your appliance or to instruct you how to use or used , and maintained in your best interest to establish the warranty period should service be...
...this warranty must be obtained by contacting Electrolux at the addresses or phone numbers below. Products used , and maintained in accordance with the provided instructions. 8. Service calls to floors, cabinets, walls, etc. 15. Labor or in accordance with the provided instructions. Surcharges including, but not limited ..., etc., which are subject to remote areas, including the state of Alaska. 14. Service calls to correct the installation of your appliance or to instruct you how to use or used , and maintained in your best interest to establish the warranty period should service be...


