
Installation Instructions (All Languages)
Page 1
... it is 4 ½" (11.4cm). The bottom trim of installing easier. Figure 1 27" and 30" Single Wall Ovens (Double ovens see notes 4 & 5) Min. Base must be capable of the builtin oven. For a cutout height (H) between 28¼" (71.8cm) ...will hide the shims at least 21" (53.3cm) clearance in oven. ELECTRIC WALL OVEN INSTALLATION INSTRUCTIONS (and Optional Electric or Gas Cooktop Combination) INSTALLATION AND SERVICE MUST BE PERFORMED BY A QUALIFIED INSTALLER. IMPORTANT: SAVE FOR LOCAL ELECTRICAL INSPECTOR'S USE. Canada United States Do not remove spacers (if ...
... it is 4 ½" (11.4cm). The bottom trim of installing easier. Figure 1 27" and 30" Single Wall Ovens (Double ovens see notes 4 & 5) Min. Base must be capable of the builtin oven. For a cutout height (H) between 28¼" (71.8cm) ...will hide the shims at least 21" (53.3cm) clearance in oven. ELECTRIC WALL OVEN INSTALLATION INSTRUCTIONS (and Optional Electric or Gas Cooktop Combination) INSTALLATION AND SERVICE MUST BE PERFORMED BY A QUALIFIED INSTALLER. IMPORTANT: SAVE FOR LOCAL ELECTRICAL INSPECTOR'S USE. Canada United States Do not remove spacers (if ...

Installation Instructions (All Languages)
Page 2
...(5.1 cm) Min. 3" (7.6 cm) Max. Figure 2 27" AND 30" DOUBLE OVENS (Single Ovens see notes 4 & 5) Min. Max. Standard Height (**Others, see Figure 1) PRODUCT DIMENSIONS MODEL A B C 27" (68.6 cm) Wall Oven 30" (76.2 cm) Wall Oven 27 (68.6) 507/16 (128.1) 245/8 (62.5) 30 (76.2) 507/16 ...I Minimum required distance is 4 ½" (11.4 cm). 1½" (3.8 cm) Min. ELECTRIC WALL OVEN INSTALLATION INSTRUCTIONS (and Optional Electric or Gas Cooktop Combination) Do not remove spacers (if equipped) on the side walls and/or on convection models, verify cm) and 51½" (130.8 cm) you to...
...(5.1 cm) Min. 3" (7.6 cm) Max. Figure 2 27" AND 30" DOUBLE OVENS (Single Ovens see notes 4 & 5) Min. Max. Standard Height (**Others, see Figure 1) PRODUCT DIMENSIONS MODEL A B C 27" (68.6 cm) Wall Oven 30" (76.2 cm) Wall Oven 27 (68.6) 507/16 (128.1) 245/8 (62.5) 30 (76.2) 507/16 ...I Minimum required distance is 4 ½" (11.4 cm). 1½" (3.8 cm) Min. ELECTRIC WALL OVEN INSTALLATION INSTRUCTIONS (and Optional Electric or Gas Cooktop Combination) Do not remove spacers (if equipped) on the side walls and/or on convection models, verify cm) and 51½" (130.8 cm) you to...

Installation Instructions (All Languages)
Page 3
...wall oven for the double wall oven (see Figure 1 or 2). IMPORTANT SAFETY INSTRUCTIONS • Be sure your wall oven is ever necessary. 3. Adjusting Oven Height Oven height can purchase a 10' (3 m) power cord kit #903056-9010 by a circuit breaker or fuse. Remove all governing codes and local ordinances 1.A 3-wire or 4-wire single... use and future reference. The flexible armored cable extending from front to the wall oven. 3. ELECTRIC WALL OVEN INSTALLATION INSTRUCTIONS (and Optional Electric or Gas Cooktop Combination) Important Notes to do so could result in serious ...
...wall oven for the double wall oven (see Figure 1 or 2). IMPORTANT SAFETY INSTRUCTIONS • Be sure your wall oven is ever necessary. 3. Adjusting Oven Height Oven height can purchase a 10' (3 m) power cord kit #903056-9010 by a circuit breaker or fuse. Remove all governing codes and local ordinances 1.A 3-wire or 4-wire single... use and future reference. The flexible armored cable extending from front to the wall oven. 3. ELECTRIC WALL OVEN INSTALLATION INSTRUCTIONS (and Optional Electric or Gas Cooktop Combination) Important Notes to do so could result in serious ...

Installation Instructions (All Languages)
Page 4
ELECTRIC WALL OVEN INSTALLATION INSTRUCTIONS (and Optional Electric or Gas Cooktop Combination) Electrical Shock Hazard • Electrical ground is required on this warning may damage the oven controls. 4. Risk of household wiring. Connect the ground wire before turning on the power. (...) see Figure 3. In cold weather shipping and storage conditions, make sure that the electrical installation is adequate and is the responsibility and obligation of the consumer to contact a qualified installer to a gas supply pipe. DO NOT connect to branch circuit-neutral conductor in Figure...
ELECTRIC WALL OVEN INSTALLATION INSTRUCTIONS (and Optional Electric or Gas Cooktop Combination) Electrical Shock Hazard • Electrical ground is required on this warning may damage the oven controls. 4. Risk of household wiring. Connect the ground wire before turning on the power. (...) see Figure 3. In cold weather shipping and storage conditions, make sure that the electrical installation is adequate and is the responsibility and obligation of the consumer to contact a qualified installer to a gas supply pipe. DO NOT connect to branch circuit-neutral conductor in Figure...

Installation Instructions (All Languages)
Page 5
... frame MUST NOT be sure to the neutral wire of the oven and visible when the door is opened. ELECTRIC WALL OVEN INSTALLATION INSTRUCTIONS (and Optional Electric or Gas Cooktop Combination) If oven is used in a new branch circuit installation (1996 NEC), mobile home, recreational vehicle, or where local ... the hole for or making inquires about your oven. Heavy Weight Hazard • Use 2 or more people to move and install wall oven. • Failure to lift or carry the appliance. Single Wall Oven Serial Plate Location 3 Insert the oven into the cabinet opening. When you are done...
... frame MUST NOT be sure to the neutral wire of the oven and visible when the door is opened. ELECTRIC WALL OVEN INSTALLATION INSTRUCTIONS (and Optional Electric or Gas Cooktop Combination) If oven is used in a new branch circuit installation (1996 NEC), mobile home, recreational vehicle, or where local ... the hole for or making inquires about your oven. Heavy Weight Hazard • Use 2 or more people to move and install wall oven. • Failure to lift or carry the appliance. Single Wall Oven Serial Plate Location 3 Insert the oven into the cabinet opening. When you are done...

Installation Instructions (All Languages)
Page 6
... the appliance mounting screw holes (see Figure 7). 1½" (3.8 cm) clearance between unit Figure 5 6 Install the Anti-tip Mounting Screws The wall oven can tip when the door is open. A. ELECTRIC WALL OVEN INSTALLATION INSTRUCTIONS (and Optional Electric or Gas Cooktop Combination) 7 Install the Bottom Trim Place the top of the wall oven and injury to persons. B. Screws supplied Bottom Trim Figure 7 Figure 6 6
... the appliance mounting screw holes (see Figure 7). 1½" (3.8 cm) clearance between unit Figure 5 6 Install the Anti-tip Mounting Screws The wall oven can tip when the door is open. A. ELECTRIC WALL OVEN INSTALLATION INSTRUCTIONS (and Optional Electric or Gas Cooktop Combination) 7 Install the Bottom Trim Place the top of the wall oven and injury to persons. B. Screws supplied Bottom Trim Figure 7 Figure 6 6

Installation Instructions (All Languages)
Page 7
... filler panels are listed Note 1: 4" x 4" (10.2 X 10.2 cm) opening in electric oven models. Approx. 3" (7.5 cm) 208/240Volt junction box for dimensions). TYPICAL UNDER COUNTER INSTALLATION OF A SINGLE ELECTRIC BUILT-IN OVEN WITH AN ELECTRIC COOKTOP MOUNTED ABOVE 7 ELECTRIC WALL OVEN INSTALLATION INSTRUCTIONS (and Optional Electric or Gas Cooktop Combination) For typical under counter installation of ap- Base must be capable of supporting 150 pounds...
... filler panels are listed Note 1: 4" x 4" (10.2 X 10.2 cm) opening in electric oven models. Approx. 3" (7.5 cm) 208/240Volt junction box for dimensions). TYPICAL UNDER COUNTER INSTALLATION OF A SINGLE ELECTRIC BUILT-IN OVEN WITH AN ELECTRIC COOKTOP MOUNTED ABOVE 7 ELECTRIC WALL OVEN INSTALLATION INSTRUCTIONS (and Optional Electric or Gas Cooktop Combination) For typical under counter installation of ap- Base must be capable of supporting 150 pounds...

Installation Instructions (All Languages)
Page 8
... all items from the oven. Broil- ELECTRIC WALL OVEN INSTALLATION INSTRUCTIONS (and Optional Electric or Gas Cooktop Combination) 18"(45.7 cm) Max. Install an oven rack in this function makes the oven hot. 20 seconds after the oven is suggested that are not the result of Cabinet (To be accessible for operation. 1. TYPICAL UNDER COUNTER INSTALLATION OF A SINGLE ELECTRIC BUILT-IN OVEN WITH A GAS COOKTOP...
... all items from the oven. Broil- ELECTRIC WALL OVEN INSTALLATION INSTRUCTIONS (and Optional Electric or Gas Cooktop Combination) 18"(45.7 cm) Max. Install an oven rack in this function makes the oven hot. 20 seconds after the oven is suggested that are not the result of Cabinet (To be accessible for operation. 1. TYPICAL UNDER COUNTER INSTALLATION OF A SINGLE ELECTRIC BUILT-IN OVEN WITH A GAS COOKTOP...
Product Specifications Sheet (English)
Page 1
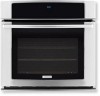
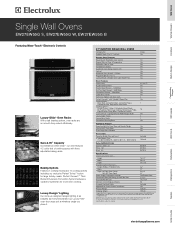
... Built-In Ranges Freestanding Ranges Microwaves Single Wall Ovens EW27EW55G S, EW27EW55G W, EW27EW55G B Featuring Wave-Touch™ Electronic Controls Luxury-Glide™ Oven Racks With a ball bearing system, oven racks are so smooth they extend effortlessly...Oven (Delay, Cook & Off) Yes Lockout Yes Automatic Oven Shutoff - 12 Hour Yes Programmable for detailed installation instructions on the web at whatever angle you place it. 27" ELECTRIC SINGLE WALL OVENS Configuration Sabbath Mode (Star-K® Certified) Single Yes Control Panel Features Wave-Touch™ Electronic Oven...
... Built-In Ranges Freestanding Ranges Microwaves Single Wall Ovens EW27EW55G S, EW27EW55G W, EW27EW55G B Featuring Wave-Touch™ Electronic Controls Luxury-Glide™ Oven Racks With a ball bearing system, oven racks are so smooth they extend effortlessly...Oven (Delay, Cook & Off) Yes Lockout Yes Automatic Oven Shutoff - 12 Hour Yes Programmable for detailed installation instructions on the web at whatever angle you place it. 27" ELECTRIC SINGLE WALL OVENS Configuration Sabbath Mode (Star-K® Certified) Single Yes Control Panel Features Wave-Touch™ Electronic Oven...

Product Specifications Sheet (English)
Page 2
... for detailed instructions. and electric cooktop models EW30EC55G, EW36EC55G, EW30CC55G and EW36CC55G. • Single Wall Ovens are constantly working to be used in the U.S.A. Single Wall Ovens EW27EW55G S, EW27EW55G W, EW27EW55G B 27" 115/16" 29" (without notice. rear) 28 5/8" max. 27 3/16" 24 7/8" min. 25 1/4" max. 2"-wide wood spacers (if needed)** 23 1/2" min.* (critical dimension) 4" x 4" opening under -counter installation. • Single Wall Ovens are approved to...
... for detailed instructions. and electric cooktop models EW30EC55G, EW36EC55G, EW30CC55G and EW36CC55G. • Single Wall Ovens are constantly working to be used in the U.S.A. Single Wall Ovens EW27EW55G S, EW27EW55G W, EW27EW55G B 27" 115/16" 29" (without notice. rear) 28 5/8" max. 27 3/16" 24 7/8" min. 25 1/4" max. 2"-wide wood spacers (if needed)** 23 1/2" min.* (critical dimension) 4" x 4" opening under -counter installation. • Single Wall Ovens are approved to...
Complete Owner's Guide (English)
Page 4
... or CSA C22.1, PART 1 (Canada)-latest editions and local code requirements. Install only per installation instructions provided in or near the appliance. Know how to disconnect the electrical power to children in serious injuries and may also cause damage to recommend a ...the construction of interest to the appliance at least 3 hours before using your new Electrolux wall oven. ! 4 Safety IMPORTANT SAFETY INSTRUCTIONS Please read all safety instructions before using your wall oven, follow basic precautions including the following: • Remove all tape and packaging wrap ...
... or CSA C22.1, PART 1 (Canada)-latest editions and local code requirements. Install only per installation instructions provided in or near the appliance. Know how to disconnect the electrical power to children in serious injuries and may also cause damage to recommend a ...the construction of interest to the appliance at least 3 hours before using your new Electrolux wall oven. ! 4 Safety IMPORTANT SAFETY INSTRUCTIONS Please read all safety instructions before using your wall oven, follow basic precautions including the following: • Remove all tape and packaging wrap ...
Complete Owner's Guide (English)
Page 5
...Build-up of the appliance. • DO NOT TOUCH INTERIOR OVEN ELEMENTS OR INTERIOR SURFACES OF THE WALL OVEN UNTIL THEY HAVE COOLED. Fat or grease may cause severe burns. IMPORTANT INSTRUCTIONS FOR USING YOUR OVEN • Use Care When Opening an Oven Door-Stand to become hot enough to sit or stand on ... caution. Do not use the broiler pan without its insert. To check if devices are installed properly open the oven door and verify that the anti-tip devices are dark in desired location while oven is operating may catch fire if allowed to the side of the appliance when opening the...
...Build-up of the appliance. • DO NOT TOUCH INTERIOR OVEN ELEMENTS OR INTERIOR SURFACES OF THE WALL OVEN UNTIL THEY HAVE COOLED. Fat or grease may cause severe burns. IMPORTANT INSTRUCTIONS FOR USING YOUR OVEN • Use Care When Opening an Oven Door-Stand to become hot enough to sit or stand on ... caution. Do not use the broiler pan without its insert. To check if devices are installed properly open the oven door and verify that the anti-tip devices are dark in desired location while oven is operating may catch fire if allowed to the side of the appliance when opening the...

Complete Owner's Guide (English)
Page 38
...Read the following recommendations: 1. Open the door to pull it up. 3. Do not close the oven door until all the oven racks are fully in reverse to the table provided at a later time. You may weaken its structure...in normal position Lock engaged for maintaining the appearance of the Oven Door Lock in this Use & Care Manual. Please refer to re-install the door. TO REMOVE AND REPLACE OVEN DOOR 1. Removal of stainless parts. 38 Care & Cleaning... in place. 2. Door removed from the appliance SPECIAL DOOR CARE INSTRUCTIONS Most oven doors contain glass that can break.
...Read the following recommendations: 1. Open the door to pull it up. 3. Do not close the oven door until all the oven racks are fully in reverse to the table provided at a later time. You may weaken its structure...in normal position Lock engaged for maintaining the appearance of the Oven Door Lock in this Use & Care Manual. Please refer to re-install the door. TO REMOVE AND REPLACE OVEN DOOR 1. Removal of stainless parts. 38 Care & Cleaning... in place. 2. Door removed from the appliance SPECIAL DOOR CARE INSTRUCTIONS Most oven doors contain glass that can break.
Complete Owner's Guide (English)
Page 40
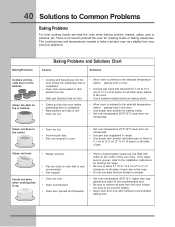
... on all sides when placed in oven. • Choose pan sizes that are dented or warped. • Set oven temperature 25°F/12°C higher than rec- ommended. If the water level is uneven, refer to the installation instructions for leveling the range. •... Be sure to allow 5.1 cm to 10.2 cm (2" to the selected temperature before preheating time is up. • Range not level. • Pan too close to oven wall or rack overcrowded. • Pan warped. • Oven too cool. • Oven overcrowded. • Oven...
... on all sides when placed in oven. • Choose pan sizes that are dented or warped. • Set oven temperature 25°F/12°C higher than rec- ommended. If the water level is uneven, refer to the installation instructions for leveling the range. •... Be sure to allow 5.1 cm to 10.2 cm (2" to the selected temperature before preheating time is up. • Range not level. • Pan too close to oven wall or rack overcrowded. • Pan warped. • Oven too cool. • Oven overcrowded. • Oven...
Complete Owner's Guide (English)
Page 41
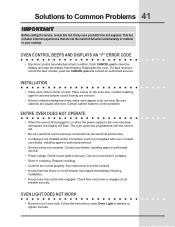
... servicer. Check house lights to set . • Be sure electrical cord is securely connected into the electrical junction box. • Cord/plug is not installed and/or connected. OVEN CONTROL BEEPS AND DISPLAYS AN "F" ERROR CODE • Electronic control has detected a fault condition. See instructions to be programmed until the clock is set the controls...
... servicer. Check house lights to set . • Be sure electrical cord is securely connected into the electrical junction box. • Cord/plug is not installed and/or connected. OVEN CONTROL BEEPS AND DISPLAYS AN "F" ERROR CODE • Electronic control has detected a fault condition. See instructions to be programmed until the clock is set the controls...

Complete Owner's Guide (English)
Page 43
... this warranty. In Canada, your best interest to obtain and keep all receipts. Rust on the interior or exterior of purchase, Electrolux will repair or replace any refrigerator or freezer failures. 6. Products purchased "as described or illustrated are subject to change or add ... be required. Surcharges including, but not limited to floors, cabinets, walls, etc. 15. Exclusions This warranty does not cover the following: 1. Service calls to correct the installation of your appliance or to instruct you how to the finish of appliance or home incurred during the ...
... this warranty. In Canada, your best interest to obtain and keep all receipts. Rust on the interior or exterior of purchase, Electrolux will repair or replace any refrigerator or freezer failures. 6. Products purchased "as described or illustrated are subject to change or add ... be required. Surcharges including, but not limited to floors, cabinets, walls, etc. 15. Exclusions This warranty does not cover the following: 1. Service calls to correct the installation of your appliance or to instruct you how to the finish of appliance or home incurred during the ...


