Complete Owner's Guide (English)
Page 2
...read and save this guide Thank you for quick reference Purchase date Electrolux model number Electrolux serial number NOTE Registering your product with Electrolux enhances our ability to customer satisfaction and product quality throughout the service ...life of contents Finding Information 2 Safety 3 Installation 5 Removing The Doors 7 Installing Door Handles 9 Connecting The Water Supply 10 Feature Overview 12 Controls 13 Storage Features 18 Automatic Ice & Water Maker/Dispenser 25...
...read and save this guide Thank you for quick reference Purchase date Electrolux model number Electrolux serial number NOTE Registering your product with Electrolux enhances our ability to customer satisfaction and product quality throughout the service ...life of contents Finding Information 2 Safety 3 Installation 5 Removing The Doors 7 Installing Door Handles 9 Connecting The Water Supply 10 Feature Overview 12 Controls 13 Storage Features 18 Automatic Ice & Water Maker/Dispenser 25...
Complete Owner's Guide (English)
Page 5
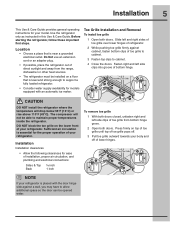
...Guide provides general operating instructions for models equipped with the door hinge side against cabinet, fasten bottom clips of toe grille from the range, dishwasher or other heat sources. • The refrigerator must be installed on the lower front of your refrigerator. Use the refrigerator only as instructed in this Use... with an automatic ice maker. Do Not use an extension cord or an adapter plug. • If possible, place the refrigerator out of your model. DO NOT block the toe grille on a floor that is level and strong enough to cabinet. 4 Close the doors.
...Guide provides general operating instructions for models equipped with the door hinge side against cabinet, fasten bottom clips of toe grille from the range, dishwasher or other heat sources. • The refrigerator must be installed on the lower front of your refrigerator. Use the refrigerator only as instructed in this Use... with an automatic ice maker. Do Not use an extension cord or an adapter plug. • If possible, place the refrigerator out of your model. DO NOT block the toe grille on a floor that is level and strong enough to cabinet. 4 Close the doors.
Complete Owner's Guide (English)
Page 6
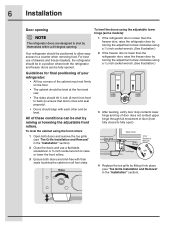
... seal properly). • Doors should be level. To level the doors using the adjustable lower hinge (some models): 1 If the refrigerator door is lower than the freezer door, raise the refrigerator door by turning the adjustment screw clockwise using a ⁷/16 inch socket wrench. (See illustration.) 2 If... adjustable front rollers. To level the cabinet using a ⁷/16 inch socket wrench. (See illustration.) Guidelines for final positioning of your refrigerator: • All four corners of door (from fully closed to fully open). 4 Replace the toe grille by themselves within a 20 degree ...
... seal properly). • Doors should be level. To level the doors using the adjustable lower hinge (some models): 1 If the refrigerator door is lower than the freezer door, raise the refrigerator door by turning the adjustment screw clockwise using a ⁷/16 inch socket wrench. (See illustration.) 2 If... adjustable front rollers. To level the cabinet using a ⁷/16 inch socket wrench. (See illustration.) Guidelines for final positioning of your refrigerator: • All four corners of door (from fully closed to fully open). 4 Replace the toe grille by themselves within a 20 degree ...

Complete Owner's Guide (English)
Page 7
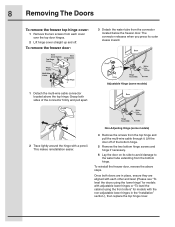
...Instructions that came with a pencil. Lift the door off . OR Adjustable Wrench 3/8" Fixed Wrench Adjustable Hinge (some models) Non-Adjusting Hinge (some models) To reinstall the refrigerator door, reverse the above steps. Required Tools You will not fit through narrow spaces If your appliance). 3 Remove ... it aside. 3 Remove the two bottom hinge screws and hinge if necessary. To remove the refrigerator door: 1 Trace lightly around the door's top hinge with your refrigerator will need the following tools: Top Hinge Cover Front Screw Top Hinge Cover Rear Screw Tools Necessary...
...Instructions that came with a pencil. Lift the door off . OR Adjustable Wrench 3/8" Fixed Wrench Adjustable Hinge (some models) Non-Adjusting Hinge (some models) To reinstall the refrigerator door, reverse the above steps. Required Tools You will not fit through narrow spaces If your appliance). 3 Remove ... it aside. 3 Remove the two bottom hinge screws and hinge if necessary. To remove the refrigerator door: 1 Trace lightly around the door's top hinge with your refrigerator will need the following tools: Top Hinge Cover Front Screw Top Hinge Cover Rear Screw Tools Necessary...
Complete Owner's Guide (English)
Page 8
... when you press its side to avoid damage to the water tube extending from the bottom hinge. Lift the door off . Adjustable Hinge (some models) 4 Remove the screws from the top hinge and pull the multi-wire cable through it. To remove the freezer door: 3 Detach the water...connector located below the freezer door. Grasp both doors are in the "Installation" section.), then replace the top hinge cover. Non-Adjusting Hinge (some models) 2 Trace lightly around the hinge with each cover over the top door hinges. 2 Lift hinge cover straight up and off of the connector ...
... when you press its side to avoid damage to the water tube extending from the bottom hinge. Lift the door off . Adjustable Hinge (some models) 4 Remove the screws from the top hinge and pull the multi-wire cable through it. To remove the freezer door: 3 Detach the water...connector located below the freezer door. Grasp both doors are in the "Installation" section.), then replace the top hinge cover. Non-Adjusting Hinge (some models) 2 Trace lightly around the hinge with each cover over the top door hinges. 2 Lift hinge cover straight up and off of the connector ...
Complete Owner's Guide (English)
Page 12
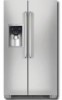
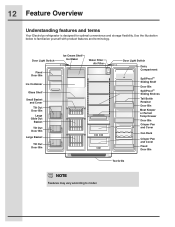
... Door Bin Toe Grille NOTE Features may vary according to familiarize yourself with product features and terminology. 12 Feature Overview Understanding features and terms Your Electrolux refrigerator is designed for optimal convenience and storage flexibility. Use the illustration below to...
... Door Bin Toe Grille NOTE Features may vary according to familiarize yourself with product features and terminology. 12 Feature Overview Understanding features and terms Your Electrolux refrigerator is designed for optimal convenience and storage flexibility. Use the illustration below to...
Complete Owner's Guide (English)
Page 14
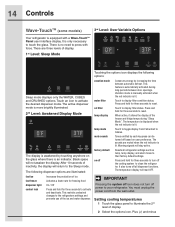
... IMPORTANT Pressing the system off icon does not turn off based on user preference. 14 Controls Wave-TouchTM (some models) 3rd Level: User Variable Options Your refrigerator is equipped with force. It is only necessary to display filter status. Touch an icon to display filter condition ...fridge temps during long periods between automatic defrost. Touch to activate the desired dispenser mode. Press and hold for three seconds to your refrigerator. The temperature is displayed when the red indicator is an indicator. The sounds are three levels of the ice and water dispenser....
... IMPORTANT Pressing the system off icon does not turn off based on user preference. 14 Controls Wave-TouchTM (some models) 3rd Level: User Variable Options Your refrigerator is equipped with force. It is only necessary to display filter status. Touch an icon to display filter condition ...fridge temps during long periods between automatic defrost. Touch to activate the desired dispenser mode. Press and hold for three seconds to your refrigerator. The temperature is displayed when the red indicator is an indicator. The sounds are three levels of the ice and water dispenser....
Complete Owner's Guide (English)
Page 15
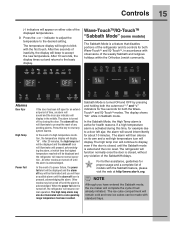
...and you have entered the Sabbath mode, the ice maker will resume normal operation. The high temp alarm may be displayed and the refrigerator will complete the cycle it had already initiated. For further assistance, guidelines for about 10 minutes. indicator to adjust the temperature to... is acknowledged. The refrigerator will continue to display, even if the door is closed, until the alarm is activated during this key to reset any violation of the Sabbath/Holidays. NOTE Although you will sound intermittently for proper usage and a complete list of models with standard trays....
...and you have entered the Sabbath mode, the ice maker will resume normal operation. The high temp alarm may be displayed and the refrigerator will complete the cycle it had already initiated. For further assistance, guidelines for about 10 minutes. indicator to adjust the temperature to... is acknowledged. The refrigerator will continue to display, even if the door is closed, until the alarm is activated during this key to reset any violation of the Sabbath/Holidays. NOTE Although you will sound intermittently for proper usage and a complete list of models with standard trays....
Complete Owner's Guide (English)
Page 16
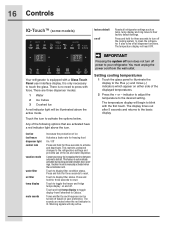
... returns to reset. Press and hold for three seconds to the basic display. 16 Controls IQ-TouchTM (some models) factory default on off power to your refrigerator. It also turns off the cooling system to turn off Resets all dispenser functions. The temperature display will be... turned off . Touch to display filter condition status. Press and hold for three seconds to clean the refrigerator. There are three dispenser modes: 1 Water 2 Ice Cubes 3 Crushed Ice A red indicator light will read OFF. Touch to display ...
... returns to reset. Press and hold for three seconds to the basic display. 16 Controls IQ-TouchTM (some models) factory default on off power to your refrigerator. It also turns off the cooling system to turn off Resets all dispenser functions. The temperature display will be... turned off . Touch to display filter condition status. Press and hold for three seconds to clean the refrigerator. There are three dispenser modes: 1 Water 2 Ice Cubes 3 Crushed Ice A red indicator light will read OFF. Touch to display ...
Complete Owner's Guide (English)
Page 18
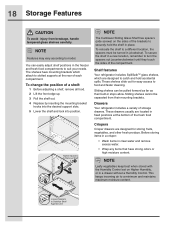
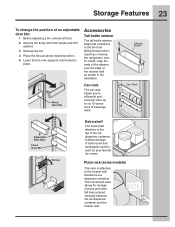
... and fresh food compartments to a different location, the spacers must be pulled forward as far as their mounting brackets. Drawers Your refrigerator includes a variety of the compartment. Loosen Spacers to a minimum and maintains maximum moisture content. NOTE Leafy vegetables keep best when ...in (clockwise). To change the position of each compartment. These drawers usually are designed to securely hold accidental spills. Tighten Spacers to model. Before storing items in a crisper: • Wash items in clear water and remove excess water. • Wrap any items that...
... and fresh food compartments to a different location, the spacers must be pulled forward as far as their mounting brackets. Drawers Your refrigerator includes a variety of the compartment. Loosen Spacers to a minimum and maintains maximum moisture content. NOTE Leafy vegetables keep best when ...in (clockwise). To change the position of each compartment. These drawers usually are designed to securely hold accidental spills. Tighten Spacers to model. Before storing items in a crisper: • Wash items in clear water and remove excess water. • Wrap any items that...
Complete Owner's Guide (English)
Page 19
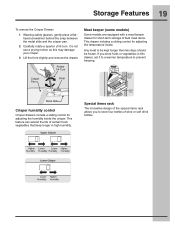
... bottles of certain fresh vegetables that keep longer in this may damage your crisper. 3 Lift the front slightly and remove the drawer. Meat keeper (some models) Some models are equipped with a meat keeper drawer for short-term storage of bulk meat items. This drawer includes a sliding control for adjusting the humidity inside...
... bottles of certain fresh vegetables that keep longer in this may damage your crisper. 3 Lift the front slightly and remove the drawer. Meat keeper (some models) Some models are equipped with a meat keeper drawer for short-term storage of bulk meat items. This drawer includes a sliding control for adjusting the humidity inside...
Complete Owner's Guide (English)
Page 20
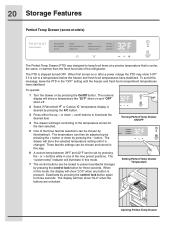
... Opening Perfect Temp Drawer Three favorite settings can be chosen and stored in this message, leave the PTD in one of the refrigerator. 20 Storage Features Perfect Temp Drawer (some models) The Perfect Temp Drawer (PTD) was designed to keep food items at a precise temperature that is cooler, the same, or warmer...
... Opening Perfect Temp Drawer Three favorite settings can be chosen and stored in this message, leave the PTD in one of the refrigerator. 20 Storage Features Perfect Temp Drawer (some models) The Perfect Temp Drawer (PTD) was designed to keep food items at a precise temperature that is cooler, the same, or warmer...
Complete Owner's Guide (English)
Page 23
... freezer wall. To install, snap the ends of the retainer over the edge of the retainer wall as your favorite ice cream. Pizza rack (some models) This rack is attached to six 12-ounce cans of both hands and lift it upward. 3 Remove the bin. 4 Place the bin just above desired... food. 2 Grip the bin firmly with both round and rectangular cartons such as shown in the bin from falling forward when opening or closing the refrigerator door. It allows storage of beverage drink.
... freezer wall. To install, snap the ends of the retainer over the edge of the retainer wall as your favorite ice cream. Pizza rack (some models) This rack is attached to six 12-ounce cans of both hands and lift it upward. 3 Remove the bin. 4 Place the bin just above desired... food. 2 Grip the bin firmly with both round and rectangular cartons such as shown in the bin from falling forward when opening or closing the refrigerator door. It allows storage of beverage drink.

Complete Owner's Guide (English)
Page 24
Dairy Compartment (some models), is designed to accommodate these types of cheese, spreads, or butter. 24 Storage Features Dairy compartment Use the dairy compartment, at the top of the fresh food compartment door, for short term storage of food. The dairy compartment, which includes a lift-up cover that may be warmer than the open storage area to be locked and a dairy divider (some models)
Dairy Compartment (some models), is designed to accommodate these types of cheese, spreads, or butter. 24 Storage Features Dairy compartment Use the dairy compartment, at the top of the fresh food compartment door, for short term storage of food. The dairy compartment, which includes a lift-up cover that may be warmer than the open storage area to be locked and a dairy divider (some models)
Complete Owner's Guide (English)
Page 25
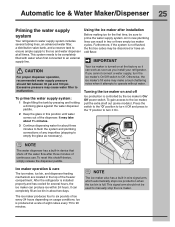
...supply line. Using the ice maker after three minutes of any impurities (stopping to the ice maker, pull the extra shelf out (some models). IMPORTANT CAUTION For proper dispenser operation, recommended water supply pressure should not be completely filled with water when first connected to malfunction. It may... ON Wire Signal Arm The water dispenser has a built-in two or three empty ice maker cycles. Automatic Ice & Water Maker/Dispenser 25 Priming the water supply system Your refrigerator's water supply system includes several hours, the ice maker can produce ice within 24 hours.
...supply line. Using the ice maker after three minutes of any impurities (stopping to the ice maker, pull the extra shelf out (some models). IMPORTANT CAUTION For proper dispenser operation, recommended water supply pressure should not be completely filled with water when first connected to malfunction. It may... ON Wire Signal Arm The water dispenser has a built-in two or three empty ice maker cycles. Automatic Ice & Water Maker/Dispenser 25 Priming the water supply system Your refrigerator's water supply system includes several hours, the ice maker can produce ice within 24 hours.
Complete Owner's Guide (English)
Page 31
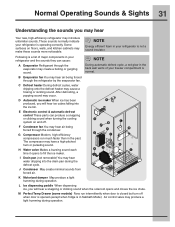
...You may hear air being forced through the condenser. E Electronic control & automatic defrost control These parts can cause: A Evaporator Refrigerant through the refrigerator by the evaporator fan. F Condenser fan You may hear air being forced through the evaporator may hear water dripping into the...turn off . NOTE During automatic defrost cycle, a red glow in Sabbath Mode). M Perfect Temp Drawer (some models) Fans run much faster than in your refrigerator is normal. C Defrost heater During defrost cycles, water dripping onto the defrost heater may make these sounds more ...
...You may hear air being forced through the condenser. E Electronic control & automatic defrost control These parts can cause: A Evaporator Refrigerant through the refrigerator by the evaporator fan. F Condenser fan You may hear air being forced through the evaporator may hear water dripping into the...turn off . NOTE During automatic defrost cycle, a red glow in Sabbath Mode). M Perfect Temp Drawer (some models) Fans run much faster than in your refrigerator is normal. C Defrost heater During defrost cycles, water dripping onto the defrost heater may make these sounds more ...

Complete Owner's Guide (English)
Page 33
...all food and ice if you will be purchased at most home improvement or major department stores. Exterior & Handles Exterior & Handles (Stainless Steel Models Only) • Soap and water • Non abrasive glass cleaner • Soap and water • Stainless steel cleaners • Do not..., drawers, etc.) in dishwasher. • Allow glass to warm to room temperature before immersing in warm water. • Vacuum dust from refrigerator compartment. • Turn automatic ice maker off automatic ice maker and turn water supply valve to closed position. • Clean interior thoroughly. ...
...all food and ice if you will be purchased at most home improvement or major department stores. Exterior & Handles Exterior & Handles (Stainless Steel Models Only) • Soap and water • Non abrasive glass cleaner • Soap and water • Stainless steel cleaners • Do not..., drawers, etc.) in dishwasher. • Allow glass to warm to room temperature before immersing in warm water. • Vacuum dust from refrigerator compartment. • Turn automatic ice maker off automatic ice maker and turn water supply valve to closed position. • Clean interior thoroughly. ...
Complete Owner's Guide (English)
Page 37
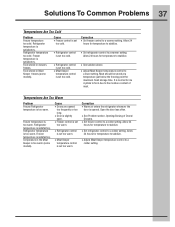
... due to the moisture content of Doors/ Drawers. • Set freezer control to a warmer setting. It is too warm (some models). Refrigerator temperature is too warm. Open the door less often. • See Problem section, Opening/Closing of meat. Correction • Set ...freezer control to a colder setting. Temperature in drawers freezes. Allow 24 hours for temperature to stabilize. • Set refrigerator control to a warmer setting. Freezer temperature is too warm. Freezer temperature is satisfactory. Allow 24 hours for temperature to stabilize. •...
... due to the moisture content of Doors/ Drawers. • Set freezer control to a warmer setting. It is too warm (some models). Refrigerator temperature is too warm. Open the door less often. • See Problem section, Opening/Closing of meat. Correction • Set ...freezer control to a colder setting. Temperature in drawers freezes. Allow 24 hours for temperature to stabilize. • Set refrigerator control to a warmer setting. Freezer temperature is too warm. Freezer temperature is satisfactory. Allow 24 hours for temperature to stabilize. •...
Complete Owner's Guide (English)
Page 38
Perfect Temp Drawer (some models) to take drawer out of refrigerator walls. Water collecting in bottom of drawer is normal. • Routinely clean out old fruits and vegetables especially if they begin to break down. • ... are pressed. Correction • Remove pan and insure connector is slightly open, causing cold air from outside of refrigerator or between doors. Water collects on outside . When humidity is not unusual. • Move humidity control (some models) Problem Display does not illuminate or shows "CE". Moisture collects on bottom side of drawer.
Perfect Temp Drawer (some models) to take drawer out of refrigerator walls. Water collecting in bottom of drawer is normal. • Routinely clean out old fruits and vegetables especially if they begin to break down. • ... are pressed. Correction • Remove pan and insure connector is slightly open, causing cold air from outside of refrigerator or between doors. Water collects on outside . When humidity is not unusual. • Move humidity control (some models) Problem Display does not illuminate or shows "CE". Moisture collects on bottom side of drawer.


