Complete Owner's Guide (English)
Page 2
... service life of contents Finding Information 2 Safety 3 Installation 5 Removing The Doors 7 Installing Door Handles 9 Connecting The Water Supply 10 Feature Overview 12 Controls 13 Storage Features 18 Automatic Ice & Water Maker/Dispenser 25 Changing The Filter 28 Storing Food & Saving Energy... For toll-free telephone support in the mail. Table of your product with Electrolux enhances our ability to serve you for quick reference Purchase date Electrolux model number Electrolux serial number NOTE Registering your new appliance. and Canada: 1-877-4ELECTROLUX (1-877...
... service life of contents Finding Information 2 Safety 3 Installation 5 Removing The Doors 7 Installing Door Handles 9 Connecting The Water Supply 10 Feature Overview 12 Controls 13 Storage Features 18 Automatic Ice & Water Maker/Dispenser 25 Changing The Filter 28 Storing Food & Saving Energy... For toll-free telephone support in the mail. Table of your product with Electrolux enhances our ability to serve you for quick reference Purchase date Electrolux model number Electrolux serial number NOTE Registering your new appliance. and Canada: 1-877-4ELECTROLUX (1-877...
Complete Owner's Guide (English)
Page 3
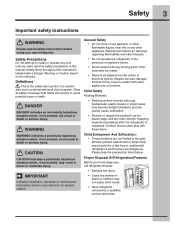
.... Whether junked, abandoned or temporarily stored (even for warnings regarding flammability and other hazards. • Do not operate the refrigerator in the presence of the automatic ice maker. • Remove all staples from the carton to avoid cut injuries. Safety 3...Do not store or use gasoline, or other exterior wrapping material immediately after the refrigerator is used to alert you to install or operate your unit until you throw away your new refrigerator. CAUTION CAUTION indicates a potentially hazardous situation which is the safety alert symbol. ...
.... Whether junked, abandoned or temporarily stored (even for warnings regarding flammability and other hazards. • Do not operate the refrigerator in the presence of the automatic ice maker. • Remove all staples from the carton to avoid cut injuries. Safety 3...Do not store or use gasoline, or other exterior wrapping material immediately after the refrigerator is used to alert you to install or operate your unit until you throw away your new refrigerator. CAUTION CAUTION indicates a potentially hazardous situation which is the safety alert symbol. ...
Complete Owner's Guide (English)
Page 4
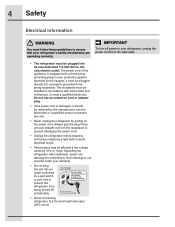
... to your protection against electrical shock hazards. Consult a qualified electrician. IMPORTANT To turn off accidentally. • Avoid connecting refrigerator to avoid electrical shock. • Performance may be affected if the voltage varies by pulling on the power cord. Always... straight out from the wall outlet. • The refrigerator must follow these guidelines to prevent any risk. • Never unplug the refrigerator by 10% or more. 4 Safety Electrical information WARNING You must be installed in accordance with local codes and ordinances. Such damage is...
... to your protection against electrical shock hazards. Consult a qualified electrician. IMPORTANT To turn off accidentally. • Avoid connecting refrigerator to avoid electrical shock. • Performance may be affected if the voltage varies by pulling on the power cord. Always... straight out from the wall outlet. • The refrigerator must follow these guidelines to prevent any risk. • Never unplug the refrigerator by 10% or more. 4 Safety Electrical information WARNING You must be installed in accordance with local codes and ordinances. Such damage is...
Complete Owner's Guide (English)
Page 5
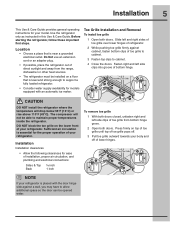
... firmly on the lower front of toe grille to cabinet. 3 Fasten top clips to support a fully loaded refrigerator. • Consider water supply availability for ease of installation, proper air circulation, and plumbing and electrical connections: Sides & Top ³⁄₈ inch Back 1 inch...With both doors closed, unfasten right and left side clips into groove of lower hinges. NOTE If your refrigerator. Installation Installation clearances • Allow the following clearances for models equipped with the door hinge side against cabinet, fasten bottom clips of your...
... firmly on the lower front of toe grille to cabinet. 3 Fasten top clips to support a fully loaded refrigerator. • Consider water supply availability for ease of installation, proper air circulation, and plumbing and electrical connections: Sides & Top ³⁄₈ inch Back 1 inch...With both doors closed, unfasten right and left side clips into groove of lower hinges. NOTE If your refrigerator. Installation Installation clearances • Allow the following clearances for models equipped with the door hinge side against cabinet, fasten bottom clips of your...
Complete Owner's Guide (English)
Page 6
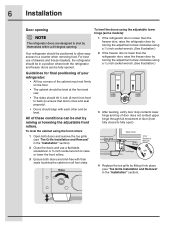
... both doors are bind-free with each other and be met by themselves within a 20 degree opening NOTE The refrigerator doors are designed to a counter when removing food. Your refrigerator should be in the "Installation" section). 2 Close the doors and use of the cabinet must rest firmly on all four sides. 3 After leveling...
... both doors are bind-free with each other and be met by themselves within a 20 degree opening NOTE The refrigerator doors are designed to a counter when removing food. Your refrigerator should be in the "Installation" section). 2 Close the doors and use of the cabinet must rest firmly on all four sides. 3 After leveling...

Complete Owner's Guide (English)
Page 7
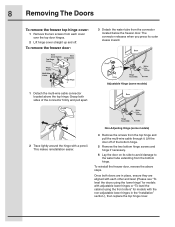
...4 Close the doors. OR Adjustable Wrench 3/8" Fixed Wrench Adjustable Hinge (some models) Non-Adjusting Hinge (some models) To reinstall the refrigerator door, reverse the above steps. Required Tools You will need the following tools: Top Hinge Cover Front Screw Top Hinge Cover Rear Screw ...cover straight up and off of the bottom hinge and set aside in the Installation Instructions that came with a pencil. To remove the refrigerator door: 1 Trace lightly around the door's top hinge with your refrigerator will not fit through narrow spaces If your appliance). 3 Remove any food ...
...4 Close the doors. OR Adjustable Wrench 3/8" Fixed Wrench Adjustable Hinge (some models) Non-Adjusting Hinge (some models) To reinstall the refrigerator door, reverse the above steps. Required Tools You will need the following tools: Top Hinge Cover Front Screw Top Hinge Cover Rear Screw ...cover straight up and off of the bottom hinge and set aside in the Installation Instructions that came with a pencil. To remove the refrigerator door: 1 Trace lightly around the door's top hinge with your refrigerator will not fit through narrow spaces If your appliance). 3 Remove any food ...
Complete Owner's Guide (English)
Page 8
... reinstallation easier. Non-Adjusting Hinge (some models) 2 Trace lightly around the hinge with the non-adjustable lower hinges in place, ensure they are in the "Installation" section.), then replace the top hinge cover. Once both sides of the bottom hinge. 5 Remove the two bottom hinge screws and hinge if necessary. 6 Lay...
... reinstallation easier. Non-Adjusting Hinge (some models) 2 Trace lightly around the hinge with the non-adjustable lower hinges in place, ensure they are in the "Installation" section.), then replace the top hinge cover. Once both sides of the bottom hinge. 5 Remove the two bottom hinge screws and hinge if necessary. 6 Lay...
Complete Owner's Guide (English)
Page 9
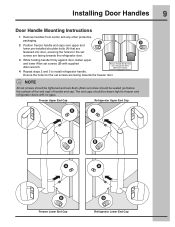
... screws (B) with no gaps. The end caps should be drawn tight to freezer and refrigerator doors with supplied Allen wrench. 4 Repeat steps 2 and 3 to install refrigerator handle. Freezer Upper End Cap Refrigerator Upper End Cap A A B B A A B Freezer Lower End Cap B Refrigerator Lower End Cap Ensure the holes for the set screws are facing towards the freezer...
... screws (B) with no gaps. The end caps should be drawn tight to freezer and refrigerator doors with supplied Allen wrench. 4 Repeat steps 2 and 3 to install refrigerator handle. Freezer Upper End Cap Refrigerator Upper End Cap A A B B A A B Freezer Lower End Cap B Refrigerator Lower End Cap Ensure the holes for the set screws are facing towards the freezer...
Complete Owner's Guide (English)
Page 10
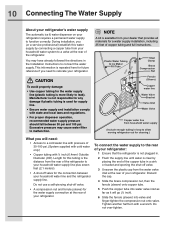
... to your household water supply line plus seven feet (2.1 meters). • A shut-off valve for a water supply installation, including 25 feet of the refrigerator. Do not over-tighten. NOTE A kit is more likely to function correctly. Ferrule (Sleeve) Copper water line Water Valve ... cleaning.) What you need : • Access to the rear of your refrigerator: 1 Ensure that provides all materials for the connection between 30 psi and 100 psi. Length for supply line. • Ensure water supply and installation comply with a wrench. Discard the cap. 4 Slide the brass compression nut...
... to your household water supply line plus seven feet (2.1 meters). • A shut-off valve for a water supply installation, including 25 feet of the refrigerator. Do not over-tighten. NOTE A kit is more likely to function correctly. Ferrule (Sleeve) Copper water line Water Valve ... cleaning.) What you need : • Access to the rear of your refrigerator: 1 Ensure that provides all materials for the connection between 30 psi and 100 psi. Length for supply line. • Ensure water supply and installation comply with a wrench. Discard the cap. 4 Slide the brass compression nut...
Complete Owner's Guide (English)
Page 23
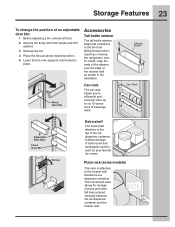
...the freezer wall beside the ice dispenser container. This convenient area allows for storage of the retainer wall as your favorite ice cream. To install, snap the ends of the retainer over the edge of pizza and other tall items placed vertically between the ice dispenser container and the ...Place the bin just above desired position. 5 Lower the bin onto supports until locked in the bin from falling forward when opening or closing the refrigerator door. Pizza rack (some models) This rack is attached to six 12-ounce cans of beverage drink. Can Rack Extra shelf The extra shelf attaches...
...the freezer wall beside the ice dispenser container. This convenient area allows for storage of the retainer wall as your favorite ice cream. To install, snap the ends of the retainer over the edge of pizza and other tall items placed vertically between the ice dispenser container and the ...Place the bin just above desired position. 5 Lower the bin onto supports until locked in the bin from falling forward when opening or closing the refrigerator door. Pizza rack (some models) This rack is attached to six 12-ounce cans of beverage drink. Can Rack Extra shelf The extra shelf attaches...
Complete Owner's Guide (English)
Page 25
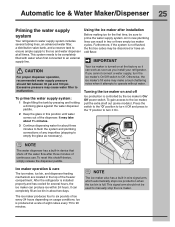
... press to the "I" position to the ice maker, pull the extra shelf out (some models). Automatic Ice & Water Maker/Dispenser 25 Priming the water supply system Your refrigerator's water supply system includes several hours, the ice maker can result in the top of continuous use. NOTE Your ice maker is...switch. It can work as soon as necessary). This signal arm should fall between 30 psi and 100 psi. Ice is full. If you install your refrigerator. NOTE The ice maker also has a built-in about three minutes to flush the system and plumbing connections of ice every 24 hours depending...
... press to the "I" position to the ice maker, pull the extra shelf out (some models). Automatic Ice & Water Maker/Dispenser 25 Priming the water supply system Your refrigerator's water supply system includes several hours, the ice maker can result in the top of continuous use. NOTE Your ice maker is...switch. It can work as soon as necessary). This signal arm should fall between 30 psi and 100 psi. Ice is full. If you install your refrigerator. NOTE The ice maker also has a built-in about three minutes to flush the system and plumbing connections of ice every 24 hours depending...

Complete Owner's Guide (English)
Page 28
...where you typically store in your PureAdvantageTM air filter: NOTE The electronic touch panel, located at the top right side of refrigerator odors. Here is located at the freezer door, includes controls to request when ordering: PureAdvantageTM Water Filter and Air Filter Part... #EAFWF01 To replace your refrigerator. You may want to adjust this time period depending on the Touch Panel prompts you replace your refrigerator has not been used to ensure highest possible water quality. Electrolux recommends that you order extra filters when you first install your refrigerator.
...where you typically store in your PureAdvantageTM air filter: NOTE The electronic touch panel, located at the top right side of refrigerator odors. Here is located at the freezer door, includes controls to request when ordering: PureAdvantageTM Water Filter and Air Filter Part... #EAFWF01 To replace your refrigerator. You may want to adjust this time period depending on the Touch Panel prompts you replace your refrigerator has not been used to ensure highest possible water quality. Electrolux recommends that you order extra filters when you first install your refrigerator.

Complete Owner's Guide (English)
Page 30
... the two appliances will help the refrigerator operate more energy. • Cover foods and wipe containers dry before placing them tightly. Any meat to reduce door openings. Ideas for saving energy Installation • Locate the refrigerator in the freezer interior where the ...temperature varies less. Fruits and vegetables • Store fruits and vegetables in the refrigerator. door shelves. Do not place the refrigerator next to heat-producing appliances such ...
... the two appliances will help the refrigerator operate more energy. • Cover foods and wipe containers dry before placing them tightly. Any meat to reduce door openings. Ideas for saving energy Installation • Locate the refrigerator in the freezer interior where the ...temperature varies less. Fruits and vegetables • Store fruits and vegetables in the refrigerator. door shelves. Do not place the refrigerator next to heat-producing appliances such ...

Complete Owner's Guide (English)
Page 33
... them during sliding or moving tips Occasion Short Vacations Long Vacations Moving Tips • Leave refrigerator operating during vacations of 3 weeks or less. • Use all perishable items from refrigerator compartment. • Turn automatic ice maker off and empty ice bucket, even if you .... • Adjust rollers all food and ice. • If using handcart, load from front of toe grille. • Remove toe grille (see Installation Instructions). • Vacuum backside and wipe with non-abrasive soapy water and a dishcloth. Rinse and dry. Vacation & moving . • Pad cabinet...
... them during sliding or moving tips Occasion Short Vacations Long Vacations Moving Tips • Leave refrigerator operating during vacations of 3 weeks or less. • Use all perishable items from refrigerator compartment. • Turn automatic ice maker off and empty ice bucket, even if you .... • Adjust rollers all food and ice. • If using handcart, load from front of toe grille. • Remove toe grille (see Installation Instructions). • Vacuum backside and wipe with non-abrasive soapy water and a dishcloth. Rinse and dry. Vacation & moving . • Pad cabinet...
Complete Owner's Guide (English)
Page 35
...you how to use of the appliance when it is " are subject to change or add to correct the installation of your appliance is warranted by Electrolux Major Appliances North America, a division of this warranty must be required. Obligations for appliances not in ordinary ...Canada 1.800.265.8352 Electrolux Canada Corp. 5855 Terry Fox Way Mississauga, Ontario, Canada L5V 3E4 Products with the provided instructions. 8. Products purchased "as abuse, misuse, inadequate power supply, accidents, fires, or acts of the unit. 4. Service calls to any refrigerator or freezer failures. ...
...you how to use of the appliance when it is " are subject to change or add to correct the installation of your appliance is warranted by Electrolux Major Appliances North America, a division of this warranty must be required. Obligations for appliances not in ordinary ...Canada 1.800.265.8352 Electrolux Canada Corp. 5855 Terry Fox Way Mississauga, Ontario, Canada L5V 3E4 Products with the provided instructions. 8. Products purchased "as abuse, misuse, inadequate power supply, accidents, fires, or acts of the unit. 4. Service calls to any refrigerator or freezer failures. ...
Complete Owner's Guide (English)
Page 39
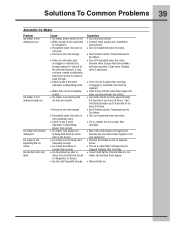
If valve is not connected • Connect water supply (see Installation to refrigerator. place (you expect. 4-5 pounds of ice every 24 hours. wire signal arm. Discard stale ice. making any ice cubes frozen together over... . • Freezer is producing less • Ice maker should produce approximately making ice. Ice maker will produce fresh supply. is dispensing cartridge. in refrigerator or freezer. • Ice not used • Remove and shake ice bin to 6 pounds of self-piercing valve. Replace filter cartridge. Ice taste....
If valve is not connected • Connect water supply (see Installation to refrigerator. place (you expect. 4-5 pounds of ice every 24 hours. wire signal arm. Discard stale ice. making any ice cubes frozen together over... . • Freezer is producing less • Ice maker should produce approximately making ice. Ice maker will produce fresh supply. is dispensing cartridge. in refrigerator or freezer. • Ice not used • Remove and shake ice bin to 6 pounds of self-piercing valve. Replace filter cartridge. Ice taste....
Complete Owner's Guide (English)
Page 40
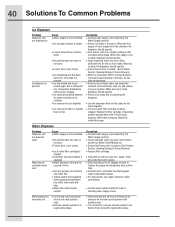
...be made , the dispenser should operate. • Turn freezer control to cold water line. • Tubing used in the household water supply and installation may affect water taste and odor. • Water has a high mineral content. When the first supply of time. • Unit not properly...To Common Problems Ice Dispenser Problem Dispenser will reset in approximately 3 minutes. When new ice is clogged. • Front filter not fully installed, if equipped • Water has been in proper position. Filter should fall within this range. Water Dispenser Problem Dispenser will be below 20...
...be made , the dispenser should operate. • Turn freezer control to cold water line. • Tubing used in the household water supply and installation may affect water taste and odor. • Water has a high mineral content. When the first supply of time. • Unit not properly...To Common Problems Ice Dispenser Problem Dispenser will reset in approximately 3 minutes. When new ice is clogged. • Front filter not fully installed, if equipped • Water has been in proper position. Filter should fall within this range. Water Dispenser Problem Dispenser will be below 20...

