

Installation Instructions English
Page 1
... the washer through shipping hole. 2. For support in the vicinity of the Use & Care Guide provided with the customer. Installation* for Electrolux Front Load Washer *Please refer to the Use & Care Guide provided with this washer. 3 Leveling the Washer Excessive noise and vibration can...bedspreads, or plastic sheets can cause an electrical shock that may present a risk of electrical shock if contacted during initial operation, please review the "Troubleshooting" section in Canada, the Canadian Electrical Code CSA C22.1 part 1. • To avoid back or other literature included...
... the washer through shipping hole. 2. For support in the vicinity of the Use & Care Guide provided with the customer. Installation* for Electrolux Front Load Washer *Please refer to the Use & Care Guide provided with this washer. 3 Leveling the Washer Excessive noise and vibration can...bedspreads, or plastic sheets can cause an electrical shock that may present a risk of electrical shock if contacted during initial operation, please review the "Troubleshooting" section in Canada, the Canadian Electrical Code CSA C22.1 part 1. • To avoid back or other literature included...
Quick Start Guide English
Page 2
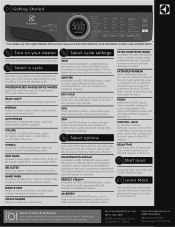
... you will extract more information on 500 & 600 series, uses a higher wash temperature to remove dust mites and dander from 30 minutes to dye transfer. Review your model) to scroll to remove the load right after the cycle is determined by model. This cycle varies by the chosen cycle. DELICATES Select...
... you will extract more information on 500 & 600 series, uses a higher wash temperature to remove dust mites and dander from 30 minutes to dye transfer. Review your model) to scroll to remove the load right after the cycle is determined by model. This cycle varies by the chosen cycle. DELICATES Select...
Complete Owners Guide
Page 15
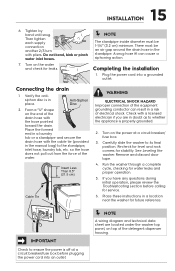
... tape. 4. Tighten by hand until snug. Then tighten each supply connection another 2/3 turn with a licensed electrician if you have any questions during initial operation, please review the Troubleshooting section before plugging the power cord into a grounded outlet. Verify the antisiphon disc is off at a circuit breaker/ fuse box. 3. Anti-Siphon Disc...
... tape. 4. Tighten by hand until snug. Then tighten each supply connection another 2/3 turn with a licensed electrician if you have any questions during initial operation, please review the Troubleshooting section before plugging the power cord into a grounded outlet. Verify the antisiphon disc is off at a circuit breaker/ fuse box. 3. Anti-Siphon Disc...
Complete Owners Guide
Page 44
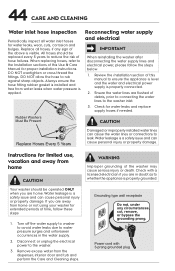
... the washer. 3. Reconnecting water supply and electrical IMPORTANT When reinstalling the washer after disconnecting the water supply lines and electrical power, please follow these steps: 1. Review the Installation section of this Use & Care Manual for water leaks, wear, cuts, corrosion and bulges. Rubber Washers Must Be Present CAUTION Replace Hoses Every...
... the washer. 3. Reconnecting water supply and electrical IMPORTANT When reinstalling the washer after disconnecting the water supply lines and electrical power, please follow these steps: 1. Review the Installation section of this Use & Care Manual for water leaks, wear, cuts, corrosion and bulges. Rubber Washers Must Be Present CAUTION Replace Hoses Every...

Complete Owners Guide
Page 48
... distributed • Stop washer and rearrange wash in pump. Wait at least 10 seconds, then simultaneously press and hold soil and options buttons for service, review this have not been removed during the spin cycle. • Foreign objects such as coins or safety pins may • Stop washer and redistribute wash...
... distributed • Stop washer and rearrange wash in pump. Wait at least 10 seconds, then simultaneously press and hold soil and options buttons for service, review this have not been removed during the spin cycle. • Foreign objects such as coins or safety pins may • Stop washer and redistribute wash...