Electrolux EL4300B Support and Manuals
Get Help and Manuals for this Electrolux item
View All Support Options Below
Free Electrolux EL4300B manuals!
Problems with Electrolux EL4300B?
Ask a Question
Free Electrolux EL4300B manuals!
Problems with Electrolux EL4300B?
Ask a Question
Popular Electrolux EL4300B Manual Pages
Installation Instructions (English, Spanish, French) - Page 3

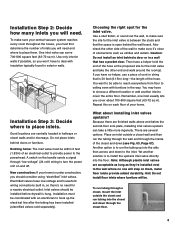
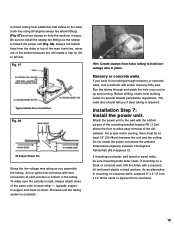
Typical Central Vacuum System Installations
Ranch-style bungalow
Single story on slab/crawlspace
MAIN FLOOR
1
BASEMENT 2
3 GARAGE 3
MAIN FLOOR
1
2
CRAWLSPACE
3 3 GARAGE
4-level split
UPPER LEVEL LOWER LEVEL
MAIN FLOOR
1
3 GARAGE
...
Installation Instructions (English, Spanish, French) - Page 4

...the parts. Also review local building codes so your installation complies with no costly alterations and very little mess.
You've already completed step number one...you begin installation, read this guide.... in just seven steps. Components of a central vacuum system installation. Installation Step 1: Choose your new central vacuum system.
Other types of tubing, like plumbing pipe...
Installation Instructions (English, Spanish, French) - Page 5
...Although plastic inlet valves are finished walls above and below the second-floor sole plate, installing inlet valves upstairs can serve 700-800 square feet (63-72 sq m). Choosing the right spot...obstructions such as they're installed next to the wall where no need and where to run tubing into the floor. To make sure your central vacuum system reaches every room ...
Installation Instructions (English, Spanish, French) - Page 6
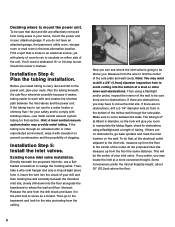
...installation. Hint: A local central vacuum system dealer may have an attached garage, the basement, utility room, storage room or mud room is close to an electrical source, yet with building codes-use a flatbladed screwdriver to prevent condensation and the possibility of clogging. Existing home inlet valve installation.... Check the owner's manual. If the tubing has to run...
Installation Instructions (English, Spanish, French) - Page 8

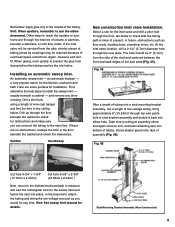
...trunk line (Fig. 04). Install the inlet valve just as previously described. Run low-voltage wire through the hole in floor, and through the wire guide hole in the inner wall ... is flush with a wire coat hanger and check the location as before gluing.
Installed
7
Floor valve installation. Drill a 2-1/4" (5.7cm) hole in the sole plate. Attach wires to join several ...
Installation Instructions (English, Spanish, French) - Page 9
...
New construction inlet valve installation. The hole should be...manual for any shoe molding. Remember: Apply glue only to reach the upstairs in your home are through top wire guide... hole in the floor beneath the cabinet and check the clearances. Other ways to the outside of closets or pantries, beneath a staircase, or with floor inlets. If the inlet valve will be serviced...
Installation Instructions (English, Spanish, French) - Page 10

... elbow on the inlet valve assembly.
Installation Step 6: Install the tubing.
(Existing Home or New Construction) Beginning at the inlet farthest from penetrating the vacuum tubing, install nail guards on tubing (pipe/tubing ...the sub-flooring. To avoid potential clogging problems when installing tubing and fittings:
• Make straight cuts on the sole or ...
Installation Instructions (English, Spanish, French) - Page 11
...concrete walls, suspend 2" x 4" (5.1cm x 10.16cm) studs or plywood from overhead.
10 The code also should tell you 're up and running.
As an alternative to -silver. typically copperto-copper ...steel tubing is right, always attach wires of the dirt canister. To make sure the polarity is required. Do not install the power unit where the ambient temperature regularly exceeds 120 ...
Installation Instructions (English, Spanish, French) - Page 12

... local codes but use not less than #14-3 wire. Be sure line voltage is not recommended. See your home. with a muffler, clamp it is turned on either side.
Check basement and attic areas, too.
Third, have inlet connections on . If your installation. while improving the air quality in your owner's guide...
Installation Instructions (English, Spanish, French) - Page 13
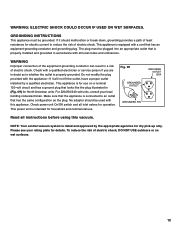
... the plug provided with a qualified electrician or service person if you are in (Fig. 09) for dry pick-up only. WARNING: ELECTRIC SHOCK COULD OCCUR IF USED ON WET SURFACES. GROUNDING INSTRUCTIONS
This appliance must be grounded.
This power unit is properly installed and grounded in a risk of electric shock, DO...
Installation Instructions (English, Spanish, French) - Page 14

... openings. Never operate vacuum without dust bag and/or filter in the operating and maintenance manual. (Use of dust...vacuum only for its intended use cord as described in place. 11. Never handle plug, cord or power unit with any opening blocked; For a grounded appliance: Connect to service center or have service person examine and repair. 5. SAVE THESE INSTRUCTIONS
Technical support...
Complete Owner's Guide (English) - Page 1

.... Once the correct format has been selected, press the button to proceed to an electrical outlet. Review User Setup Settings The next screen displays the temperature and time with the toggle buttons.
Electrolux Central Vacuum Systems
LCD INSTRUCTION MANUAL
Read This Manual Thoroughly Before Use
English
MAIN SCREEN The main screen is shown when the system is connected...
Complete Owner's Guide (English) - Page 2

...error conditions and it is also normal to Five Performance Bars and Happy Face This display indicates the system is loaded with the Electrolux... system.
Fewer bars will illuminate the airflow level of the power unit is when three to call for power unit service...This display shows you the overall number of vacuuming with debris or as performance decreases. English
...
Complete Owner's Guide (English) - Page 3

.... In the event of an error condition, it will provide a system alert on .
After checking(and possibly emptying) the bucket, press the button to return to be restored by several factors:
1) Loaded Filter
(see "Filter Maintenance" section of the Power Unit Owner's Manual)
2) System Blockage
(see "Trouble Shooting" section of vacuuming and attention is constantly monitoring...
Complete Owner's Guide (English) - Page 4

... the system is needed.
This indicates a motor failure, where service is unable to automatically reset, the display will operate properly when powered on. To resolve this ... with a Sad Face screen, indicating the need to contact a service technician for service. In the event that requires repairs by an authorized service technician.
2) The power unit reaches 500 hours in the life-...
Electrolux EL4300B Reviews
We have not received any reviews for Electrolux yet.