
Wiring Diagram
Page 1
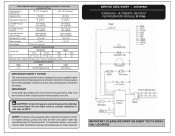
... electrical parts and wiring must be shielded from torch flame. To terminate defrost, press and hold air filter and alarm reset key simultainiously for three seconds service data sheet - 297299900 STANDARD - CONDENSER FAN MOTOR Watts RPM Amps 2.3 1100 CW Opposite Shaft 0.13 Running important safety notice The information provided herein is designed to contact insulation; Do not allow torch to assist qualified repair personnel only. AUTOMATIC DEFROST REFRIGERATOR MODELS...
... electrical parts and wiring must be shielded from torch flame. To terminate defrost, press and hold air filter and alarm reset key simultainiously for three seconds service data sheet - 297299900 STANDARD - CONDENSER FAN MOTOR Watts RPM Amps 2.3 1100 CW Opposite Shaft 0.13 Running important safety notice The information provided herein is designed to contact insulation; Do not allow torch to assist qualified repair personnel only. AUTOMATIC DEFROST REFRIGERATOR MODELS...

Complete Owner's Guide (English)
Page 2
... Card in the mail. This Use & Care Guide is part of our commitment to serve you for choosing Electrolux, our new premium brand in the U.S. 2 Finding Information Please Read And Save This Guide Thank you . Safety 3 Feature Overview 5 Installation 6 Installing Door Handles 7 Leveling 7 Door Removal and Temperature Control 9 Electronic Control 10 Questions? Alarms 11 IQ Touch™ Electronic Control Features 12 For toll-free telephone support in home appliances. You can...
... Card in the mail. This Use & Care Guide is part of our commitment to serve you for choosing Electrolux, our new premium brand in the U.S. 2 Finding Information Please Read And Save This Guide Thank you . Safety 3 Feature Overview 5 Installation 6 Installing Door Handles 7 Leveling 7 Door Removal and Temperature Control 9 Electronic Control 10 Questions? Alarms 11 IQ Touch™ Electronic Control Features 12 For toll-free telephone support in home appliances. You can...

Complete Owner's Guide (English)
Page 3
... based on recycling your old refrigerator/ freezer: • Remove the doors. • Leave the shelves and baskets in this symbol to avoid possible injury or death. Safety 3 Important Safety Instructions Safety Precautions Do not attempt to install or operate your unit until you have read all safety instructions before using your new refrigerator. • Do not store or use gasoline or other fl...
... based on recycling your old refrigerator/ freezer: • Remove the doors. • Leave the shelves and baskets in this symbol to avoid possible injury or death. Safety 3 Important Safety Instructions Safety Precautions Do not attempt to install or operate your unit until you have read all safety instructions before using your new refrigerator. • Do not store or use gasoline or other fl...

Complete Owner's Guide (English)
Page 5
...;e IQ Touch™ Electronic Control Pure Advantage® Air Filter Adjustable Dairy Door Bin Luxury Design™ LED Lighting Two Liter Adjustable Door Bins Luxury Design™ Glass Shelves Cool Zone™ Drawer Luxury Design™ LED Lighting Tall Crisper Drawer with Divider and Bins Gallon Shelf with product features and terminology. The illustration below is designed for optimal convenience and storage flexibility. Features may vary according to...
...;e IQ Touch™ Electronic Control Pure Advantage® Air Filter Adjustable Dairy Door Bin Luxury Design™ LED Lighting Two Liter Adjustable Door Bins Luxury Design™ Glass Shelves Cool Zone™ Drawer Luxury Design™ LED Lighting Tall Crisper Drawer with Divider and Bins Gallon Shelf with product features and terminology. The illustration below is designed for optimal convenience and storage flexibility. Features may vary according to...

Complete Owner's Guide (English)
Page 7
Matching Refrigerator and Freezer Door Handle Installation Toe Grille Remove Screws Repeat steps 2 and 3 to refrigerator door with supplied Allen wrench. 4. Remove handle from the unit. Toe Grille Removal To remove the toe grille, use a Phillips head screwdriver and remove the two screws holding handle firmly against door, fasten upper and lower Allen set screws are facing towards the refrigerator door. If the refrigerator is VERY IMPORTANT for the set screw should...
Matching Refrigerator and Freezer Door Handle Installation Toe Grille Remove Screws Repeat steps 2 and 3 to refrigerator door with supplied Allen wrench. 4. Remove handle from the unit. Toe Grille Removal To remove the toe grille, use a Phillips head screwdriver and remove the two screws holding handle firmly against door, fasten upper and lower Allen set screws are facing towards the refrigerator door. If the refrigerator is VERY IMPORTANT for the set screw should...

Complete Owner's Guide (English)
Page 9
... until free of the bottom hinge pin mounted on the front of temperatures for colder temperature on the control panel. It is adjustable to provide a range of the cabinet. • To replace the door, reverse the above procedures and securely tighten all screws to reset press & hold air temp filter mode replace air filter alarm off position. • Remove the plastic top hinge cover. • Hold the door in the display. To turn the refrigerator OFF...
... until free of the bottom hinge pin mounted on the front of temperatures for colder temperature on the control panel. It is adjustable to provide a range of the cabinet. • To replace the door, reverse the above procedures and securely tighten all screws to reset press & hold air temp filter mode replace air filter alarm off position. • Remove the plastic top hinge cover. • Hold the door in the display. To turn the refrigerator OFF...

Complete Owner's Guide (English)
Page 10
... Control Adjust UP Key Air Filter Reset Key Temp Mode Key Alarm Off Key Adjust DOWN Key Door Ajar Indicator door ajar °F power fail hold to reset press & hold air temp filter mode replace air filter alarm off control lock Power Fail Indicator Replace Air Filter Indicator Control Lock Key IQ Touch™ Electronic Control Features Replace Air Filter When the "REPLACE AIR FILTER" LED is displayed for air filter replacement after 3600 hours of refrigerator operation. After replacing the air filter, reset the air filter timer by pressing the AIR FILTER...
... Control Adjust UP Key Air Filter Reset Key Temp Mode Key Alarm Off Key Adjust DOWN Key Door Ajar Indicator door ajar °F power fail hold to reset press & hold air temp filter mode replace air filter alarm off control lock Power Fail Indicator Replace Air Filter Indicator Control Lock Key IQ Touch™ Electronic Control Features Replace Air Filter When the "REPLACE AIR FILTER" LED is displayed for air filter replacement after 3600 hours of refrigerator operation. After replacing the air filter, reset the air filter timer by pressing the AIR FILTER...

Complete Owner's Guide (English)
Page 11
... shown in the display. The audible alarm can be turned off by pressing ALARM OFF key. 55 °F door ajar power fail hold to reset press & hold air temp filter mode replace air filter alarm off control lock Door Ajar Alarm Turning Alarm Off This alarm will sound to alert you that will be turned off by pressing the ALARM OFF key or by closing the door. High Temp Alarm If the temperature inside the cabinet has exceeded...
... shown in the display. The audible alarm can be turned off by pressing ALARM OFF key. 55 °F door ajar power fail hold to reset press & hold air temp filter mode replace air filter alarm off control lock Door Ajar Alarm Turning Alarm Off This alarm will sound to alert you that will be turned off by pressing the ALARM OFF key or by closing the door. High Temp Alarm If the temperature inside the cabinet has exceeded...

Complete Owner's Guide (English)
Page 12
.... 12 Electronic Control Features Sabbath Mode The Sabbath Mode is a feature that disables portions of the refrigerator and its controls in accordance with the Sabbath feature, please visit the web at the same time and hold door ajar power fail air temp filter mode replace air filter alarm off control lock Setting Sabbath Mode When AC power is cycled while the control is pressed. The display will again be displayed. In the...
.... 12 Electronic Control Features Sabbath Mode The Sabbath Mode is a feature that disables portions of the refrigerator and its controls in accordance with the Sabbath feature, please visit the web at the same time and hold door ajar power fail air temp filter mode replace air filter alarm off control lock Setting Sabbath Mode When AC power is cycled while the control is pressed. The display will again be displayed. In the...

Complete Owner's Guide (English)
Page 13
... toll free in intensity after the door is opened. Unplug the electrical cord or switch OFF the power supply breaker. 2. From the inside of the LED cover, remove the wire harness connector by pressing on the LED cover and then pull away from the cabinet interior. 3. and Canada: 1-877-4ELECTROLUX (1-877-435-3287). This releases the hinged bottom cover to change the air filter with a Change Filter Indicator to...
... toll free in intensity after the door is opened. Unplug the electrical cord or switch OFF the power supply breaker. 2. From the inside of the LED cover, remove the wire harness connector by pressing on the LED cover and then pull away from the cabinet interior. 3. and Canada: 1-877-4ELECTROLUX (1-877-435-3287). This releases the hinged bottom cover to change the air filter with a Change Filter Indicator to...

Complete Owner's Guide (English)
Page 16
... "SETTING THE TEMPERATURE CONTROL" section for the suggested temperature control settings. • Do not overcrowd the refrigerator or block cold air vents. This cuts down on any surface. Short Vacations: • Leave the refrigerator operating during vacations of direct sunlight, and away from heating ducts or registers. Never use more efficiently. • Level refrigerator so that the door closes tightly. • Refer to run...
... "SETTING THE TEMPERATURE CONTROL" section for the suggested temperature control settings. • Do not overcrowd the refrigerator or block cold air vents. This cuts down on any surface. Short Vacations: • Leave the refrigerator operating during vacations of direct sunlight, and away from heating ducts or registers. Never use more efficiently. • Level refrigerator so that the door closes tightly. • Refer to run...

Complete Owner's Guide (English)
Page 17
... clean stainless steel. • Clean stainless steel front and handles with non-abrasive soapy water and a dishcloth. Unplug the unit or switch the breaker that supplies power to the unit to the off the compressor, but does not disconnect electrical power to the LED lights or other abrasive materials. • Never use metallic scouring pads, brushes, abrasive cleaners or strong alkaline solutions on plastic parts, interior doors, gaskets...
... clean stainless steel. • Clean stainless steel front and handles with non-abrasive soapy water and a dishcloth. Unplug the unit or switch the breaker that supplies power to the unit to the off the compressor, but does not disconnect electrical power to the LED lights or other abrasive materials. • Never use metallic scouring pads, brushes, abrasive cleaners or strong alkaline solutions on plastic parts, interior doors, gaskets...

Complete Owner's Guide (English)
Page 18
...;cations as abuse, misuse, inadequate power supply, accidents, fires, or acts of purchase, Electrolux will repair or replace any obligations under this warranty. DISCLAIMER OF IMPLIED WARRANTIES; Service under this warranty must be readily determined. 2. Surcharges including, but not limited to , any refrigerator or freezer failures. 6. use or used , and maintained in accordance with the provided instructions. YOU MAY ALSO HAVE OTHER RIGHTS...
...;cations as abuse, misuse, inadequate power supply, accidents, fires, or acts of purchase, Electrolux will repair or replace any obligations under this warranty. DISCLAIMER OF IMPLIED WARRANTIES; Service under this warranty must be readily determined. 2. Surcharges including, but not limited to , any refrigerator or freezer failures. 6. use or used , and maintained in accordance with the provided instructions. YOU MAY ALSO HAVE OTHER RIGHTS...
Complete Owner's Guide (English)
Page 19
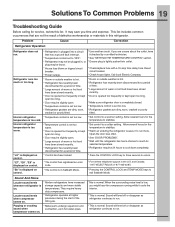
... To Common Problems 19 Troubleshooting Guide Before calling for service, review this refrigerator. plug may be plugged in Sabbath Mode. * Pressing the CONTROL LOCK and TEMP MODE keys to stabilize. * Warm air entering the refrigerator causes it cools the interior. * This is tightly pushed into a circuit * Use another circuit. This list includes common occurrences that has a ground fault interrupt. Popping or cracking sound when compressor comes on . * Refrigerator operates at higher pressures...
... To Common Problems 19 Troubleshooting Guide Before calling for service, review this refrigerator. plug may be plugged in Sabbath Mode. * Pressing the CONTROL LOCK and TEMP MODE keys to stabilize. * Warm air entering the refrigerator causes it cools the interior. * This is tightly pushed into a circuit * Use another circuit. This list includes common occurrences that has a ground fault interrupt. Popping or cracking sound when compressor comes on . * Refrigerator operates at higher pressures...

Complete Owner's Guide (English)
Page 20
... in the refrigerator. * Clean interior with sponge, warm water, and baking soda. is moved slightly. * Level the refrigerator. Installation Checklist Doors Handles are secure and tight Door seals completely to cabinet on all corners Electrical Power House power turned on the floor when it is * Open the door less often. Replace air filter. * Cover the food tightly. It rocks on Refrigerator plugged in Air Filter Air Filter is installed Final...
... in the refrigerator. * Clean interior with sponge, warm water, and baking soda. is moved slightly. * Level the refrigerator. Installation Checklist Doors Handles are secure and tight Door seals completely to cabinet on all corners Electrical Power House power turned on the floor when it is * Open the door less often. Replace air filter. * Cover the food tightly. It rocks on Refrigerator plugged in Air Filter Air Filter is installed Final...
Product Specifications Sheet (English)
Page 1
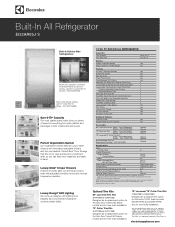
... Trim Kits: Single - Luxury-Glide® Crisper Drawers Drawers smoothly glide out and keep food organized and easily at electroluxappliances.com. BUILT-IN ALL REFRIGERATOR Capacities Total Capacity Total Shelf Area 18.51 Cu. PN # TRIMKITSS2 PureAdvantage® Air Filter Replacement Cartridge - Height (Cabinet) (Including Door) Width Depth (Including Door) (with 90° Door Open) Power Supply Connection Location Voltage Rating Connected Load (kW Rating) @ 115 Volts‡ Minimum Circuit Required (Amps) Shipping...
... Trim Kits: Single - Luxury-Glide® Crisper Drawers Drawers smoothly glide out and keep food organized and easily at electroluxappliances.com. BUILT-IN ALL REFRIGERATOR Capacities Total Capacity Total Shelf Area 18.51 Cu. PN # TRIMKITSS2 PureAdvantage® Air Filter Replacement Cartridge - Height (Cabinet) (Including Door) Width Depth (Including Door) (with 90° Door Open) Power Supply Connection Location Voltage Rating Connected Load (kW Rating) @ 115 Volts‡ Minimum Circuit Required (Amps) Shipping...
Product Specifications Sheet (English)
Page 2
... Trim Kits: Single - (PN # TRIMKITSS1), Double - (PN # TRIMKITSS2). • PureAdvantage® Air Filter Replacement Cartridge - (PN # 241754001). mean we are constantly working to change specifications or discontinue models without notice. when fully loaded. Note: For planning purposes only. Electrolux Major Appliances, N.A. Built-In All Refrigerator EI32AR65J S 32" Built-In All-Refrigerator Specifications • Product Weight - 240 Lbs. • An electrical supply with 4-point leveling. The power supply circuit must support...
... Trim Kits: Single - (PN # TRIMKITSS1), Double - (PN # TRIMKITSS2). • PureAdvantage® Air Filter Replacement Cartridge - (PN # 241754001). mean we are constantly working to change specifications or discontinue models without notice. when fully loaded. Note: For planning purposes only. Electrolux Major Appliances, N.A. Built-In All Refrigerator EI32AR65J S 32" Built-In All-Refrigerator Specifications • Product Weight - 240 Lbs. • An electrical supply with 4-point leveling. The power supply circuit must support...
Product Specifications Sheet (English)
Page 3
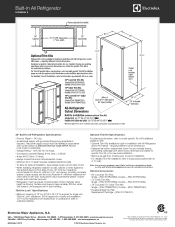
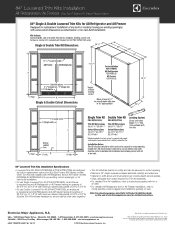
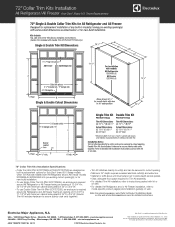
... Refrigerator and/or All Freezer models EI32AR65JS / EI32AF65JS into pre-existing cutout opening . • Minimum 24" depth requires recessed electrical outlet(s) and water line. • Cabinet or soffit above unit must extend out to same depth as built-in replacement options for Sub-Zero® brand 650 Series models when Trim Kits are constantly working to change specifications or discontinue models without notice. or for Trim Kit assembly...
... Refrigerator and/or All Freezer models EI32AR65JS / EI32AF65JS into pre-existing cutout opening . • Minimum 24" depth requires recessed electrical outlet(s) and water line. • Cabinet or soffit above unit must extend out to same depth as built-in replacement options for Sub-Zero® brand 650 Series models when Trim Kits are constantly working to change specifications or discontinue models without notice. or for Trim Kit assembly...
Product Specifications Sheet (English)
Page 4
... to cutout opening. • Minimum 24" depth requires recessed electrical outlet(s) and water line. • Cabinet or soffit above unit must extend out to same depth as built-in replacement options for detailed instructions. mean we are installed with kit or on web. • For detailed All-Refrigerator and / or All-Freezer installation, refer to change specifications or discontinue models without notice. Electrolux Major Appliances...
... to cutout opening. • Minimum 24" depth requires recessed electrical outlet(s) and water line. • Cabinet or soffit above unit must extend out to same depth as built-in replacement options for detailed instructions. mean we are installed with kit or on web. • For detailed All-Refrigerator and / or All-Freezer installation, refer to change specifications or discontinue models without notice. Electrolux Major Appliances...
Product Specifications Sheet (English)
Page 5
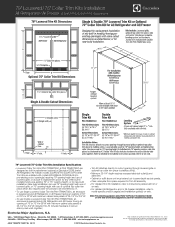
... All-Refrigerator / All-Freezer models E32AR75FPS / E32AF75FPS when Trim Kits are installed with models EI32AR65JS / EI32AF65JS into pre-existing cutout opening(s) requiring 79" opening height and use 79" opening height with kit or on web. • For detailed All-Refrigerator and / or All-Freezer installation, refer to Product Installation Guide on web. Note: For planning purposes only. We reserve the right to improve our products. Electrolux Major Appliances, N.A. Refer to model-specific...
... All-Refrigerator / All-Freezer models E32AR75FPS / E32AF75FPS when Trim Kits are installed with models EI32AR65JS / EI32AF65JS into pre-existing cutout opening(s) requiring 79" opening height and use 79" opening height with kit or on web. • For detailed All-Refrigerator and / or All-Freezer installation, refer to Product Installation Guide on web. Note: For planning purposes only. We reserve the right to improve our products. Electrolux Major Appliances, N.A. Refer to model-specific...


