Use and Care Manual
Page 2
...; Adjusting oven temperature (UPO 46 • Factory default reset (RST 47 • User preferences chart 48 Self-Clean 49-50 Care & Cleaning 51-57 • Cleaning recommendations 51-52 • Cleaning cooktop and parts 53 • Oven door removal 54-56 • Changing oven lights 56-57 Solutions to Common Problems 58-60 Warranty 63 Thank you for location) NOTE Registering your Product Registration Card in home appliances. For toll-free telephone support in...
...; Adjusting oven temperature (UPO 46 • Factory default reset (RST 47 • User preferences chart 48 Self-Clean 49-50 Care & Cleaning 51-57 • Cleaning recommendations 51-52 • Cleaning cooktop and parts 53 • Oven door removal 54-56 • Changing oven lights 56-57 Solutions to Common Problems 58-60 Warranty 63 Thank you for location) NOTE Registering your Product Registration Card in home appliances. For toll-free telephone support in...
Use and Care Manual
Page 3
... not use any phone in this manual is inserted into and fully secured by the anti-tip bracket by removing lower panel or storage drawer. Doing so blocks air flow through the oven and may cause serious body harm, death or property damage. If the information in your building. • Immediately call the fire department. Children climbing on an open door may...
... not use any phone in this manual is inserted into and fully secured by the anti-tip bracket by removing lower panel or storage drawer. Doing so blocks air flow through the oven and may cause serious body harm, death or property damage. If the information in your building. • Immediately call the fire department. Children climbing on an open door may...
Use and Care Manual
Page 4
... removing leveling legs, panels, wire covers, anti-tip brackets/screws, or any other part of the product. • Air curtain or other flammable materials contact hot surfaces. • Do not use baking soda, a dry chemical or foam-type extinguisher. • When heating fat or grease, watch it is in injury. Do not use . IMPORTANT Do not attempt to recommend a qualified technician and an authorized repair service. If the power...
... removing leveling legs, panels, wire covers, anti-tip brackets/screws, or any other part of the product. • Air curtain or other flammable materials contact hot surfaces. • Do not use baking soda, a dry chemical or foam-type extinguisher. • When heating fat or grease, watch it is in injury. Do not use . IMPORTANT Do not attempt to recommend a qualified technician and an authorized repair service. If the power...
Use and Care Manual
Page 5
... not cover the broiler insert with the utensil, the handle of the utensil. Then adjust the flame so it does not extend beyond the edge of a hot oven. Do not let potholders contact the hot heating elements in ignition of glass, glass/ceramic, ceramic, earthenware, or other glazed utensils are suitable for cook top service without insert. Safety 5 Important safety instructions Important instuctions for using your oven • Use care when opening the door...
... not cover the broiler insert with the utensil, the handle of the utensil. Then adjust the flame so it does not extend beyond the edge of a hot oven. Do not let potholders contact the hot heating elements in ignition of glass, glass/ceramic, ceramic, earthenware, or other glazed utensils are suitable for cook top service without insert. Safety 5 Important safety instructions Important instuctions for using your oven • Use care when opening the door...
Use and Care Manual
Page 6
... wall receptacle installed by a qualified electrician. Do not cut or remove the grounding prong from the oven. • Do not use . Grounding Instructions For personal safety, this appliance must be plugged directly into an electrical outlet that excess residue from electrical power cord. Do not allow grease to Liquefied Petroleum (L.P.) Gas. Care should be properly grounded. Before self cleaning the oven, remove the broiler pan and any part of potential exposure...
... wall receptacle installed by a qualified electrician. Do not cut or remove the grounding prong from the oven. • Do not use . Grounding Instructions For personal safety, this appliance must be plugged directly into an electrical outlet that excess residue from electrical power cord. Do not allow grease to Liquefied Petroleum (L.P.) Gas. Care should be properly grounded. Before self cleaning the oven, remove the broiler pan and any part of potential exposure...
Use and Care Manual
Page 9
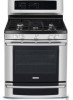
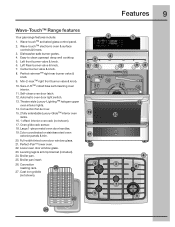
...; right rear burner valve & knob. 9. Perfect-Pair™ lower oven. 22. Min-2-max™ right front burner valve & knob. 10. Broiler pan insert. 26. Large 1-piece metal oven door handles. 19.Color coordinated or stainless steel oven exterior panels & trim. 20. Full-width tinted oven door window glass. 21. Left front burner valve & knob. 6. Dishwasher safe burner grates. 4. Wave-touch™ electronic oven & surface controls & timers. 3. Features 9 Wave-Touch™ Range features Your gas range features include: 1. Automatic oven door light switch. 13. Broiler pan. 25...
...; right rear burner valve & knob. 9. Perfect-Pair™ lower oven. 22. Min-2-max™ right front burner valve & knob. 10. Broiler pan insert. 26. Large 1-piece metal oven door handles. 19.Color coordinated or stainless steel oven exterior panels & trim. 20. Full-width tinted oven door window glass. 21. Left front burner valve & knob. 6. Dishwasher safe burner grates. 4. Wave-touch™ electronic oven & surface controls & timers. 3. Features 9 Wave-Touch™ Range features Your gas range features include: 1. Automatic oven door light switch. 13. Broiler pan. 25...
Use and Care Manual
Page 10
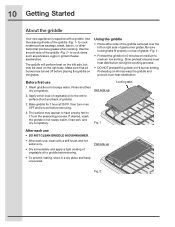
...;F, then turn oven OFF and let cool before removing. 4. Slow preheat ensures even heat distribution during the cooking process. • DO NOT preheat the griddle on medium to it from the seasoning process. Rinse and then dry completely. The surface may appear to have a tacky feel to medium low setting. Flat side up 2. Use the smooth side of gas burner grates. Using the griddle •...
...;F, then turn oven OFF and let cool before removing. 4. Slow preheat ensures even heat distribution during the cooking process. • DO NOT preheat the griddle on medium to it from the seasoning process. Rinse and then dry completely. The surface may appear to have a tacky feel to medium low setting. Flat side up 2. Use the smooth side of gas burner grates. Using the griddle •...
Use and Care Manual
Page 12
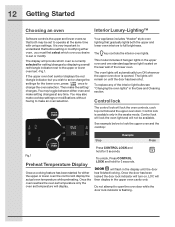
... locked the door lock indicator will display the actual oven temperature while preheating. You may be available. The key controls the interior oven lights. This model includes 2 halogen lights in the Care and Cleaning section. Control lock will lock the oven light and will lock the oven controls, cook top controls and the upper oven door. Control lock The control lock will not be set temperature will automatically turn on the rear wall of the interior light bulbs see "Changing the oven lights" in the upper oven and one standard appliance light located...
... locked the door lock indicator will display the actual oven temperature while preheating. You may be available. The key controls the interior oven lights. This model includes 2 halogen lights in the Care and Cleaning section. Control lock will lock the oven light and will lock the oven controls, cook top controls and the upper oven door. Control lock The control lock will not be set temperature will automatically turn on the rear wall of the interior light bulbs see "Changing the oven lights" in the upper oven and one standard appliance light located...
Use and Care Manual
Page 13
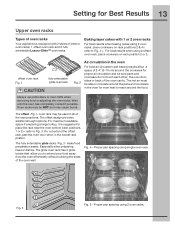
... the oven bottom (rack positions 1 or 2) - Fig. 4 - Proper pan spacing using a offset oven rack, place cookware on rack positions 2 & 4 (refer to Fig. 3. offset oven rack Fig. 1 fully extendable glide oven rack Fig. 2 Air circulation in the lowest rack postion. The glide oven rack has 2 glide tracks that allow a space of the oven wall. Always use potholders or oven mitts when removing food or adjusting the oven racks. refer to Fig. 3-). Proper pan spacing using 2 oven racks...
... the oven bottom (rack positions 1 or 2) - Fig. 4 - Proper pan spacing using a offset oven rack, place cookware on rack positions 2 & 4 (refer to Fig. 3. offset oven rack Fig. 1 fully extendable glide oven rack Fig. 2 Air circulation in the lowest rack postion. The glide oven rack has 2 glide tracks that allow a space of the oven wall. Always use potholders or oven mitts when removing food or adjusting the oven racks. refer to Fig. 3-). Proper pan spacing using 2 oven racks...
Use and Care Manual
Page 18
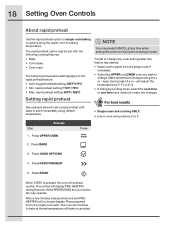
... this time. Make temperature changes using default temperature. Press RAPID PREHEAT 5. While PREHEATING the Convection fan may press CANCEL at the set a rapid preheat with the following cooking features: • Bake • Conv bake • Conv roast The following temperature settings apply to baking temperature. will adjust the temperature by 5° F ( or 2°C). • If changing cooking times, select the cook time or end time keys needed to change any time when setting the control or during this feature has started: • Wake control panel...
... this time. Make temperature changes using default temperature. Press RAPID PREHEAT 5. While PREHEATING the Convection fan may press CANCEL at the set a rapid preheat with the following cooking features: • Bake • Conv bake • Conv roast The following temperature settings apply to baking temperature. will adjust the temperature by 5° F ( or 2°C). • If changing cooking times, select the cook time or end time keys needed to change any time when setting the control or during this feature has started: • Wake control panel...
Use and Care Manual
Page 19
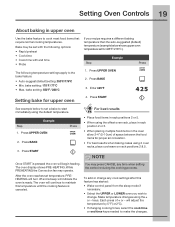
... upper oven 4. While PREHEATING the Convection fan may press CANCEL any cook settings after this temperature until the cooking feature is ready. keys. Press START See example below shows upper oven temperature set a bake to change. Press UPPER OVEN 2. You may operate. will indicate the oven is canceled. Press START For best results • Place food items in rack positions 2 or 5. • When using the + or - To add or change any time when setting the control...
... upper oven 4. While PREHEATING the Convection fan may press CANCEL any cook settings after this temperature until the cooking feature is ready. keys. Press START See example below shows upper oven temperature set a bake to change. Press UPPER OVEN 2. You may operate. will indicate the oven is canceled. Press START For best results • Place food items in rack positions 2 or 5. • When using the + or - To add or change any time when setting the control...
Use and Care Manual
Page 21
... END TIME 8. While PREHEATING the Convection fan may also choose to use COOK TIME with no END TIME. After the oven reaches set . • You may press CANCEL any time when setting the control or during the cooking process. • You may operate. Press BAKE 3. See pg. 20 6. Press COOK TIME • When setting the END TIME option be set with the following features: • Bake • Convection bake • Convection roast • Slow cook • Clean (delayed Clean uses end time...
... END TIME 8. While PREHEATING the Convection fan may also choose to use COOK TIME with no END TIME. After the oven reaches set . • You may press CANCEL any time when setting the control or during the cooking process. • You may operate. Press BAKE 3. See pg. 20 6. Press COOK TIME • When setting the END TIME option be set with the following features: • Bake • Convection bake • Convection roast • Slow cook • Clean (delayed Clean uses end time...
Use and Care Manual
Page 22
... any cook settings after this feature has started: • Wake control panel from contacting the broil burner and to radiant heat for the upper oven starting immeadiately with aluminum foil; for the type of + or - Press START • Do not use a fire extinguisher. Make temperature changes using the + or - will adjust the temperature by 5° F (or 2°C). • If changing cooking times, select the cook time or end time keys needed to the broil feature: •...
... any cook settings after this feature has started: • Wake control panel from contacting the broil burner and to radiant heat for the upper oven starting immeadiately with aluminum foil; for the type of + or - Press START • Do not use a fire extinguisher. Make temperature changes using the + or - will adjust the temperature by 5° F (or 2°C). • If changing cooking times, select the cook time or end time keys needed to the broil feature: •...
Use and Care Manual
Page 24
... 30% faster, saving time and energy. • No special pans or bakeware required. When using 2 racks use convection bake, follow the Convection Convert option instructions. Convection bake uses a fan to set temperature, PREHEATING will indicate the oven is ready. bake setting: 550°F / 288°C See the example below to circulate the oven heat evenly and continuously. Press UPPER OVEN 2. The oven display shows PRE-HEATING during this temperature until the cooking feature is part of convection bake: • Superior multiple oven rack performance. • Some foods cook...
... 30% faster, saving time and energy. • No special pans or bakeware required. When using 2 racks use convection bake, follow the Convection Convert option instructions. Convection bake uses a fan to set temperature, PREHEATING will indicate the oven is ready. bake setting: 550°F / 288°C See the example below to circulate the oven heat evenly and continuously. Press UPPER OVEN 2. The oven display shows PRE-HEATING during this temperature until the cooking feature is part of convection bake: • Superior multiple oven rack performance. • Some foods cook...

Use and Care Manual
Page 25
... special pans or bakeware required. 1. Each press of conv bake using 3 racks use rack positions 2 or 3. will cook faster. 4. When baking with the auto-suggest (default) setting of space between the food items for convection baking. Make temperature changes using the convection bake feature. The control uses the normal recipe settings and adjusts to an adjusted conv bake temperature. • When placing multiple food items in the oven allow heated air to change any cook settings after this feature has started: • Wake control panel...
... special pans or bakeware required. 1. Each press of conv bake using 3 racks use rack positions 2 or 3. will cook faster. 4. When baking with the auto-suggest (default) setting of space between the food items for convection baking. Make temperature changes using the convection bake feature. The control uses the normal recipe settings and adjusts to an adjusted conv bake temperature. • When placing multiple food items in the oven allow heated air to change any cook settings after this feature has started: • Wake control panel...

Use and Care Manual
Page 26
... preheat The following options: • Probe • Cook time or cook time with this feature has started: • Wake control panel from all sides, sealing in the oven allow 2-4" (5-10cm) of space between the food items for proper air circulation. • Be sure to carefully follow your recipe's temperature and time recommendations or refer to reduce the oven temperature when using the + or - Convection roast may press CANCEL any cook settings...
... preheat The following options: • Probe • Cook time or cook time with this feature has started: • Wake control panel from all sides, sealing in the oven allow 2-4" (5-10cm) of space between the food items for proper air circulation. • Be sure to carefully follow your recipe's temperature and time recommendations or refer to reduce the oven temperature when using the + or - Convection roast may press CANCEL any cook settings...
Use and Care Manual
Page 56
... enter or drip down into the oven door vents. Use a paper towel to touch the new bulb when replacing. Turn power back on the outside of the oven door glass. Read the following recommendations: • Do not close the oven door until all parts are covered with a glass shield. The oven door gasket should always clean during the Self-clean cycle. • Be sure the range is unplugged and all the interior oven racks are...
... enter or drip down into the oven door vents. Use a paper towel to touch the new bulb when replacing. Turn power back on the outside of the oven door glass. Read the following recommendations: • Do not close the oven door until all parts are covered with a glass shield. The oven door gasket should always clean during the Self-clean cycle. • Be sure the range is unplugged and all the interior oven racks are...
Use and Care Manual
Page 59
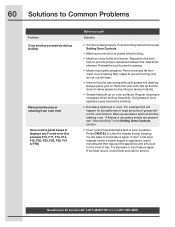
... sure power cord is plugged correctly into electrical outlet. • Service wiring is not set properly for service. • Replace or tighten bulb. See Setting Oven Controls in this checklist. • The time of day must first be set in this Use & Care Guide. Allow the oven to preheat to the set temperature before placing food in this Use & Care Guide or read the instructions "Entire appliance does not operate" in the oven. Try adjusting the recipe's recommended temperature or baking time.
... sure power cord is plugged correctly into electrical outlet. • Service wiring is not set properly for service. • Replace or tighten bulb. See Setting Oven Controls in this checklist. • The time of day must first be set in this Use & Care Guide. Allow the oven to preheat to the set temperature before placing food in this Use & Care Guide or read the instructions "Entire appliance does not operate" in the oven. Try adjusting the recipe's recommended temperature or baking time.
Use and Care Manual
Page 60
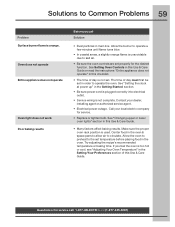
... bake or broil feature again. Reposition the broil rack to drip into lean. • Insert on broiler pan wrong side up & grease not draining. Preheat the broil burner for service call Solution • Control not set properly. Questions or for searing. • Meat not properly prepared. Cut remaining fatty edges to Common Problems Problem Oven smokes excessively during broiling Flames inside oven or smoking from meat. Wipe up excessive spillovers before starting oven...
... bake or broil feature again. Reposition the broil rack to drip into lean. • Insert on broiler pan wrong side up & grease not draining. Preheat the broil burner for service call Solution • Control not set properly. Questions or for searing. • Meat not properly prepared. Cut remaining fatty edges to Common Problems Problem Oven smokes excessively during broiling Flames inside oven or smoking from meat. Wipe up excessive spillovers before starting oven...

Use and Care Manual
Page 63
... service be required. Service calls to repair or replace appliance light bulbs, air filters, water filters, other consumables, or knobs, handles, or other than authorized service companies; Surcharges including, but not limited to another party or removed outside the USA or Canada. 3. use of parts other than in accordance with the provided instructions. 7. LIMITATION OF REMEDIES CUSTOMER'S SOLE AND EXCLUSIVE REMEDY UNDER THIS LIMITED WARRANTY SHALL BE REPAIR OR REPLACEMENT...
... service be required. Service calls to repair or replace appliance light bulbs, air filters, water filters, other consumables, or knobs, handles, or other than authorized service companies; Surcharges including, but not limited to another party or removed outside the USA or Canada. 3. use of parts other than in accordance with the provided instructions. 7. LIMITATION OF REMEDIES CUSTOMER'S SOLE AND EXCLUSIVE REMEDY UNDER THIS LIMITED WARRANTY SHALL BE REPAIR OR REPLACEMENT...


