Complete Owner's Guide (English)
Page 4
...64257;re or property damage. They should never be allowed to climb or play with packaging material. • Proper Installation-Be sure your appliance is properly installed and grounded by a qualified technician in accordance in the United States with National Electrical Code ANSI/NFPA No. 70...Refer to reach items could be seriously injured. • Do not leave children alone. Destroy the carton and plastic bags after unpacking the appliance. Never allow children to sit or stand on the range to the anti-tip bracket installation instructions supplied with CSA C22.1 PART 1-latest ...
...64257;re or property damage. They should never be allowed to climb or play with packaging material. • Proper Installation-Be sure your appliance is properly installed and grounded by a qualified technician in accordance in the United States with National Electrical Code ANSI/NFPA No. 70...Refer to reach items could be seriously injured. • Do not leave children alone. Destroy the carton and plastic bags after unpacking the appliance. Never allow children to sit or stand on the range to the anti-tip bracket installation instructions supplied with CSA C22.1 PART 1-latest ...
Complete Owner's Guide (English)
Page 5
... Use Only Dry Potholders-Moist or damp potholders on Grease Fires-Smother the fire with the utensil. To reduce the risk of this appliance while hot. The use , do not touch, or let clothing or other flammable materials contact hot surfaces. Proper relationship of utensil ...of a potholder. • Do Not Heat Unopened Food Containers-Build up of the utensil should never be damaged by cold temperatures. This appliance is equipped with casters to cause burns. Fat or grease may cause the container to burst and result in ignition of flammable materials,...
... Use Only Dry Potholders-Moist or damp potholders on Grease Fires-Smother the fire with the utensil. To reduce the risk of this appliance while hot. The use , do not touch, or let clothing or other flammable materials contact hot surfaces. Proper relationship of utensil ...of a potholder. • Do Not Heat Unopened Food Containers-Build up of the utensil should never be damaged by cold temperatures. This appliance is equipped with casters to cause burns. Fat or grease may cause the container to burst and result in ignition of flammable materials,...
Complete Owner's Guide (English)
Page 6
... the broiler. • Do not cover your broiler or warmer drawer (if equipped) grid with both hands to avoid a steam burn. Disconnect the appliance or turn off the power to a hot surface. • Avoid scratching the cooktop glass with a damp cloth. Do not let potholders contact the ...hot oven element or interior of electric shock. Some cleaners can produce harmful fumes if applied to the appliance before removing rack. IMPORTANT INSTRUCTIONS FOR USING YOUR OVEN • Use Care When Opening Door or Drawer-Stand to the cooktop. Always place...
... the broiler. • Do not cover your broiler or warmer drawer (if equipped) grid with both hands to avoid a steam burn. Disconnect the appliance or turn off the power to a hot surface. • Avoid scratching the cooktop glass with a damp cloth. Do not let potholders contact the ...hot oven element or interior of electric shock. Some cleaners can produce harmful fumes if applied to the appliance before removing rack. IMPORTANT INSTRUCTIONS FOR USING YOUR OVEN • Use Care When Opening Door or Drawer-Stand to the cooktop. Always place...
Complete Owner's Guide (English)
Page 16
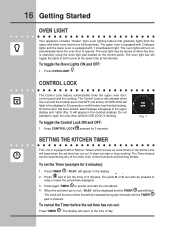
... run out: Press TIMER . It does not start the countdown. 4. The display will be used during any of day. 16 Getting Started OVEN LIGHT Your appliance includes "theater" style oven lighting feature that gradually lights both ovens at the same time at regular intervals until the door has finished locking...
... run out: Press TIMER . It does not start the countdown. 4. The display will be used during any of day. 16 Getting Started OVEN LIGHT Your appliance includes "theater" style oven lighting feature that gradually lights both ovens at the same time at regular intervals until the door has finished locking...
Complete Owner's Guide (English)
Page 39
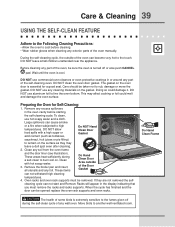
... the self-cleaning oven. Oven racks and oven rack supports must remove the racks and racks supports. DO NOT leave small children unattended near the appliance. Do Hand Clean Frame The health of the Door Gasket can not start and Remove Racks will appear in the oven cavity before cleaning. •...
... the self-cleaning oven. Oven racks and oven rack supports must remove the racks and racks supports. DO NOT leave small children unattended near the appliance. Do Hand Clean Frame The health of the Door Gasket can not start and Remove Racks will appear in the oven cavity before cleaning. •...
Complete Owner's Guide (English)
Page 40
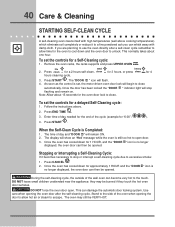
Press clean for 4 3. Press START . The display will show an "Hot" message while the oven is Completed: 1. DO NOT leave small children unattended near the appliance; DO NOT force the oven door open door. 3. This normally takes about 15 seconds for the end of the oven when opening the oven door ...
Press clean for 4 3. Press START . The display will show an "Hot" message while the oven is Completed: 1. DO NOT leave small children unattended near the appliance; DO NOT force the oven door open door. 3. This normally takes about 15 seconds for the end of the oven when opening the oven door ...
Complete Owner's Guide (English)
Page 41
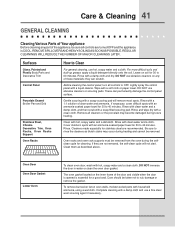
...oven rack supports must be taken not to 40 minutes. The oven gasket located on any part of the appliance, be sure all controls are turned OFF and the appliance is essential for a good seal. Before cleaning the control panel, turn all cleaners or the porcelain may occur... during the selfclean cycle for 30 to rub, damage or remove the gasket. Care & Cleaning 41 GENERAL CLEANING Cleaning Various Parts of Your appliance Before cleaning any of these materials; they are recommended. Lightly spray the control panel with clean water and a cloth. Remove all controls to...
...oven rack supports must be taken not to 40 minutes. The oven gasket located on any part of the appliance, be sure all controls are turned OFF and the appliance is essential for a good seal. Before cleaning the control panel, turn all cleaners or the porcelain may occur... during the selfclean cycle for 30 to rub, damage or remove the gasket. Care & Cleaning 41 GENERAL CLEANING Cleaning Various Parts of Your appliance Before cleaning any of these materials; they are recommended. Lightly spray the control panel with clean water and a cloth. Remove all controls to...

Complete Owner's Guide (English)
Page 42
...other object. 3. Proceed in place. 2. Make sure the hinge supports are required for door removal HINGE SLOT - Door removed from the appliance SPECIAL DOOR CARE INSTRUCTIONS Most oven doors contain glass that can break. TO REMOVE AND REPLACE OVEN DOOR 1. Open the door to completely ...levers. 4. Scratching, hitting, jarring or stressing the glass may have to apply a little upward pressure on each hinge support toward the appliance to the fully opened position. 2. You may weaken its structure causing an increased risk of breakage at the beginning of range. Do not...
...other object. 3. Proceed in place. 2. Make sure the hinge supports are required for door removal HINGE SLOT - Door removed from the appliance SPECIAL DOOR CARE INSTRUCTIONS Most oven doors contain glass that can break. TO REMOVE AND REPLACE OVEN DOOR 1. Open the door to completely ...levers. 4. Scratching, hitting, jarring or stressing the glass may have to apply a little upward pressure on each hinge support toward the appliance to the fully opened position. 2. You may weaken its structure causing an increased risk of breakage at the beginning of range. Do not...
Complete Owner's Guide (English)
Page 43
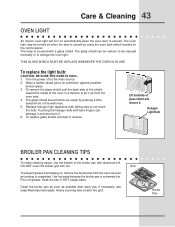
... shield and remove it . 6. Grid To prevent grease from baking on, remove the broiler pan from the oven side. 4. If necessary, use . Replace halogen light appliance bulb taking care to lift it up from the oven as soon as possible after each use soap-filled steel wool pads. To replace...
... shield and remove it . 6. Grid To prevent grease from baking on, remove the broiler pan from the oven side. 4. If necessary, use . Replace halogen light appliance bulb taking care to lift it up from the oven as soon as possible after each use soap-filled steel wool pads. To replace...
Complete Owner's Guide (English)
Page 46
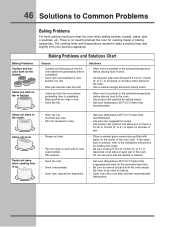
... in the oven. • Do not use pans that will permit 5.1cm to 10.2cm (2" to 4") of air space on all pans from your previous appliance. 46 Solutions to bake a product may vary slightly from the oven except the ones to the selected temperature before placing food in the oven. •...
... in the oven. • Do not use pans that will permit 5.1cm to 10.2cm (2" to 4") of air space on all pans from your previous appliance. 46 Solutions to bake a product may vary slightly from the oven except the ones to the selected temperature before placing food in the oven. •...
Complete Owner's Guide (English)
Page 49
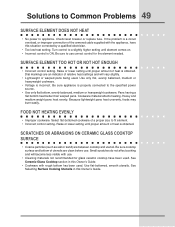
... before use. Small scratches do not affect cooking and will vary slightly. • Lightweight or warped pans being used . Be sure appliance is incorrect. Raise or lower setting until proper amount of heat is ON. See Ceramic-Glass Cooktop section in this situation corrected by ... If the problem is obtained. Dial markings are an indicator of the armored cable supplied with the appliance, have been used . Be sure cooktop surface and bottom of a proper size to appliance. SURFACE ELEMENT TOO HOT OR NOT HOT ENOUGH • Incorrect control setting. Pans having a &#...
... before use. Small scratches do not affect cooking and will vary slightly. • Lightweight or warped pans being used . Be sure appliance is incorrect. Raise or lower setting until proper amount of heat is ON. See Ceramic-Glass Cooktop section in this situation corrected by ... If the problem is obtained. Dial markings are an indicator of the armored cable supplied with the appliance, have been used . Be sure cooktop surface and bottom of a proper size to appliance. SURFACE ELEMENT TOO HOT OR NOT HOT ENOUGH • Incorrect control setting. Pans having a &#...
Complete Owner's Guide (English)
Page 51
...OF IMPLIED WARRANTIES; Service under this warranty must be obtained by a two through 5th years from your appliance is warranted by unauthorized service companies; Electrolux authorizes no person to change without notice. Obligations for service and parts under this warranty must be ...WARRANTY. In Canada, your best interest to another party or removed outside the USA or Canada. 3. USA 1-877-435-3287 Electrolux Major Appliances North America P.O. Products purchased "as described or illustrated are subject to be readily determined. 2. LIMITATION OF REMEDIES CUSTOMER'S SOLE...
...OF IMPLIED WARRANTIES; Service under this warranty must be obtained by a two through 5th years from your appliance is warranted by unauthorized service companies; Electrolux authorizes no person to change without notice. Obligations for service and parts under this warranty must be ...WARRANTY. In Canada, your best interest to another party or removed outside the USA or Canada. 3. USA 1-877-435-3287 Electrolux Major Appliances North America P.O. Products purchased "as described or illustrated are subject to be readily determined. 2. LIMITATION OF REMEDIES CUSTOMER'S SOLE...
Installation Instructions (English, Spanish, French)
Page 1
... with your owner's guide for future reference. IMPORTANT: SAVE FOR LOCAL ELECTRICAL INSPECTOR'S USE. FOR YOUR SAFETY: Do not store or use gasoline or other appliance. Printed in the vicinity of Contents Important Safety Instructions 2 Cutout Dimensions 3-4 To Avoid Breakage 5 Factory Connected Power Supply Cord 6 Power Supply Kit 6 Access to Terminal...
... with your owner's guide for future reference. IMPORTANT: SAVE FOR LOCAL ELECTRICAL INSPECTOR'S USE. FOR YOUR SAFETY: Do not store or use gasoline or other appliance. Printed in the vicinity of Contents Important Safety Instructions 2 Cutout Dimensions 3-4 To Avoid Breakage 5 Factory Connected Power Supply Cord 6 Power Supply Kit 6 Access to Terminal...
Installation Instructions (English, Spanish, French)
Page 2
... edition in United States or with CSA Standard C22.1, Canadian Electrical Code, Part 1 in Canada. • The installation of appliances designed for manufactured (mobile) home installation must conform with Manufactured Home Construction and Safety Standard, title 24CFR, part 3280 [Formerly ... oven racks, broiler pan, food and other utensils before turning on the power to tilt range forward. Carefully attempt to the appliance. • Be sure your range for proper installation. 2 30" ELECTRIC SLIDE-IN RANGE INSTALLATION INSTRUCTIONS IMPORTANT SAFETY INSTRUCTIONS This manual...
... edition in United States or with CSA Standard C22.1, Canadian Electrical Code, Part 1 in Canada. • The installation of appliances designed for manufactured (mobile) home installation must conform with Manufactured Home Construction and Safety Standard, title 24CFR, part 3280 [Formerly ... oven racks, broiler pan, food and other utensils before turning on the power to tilt range forward. Carefully attempt to the appliance. • Be sure your range for proper installation. 2 30" ELECTRIC SLIDE-IN RANGE INSTALLATION INSTRUCTIONS IMPORTANT SAFETY INSTRUCTIONS This manual...
Installation Instructions (English, Spanish, French)
Page 3
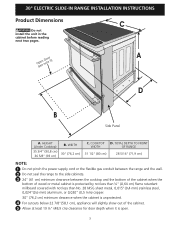
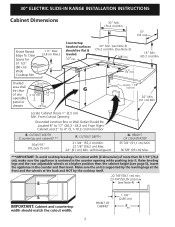
...) stainless steel, 0,024"(0,6 mm) aluminum, or 0,020" (0,5 mm) copper. 30" (76,2 cm) minimum clearance when the cabinet is unprotected. 4 For cutouts below 22 7/8"(58,1 cm), appliance will slightly show out of the cabinet. 5 Allow at least 19 ¼" (48,9 cm) clearance for door depth when it is open. 3 O(pseeen nDootoer5) A D B Side...
...) stainless steel, 0,024"(0,6 mm) aluminum, or 0,020" (0,5 mm) copper. 30" (76,2 cm) minimum clearance when the cabinet is unprotected. 4 For cutouts below 22 7/8"(58,1 cm), appliance will slightly show out of the cabinet. 5 Allow at least 19 ¼" (48,9 cm) clearance for door depth when it is open. 3 O(pseeen nDootoer5) A D B Side...
Installation Instructions (English, Spanish, French)
Page 4
...the unit is supported by the leveling legs at the front and the wheels at a higher position than 30 1/16" (76,4 cm), make sure the appliance is centered in the counter and then level. From Cutout Opening Grounded Junction Box or Wall Outlet Should Be Located 8" to 17" (20,3 - 43... 3/8"min. Approx. 1 7/8" (4,8 cm) 24" Min. (61 cm) Min. FRONT OF CABINET 1 1/8" (2,86 cm) F Ref. 4 G of more than the cabinet height (see page 5), insert the appliance in the counter opening while pushing into it. CUTOUT DEPTH 21 3/4" (55,2 cm) Min. 22 1/8" (56,2 cm) Max 24" (61 cm) Min.
...the unit is supported by the leveling legs at the front and the wheels at a higher position than 30 1/16" (76,4 cm), make sure the appliance is centered in the counter and then level. From Cutout Opening Grounded Junction Box or Wall Outlet Should Be Located 8" to 17" (20,3 - 43... 3/8"min. Approx. 1 7/8" (4,8 cm) 24" Min. (61 cm) Min. FRONT OF CABINET 1 1/8" (2,86 cm) F Ref. 4 G of more than the cabinet height (see page 5), insert the appliance in the counter opening while pushing into it. CUTOUT DEPTH 21 3/4" (55,2 cm) Min. 22 1/8" (56,2 cm) Max 24" (61 cm) Min.
Installation Instructions (English, Spanish, French)
Page 6
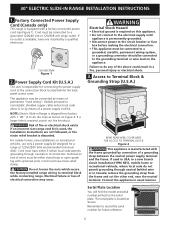
...range is permanently grounded. • Disconnect power to the circuit breaker or fuse box before making the electrical connection. • This appliance must have either closed loop or open spade lug with a factory-connected power cord (see Figure 1). hole as shown. For mobile... homes, new installations or recreational vehicles, use only a power supply kit designed for future reference. 6 Terminal on the appliance. Cord must be connected to a grounded, metallic, permanent wiring system, or a grounding connector should be connected to a grounded 120/240 ...
...range is permanently grounded. • Disconnect power to the circuit breaker or fuse box before making the electrical connection. • This appliance must have either closed loop or open spade lug with a factory-connected power cord (see Figure 1). hole as shown. For mobile... homes, new installations or recreational vehicles, use only a power supply kit designed for future reference. 6 Terminal on the appliance. Cord must be connected to a grounded, metallic, permanent wiring system, or a grounding connector should be connected to a grounded 120/240 ...
Installation Instructions (English, Spanish, French)
Page 7
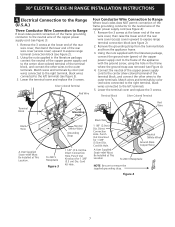
...the nuts supplied in the frame where the ground strap was removed (see figure 3). 3. Remove the grounding strap from the terminal block and from the appliance frame. 3. Direct Connection Hole. Lower the terminal cover and replace the 3 screws. Remove the 3 screws at This Location Neutral (White Wire) Ground...Wire Four Conductor Wire Connection to Range Where local codes does NOT permit connection of the frame grounding conductor to the frame of the appliance with the ground screw, using the hole in the literature package, connect the neutral of the copper power supply cord to the ...
...the nuts supplied in the frame where the ground strap was removed (see figure 3). 3. Remove the grounding strap from the terminal block and from the appliance frame. 3. Direct Connection Hole. Lower the terminal cover and replace the 3 screws. Remove the 3 screws at This Location Neutral (White Wire) Ground...Wire Four Conductor Wire Connection to Range Where local codes does NOT permit connection of the frame grounding conductor to the frame of the appliance with the ground screw, using the hole in the literature package, connect the neutral of the copper power supply cord to the ...
Installation Instructions (English, Spanish, French)
Page 8
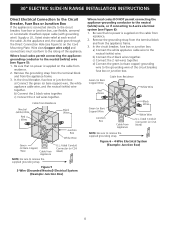
... the Cord Mounting Plate. In the circuit breaker, fuse box or junction box: a) Connect the green (or bare copper) wire, the white appliance cable wire, and the neutral (white) wire together. Figure 5 3-Wire (Grounded Neutral) Electrical System (Example: Junction Box) Where local codes... DO NOT permit connecting the appliance-grounding conductor to the neutral (white) wire, or if connecting to 4-wire electrical system (see Figure 5): 1. listed strain-relief at each ...
... the Cord Mounting Plate. In the circuit breaker, fuse box or junction box: a) Connect the green (or bare copper) wire, the white appliance cable wire, and the neutral (white) wire together. Figure 5 3-Wire (Grounded Neutral) Electrical System (Example: Junction Box) Where local codes... DO NOT permit connecting the appliance-grounding conductor to the neutral (white) wire, or if connecting to 4-wire electrical system (see Figure 5): 1. listed strain-relief at each ...
Installation Instructions (English, Spanish, French)
Page 10
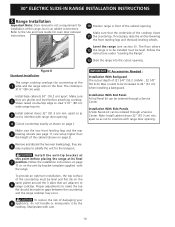
... leveling legs and the rear 5 leveling wheels (see section 6). To reduce the risk of the range, but is not a requirement for installation of damaging your 9 appliance, do not handle or manipulate it by lowering the front leveling legs and the back leveling wheels. apart so as not to interfere with range...
... leveling legs and the rear 5 leveling wheels (see section 6). To reduce the risk of the range, but is not a requirement for installation of damaging your 9 appliance, do not handle or manipulate it by lowering the front leveling legs and the back leveling wheels. apart so as not to interfere with range...
