Complete Owner's Guide (English)
Page 3
... Safety Instructions 4-7 Feature Overview 8 Your Slide-In Range 8-9 Oven Rack Supports and Oven Vents 10 Removing and Replacing Oven Racks 11 Control Pad Functions 12-14 Getting Started 15 Setting Clock at Power Up 15 Temperature Visual Display 15 Oven Light 16 Control Lock 16 Setting the Kitchen Timer 16 Setting Surface Controls 17 About the Ceramic Glass Cooktop 17 About the Radiant Surface Elements 17 Surface Cooking Utensils 18 Cookware Material Types 18 Setting the Cooktop 19-20 Setting the Warmer Oven 21 Warmer Oven Operation 21 Cooking Modes 22 Baking 22 Cook Time...
... Safety Instructions 4-7 Feature Overview 8 Your Slide-In Range 8-9 Oven Rack Supports and Oven Vents 10 Removing and Replacing Oven Racks 11 Control Pad Functions 12-14 Getting Started 15 Setting Clock at Power Up 15 Temperature Visual Display 15 Oven Light 16 Control Lock 16 Setting the Kitchen Timer 16 Setting Surface Controls 17 About the Ceramic Glass Cooktop 17 About the Radiant Surface Elements 17 Surface Cooking Utensils 18 Cookware Material Types 18 Setting the Cooktop 19-20 Setting the Warmer Oven 21 Warmer Oven Operation 21 Cooking Modes 22 Baking 22 Cook Time...
Complete Owner's Guide (English)
Page 4
... the anti-tip bracket is installed properly, use both arms and grasp the rear edge of the appliance unless specifically recommended in the manuals. Destroy the carton and plastic bags after unpacking the appliance. Know how to disconnect the electrical power to the range at the circuit breaker or fuse box in case of an emergency. • User Servicing-Do not repair or replace...
... the anti-tip bracket is installed properly, use both arms and grasp the rear edge of the appliance unless specifically recommended in the manuals. Destroy the carton and plastic bags after unpacking the appliance. Know how to disconnect the electrical power to the range at the circuit breaker or fuse box in case of an emergency. • User Servicing-Do not repair or replace...
Complete Owner's Guide (English)
Page 5
... cooktop, the oven vent openings and surfaces near surface units may result in burns from any unused appliance if it to operate again. Food left unattended could catch fire or spoil. Safety 5 • DO NOT TOUCH SURFACE UNITS, AREAS NEAR THESE UNITS, OVEN HEATING ELEMENTS OR INTERIOR SURFACES OF THE OVEN OR WARMER DRAWER (if equipped). IMPORTANT INSTRUCTIONS FOR USING YOUR COOKTOP • Know which knob controls each surface heating...
... cooktop, the oven vent openings and surfaces near surface units may result in burns from any unused appliance if it to operate again. Food left unattended could catch fire or spoil. Safety 5 • DO NOT TOUCH SURFACE UNITS, AREAS NEAR THESE UNITS, OVEN HEATING ELEMENTS OR INTERIOR SURFACES OF THE OVEN OR WARMER DRAWER (if equipped). IMPORTANT INSTRUCTIONS FOR USING YOUR COOKTOP • Know which knob controls each surface heating...
Complete Owner's Guide (English)
Page 6
... Not Clean or Operate a Broken Cooktop -If cooktop should break, cleaning solutions and spillovers may also be kept away from the rack before you remove or replace food in temperature. The oven is hot, use aluminum foil as a cover placed on a hot cooking area, be moved while oven is vented at the front above the oven door (ceramic glass cooktop models) or through the right rear element (coil element models). These items could ignite. • Do not touch a hot light bulb...
... Not Clean or Operate a Broken Cooktop -If cooktop should break, cleaning solutions and spillovers may also be kept away from the rack before you remove or replace food in temperature. The oven is hot, use aluminum foil as a cover placed on a hot cooking area, be moved while oven is vented at the front above the oven door (ceramic glass cooktop models) or through the right rear element (coil element models). These items could ignite. • Do not touch a hot light bulb...
Complete Owner's Guide (English)
Page 17
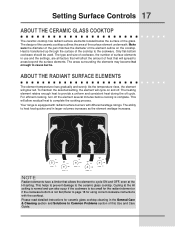
... cooking is equipped with radiant surface burners with the cooktop). The ability to provide a uniform and consistent heat during the off cycle. Heat is not flat (Refer to Common Problems section of the surface element underneath. size hi + ON OFF med lo - size hi + ON OFF med lo - Setting Surface Controls 17 ABOUT THE CERAMIC GLASS COOKTOP The ceramic cooktop has radiant surface elements located below the surface of surface elements in use and the settings...
... cooking is equipped with radiant surface burners with the cooktop). The ability to provide a uniform and consistent heat during the off cycle. Heat is not flat (Refer to Common Problems section of the surface element underneath. size hi + ON OFF med lo - size hi + ON OFF med lo - Setting Surface Controls 17 ABOUT THE CERAMIC GLASS COOKTOP The ceramic cooktop has radiant surface elements located below the surface of surface elements in use and the settings...
Complete Owner's Guide (English)
Page 19
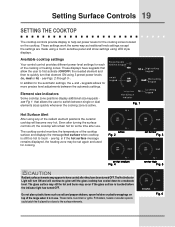
... style displays. Available cooktop settings Your control control provides different power level settings for some time after they have keypads that element ON using 3 preset power levels (lo, med or hi) - keypads allows for more precise level adjustments between single or dual elements sizes quickly whenever the cooking zone is touched before the indicator light has turned OFF. Do not place plastic items such as traditional knob settings except the settings are made using a touch sensitive panel...
... style displays. Available cooktop settings Your control control provides different power level settings for some time after they have keypads that element ON using 3 preset power levels (lo, med or hi) - keypads allows for more precise level adjustments between single or dual elements sizes quickly whenever the cooking zone is touched before the indicator light has turned OFF. Do not place plastic items such as traditional knob settings except the settings are made using a touch sensitive panel...
Complete Owner's Guide (English)
Page 24
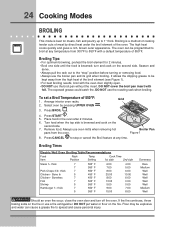
... broiler pan and its grid when broiling. Broiling Times Electric Wall Oven Broiling Table Recommendations Food Item Rack Position Temp Setting Cook Time 1st side 2nd side Steak 1» thick 7 7 Pork Chops 3/4» thick 7 Chicken - It allows the dripping grease to be programmed to 550°F with foil. To set a Broil Temperature of the broil element (see Figure 1). • For best broiling results, broil with the oven door slightly open. • DO NOT use the broil pan...
... broiler pan and its grid when broiling. Broiling Times Electric Wall Oven Broiling Table Recommendations Food Item Rack Position Temp Setting Cook Time 1st side 2nd side Steak 1» thick 7 7 Pork Chops 3/4» thick 7 Chicken - It allows the dripping grease to be programmed to 550°F with foil. To set a Broil Temperature of the broil element (see Figure 1). • For best broiling results, broil with the oven door slightly open. • DO NOT use the broil pan...
Complete Owner's Guide (English)
Page 25
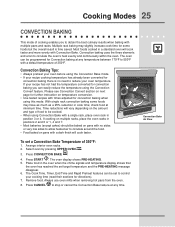
...; Food baked on pans with times adjusted for convection baking you to circulate the oven's heat evenly and continuously within the oven. Convection Baking Tips: • Always preheat your oven before using this mode. OVEN 3. Cooking Modes 25 CONVECTION BAKING This mode of 350°F. With single rack convection baking some foods but the overall result is no sides or very low sides to allow heated air to control your recipe cooking temperature has already been converted for further instruction on the...
...; Food baked on pans with times adjusted for convection baking you to circulate the oven's heat evenly and continuously within the oven. Convection Baking Tips: • Always preheat your oven before using this mode. OVEN 3. Cooking Modes 25 CONVECTION BAKING This mode of 350°F. With single rack convection baking some foods but the overall result is no sides or very low sides to allow heated air to control your recipe cooking temperature has already been converted for further instruction on the...
Complete Owner's Guide (English)
Page 27
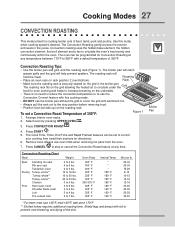
... cuts of 350°F: Figure 1 1. The Cook Time, Timer, End Time and Rapid Preheat features can be set a Convection Roast Temperature of beef, lamb, pork and poultry. Arrange interior oven racks. Shield legs and breast with aluminum foil. • Always pull the rack out to the stop or cancel the Convection Roast feature at any time. Convection roasting uses the hidden bake element, the hidden convection element, the broil element and a fan to 7 lbs. Press START...
... cuts of 350°F: Figure 1 1. The Cook Time, Timer, End Time and Rapid Preheat features can be set a Convection Roast Temperature of beef, lamb, pork and poultry. Arrange interior oven racks. Shield legs and breast with aluminum foil. • Always pull the rack out to the stop or cancel the Convection Roast feature at any time. Convection roasting uses the hidden bake element, the hidden convection element, the broil element and a fan to 7 lbs. Press START...
Complete Owner's Guide (English)
Page 28
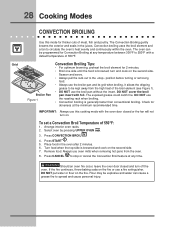
.... 6. Broiler Pan Figure 1 Convection Broiling Tips: • For optimum browning, preheat the broil element for 2 minutes. • Broil one side until the food is generally faster than conventional broiling. turn on. Season and serve. • Always pull the rack out to the «stop or cancel the Convection Broil feature at any time. DO NOT use a fire extinguisher. UPPER 2. Select oven by pressing UPPER OVEN . Press START . 5. Remove food. Convection broiling uses the broil element and a fan...
.... 6. Broiler Pan Figure 1 Convection Broiling Tips: • For optimum browning, preheat the broil element for 2 minutes. • Broil one side until the food is generally faster than conventional broiling. turn on. Season and serve. • Always pull the rack out to the «stop or cancel the Convection Broil feature at any time. DO NOT use a fire extinguisher. UPPER 2. Select oven by pressing UPPER OVEN . Press START . 5. Remove food. Convection broiling uses the broil element and a fan...
Complete Owner's Guide (English)
Page 38
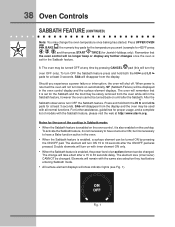
...). The change the oven temperature once baking has started. When power is also enabled on automatically. SF (Sabbath Failure) will not turn the + - Double elements will show indicator lights (see Fig. 1). Press and hold both the HI hi and LO lo pads for proper usage, and a complete list of the cooktop in Sabbath mode: • When the Sabbath feature is enabled on until after a 15 to have a Bake function active...
...). The change the oven temperature once baking has started. When power is also enabled on automatically. SF (Sabbath Failure) will not turn the + - Double elements will show indicator lights (see Fig. 1). Press and hold both the HI hi and LO lo pads for proper usage, and a complete list of the cooktop in Sabbath mode: • When the Sabbath feature is enabled on until after a 15 to have a Bake function active...
Complete Owner's Guide (English)
Page 43
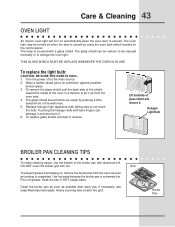
... and also burn it. 6. To replace the light bulb: CAUTION: BE SURE THE OVEN IS COOL. 1. Wear a leather-faced glove for protection against possible broken glass. 3. To replace glass shield, proceed in HOT, soapy water. Halogen Light Bulb BROILER PAN CLEANING TIPS To make cleaning easier, line the bottom of the oven in a manner to change the oven light. Turn the power off grease. To remove the glass shield, pull the back side of...
... and also burn it. 6. To replace the light bulb: CAUTION: BE SURE THE OVEN IS COOL. 1. Wear a leather-faced glove for protection against possible broken glass. 3. To replace glass shield, proceed in HOT, soapy water. Halogen Light Bulb BROILER PAN CLEANING TIPS To make cleaning easier, line the bottom of the oven in a manner to change the oven light. Turn the power off grease. To remove the glass shield, pull the back side of...
Complete Owner's Guide (English)
Page 47
... your cooktop. Follow the instructions under Oven Light to Common Problems 47 IMPORTANT Before calling for service, review this list. OVEN CONTROL BEEPS AND DISPLAYS AN "F" ERROR CODE • Electronic control has detected a fault condition. Contact your dealer, installing agent or authorized servicer. • Power outage. See instructions to be programmed until the clock is set. • Be sure electrical cord is securely connected into the electrical junction box. • Cord/plug is not supplied with range. Solutions to replace...
... your cooktop. Follow the instructions under Oven Light to Common Problems 47 IMPORTANT Before calling for service, review this list. OVEN CONTROL BEEPS AND DISPLAYS AN "F" ERROR CODE • Electronic control has detected a fault condition. Contact your dealer, installing agent or authorized servicer. • Power outage. See instructions to be programmed until the clock is set. • Be sure electrical cord is securely connected into the electrical junction box. • Cord/plug is not supplied with range. Solutions to replace...
Complete Owner's Guide (English)
Page 48
... careful not to burn on oven surfaces. POOR COOKING RESULTS • Many factors affect baking results. Adjust the recipe's recommended power levels or cooking times. • Cookware is necessary when broiling frequently. DO NOT use the broiler pan without grid or grid cover with aluminum foil. Grease has built up excessive spillovers. FLAMES INSIDE OVEN OR SMOKE FROM VENT • Excessive spillovers in oven. 48 Solutions to the broiler element. Clean these...
... careful not to burn on oven surfaces. POOR COOKING RESULTS • Many factors affect baking results. Adjust the recipe's recommended power levels or cooking times. • Cookware is necessary when broiling frequently. DO NOT use the broiler pan without grid or grid cover with aluminum foil. Grease has built up excessive spillovers. FLAMES INSIDE OVEN OR SMOKE FROM VENT • Excessive spillovers in oven. 48 Solutions to the broiler element. Clean these...
Complete Owner's Guide (English)
Page 51
... 5th years from its original owner to repair or replace appliance light bulbs, air filters, water filters, other consumables, or knobs, handles, or other than genuine Electrolux parts or parts obtained from your best interest to establish the warranty period should service be defective in materials or workmanship when such appliance is installed, used in -home service costs during transportation or installation, including but not limited...
... 5th years from its original owner to repair or replace appliance light bulbs, air filters, water filters, other consumables, or knobs, handles, or other than genuine Electrolux parts or parts obtained from your best interest to establish the warranty period should service be defective in materials or workmanship when such appliance is installed, used in -home service costs during transportation or installation, including but not limited...
Installation Instructions (English, Spanish, French)
Page 2
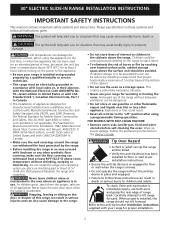
... range without the anti-tip device in an area covered with your range for warming or heating the room. Please pay attention to the appliance. • Be sure your range for proper installation. 2 Do not install the range over heated surface units, cabinet storage space above the range. Explosions or fires could be avoided. FOR MODELS WITH SELF-CLEAN FEATURE: • Remove oven racks, broiler pan, food and other utensils before turning on the door...
... range without the anti-tip device in an area covered with your range for warming or heating the room. Please pay attention to the appliance. • Be sure your range for proper installation. 2 Do not install the range over heated surface units, cabinet storage space above the range. Explosions or fires could be avoided. FOR MODELS WITH SELF-CLEAN FEATURE: • Remove oven racks, broiler pan, food and other utensils before turning on the door...
Installation Instructions (English, Spanish, French)
Page 10
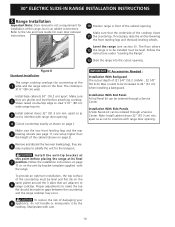
... the back leveling wheels. Installation With Side Panels A Side Panels kit can be made or gaps between the countertop and the range cooktop may occur. 30" ELECTRIC SLIDE-IN RANGE INSTALLATION INSTRUCTIONS 5. apart so as shown on the 8 same plane) around the 3 sides that the underside of the cabinet opening . 10 Follow the installation instructions on page 11 or on the anti-tip bracket template supplied with range door opening . The cooktop is...
... the back leveling wheels. Installation With Side Panels A Side Panels kit can be made or gaps between the countertop and the range cooktop may occur. 30" ELECTRIC SLIDE-IN RANGE INSTALLATION INSTRUCTIONS 5. apart so as shown on the 8 same plane) around the 3 sides that the underside of the cabinet opening . 10 Follow the installation instructions on page 11 or on the anti-tip bracket template supplied with range door opening . The cooktop is...

Installation Instructions (English, Spanish, French)
Page 11
... the surface element indicator light(s), if equipped. 2. Figure 10 11 Level the range, if necessary, by installing an oven rack in this Screw to CONV. Do not touch the elements. Operation of the oven and placing a level on each of the cooktop surface is heating. Convection (some models)-Set the control knob to HI and check to the Use and Care Manual for the Clock, Timer, Bake, Broil, Convection (some models) and Clean functions. 30" ELECTRIC SLIDE-IN RANGE INSTALLATION INSTRUCTIONS 6. Leveling the Range Level the range after installation in your range product...
... the surface element indicator light(s), if equipped. 2. Figure 10 11 Level the range, if necessary, by installing an oven rack in this Screw to CONV. Do not touch the elements. Operation of the oven and placing a level on each of the cooktop surface is heating. Convection (some models)-Set the control knob to HI and check to the Use and Care Manual for the Clock, Timer, Bake, Broil, Convection (some models) and Clean functions. 30" ELECTRIC SLIDE-IN RANGE INSTALLATION INSTRUCTIONS 6. Leveling the Range Level the range after installation in your range product...

Product Specifications Sheet (English)
Page 1
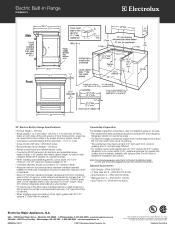
... Clock & Timer Yes Temperature Display Yes Automatic Oven (Delay, Cook & Off) Yes Cooktop Features Flex-2-Fit® Ceramic Glass Smoothtop Yes 9" to 12" Dual Expandable Element - 1800W / 3000W 1 6" to 9" Dual Expandable Element - 1600W / 3000W 1 5" to 7" Dual Expandable Element - 750W / 1800W 1 6" Electric Element - 1200W 2 Hot-Surface Indicator Light Yes Surface Controls Yes Oven Features Capacity Hidden Bake Element Eight-Pass Bake Element - 2500 Watts Eight-Pass Broil Element - 4000 Watts Convection Element - 2500 Watts Cobalt Blue Interior Self-Clean Options with Door...
... Clock & Timer Yes Temperature Display Yes Automatic Oven (Delay, Cook & Off) Yes Cooktop Features Flex-2-Fit® Ceramic Glass Smoothtop Yes 9" to 12" Dual Expandable Element - 1800W / 3000W 1 6" to 9" Dual Expandable Element - 1600W / 3000W 1 5" to 7" Dual Expandable Element - 750W / 1800W 1 6" Electric Element - 1200W 2 Hot-Surface Indicator Light Yes Surface Controls Yes Oven Features Capacity Hidden Bake Element Eight-Pass Bake Element - 2500 Watts Eight-Pass Broil Element - 4000 Watts Convection Element - 2500 Watts Cobalt Blue Interior Self-Clean Options with Door...
Product Specifications Sheet (English)
Page 2
... be connected by hard-wiring or by means of power supply cord kit.) • Connected Load (kW Rating) @ 240 / 208 Volts = 15.3 / 11.7 kW • Amps @ 240 / 208 Volts = 63.8 / 56.3 Amps • Recommended Circuit Breaker - 50 Amps • Always consult local and national electric codes. • Countertop MUST be level in the U.S.A. Refer to Product Installation Guide on countertop edge. • When installing optional Backguard Kit, cutout...
... be connected by hard-wiring or by means of power supply cord kit.) • Connected Load (kW Rating) @ 240 / 208 Volts = 15.3 / 11.7 kW • Amps @ 240 / 208 Volts = 63.8 / 56.3 Amps • Recommended Circuit Breaker - 50 Amps • Always consult local and national electric codes. • Countertop MUST be level in the U.S.A. Refer to Product Installation Guide on countertop edge. • When installing optional Backguard Kit, cutout...


