Use and Care Manual
Page 2
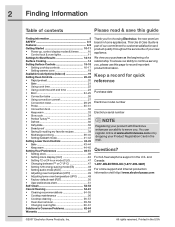
...can register online at www.electroluxusa.com or by dropping your Product Registration Card in home appliances. All rights reserved. Keep a record for quick reference Purchase date Electrolux model number Electrolux serial number NOTE Registering your product with end time 23 • Broil 24-25 ...• Convection bake 26 • Using convection convert 27 • Convection roast 28-29 • Probe 30-31 • Convection broil 32...
...can register online at www.electroluxusa.com or by dropping your Product Registration Card in home appliances. All rights reserved. Keep a record for quick reference Purchase date Electrolux model number Electrolux serial number NOTE Registering your product with end time 23 • Broil 24-25 ...• Convection bake 26 • Using convection convert 27 • Convection roast 28-29 • Probe 30-31 • Convection broil 32...
Use and Care Manual
Page 3
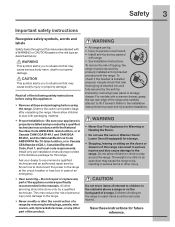
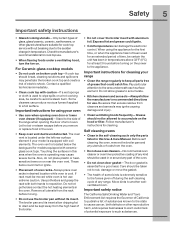
... of the product. • All ranges can result in Canada CSA Standard C22.1, Canadian Electrical Code, Part 1, and local code requirements. Do not allow children to play around the range. This symbol alerts you to the installation instructions for proper anti-tip bracket installation. • Never Use Your Appliance for Warming or Heating the...
... of the product. • All ranges can result in Canada CSA Standard C22.1, Canadian Electrical Code, Part 1, and local code requirements. Do not allow children to play around the range. This symbol alerts you to the installation instructions for proper anti-tip bracket installation. • Never Use Your Appliance for Warming or Heating the...
Use and Care Manual
Page 4
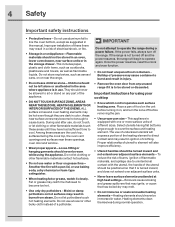
... smoking and greasy spillovers that may result in a risk of utensil to element will begin to operate the range during normal operation. Moist or damp potholders on grease fires- Proper relationship of electrical shock, or fire. • Storage in or on , and turn off and the power resumes, the... and cloth items, such as cookbooks, plasticware and towels, as well as aerosol cans, on any unused range if it closely. Areas near surface units or in the area where appliance is equipped with one or more surface units of the utensil should be positioned so that has boiled dry...
... smoking and greasy spillovers that may result in a risk of utensil to element will begin to operate the range during normal operation. Moist or damp potholders on grease fires- Proper relationship of electrical shock, or fire. • Storage in or on , and turn off and the power resumes, the... and cloth items, such as cookbooks, plasticware and towels, as well as aerosol cans, on any unused range if it closely. Areas near surface units or in the area where appliance is equipped with one or more surface units of the utensil should be positioned so that has boiled dry...
Use and Care Manual
Page 5
...8226; Clean ventilating hoods frequently-Grease should break, cleaning solutions and spillovers may penetrate the broken cook top and create a risk of electric shock. Exposed fat and grease could ignite. • Cold temperatures can produce noxious fumes if applied to a hot surface. Self cleaning...should be allowed to accumulate on the power to the appliance. Follow manufacturer's instructions for use extreme caution. Move birds to the area underneath each surface element. When using your range • Clean the range regularly to keep all utensils from the high heat of ...
...8226; Clean ventilating hoods frequently-Grease should break, cleaning solutions and spillovers may penetrate the broken cook top and create a risk of electric shock. Exposed fat and grease could ignite. • Cold temperatures can produce noxious fumes if applied to a hot surface. Self cleaning...should be allowed to accumulate on the power to the appliance. Follow manufacturer's instructions for use extreme caution. Move birds to the area underneath each surface element. When using your range • Clean the range regularly to keep all utensils from the high heat of ...
Use and Care Manual
Page 10
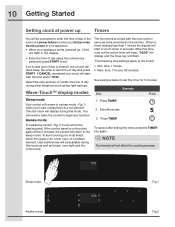
...display during this mode. If CANCEL is not touched again within the display panel. Only the clock will start cooking you first provide electric power to your appliance. • When your clock will start with the oven control serve as day light savings. 10 Getting Started Setting clock at power...8482; display modes The two timers provided with the time set the timer for 12:00. If the control panel is pressed your appliance is entered, the control will not affect the cooking process. Press TIMER To cancel after setting the timer, press the TIMER key again.
...display during this mode. If CANCEL is not touched again within the display panel. Only the clock will start cooking you first provide electric power to your appliance. • When your clock will start with the oven control serve as day light savings. 10 Getting Started Setting clock at power...8482; display modes The two timers provided with the time set the timer for 12:00. If the control panel is pressed your appliance is entered, the control will not affect the cooking process. Press TIMER To cancel after setting the timer, press the TIMER key again.
Use and Care Manual
Page 11
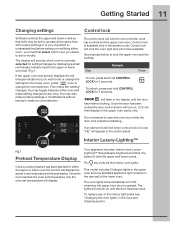
You may also make an oven selection. LOC will appear in the upper oven cavity only. Your appliance includes interior oven LuxuryLighting™ that gradually brightens and dims the lights for either the upper or lower oven the control will display the actual ... lock will automatically turn on the rear wall of the interior light bulbs see "Changing the oven lights" in the upper oven and one standard appliance light located on . If the upper oven text symbol displays the red triangle indicator but you desire to set or modify. To replace any time...
You may also make an oven selection. LOC will appear in the upper oven cavity only. Your appliance includes interior oven LuxuryLighting™ that gradually brightens and dims the lights for either the upper or lower oven the control will display the actual ... lock will automatically turn on the rear wall of the interior light bulbs see "Changing the oven lights" in the upper oven and one standard appliance light located on . If the upper oven text symbol displays the red triangle indicator but you desire to set or modify. To replace any time...
Use and Care Manual
Page 12
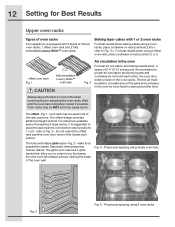
... Fig. 2 Air circulation in the oven for even heat to reach around the cookware for Best Results Upper oven racks Types of oven racks Your appliance is suggested to place the rack near the oven bottom (rack positions 1 or 2) - refer to Fig. 3-. The offset -Fig 1- Always use potholders or oven mitts...
... Fig. 2 Air circulation in the oven for even heat to reach around the cookware for Best Results Upper oven racks Types of oven racks Your appliance is suggested to place the rack near the oven bottom (rack positions 1 or 2) - refer to Fig. 3-. The offset -Fig 1- Always use potholders or oven mitts...

Use and Care Manual
Page 19
... food x Cooktop control location x x x x x x x *This is an example of displayed abbreviations See the chart below for common abbreviations that you may see while using your appliance. Message - Display Abbreviations 19 List of a fault code that you may see . These codes will help your servicer repair your...
... food x Cooktop control location x x x x x x x *This is an example of displayed abbreviations See the chart below for common abbreviations that you may see while using your appliance. Message - Display Abbreviations 19 List of a fault code that you may see . These codes will help your servicer repair your...
Use and Care Manual
Page 29
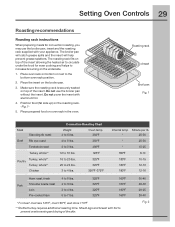
...rack position. 2. Make sure the roasting rack is securely seated on the roasting rack. -Fig. 1- 5. Do not cover the insert with your appliance. Shield legs and breast with foil to 6 lbs. Roasting rack Insert Broil pan Fig. 1 Meat Beef Standing rib roast Rib eye roast Tenderloin... roast Turkey, whole** Turkey, whole** Poultry Turkey, whole** Chicken Convection Roasting Chart Weight 4 to prevent overbrowning and drying of the skin. 30-40 20-30 20-25 30-40 Fig. 2 Pork Shoulder blade roast 4 to 4 lbs. Loin 3 to 6 lbs. Do not use the broiler pan, insert and...
...rack position. 2. Make sure the roasting rack is securely seated on the roasting rack. -Fig. 1- 5. Do not cover the insert with your appliance. Shield legs and breast with foil to 6 lbs. Roasting rack Insert Broil pan Fig. 1 Meat Beef Standing rib roast Rib eye roast Tenderloin... roast Turkey, whole** Turkey, whole** Poultry Turkey, whole** Chicken Convection Roasting Chart Weight 4 to prevent overbrowning and drying of the skin. 30-40 20-30 20-25 30-40 Fig. 2 Pork Shoulder blade roast 4 to 4 lbs. Loin 3 to 6 lbs. Do not use the broiler pan, insert and...
Use and Care Manual
Page 30
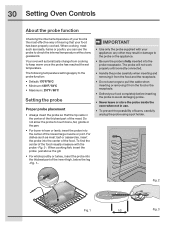
.... The probe will automatically change from the food or the receptacle. • Defrost your food completely before inserting the probe to the probe or the appliance. • Be sure the probe is the most effective way of insuring that the tip rests in the center of the thickest part of the.... • Never leave or store the probe inside the oven when not in ham or lamb, insert the probe into the center of the food. 30 Setting Oven Controls About the probe function Checking the internal temperature of your food is fully inserted into the thickest part of the inner thigh...
.... The probe will automatically change from the food or the receptacle. • Defrost your food completely before inserting the probe to the probe or the appliance. • Be sure the probe is the most effective way of insuring that the tip rests in the center of the thickest part of the.... • Never leave or store the probe inside the oven when not in ham or lamb, insert the probe into the center of the food. 30 Setting Oven Controls About the probe function Checking the internal temperature of your food is fully inserted into the thickest part of the inner thigh...
Use and Care Manual
Page 36
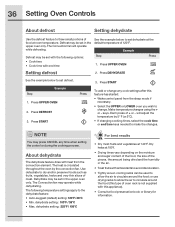
... control panel from the convection element. See the example below to make the changes. The Convection fan may press CANCEL any cook settings after this appliance). • Consult a food preservation book or library for information. The following options: • Cook time • Cook time with antioxidants to avoid discoloration. • Tightly...
... control panel from the convection element. See the example below to make the changes. The Convection fan may press CANCEL any cook settings after this appliance). • Consult a food preservation book or library for information. The following options: • Cook time • Cook time with antioxidants to avoid discoloration. • Tightly...
Use and Care Manual
Page 41
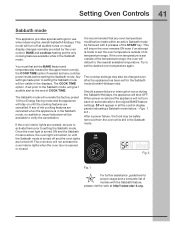
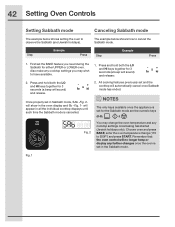
...upper/lower oven(s), the COOK TIME option if needed , be followed with the Sabbath feature, please vist the web at the end of its temperature range. If the oven interior lights are cancelled. Figs. 1 & 2 After a power failure, the food may also be visible in the displays....to the original BAKE feature settings. This mode will remain on automatically to verify the cancellation. Setting Oven Controls 41 Sabbath mode This appliance provides special settings for the Sabbath mode (Jewish Holidays only). BAKE and cooktop heating are the only cooking features available while in ...
...upper/lower oven(s), the COOK TIME option if needed , be followed with the Sabbath feature, please vist the web at the end of its temperature range. If the oven interior lights are cancelled. Figs. 1 & 2 After a power failure, the food may also be visible in the displays....to the original BAKE feature settings. This mode will remain on automatically to verify the cancellation. Setting Oven Controls 41 Sabbath mode This appliance provides special settings for the Sabbath mode (Jewish Holidays only). BAKE and cooktop heating are the only cooking features available while in ...
Use and Care Manual
Page 42
... for the Sabbath mode are the numeric keys (0-9), , & . Also make any cooktop settings you need during the 1. NOTES Example The only keys available once the appliance is set the BAKE feature you may change (170 to have available. All cooking features previously set and the cooktop will appear in all the...
... for the Sabbath mode are the numeric keys (0-9), , & . Also make any cooktop settings you need during the 1. NOTES Example The only keys available once the appliance is set the BAKE feature you may change (170 to have available. All cooking features previously set and the cooktop will appear in all the...

Use and Care Manual
Page 48
... hours and 59 minutes. Setting audio mode (AUD) The audio mode allows you reach the pre-set audible level is 5. You may turn off the appliance if the oven has been heating for the oven control. The factory pre-set 12hr energy saving mode -Fig. 1-. 2. See the example below to choose...
... hours and 59 minutes. Setting audio mode (AUD) The audio mode allows you reach the pre-set audible level is 5. You may turn off the appliance if the oven has been heating for the oven control. The factory pre-set 12hr energy saving mode -Fig. 1-. 2. See the example below to choose...
Use and Care Manual
Page 49
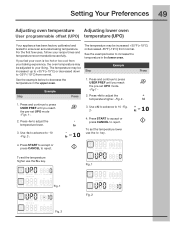
...-set the temperature lower use the hi+ key. Setting Your Preferences 49 Adjusting oven temperature Adjusting lower oven User programmable offset (UPO) temperature (UPO) Your appliance has been factory calibrated and tested to increase the temperature in the upper oven. See the example below to ensure an accurate baking temperature. or 4.
...-set the temperature lower use the hi+ key. Setting Your Preferences 49 Adjusting oven temperature Adjusting lower oven User programmable offset (UPO) temperature (UPO) Your appliance has been factory calibrated and tested to increase the temperature in the upper oven. See the example below to ensure an accurate baking temperature. or 4.
Use and Care Manual
Page 52
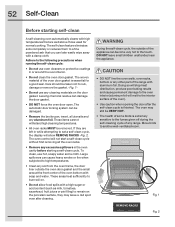
... The oven control will not start a self-clean cycle without first removing all utensils and any other part of the range with a damp cloth. DO NOT leave small children unattended near the appliance. • DO NOT line the oven walls, oven racks, bottom or any aluminum foil. Doing so will stop heat...door gasket. Care should be removed. Move birds to high temperatures. • Clean any soil from the oven frame, the door liner outside of the appliance can become very hot to the fumes given off during the self-cleaning cycle of the oven). • Use caution when opening the door after...
... The oven control will not start a self-clean cycle without first removing all utensils and any other part of the range with a damp cloth. DO NOT leave small children unattended near the appliance. • DO NOT line the oven walls, oven racks, bottom or any aluminum foil. Doing so will stop heat...door gasket. Care should be removed. Move birds to high temperatures. • Clean any soil from the oven frame, the door liner outside of the appliance can become very hot to the fumes given off during the self-cleaning cycle of the oven). • Use caution when opening the door after...
Use and Care Manual
Page 53
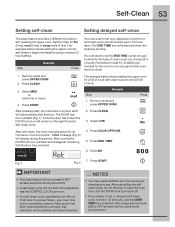
...during this period. Enter 800 Fig. 1 Fig. 2 7. Set the clean for self-cleaning the upper oven. You will need to a power failure, your appliance to perform a self-clean cycle sometime later (up to 24 hr. Press CLEAN 3. Press CLEAN 3. After cooling the DOOR lock icon will display during the...the upper oven for a lite (2 hour) self-clean cycle to cool and unlock. Press END TIME 6. NOTES Example • You may take about 30-40 minutes to end at 8:00 o'clock: Step Example Press 1. Once the door has locked the DOOR lock icon will automatically lock the door. ...
...during this period. Enter 800 Fig. 1 Fig. 2 7. Set the clean for self-cleaning the upper oven. You will need to a power failure, your appliance to perform a self-clean cycle sometime later (up to 24 hr. Press CLEAN 3. Press CLEAN 3. After cooling the DOOR lock icon will display during the...the upper oven for a lite (2 hour) self-clean cycle to cool and unlock. Press END TIME 6. NOTES Example • You may take about 30-40 minutes to end at 8:00 o'clock: Step Example Press 1. Once the door has locked the DOOR lock icon will automatically lock the door. ...

Use and Care Manual
Page 54
...the flat sides of these materials; Clean using a dishcloth. especially when wiping around the controls may become damaged during heating that are especially made for 30 to the OFF position; Always be removed. • Porcelain enamel broiler pan and insert (if equipped) • Door liner & body parts &#... a damp cloth, and then scrub with a soapy scouring pad will remove most spots. Do not use abrasive cleaners on soil for 30 to the appliance.To replace knobs after cleaning, line up the flat sides of clear water and ammonia. grasp firmly and pull straight off the shaft....
...the flat sides of these materials; Clean using a dishcloth. especially when wiping around the controls may become damaged during heating that are especially made for 30 to the OFF position; Always be removed. • Porcelain enamel broiler pan and insert (if equipped) • Door liner & body parts &#... a damp cloth, and then scrub with a soapy scouring pad will remove most spots. Do not use abrasive cleaners on soil for 30 to the appliance.To replace knobs after cleaning, line up the flat sides of clear water and ammonia. grasp firmly and pull straight off the shaft....
Use and Care Manual
Page 56
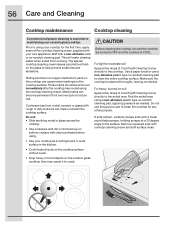
... your ceramic glass cooktop. Remove loosened soils with rough or dirty bottoms can become permanent if not removed prior to maintaining your new appliance. Metal marks can mark or scratch the cooktop surface. Before cleaning the cooktop, be removed immediately after the cooktop has cooled using...not: • Slide anything metal or glass across the cooktop. • Use cookware with a metal razor blade scraper, holding scraper at a 30 degree angle to clean the entire cooktop surface. If soils remain, carefully scrape soils with dirt or dirt build up on the cooktop surface. Use...
... your ceramic glass cooktop. Remove loosened soils with rough or dirty bottoms can become permanent if not removed prior to maintaining your new appliance. Metal marks can mark or scratch the cooktop surface. Before cleaning the cooktop, be removed immediately after the cooktop has cooled using...not: • Slide anything metal or glass across the cooktop. • Use cookware with a metal razor blade scraper, holding scraper at a 30 degree angle to clean the entire cooktop surface. If soils remain, carefully scrape soils with dirt or dirt build up on the cooktop surface. Use...
Use and Care Manual
Page 60
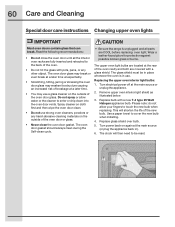
... upper oven lights IMPORTANT Most oven doors contain glass that can break. Replacing the upper oven interior light bulbs: 1. Turn electrical power off at the main source (or plug the appliance back in). 6. Replace glass shield over bulb. 5. Turn power back on again at the main source or unplug the...retracted to touch the new bulb when replacing. The oven door gasket should always clean during the Self-clean cycle. • Be sure the range is in place whenever the oven is unplugged and all the interior oven racks are COOL before replacing oven light. Wear a leather-faced glove ...
... upper oven lights IMPORTANT Most oven doors contain glass that can break. Replacing the upper oven interior light bulbs: 1. Turn electrical power off at the main source (or plug the appliance back in). 6. Replace glass shield over bulb. 5. Turn power back on again at the main source or unplug the...retracted to touch the new bulb when replacing. The oven door gasket should always clean during the Self-clean cycle. • Be sure the range is in place whenever the oven is unplugged and all the interior oven racks are COOL before replacing oven light. Wear a leather-faced glove ...
