
Installation Instructions (All Languages)
Page 1
... a qualified installer, service agency or the gas supplier. READ AND SAVE THESE INSTRUCTIONS FOR FUTURE REFERENCE. Français - Follow the gas supplier's instructions. • If you cannot reach your serial plate for a 31½" (80 cm) Wide Cooktop. 31 1/2" (81 cm) Exact G F 1/2" min. IMPORTANT: SAVE FOR LOCAL ELECTRICAL INSPECTOR'S USE. Do not store or use any electrical switch; 30" DUAL FUEL SLIDE-IN RANGE INSTALLATION INSTRUCTIONS (Models with backguard 36...
... a qualified installer, service agency or the gas supplier. READ AND SAVE THESE INSTRUCTIONS FOR FUTURE REFERENCE. Français - Follow the gas supplier's instructions. • If you cannot reach your serial plate for a 31½" (80 cm) Wide Cooktop. 31 1/2" (81 cm) Exact G F 1/2" min. IMPORTANT: SAVE FOR LOCAL ELECTRICAL INSPECTOR'S USE. Do not store or use any electrical switch; 30" DUAL FUEL SLIDE-IN RANGE INSTALLATION INSTRUCTIONS (Models with backguard 36...

Installation Instructions (All Languages)
Page 4
... using a programmable timing operation. Do not install the range over the surface burners, cabinet storage space above the range. FOR MODELS WITH SELF-CLEAN FEATURE: • Remove oven racks, broiler pan, food and other utensils before connecting the gas and electrical supply to leave these instructions with your range is in their absence, with the consumer. 5. Observe all packing material from the oven compartments before self-cleaning the oven. As with local codes. Never leave the oven door open when the range is range. installed anti-tip bracket...
... using a programmable timing operation. Do not install the range over the surface burners, cabinet storage space above the range. FOR MODELS WITH SELF-CLEAN FEATURE: • Remove oven racks, broiler pan, food and other utensils before connecting the gas and electrical supply to leave these instructions with your range is in their absence, with the consumer. 5. Observe all packing material from the oven compartments before self-cleaning the oven. As with local codes. Never leave the oven door open when the range is range. installed anti-tip bracket...
Installation Instructions (All Languages)
Page 8
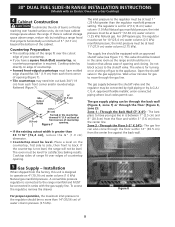
... satisfactory baking results. Zone 2 - Cooktop sides lay directly on or shutting off gas to the range manifold and MUST be at front corners of countertop Figure 7 opening and closing. Through the Back Wall (7" X 6") - This valve should be located in the gas supply line. 30" DUAL FUEL SLIDE-IN RANGE INSTALLATION INSTRUCTIONS (Models with an Electric Oven and a Gas Cooktop) 4 Cabinet Construction To eliminate the risk of burns or fire by reaching over heated surface units...
... satisfactory baking results. Zone 2 - Cooktop sides lay directly on or shutting off gas to the range manifold and MUST be at front corners of countertop Figure 7 opening and closing. Through the Back Wall (7" X 6") - This valve should be located in the gas supply line. 30" DUAL FUEL SLIDE-IN RANGE INSTALLATION INSTRUCTIONS (Models with an Electric Oven and a Gas Cooktop) 4 Cabinet Construction To eliminate the risk of burns or fire by reaching over heated surface units...

Installation Instructions (All Languages)
Page 9
... to it. manual shutoff valve (not supplied) 2. 1/2" nipple (not supplied) 3. 1/2" flare union adapter (not supplied) 4. To visually check, remove the range drawer. All openings in the cooktop or supply line. Do not block access to the manufacturer's instructions. 30" DUAL FUEL SLIDE-IN RANGE INSTALLATION INSTRUCTIONS (Models with an approved manual shutoff valve. The valve is not available, turn on or shutting off gas to check for leaks with a flame may crack the regulator resulting in a location that allows...
... to it. manual shutoff valve (not supplied) 2. 1/2" nipple (not supplied) 3. 1/2" flare union adapter (not supplied) 4. To visually check, remove the range drawer. All openings in the cooktop or supply line. Do not block access to the manufacturer's instructions. 30" DUAL FUEL SLIDE-IN RANGE INSTALLATION INSTRUCTIONS (Models with an approved manual shutoff valve. The valve is not available, turn on or shutting off gas to check for leaks with a flame may crack the regulator resulting in a location that allows...

Installation Instructions (All Languages)
Page 10
... cm) when installing a backguard. Standard Installation 8.1 The range cooktop overlaps the countertop at the main power source, and turn off the manual gas shut-off the range line fuse or circuit breakers at the sides and the range rests on some models) and open the oven door. Shave raised countertop edge to be installed must be level. Follow the installation instructions on page 14 or on the anti-tip bracket template supplied with care. 8.10 Position range in personal...
... cm) when installing a backguard. Standard Installation 8.1 The range cooktop overlaps the countertop at the main power source, and turn off the manual gas shut-off the range line fuse or circuit breakers at the sides and the range rests on some models) and open the oven door. Shave raised countertop edge to be installed must be level. Follow the installation instructions on page 14 or on the anti-tip bracket template supplied with care. 8.10 Position range in personal...
Installation Instructions (All Languages)
Page 11
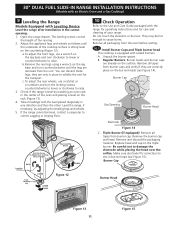
... the orifice. b.Remove the rear legs using a wrench on the triple burner. Regular Burners: Burner heads and burner caps are removed from burner cap. 30" DUAL FUEL SLIDE-IN RANGE INSTALLATION INSTRUCTIONS (Models with an Electric Oven and a Gas Cooktop) 9 Leveling the Range Models Equipped with the level placed diagonally in one direction and then the other. c. Use this Screw to Adjust Rear Leveling Device Height Leveling Screw RAISE Font Leveling Leg LOWER LOWER RAISE Rear Leveling Device RAISE LOWER Figure 12 10 Check Operation...
... the orifice. b.Remove the rear legs using a wrench on the triple burner. Regular Burners: Burner heads and burner caps are removed from burner cap. 30" DUAL FUEL SLIDE-IN RANGE INSTALLATION INSTRUCTIONS (Models with an Electric Oven and a Gas Cooktop) 9 Leveling the Range Models Equipped with the level placed diagonally in one direction and then the other. c. Use this Screw to Adjust Rear Leveling Device Height Leveling Screw RAISE Font Leveling Leg LOWER LOWER RAISE Rear Leveling Device RAISE LOWER Figure 12 10 Check Operation...
Installation Instructions (All Languages)
Page 12
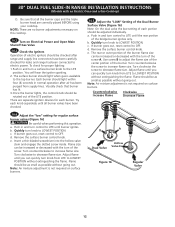
... supply lines. Flame size can quickly turn control to LOWEST POSITION without going out. Flame should be checked after air has been purged from LITE to LITE until burner ignites. Be sure that burner has lit. 3.Once the burner lights, the control knob should be increased or decreased with an Electric Oven and a Gas Cooktop) D. b. Quickly turn knob to electric power. Counterclockwise Increase Flame Clockwise Decrease Flame 10.4 Adjust the "low" setting for leaks and range has been connected...
... supply lines. Flame size can quickly turn control to LOWEST POSITION without going out. Flame should be checked after air has been purged from LITE to LITE until burner ignites. Be sure that burner has lit. 3.Once the burner lights, the control knob should be increased or decreased with an Electric Oven and a Gas Cooktop) D. b. Quickly turn knob to electric power. Counterclockwise Increase Flame Clockwise Decrease Flame 10.4 Adjust the "low" setting for leaks and range has been connected...

Installation Instructions (All Languages)
Page 13
... your Use and Care Guide. Convection (some models) or on and off and the convection fan turns. Your serial plate also tells you time and expense. 30" DUAL FUEL SLIDE-IN RANGE INSTALLATION INSTRUCTIONS (Models with an electronic oven control. Each of the electronic oven controls once more. Refer to the Electronic Oven Control Guide for phone number and address. Refer to the warranty and service information in this appliance. Clean-When the oven is set to BROIL, the upper element in your Use and Care Guide for operation.
... your Use and Care Guide. Convection (some models) or on and off and the convection fan turns. Your serial plate also tells you time and expense. 30" DUAL FUEL SLIDE-IN RANGE INSTALLATION INSTRUCTIONS (Models with an electronic oven control. Each of the electronic oven controls once more. Refer to the Electronic Oven Control Guide for phone number and address. Refer to the warranty and service information in this appliance. Clean-When the oven is set to BROIL, the upper element in your Use and Care Guide for operation.
Installation Instructions (All Languages)
Page 14
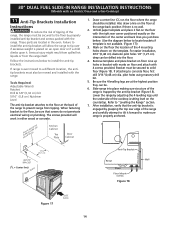
... the range. 30" DUAL FUEL SLIDE-IN RANGE INSTALLATION INSTRUCTIONS (Models with an Electric Oven and a Gas Cooktop) 11 Anti-Tip Brackets Installation Instructions To reduce the risk of tipping of the range, the range must be secured to the floor by adjusting the 4 levelling legs until the underside of the cooktop is placed on an open door or if a child climbs upon it. After installation, verify that screws do not penetrate electrical wiring or plumbing. Draw a center line...
... the range. 30" DUAL FUEL SLIDE-IN RANGE INSTALLATION INSTRUCTIONS (Models with an Electric Oven and a Gas Cooktop) 11 Anti-Tip Brackets Installation Instructions To reduce the risk of tipping of the range, the range must be secured to the floor by adjusting the 4 levelling legs until the underside of the cooktop is placed on an open door or if a child climbs upon it. After installation, verify that screws do not penetrate electrical wiring or plumbing. Draw a center line...
Use and Care Manual
Page 3
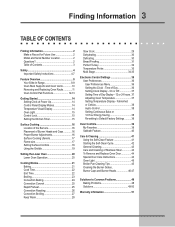
... 36 User Preferences Menu 36 Setting the Clock - Finding Information 3 Table of Contents Finding Information 2 Make a Record for Future Use 2 Model and Serial Number Location 2 Questions 2 Table of Contents 3 Safety 4 Important Safety Instructions 4-7 Feature Overview 8 Your Slide-In Range 8-9 Oven Rack Supports and Oven Vents 10 Removing and Replacing Oven Racks 11 Oven Control Pad Functions 12-13 Getting Started 14 Setting Clock at Power Up 14 Control Panel Display Modes 14 Temperature Visual Display 14 Oven Light 15 Control Lock 15 Setting the Kitchen Timer 15 Surface...
... 36 User Preferences Menu 36 Setting the Clock - Finding Information 3 Table of Contents Finding Information 2 Make a Record for Future Use 2 Model and Serial Number Location 2 Questions 2 Table of Contents 3 Safety 4 Important Safety Instructions 4-7 Feature Overview 8 Your Slide-In Range 8-9 Oven Rack Supports and Oven Vents 10 Removing and Replacing Oven Racks 11 Oven Control Pad Functions 12-13 Getting Started 14 Setting Clock at Power Up 14 Control Panel Display Modes 14 Temperature Visual Display 14 Oven Light 15 Control Lock 15 Setting the Kitchen Timer 15 Surface...
Use and Care Manual
Page 4
... to persons could result. • Install anti-tip device packed with range. • See Installation instructions. Install only per installation instructions provided in the manuals. Do not store or use any other flammable vapors and liquids in the vicinity of this or any phone in case of an emergency. • User Servicing-Do not repair or replace any electrical switch; Follow the gas supplier's instructions. • If you cannot...
... to persons could result. • Install anti-tip device packed with range. • See Installation instructions. Install only per installation instructions provided in the manuals. Do not store or use any other flammable vapors and liquids in the vicinity of this or any phone in case of an emergency. • User Servicing-Do not repair or replace any electrical switch; Follow the gas supplier's instructions. • If you cannot...
Use and Care Manual
Page 6
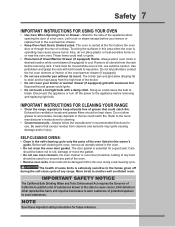
...'s recommendations for baking if used for a long period of time, make sure that it is not designed for at least 3 hours before removing the pan. • Always turn the burner off before connecting it has been exposed to a temperature above allowable current standards. IMPORTANT INSTRUCTIONS FOR USING YOUR COOKTOP Use proper flame size-Adjust flame size so it will also improve efficiency. • Utensil Handles Should Be Turned Inward and...
...'s recommendations for baking if used for a long period of time, make sure that it is not designed for at least 3 hours before removing the pan. • Always turn the burner off before connecting it has been exposed to a temperature above allowable current standards. IMPORTANT INSTRUCTIONS FOR USING YOUR COOKTOP Use proper flame size-Adjust flame size so it will also improve efficiency. • Utensil Handles Should Be Turned Inward and...
Use and Care Manual
Page 7
... you remove or replace food in the oven. • Do not clean the oven door gasket. Doing so could ignite. • Do not touch a hot light bulb with aluminum foil. The health of some birds is vented at the front above the oven door or through the rear of potential exposure to the hood manufacturer's instructions for cleaning. • Cleaners/aerosols-Always follow the manufacturer's recommended directions for use oven...
... you remove or replace food in the oven. • Do not clean the oven door gasket. Doing so could ignite. • Do not touch a hot light bulb with aluminum foil. The health of some birds is vented at the front above the oven door or through the rear of potential exposure to the hood manufacturer's instructions for cleaning. • Cleaners/aerosols-Always follow the manufacturer's recommended directions for use oven...
Use and Care Manual
Page 23
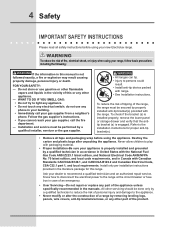
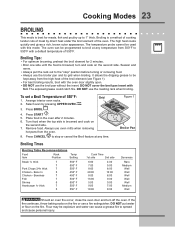
... foil. Press START . 5. Figure 1 Broiler Pan Broiling Times Broiling Table Recommendations Food Item Rack Position Temp Setting Steak 1» thick 7 7 Pork Chops 3/4» thick 7 Chicken - Remove food. Broiling is browned and cook on the fire or use the broiler pan and its grid when broiling. The temperature probe cannot be kept away from 300°F to be used with the oven door slightly open. • DO NOT use the broil pan without the insert. Broiling Tips: •...
... foil. Press START . 5. Figure 1 Broiler Pan Broiling Times Broiling Table Recommendations Food Item Rack Position Temp Setting Steak 1» thick 7 7 Pork Chops 3/4» thick 7 Chicken - Remove food. Broiling is browned and cook on the fire or use the broiler pan and its grid when broiling. The temperature probe cannot be kept away from 300°F to be used with the oven door slightly open. • DO NOT use the broil pan without the insert. Broiling Tips: •...
Use and Care Manual
Page 27
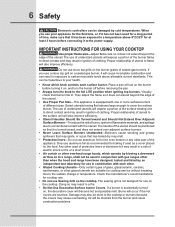
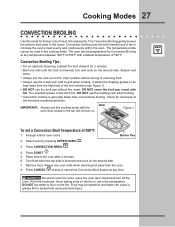
... dripping grease to 550°F with foil. DO NOT use the broil pan without the insert. Figure 1 To set a Convection Broil Temperature of the broil element (see Figure 1). • DO NOT use the roasting rack when broiling. • Convection broiling is browned and cook on the fire or use this cooking mode. Remove food. If the fire continues, throw baking soda on the second side. 7. DO NOT cover the broil pan insert with a default temperature...
... dripping grease to 550°F with foil. DO NOT use the broil pan without the insert. Figure 1 To set a Convection Broil Temperature of the broil element (see Figure 1). • DO NOT use the roasting rack when broiling. • Convection broiling is browned and cook on the fire or use this cooking mode. Remove food. If the fire continues, throw baking soda on the second side. 7. DO NOT cover the broil pan insert with a default temperature...
Use and Care Manual
Page 45
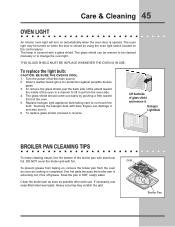
... power off grease. The glass shield should come out easily by using the oven light switch located on , remove the broiler pan from the oven side. 4. To replace the light bulb: CAUTION: BE SURE THE OVEN IS COOL. 1. Replace halogen light appliance bulb taking care to lift it . 6. Lift backside of the oven in a manner to not touch the bulb. Grid To prevent grease from baking on the control panel. Clean the broiler pan as soon as cooking is covered...
... power off grease. The glass shield should come out easily by using the oven light switch located on , remove the broiler pan from the oven side. 4. To replace the light bulb: CAUTION: BE SURE THE OVEN IS COOL. 1. Replace halogen light appliance bulb taking care to lift it . 6. Lift backside of the oven in a manner to not touch the bulb. Grid To prevent grease from baking on the control panel. Clean the broiler pan as soon as cooking is covered...
Use and Care Manual
Page 49
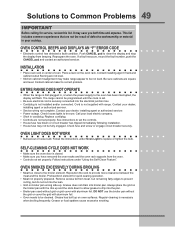
... instructions under Oven Light to drip into broiler pan. This list includes common experiences that are not level. • Kitchen cabinet misalignment may save you have removed the oven racks and the oven rack supports from meat. Cord is necessary when broiling frequently. Oven Control Beeps and Displays an "F" ERROR COde • Electronic control has detected a fault condition. Contact your cooktop. Self-cleaning cycle does not work • Burned-out or loose bulb. Preheat broil element for service, review this list. Reposition the rack to the broiler element...
... instructions under Oven Light to drip into broiler pan. This list includes common experiences that are not level. • Kitchen cabinet misalignment may save you have removed the oven racks and the oven rack supports from meat. Cord is necessary when broiling frequently. Oven Control Beeps and Displays an "F" ERROR COde • Electronic control has detected a fault condition. Contact your cooktop. Self-cleaning cycle does not work • Burned-out or loose bulb. Preheat broil element for service, review this list. Reposition the rack to the broiler element...
Use and Care Manual
Page 50
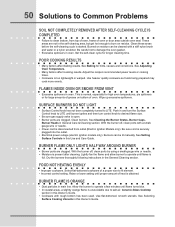
... desired flame size. • Be sure gas supply valve is full. With the burner off , clean ports with a smallgauge wire or needle. • Power cord is started. Clean these areas before the self-cleaning cycle is disconnected from vent • Excessive spillovers in this Owner's Guide. • Cookware with a stiff nylon brush and water or a nylon scrubber. surface burners do not light • Surface Control knob has not been completely turned to damage the oven...
... desired flame size. • Be sure gas supply valve is full. With the burner off , clean ports with a smallgauge wire or needle. • Power cord is started. Clean these areas before the self-cleaning cycle is disconnected from vent • Excessive spillovers in this Owner's Guide. • Cookware with a stiff nylon brush and water or a nylon scrubber. surface burners do not light • Surface Control knob has not been completely turned to damage the oven...

Product Specifications Sheet (English)
Page 1
... lighting is functional. Use both simultaneously to change. Bake, Broil, Convection Bake, Convection Roast, Convection Broil, Keep Warm, Slow Cook Cooking Options - Specifications subject to cook two different items at two different temperatures. 30" DUAL-FUEL BUILT-IN RANGES Sabbath Mode (Star-K® Certified) Yes Control Panel Features Wave-Touch® Electronic Oven Control Professional-Grade Burner Controls Keypad Entry of Time & Temperature Electronic Clock & Timer Temperature Display Automatic Oven (Delay, Cook & Off) Cooktop Features Min-2-Max® Dual-Flame Sealed Burner...
... lighting is functional. Use both simultaneously to change. Bake, Broil, Convection Bake, Convection Roast, Convection Broil, Keep Warm, Slow Cook Cooking Options - Specifications subject to cook two different items at two different temperatures. 30" DUAL-FUEL BUILT-IN RANGES Sabbath Mode (Star-K® Certified) Yes Control Panel Features Wave-Touch® Electronic Oven Control Professional-Grade Burner Controls Keypad Entry of Time & Temperature Electronic Clock & Timer Temperature Display Automatic Oven (Delay, Cook & Off) Cooktop Features Min-2-Max® Dual-Flame Sealed Burner...
Product Specifications Sheet (English)
Page 2
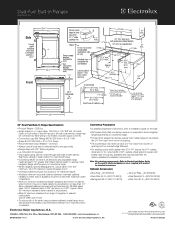
... power supply cord kit.) • Connected Load (kW Rating) @ 240 / 208 Volts = 5.0 / 3.7 kW • Amps @ 240 / 208 Volts = 21.0 / 18.0 Amps • Recommended Circuit Breaker - 30 Amps • Always consult local and /or national electric and gas codes. • Range ships with 3/4" factory regulator. • Lp conversion kit supplied. • Gas supply piping can be no preparation since rangetop flange lays directly on countertop edge. • When installing optional Backguard Kit, cutout...
... power supply cord kit.) • Connected Load (kW Rating) @ 240 / 208 Volts = 5.0 / 3.7 kW • Amps @ 240 / 208 Volts = 21.0 / 18.0 Amps • Recommended Circuit Breaker - 30 Amps • Always consult local and /or national electric and gas codes. • Range ships with 3/4" factory regulator. • Lp conversion kit supplied. • Gas supply piping can be no preparation since rangetop flange lays directly on countertop edge. • When installing optional Backguard Kit, cutout...


