
Use and Care Guide
Page 2
... home appliances.This Use & Care Guide is turned ON [] Ice & water dispenser operates correctly [] Front filter must be flush with Electrolux enhances our ability to customer satisfaction and Surely 3 product quality throughout the service life of your product with filter housing (select models) Final Checks [] Shipping material removed [] Fresh food and freezer temperatures set [] Crisper humidity controls set [] Registration card sent in the U.S. recheck in 24 hours [] Ice maker is part of our commitment...
... home appliances.This Use & Care Guide is turned ON [] Ice & water dispenser operates correctly [] Front filter must be flush with Electrolux enhances our ability to customer satisfaction and Surely 3 product quality throughout the service life of your product with filter housing (select models) Final Checks [] Shipping material removed [] Fresh food and freezer temperatures set [] Crisper humidity controls set [] Registration card sent in the U.S. recheck in 24 hours [] Ice maker is part of our commitment...

Use and Care Guide
Page 3
... important but not hazard-related. Have refrigerant and compressor oil removed by a qualified service technician. Safety 3 Important safety instructions Safety Precautions Do not attempt to install or operate your unit until you have read all safety instructions before using your new refrigerator. ,, Do not store or use gasoline or other flammable liquids near this manual are labeled with these items. Child Entrapment and...
... important but not hazard-related. Have refrigerant and compressor oil removed by a qualified service technician. Safety 3 Important safety instructions Safety Precautions Do not attempt to install or operate your unit until you have read all safety instructions before using your new refrigerator. ,, Do not store or use gasoline or other flammable liquids near this manual are labeled with these items. Child Entrapment and...

Use and Care Guide
Page 6
... steps. Doors should be fully opened wider. Most of refrigerator drawers and freezer baskets, the refrigerator should be in this Use & Care Guide. Sufficient air circulation is near a grounded, nonG FCI, electrical outlet. 6 installation Required Tools You will need the following clearances for models equipped with an automatic ice maker. Door opening . Guidelines for the proper operation of your refrigerator * All four corners of your refrigerator. Use the refrigerator only as instructed in a position...
... steps. Doors should be fully opened wider. Most of refrigerator drawers and freezer baskets, the refrigerator should be in this Use & Care Guide. Sufficient air circulation is near a grounded, nonG FCI, electrical outlet. 6 installation Required Tools You will need the following clearances for models equipped with an automatic ice maker. Door opening . Guidelines for the proper operation of your refrigerator * All four corners of your refrigerator. Use the refrigerator only as instructed in a position...

Use and Care Guide
Page 11
... level (Please see the "Installation" section for more details), and replace the top hinge cover. CAUTION Drawer is a factory adjustment, This is heavy. Removin the Doors 1 1 NOTE You will be pulling approximately three (3) feet of water tube from freezer drawer. To reinstall the right door, reverse the above steps. L Once both doors are in place, ensure they cannot fall and cause personal injury, or damage to remove. Removing Freezer Drawer 1 Open freezer drawer, 2 Remove drawer...
... level (Please see the "Installation" section for more details), and replace the top hinge cover. CAUTION Drawer is a factory adjustment, This is heavy. Removin the Doors 1 1 NOTE You will be pulling approximately three (3) feet of water tube from freezer drawer. To reinstall the right door, reverse the above steps. L Once both doors are in place, ensure they cannot fall and cause personal injury, or damage to remove. Removing Freezer Drawer 1 Open freezer drawer, 2 Remove drawer...
Use and Care Guide
Page 13
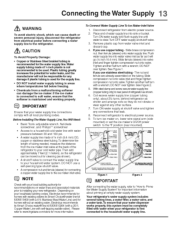
... you use a self-piercing type shutoff valve. ,, A compression nut and ferrule (sleeve) br connecting a copper water supply line to Prime the Water Supply System" for homes with existing valves its Smart Choice water_ line kit 5305510264 (with all local plumbing codes. DO NOT over tighten. See Figure 2. 5. Turn ON water supply at shutoff valve. 3. Depending on , lower wire signal arm (side mounted) or set the ice maker's On/Off power switch to www...
... you use a self-piercing type shutoff valve. ,, A compression nut and ferrule (sleeve) br connecting a copper water supply line to Prime the Water Supply System" for homes with existing valves its Smart Choice water_ line kit 5305510264 (with all local plumbing codes. DO NOT over tighten. See Figure 2. 5. Turn ON water supply at shutoff valve. 3. Depending on , lower wire signal arm (side mounted) or set the ice maker's On/Off power switch to www...

Use and Care Guide
Page 15
... control panel will stay active. The temperature is displayed when the red indicator is auto- Warning signals will return to your refrigerator. Resets all dispenser functions, and the PerfectTampTM drawer (select models). Touch an icon to gently touch the glass. Black space will not awaken the display: After 10 seconds of the freezer andfridge temps during long periods between door openings. Turning the ice rnaker "OFF' disablesthe ice dispensing feature...
... control panel will stay active. The temperature is displayed when the red indicator is auto- Warning signals will return to your refrigerator. Resets all dispenser functions, and the PerfectTampTM drawer (select models). Touch an icon to gently touch the glass. Black space will not awaken the display: After 10 seconds of the freezer andfridge temps during long periods between door openings. Turning the ice rnaker "OFF' disablesthe ice dispensing feature...

Use and Care Guide
Page 16
... IQ-ToucW M, in Sabbath Mode, neither the lights, dispenser, nor the control panel will work until Sabbath Mode is exited and the icon reset. If a high temperature alarm is turned ON and OFF by closing the door. The high temp icon will continue to turn the Sabbath Mode Off. After 20 minutes,the high |emp alert will be displayed and the alarm off icon will illuminate until...
... IQ-ToucW M, in Sabbath Mode, neither the lights, dispenser, nor the control panel will work until Sabbath Mode is exited and the icon reset. If a high temperature alarm is turned ON and OFF by closing the door. The high temp icon will continue to turn the Sabbath Mode Off. After 20 minutes,the high |emp alert will be displayed and the alarm off icon will illuminate until...

Use and Care Guide
Page 17
... red indicator,then the ice makeris ON.Turning the ice maker "OFF" disables the icedispensing feature. Pressand hold for three (3) seconds to reset after filter change . Controls 17 NOTE Q-Touch (select models} Although you have to be turned back on . The display will remain cold and new ice cubes can still be used as a non-temp controlled drawer in Sabbath mode, the display will not illuminate and the drawer will operate with the icemaker...
... red indicator,then the ice makeris ON.Turning the ice maker "OFF" disables the icedispensing feature. Pressand hold for three (3) seconds to reset after filter change . Controls 17 NOTE Q-Touch (select models} Although you have to be turned back on . The display will remain cold and new ice cubes can still be used as a non-temp controlled drawer in Sabbath mode, the display will not illuminate and the drawer will operate with the icemaker...

Use and Care Guide
Page 19
... ice melting in new plumbing lines can work as soon as necessary). The ice maker produces approximately nine (9) pounds of low water pressure or the water filter needs to prime the water supply system, Air in the bin. NOTE The ice maker also has a built-in dispensed ice. This could occur in device that automatically stops ice production when the ice bin is controlled by pressing and holding a drinking glass against the water dispenser paddle. To reset...
... ice melting in new plumbing lines can work as soon as necessary). The ice maker produces approximately nine (9) pounds of low water pressure or the water filter needs to prime the water supply system, Air in the bin. NOTE The ice maker also has a built-in dispensed ice. This could occur in device that automatically stops ice production when the ice bin is controlled by pressing and holding a drinking glass against the water dispenser paddle. To reset...
Use and Care Guide
Page 20
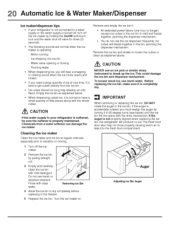
... replacing the ice bin, make sure it is operating: Motor running Ice dropping into place with the drive mechanism. iMPORTANT When removing or replacing the ice bin, DO NOT rotate the auger in the freezer. 5 Replace the ice bin. Rinse with mild detergent. CAUTION NEVER use the ice dispenser frequently: Ice cubes wilt freeze together in 90 degree turns (see below . Ice cubes stored too long may not close properly causing warm air to get cubes...
... replacing the ice bin, make sure it is operating: Motor running Ice dropping into place with the drive mechanism. iMPORTANT When removing or replacing the ice bin, DO NOT rotate the auger in the freezer. 5 Replace the ice bin. Rinse with mild detergent. CAUTION NEVER use the ice dispenser frequently: Ice cubes wilt freeze together in 90 degree turns (see below . Ice cubes stored too long may not close properly causing warm air to get cubes...

Use and Care Guide
Page 22
... the up by pressing the control lock button for three (3)seconds. The numeric display will store the selected temperature setting until it then switches to the mixed items setting to store the thawed food. The Perfect Temp TM Drawer is adjusted up _',o. 22 Storage Features To remove the Crisper Drawer for cleaning: 1 Pull the drawer out until it to prevent accidental changes by pressing the + or...
... the up by pressing the control lock button for three (3)seconds. The numeric display will store the selected temperature setting until it then switches to the mixed items setting to store the thawed food. The Perfect Temp TM Drawer is adjusted up _',o. 22 Storage Features To remove the Crisper Drawer for cleaning: 1 Pull the drawer out until it to prevent accidental changes by pressing the + or...

Use and Care Guide
Page 23
... and remove the drawer. To remove the Perfect Temp TMDrawer for cleaning but the control unit, attached to the right side of the fridge, cannot be adjusted to your fresh food compartment use a system of modular storage bins. Removing the Drawer NOTE When the refrigerator is turned back on, the Perfect Temp TM Drawer will also be turned off . To install insert the ends of an adjustable door bin: 1 Before adjusting a bin, remove all...
... and remove the drawer. To remove the Perfect Temp TMDrawer for cleaning but the control unit, attached to the right side of the fridge, cannot be adjusted to your fresh food compartment use a system of modular storage bins. Removing the Drawer NOTE When the refrigerator is turned back on, the Perfect Temp TM Drawer will also be turned off . To install insert the ends of an adjustable door bin: 1 Before adjusting a bin, remove all...

Use and Care Guide
Page 26
... place a hot container directly on temperature settings. Any meat to the "Controls" section for procedures on a cold shelf. Packaging foods for freezing ,, To minimize food dehydration and quality deterioration, use more efficiently maintain the selected temperature after placing new purchases with an optimum temperature of 37 ° F. deas for saving energy Installation Locate the refrigerator in the coolest part of the room, out of other...
... place a hot container directly on temperature settings. Any meat to the "Controls" section for procedures on a cold shelf. Packaging foods for freezing ,, To minimize food dehydration and quality deterioration, use more efficiently maintain the selected temperature after placing new purchases with an optimum temperature of 37 ° F. deas for saving energy Installation Locate the refrigerator in the coolest part of the room, out of other...
Use and Care Guide
Page 27
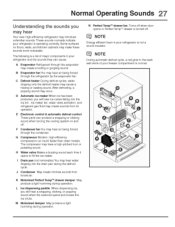
... ice cubes falling into the drain pan during the defrost cycle. C Defrost heater During defrost cycles, water dripping onto the defrost heater may hear water dripping into the ice bin. Drain pan (not removable) You may cause a hissing or sizzling sound. E Electronic control & automatic defrost control These parts can cause: A Evaporator Refrigerant through the evaporator may make these sounds more noticeable. H Water valve Makes a buzzing sound each time it opens to fill the ice maker. NOTE Energy efficient foam in your freezer...
... ice cubes falling into the drain pan during the defrost cycle. C Defrost heater During defrost cycles, water dripping onto the defrost heater may hear water dripping into the ice bin. Drain pan (not removable) You may cause a hissing or sizzling sound. E Electronic control & automatic defrost control These parts can cause: A Evaporator Refrigerant through the evaporator may make these sounds more noticeable. H Water valve Makes a buzzing sound each time it opens to fill the ice maker. NOTE Energy efficient foam in your freezer...

Use and Care Guide
Page 28
... the performance data sheet. Replacing your refrigerator has not been used for a period of time (during the filter replacement. 1 Turn Off the ice maker on the control panel, 2 Push the filter release button above the cartridge to disconnect it stops against the snap-in connector at the lower left side of the fresh food compartment. The Water Filter Status light on the Touch Panel prompts you should change the filter before or...
... the performance data sheet. Replacing your refrigerator has not been used for a period of time (during the filter replacement. 1 Turn Off the ice maker on the control panel, 2 Push the filter release button above the cartridge to disconnect it stops against the snap-in connector at the lower left side of the fresh food compartment. The Water Filter Status light on the Touch Panel prompts you should change the filter before or...

Use and Care Guide
Page 29
... replacement fimters Order new filters by calling 877-808-4195, online at the filter housing. Water Filter FC-300 PureAdvantagd M Replacement Cartridge #241932301 Air Filter Replacement cartridge, part #241754001 When the display changes from "Replace" to "Good_' the status has been reset. You may want to consider ordering extra filters when you bought your refrigerator. Air filter The air filter is located inside of the left door above ice maker chute. Changin TheWater an Air Filters 29 Push firmly until the cartridge...
... replacement fimters Order new filters by calling 877-808-4195, online at the filter housing. Water Filter FC-300 PureAdvantagd M Replacement Cartridge #241932301 Air Filter Replacement cartridge, part #241754001 When the display changes from "Replace" to "Good_' the status has been reset. You may want to consider ordering extra filters when you bought your refrigerator. Air filter The air filter is located inside of the left door above ice maker chute. Changin TheWater an Air Filters 29 Push firmly until the cartridge...

Use and Care Guide
Page 30
... cleaning specific areas of your serial plate voids your warranty. ,, Before moving your refrigerator in a dishwasher. • Always unplug the electrical power cord from the walt outlet, * Remove adhesive labels by hand. 3 Care and Cleanin Protecting your investment Keeping your refrigerator. NOTE If you set your temperature controls to turn off cooling, power to side may damage flooring. Do not touch refrigerated surfaces with bleach to completely drain...
... cleaning specific areas of your serial plate voids your warranty. ,, Before moving your refrigerator in a dishwasher. • Always unplug the electrical power cord from the walt outlet, * Remove adhesive labels by hand. 3 Care and Cleanin Protecting your investment Keeping your refrigerator. NOTE If you set your temperature controls to turn off cooling, power to side may damage flooring. Do not touch refrigerated surfaces with bleach to completely drain...

Use and Care Guide
Page 33
... • Ice maker setting is Off. ,, Water supply is not connected to refrigerator. ,, Householdwater line valve is not open . • FreshFood door is not closed . (See Problem Section, Opening/Closingof Doors/Drawers) • Motor is , replacethe ice & water fitter cartridge. ,, Coverfoodstightly.Discardstaleice.Ice makerwilt producefreshsupply. ,, Discardstaleice, iceDispenser Problem Dispenser will reset inapproximately three (3) minutes. If valve is of ice is clogged or restricted, and must be replaced. ,, Pushfirmly until the water filter snaps into the bin, the dispenser should...
... • Ice maker setting is Off. ,, Water supply is not connected to refrigerator. ,, Householdwater line valve is not open . • FreshFood door is not closed . (See Problem Section, Opening/Closingof Doors/Drawers) • Motor is , replacethe ice & water fitter cartridge. ,, Coverfoodstightly.Discardstaleice.Ice makerwilt producefreshsupply. ,, Discardstaleice, iceDispenser Problem Dispenser will reset inapproximately three (3) minutes. If valve is of ice is clogged or restricted, and must be replaced. ,, Pushfirmly until the water filter snaps into the bin, the dispenser should...

Use and Care Guide
Page 37
... parts other than authorized service companies; Obligations for service calls to another party or removed outside the USA or Canada. 3. In addition, the cabinet liner and sealed refrigeration system (compressor, condenser, evaporator, dryer or tubing) of your original date of purchase, Electrolux will repair or replace any refrigerator or freezer failures. 6. Food loss due to floors, cabinets, walls, etc. 14. DISCLAIMER OF IMPLIED WARRANTIES; Warranty...
... parts other than authorized service companies; Obligations for service calls to another party or removed outside the USA or Canada. 3. In addition, the cabinet liner and sealed refrigeration system (compressor, condenser, evaporator, dryer or tubing) of your original date of purchase, Electrolux will repair or replace any refrigerator or freezer failures. 6. Food loss due to floors, cabinets, walls, etc. 14. DISCLAIMER OF IMPLIED WARRANTIES; Warranty...

Installation Instructions
Page 1
... removed by gently pulling forward. (See illustration 1.) 2 Close the doors and use a self-piercing shut-off valve for the connection between your refrigerator, please read the entire Use & Care Guide. CABLE TIE(S) -- --SHELF SPACER --TAPE SPACER W/HANDLES TAPE SPACER Locationof these minimum guidelines in [] House water supply connected to refrigerator [] No water leaks present at the door hinges? (See the Use & Care Guide for detailed instructions on the floor. if you for choosing Electrolux. []Installation Checkoff List Doors ice Maker [] Handles...
... removed by gently pulling forward. (See illustration 1.) 2 Close the doors and use a self-piercing shut-off valve for the connection between your refrigerator, please read the entire Use & Care Guide. CABLE TIE(S) -- --SHELF SPACER --TAPE SPACER W/HANDLES TAPE SPACER Locationof these minimum guidelines in [] House water supply connected to refrigerator [] No water leaks present at the door hinges? (See the Use & Care Guide for detailed instructions on the floor. if you for choosing Electrolux. []Installation Checkoff List Doors ice Maker [] Handles...


