
Use and Care Guide
Page 2
... 13 Controls 14 AutomaticIce & Water MakertDispenser 19 Storage Features 21 Storing Food and Saving Energy 26 Normal OperatingSounds & Sights 27 Changingthe Water and Air Filters 28 Care and Cleaning 30 Solutions to CommonProblems 33 Warranty 37 Jnsta mation Checklist Doors []... on all connections - Feature Overview 5 Keep a record for choosing Electrolux, our new premium FindingInformation 2 brand in home appliances.This Use & Care Guide is part of our commitment to refrigerator C3 No water leaks present at www.electroluxappliances.com or by sending ...
... 13 Controls 14 AutomaticIce & Water MakertDispenser 19 Storage Features 21 Storing Food and Saving Energy 26 Normal OperatingSounds & Sights 27 Changingthe Water and Air Filters 28 Care and Cleaning 30 Solutions to CommonProblems 33 Warranty 37 Jnsta mation Checklist Doors []... on all connections - Feature Overview 5 Keep a record for choosing Electrolux, our new premium FindingInformation 2 brand in home appliances.This Use & Care Guide is part of our commitment to refrigerator C3 No water leaks present at www.electroluxappliances.com or by sending ...

Use and Care Guide
Page 3
...Safety Precautions Do not attempt to install or operate your unit until you have read all safety instructions before using your old refrigerator. General Safety WARNING Please read the safety precautions in this or any other appliance. Destroy or recycle the product's carton,... type. Whether junked, abandoned, or temporarily stored (even for 'warnings regarding flammability and other hazards. • Do not operate the refrigerator in minor or moderate injury. Safety items throughout this symbol to avoid injury. Proper Disposal of explosive fumes. ,, Avoid contact with a...
...Safety Precautions Do not attempt to install or operate your unit until you have read all safety instructions before using your old refrigerator. General Safety WARNING Please read the safety precautions in this or any other appliance. Destroy or recycle the product's carton,... type. Whether junked, abandoned, or temporarily stored (even for 'warnings regarding flammability and other hazards. • Do not operate the refrigerator in minor or moderate injury. Safety items throughout this symbol to avoid injury. Proper Disposal of explosive fumes. ,, Avoid contact with a...

Use and Care Guide
Page 4
...be affected if the voltage varies by pulling on the power cord. Such damage is equipped with insufficient power can damage the compressor. The refrigerator must be plugged into its own dedicated 115 Volt, 60 Hz, AC-only non=GFCl electric outlet. The power cord of the appliance ...is not covered under your refrigerator, unplug the power cord from the receptacle to your warranty. • Do not plug the unit into a properly grounded three-prong receptacle. Consult...
...be affected if the voltage varies by pulling on the power cord. Such damage is equipped with insufficient power can damage the compressor. The refrigerator must be plugged into its own dedicated 115 Volt, 60 Hz, AC-only non=GFCl electric outlet. The power cord of the appliance ...is not covered under your refrigerator, unplug the power cord from the receptacle to your warranty. • Do not plug the unit into a properly grounded three-prong receptacle. Consult...

Use and Care Guide
Page 5
... models only) _---- The illustration below is provided to model, Model is designed for optimal convenience and storage flexibility. Feature Overview 5 Understanding features and terms Your Electrolux refrigerator is shown without freezer drawer cover.
... models only) _---- The illustration below is provided to model, Model is designed for optimal convenience and storage flexibility. Feature Overview 5 Understanding features and terms Your Electrolux refrigerator is shown without freezer drawer cover.

Use and Care Guide
Page 6
... The sides should tilt ¼ inch (6 mm) from the range, dishwasher, or other and be able to maintain proper temperatures inside the refrigerator, DO NOT block the toe grille on the floor. Do Not use of the cabinet must be installed on a floor that doors close and ...seal properly). Doors should be met by themselves within a 20 degree opening NOTE The refrigerator doors are designed to a counter when removing food. Most of your model. Installation * Allow the following tools: Components Provided: Tools Necessary: ...
... The sides should tilt ¼ inch (6 mm) from the range, dishwasher, or other and be able to maintain proper temperatures inside the refrigerator, DO NOT block the toe grille on the floor. Do Not use of the cabinet must be installed on a floor that doors close and ...seal properly). Doors should be met by themselves within a 20 degree opening NOTE The refrigerator doors are designed to a counter when removing food. Most of your model. Installation * Allow the following tools: Components Provided: Tools Necessary: ...

Use and Care Guide
Page 7
... grille (see illustration). 5 After unit is leveled, lower anti-tip leg until it into place, DO NOT use the anti-tip leg to level the refrigerator. 6 Replace the toe grille by fitting it contacts the floor, 3 Close the drawer and use a flat-blade screwdriver or %-inch socket wrench to keep the... refrigerator stable. NOTE The anti-tip leg must be in contact with the floor to raise or lower the front rollers, 4 Ensure both doors are bind-...
... grille (see illustration). 5 After unit is leveled, lower anti-tip leg until it into place, DO NOT use the anti-tip leg to level the refrigerator. 6 Replace the toe grille by fitting it contacts the floor, 3 Close the drawer and use a flat-blade screwdriver or %-inch socket wrench to keep the... refrigerator stable. NOTE The anti-tip leg must be in contact with the floor to raise or lower the front rollers, 4 Ensure both doors are bind-...

Use and Care Guide
Page 8
... contact with the lower hinge. Adjusting Door Rotate door stop is looking up at the bottom of Door Loosen/Remove Set Screw Bottom of the refrigerator door, 5 Re-tighten set screw.
... contact with the lower hinge. Adjusting Door Rotate door stop is looking up at the bottom of Door Loosen/Remove Set Screw Bottom of the refrigerator door, 5 Re-tighten set screw.

Use and Care Guide
Page 10
...the door shelves and close the doors, To remove the top hinge covers: 1 Remove the two (2) screws from the connector located behind the refrigerator and pull the tube back out to hold in the sleeve, pull the tube away. I1| "._,l,Qe NOTE DO NOT remove the ground ...latch, and pull apart. i Hi Mulll-v_ I I scr_ jzF'--....f I "%_b _"-. To remove the refrigerator doors: 1 Trace tightly around the door's top hinges with a pencil. Removing e Doors Getting through narrow spaces if your refrigerator will not fit through an entrance area, you press inward on the outer sleeve while pushing...
...the door shelves and close the doors, To remove the top hinge covers: 1 Remove the two (2) screws from the connector located behind the refrigerator and pull the tube back out to hold in the sleeve, pull the tube away. I1| "._,l,Qe NOTE DO NOT remove the ground ...latch, and pull apart. i Hi Mulll-v_ I I scr_ jzF'--....f I "%_b _"-. To remove the refrigerator doors: 1 Trace tightly around the door's top hinges with a pencil. Removing e Doors Getting through narrow spaces if your refrigerator will not fit through an entrance area, you press inward on the outer sleeve while pushing...

Use and Care Guide
Page 11
... sides (two (2) screws on drawer screws if necessary. CAUTION Be sure doors are set aside in a secure position where they are in reverse of the refrigerator. 4 Unscrew the three (3) lower hinge screws and hinge if necessary. Use caution when lifting. Removin the Doors 1 1 NOTE You will be pulling approximately three (3) feet...
... sides (two (2) screws on drawer screws if necessary. CAUTION Be sure doors are set aside in a secure position where they are in reverse of the refrigerator. 4 Unscrew the three (3) lower hinge screws and hinge if necessary. Use caution when lifting. Removin the Doors 1 1 NOTE You will be pulling approximately three (3) feet...
Use and Care Guide
Page 12
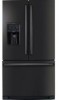
... holding handle firmly against door, fasten upper and lower Alien set screws (C) with door, make sure that set screws (C) with supplied Allen wrench, NOTE Mounting Refrigerator Handles oEnd Cap Mounting Freezer Handle To ensure that are fastened to the door, ensuring the holes for the set screws are flush with supplied...
... holding handle firmly against door, fasten upper and lower Alien set screws (C) with door, make sure that set screws (C) with supplied Allen wrench, NOTE Mounting Refrigerator Handles oEnd Cap Mounting Freezer Handle To ensure that are fastened to the door, ensuring the holes for the set screws are flush with supplied...
Use and Care Guide
Page 13
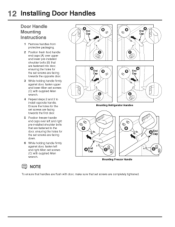
...of tubing needed, measure the distance from the ice maker inlet valve at shutoff valve and tighten any other surface. 7. To turn with a 6 ft. Your refrigerator's water supply system includes several tubing lines, a water filter, a water valve, and a water tank_ To ensure that leak. 8. Water supply ...supply, refer to "How to your water dispenser works properly, this system must be moved out for homes without an existing valve, Electrolux recommends its Smart Choice@water line kit 5305513409 (with a wrench; Slide compression nut onto valve inlet and finger tighten compression nut onto ...
...of tubing needed, measure the distance from the ice maker inlet valve at shutoff valve and tighten any other surface. 7. To turn with a 6 ft. Your refrigerator's water supply system includes several tubing lines, a water filter, a water valve, and a water tank_ To ensure that leak. 8. Water supply ...supply, refer to "How to your water dispenser works properly, this system must be moved out for homes without an existing valve, Electrolux recommends its Smart Choice@water line kit 5305513409 (with a wrench; Slide compression nut onto valve inlet and finger tighten compression nut onto ...

Use and Care Guide
Page 15
...three (3) levels of the freezer andfridge temps during long periods between door openings. This feature is an indicator. Touch to your refrigerator. Warning signals will read OFE IMPORTANT Pressing the system on off power to display filter condition status. When active, it .... Pressand hold for three (3) seconds to activate and deactivate.This restricts undesired changes to the refrigerator's settings and prevents use of inactivity, the control panel will operate with a Wave-Touch TM control panel display. fastfreeze Activates ...
...three (3) levels of the freezer andfridge temps during long periods between door openings. This feature is an indicator. Touch to your refrigerator. Warning signals will read OFE IMPORTANT Pressing the system on off power to display filter condition status. When active, it .... Pressand hold for three (3) seconds to activate and deactivate.This restricts undesired changes to the refrigerator's settings and prevents use of inactivity, the control panel will operate with a Wave-Touch TM control panel display. fastfreeze Activates ...

Use and Care Guide
Page 16
...pressed, acknowledging the alarm, at http:\\wvc_v.star-k.org. Sabbath Mode is turned ON and OFF by closing the door. The refrigerator will beep to the desired setting. Refrigerator stays in Sabbath mode. After five (5) seconds of inactivity, the display will function normally once the door is closed , ...until the alarm is acknowledged. The alarm is turned off , the refrigerator will appear on the center of the Sabbath/Holidays. After 20 minutes,the high |emp alert will be displayed and the alarm off icon ...
...pressed, acknowledging the alarm, at http:\\wvc_v.star-k.org. Sabbath Mode is turned ON and OFF by closing the door. The refrigerator will beep to the desired setting. Refrigerator stays in Sabbath mode. After five (5) seconds of inactivity, the display will function normally once the door is closed , ...until the alarm is acknowledged. The alarm is turned off , the refrigerator will appear on the center of the Sabbath/Holidays. After 20 minutes,the high |emp alert will be displayed and the alarm off icon ...

Use and Care Guide
Page 17
... maker is OFFwhen the red indicator is lit. matically activated during long periods between door openings. Touchto dispaayfilter status. Before putting the refrigerator into Sabbath Mode, it will continue to adjust itself to maintain the set point even if the display does not illuminate to gently ...three (3) seconds to reset after filter change . NOTE If the Perfect Temp TM Drawer is taken out of the ice and water dispenser. Your refrigerator is still on. It is only necessary to show "OFF" and the drawer will operate with standard trays. There are three (3) dispenser modes:...
... maker is OFFwhen the red indicator is lit. matically activated during long periods between door openings. Touchto dispaayfilter status. Before putting the refrigerator into Sabbath Mode, it will continue to adjust itself to maintain the set point even if the display does not illuminate to gently ...three (3) seconds to reset after filter change . NOTE If the Perfect Temp TM Drawer is taken out of the ice and water dispenser. Your refrigerator is still on. It is only necessary to show "OFF" and the drawer will operate with standard trays. There are three (3) dispenser modes:...

Use and Care Guide
Page 18
... the power cord from melting. The highletup alarm may be turned off until the alarm is turned off and the refrigerator will time out after a minute and returns to the basic display. DoorAjar IMPORTANT When the ice maker is turned...display "HI'. Press the + or- In the eventof a power failure, the power fail alert will be displayedand the refrigerator will display on off Tonesemittedbyeachkeypresscanbeturned off icon will illuminate until the mute soundsiconis pressed,acknowledging the alarm. Resetsall refrigeratosr ettingssuchastemp, tempdisplayandringtonesto theirfactory ...
... the power cord from melting. The highletup alarm may be turned off until the alarm is turned off and the refrigerator will time out after a minute and returns to the basic display. DoorAjar IMPORTANT When the ice maker is turned...display "HI'. Press the + or- In the eventof a power failure, the power fail alert will be displayedand the refrigerator will display on off Tonesemittedbyeachkeypresscanbeturned off icon will illuminate until the mute soundsiconis pressed,acknowledging the alarm. Resetsall refrigeratosr ettingssuchastemp, tempdisplayandringtonesto theirfactory ...

Use and Care Guide
Page 19
... your water filter, replace the water filter with particles, tess water is installed properly and has cooled for the first time, be changed your refrigerator. Press and hold the "Ice Off" icon for about three (3) minutes to flush the system and plumbing connections of the dispenser, it can... eight (8) hours. Begin filling the tank by the ice maker's On/Off icon on usage conditions. Ice maker operation & care After the refrigerator is delivered to turn off the water flow after installation Before making ice for several hours, the ice maker can produce ice within 24 hours...
... your water filter, replace the water filter with particles, tess water is installed properly and has cooled for the first time, be changed your refrigerator. Press and hold the "Ice Off" icon for about three (3) minutes to flush the system and plumbing connections of the dispenser, it can... eight (8) hours. Begin filling the tank by the ice maker's On/Off icon on usage conditions. Ice maker operation & care After the refrigerator is delivered to turn off the water flow after installation Before making ice for several hours, the ice maker can produce ice within 24 hours...
Use and Care Guide
Page 20
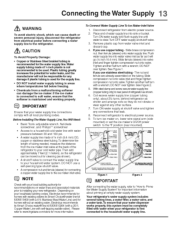
...removing or replacing the ice bin, DO NOT rotate the auger in 90 degree turns (see below . CAUTION if the water supply to your refrigerator is not connected to melt and freeze together, jamming the dispenser mechanism. • You do not use an ice pick or similar sharp ...is normal to leak into the fresh food compartment. Rinse with mild detergent. Automatic ice Water Maker/Dispenser ice maker/dispenser tips ,, If your refrigerator is softened, be sure the softener is properly maintained. If you must realign the auger by pulling straight out. Ice cubes stored too long...
...removing or replacing the ice bin, DO NOT rotate the auger in 90 degree turns (see below . CAUTION if the water supply to your refrigerator is not connected to melt and freeze together, jamming the dispenser mechanism. • You do not use an ice pick or similar sharp ...is normal to leak into the fresh food compartment. Rinse with mild detergent. Automatic ice Water Maker/Dispenser ice maker/dispenser tips ,, If your refrigerator is softened, be sure the softener is properly maintained. If you must realign the auger by pulling straight out. Ice cubes stored too long...
Use and Care Guide
Page 21
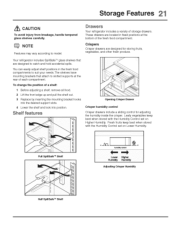
NOTE Features may vary according to catch and hold accidental spills. Your refrigerator includes SpiltSafe TM glass shelves that attach to suit your needs. She f features Opening Crisper Drawer Crisper humidity control Crisper drawers include a sliding control for ... i_ i_ i_ i_ i_ i_ i_ i_ i_ i TM _ _ _ _ _ Full SpillSafe TM Shelf humidib/_nt_el Humidi_ Humidi_ Adjusting Crisper Humidity Half SpilISafeTM Shelf Your refrigerator includes a variety of a shelf: 1 Before adjusting a shelf, remove all food. 2 Lift the front edge up and pull the shelf out. 3 Replace by inserting the mounting...
NOTE Features may vary according to catch and hold accidental spills. Your refrigerator includes SpiltSafe TM glass shelves that attach to suit your needs. She f features Opening Crisper Drawer Crisper humidity control Crisper drawers include a sliding control for ... i_ i_ i_ i_ i_ i_ i_ i_ i_ i TM _ _ _ _ _ Full SpillSafe TM Shelf humidib/_nt_el Humidi_ Humidi_ Adjusting Crisper Humidity Half SpilISafeTM Shelf Your refrigerator includes a variety of a shelf: 1 Before adjusting a shelf, remove all food. 2 Lift the front edge up and pull the shelf out. 3 Replace by inserting the mounting...

Use and Care Guide
Page 22
... drawer will show a temperature between _28 o F and 42 o F_ when on and off . 2 Press FiC if you store fruits or vegetables in one of the refrigerator. buttons. The thaw setting holds a temperature for thawing frozen foods for packaged food products. r down '_ scroll buttons to a higher humidity. Opening the Drawer Removing Crisper...
... drawer will show a temperature between _28 o F and 42 o F_ when on and off . 2 Press FiC if you store fruits or vegetables in one of the refrigerator. buttons. The thaw setting holds a temperature for thawing frozen foods for packaged food products. r down '_ scroll buttons to a higher humidity. Opening the Drawer Removing Crisper...

Use and Care Guide
Page 23
...-Touch TMor IQ-Touch TMon/off button, the PerfectTemp -r_'D,4rawer will resume operations at the temp setting that was set before the refrigerator was turned off by modeO Tall bottle retainer The tall bottle retainer keeps tall containers in the bin from falling forward when opening or...-ounce canned beverages. Clean with a moist sponge. CAUTION The Perfect Temp TMDrawer and cover can be removed. Removing the Drawer NOTE When the refrigerator is turned back on, the Perfect Temp TM Drawer will also be adjusted to your needs. All of frequently used items. Tilt Can Bin...
...-Touch TMor IQ-Touch TMon/off button, the PerfectTemp -r_'D,4rawer will resume operations at the temp setting that was set before the refrigerator was turned off by modeO Tall bottle retainer The tall bottle retainer keeps tall containers in the bin from falling forward when opening or...-ounce canned beverages. Clean with a moist sponge. CAUTION The Perfect Temp TMDrawer and cover can be removed. Removing the Drawer NOTE When the refrigerator is turned back on, the Perfect Temp TM Drawer will also be adjusted to your needs. All of frequently used items. Tilt Can Bin...


