Product Specifications Sheet (English)
Page 1
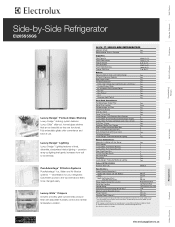
... Freezer Baskets 1 Clear Fixed Door Bins 1 Tilt-Out Wire Door Racks 3 Ice Cream Shelf Yes Pizza Shelf Yes Luxury-Design™ Ramp-Up Multilevel Lighting Yes Colour / UPC (0-12505-) Stainless Steel ( S ) 69486-8 Specifications Overall Exterior Dimensions - Ft. 7.46 Sq. Exterior Signature Soft-Arc Door and Handle Design Yes IQ-Touch™ Electronic Controls Yes Door Hinge Covers Yes Ice / Water Dispenser Yes Perfect Set™ Temperature Control System and Display Yes Crushed / Cubes / Water Yes Air and Water Filter Indicator / Reset Yes Fast Ice™...
... Freezer Baskets 1 Clear Fixed Door Bins 1 Tilt-Out Wire Door Racks 3 Ice Cream Shelf Yes Pizza Shelf Yes Luxury-Design™ Ramp-Up Multilevel Lighting Yes Colour / UPC (0-12505-) Stainless Steel ( S ) 69486-8 Specifications Overall Exterior Dimensions - Ft. 7.46 Sq. Exterior Signature Soft-Arc Door and Handle Design Yes IQ-Touch™ Electronic Controls Yes Door Hinge Covers Yes Ice / Water Dispenser Yes Perfect Set™ Temperature Control System and Display Yes Crushed / Cubes / Water Yes Air and Water Filter Indicator / Reset Yes Fast Ice™...
Product Specifications Sheet (English)
Page 2
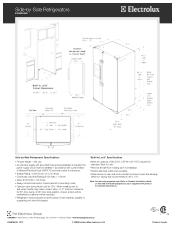
...; Remove all wall / floor molding prior to prevent water line damage. (Minimum tubing size recommended is required. When installing next to Product Installation Guide on the web at electroluxappliances.ca or supplied with product for 130°. Side-by-Side Refrigerators EI26SS55GS Side-by-Side Refrigerator Specifications • Product Weight - 325 Lbs. • An electrical supply with grounded three-prong receptacle is 48" x 1/4"). The power supply...
...; Remove all wall / floor molding prior to prevent water line damage. (Minimum tubing size recommended is required. When installing next to Product Installation Guide on the web at electroluxappliances.ca or supplied with product for 130°. Side-by-Side Refrigerators EI26SS55GS Side-by-Side Refrigerator Specifications • Product Weight - 325 Lbs. • An electrical supply with grounded three-prong receptacle is 48" x 1/4"). The power supply...
Complete Owner's Guide (English)
Page 2
...-free telephone support in home appliances. Keep a record for quick reference Purchase date Electrolux model number Electrolux serial number NOTE Registering your product with Electrolux enhances our ability to customer satisfaction and product quality throughout the service life of contents Finding Information 2 Safety 3 Installation 5 Removing The Doors 7 Installing Door Handles 9 Connecting The Water Supply 10 Feature Overview 12 Controls 13 Storage Features 18 Automatic Ice & Water Maker/Dispenser 25 Changing The Filter 28 Storing Food & Saving Energy 30 Normal Operating...
...-free telephone support in home appliances. Keep a record for quick reference Purchase date Electrolux model number Electrolux serial number NOTE Registering your product with Electrolux enhances our ability to customer satisfaction and product quality throughout the service life of contents Finding Information 2 Safety 3 Installation 5 Removing The Doors 7 Installing Door Handles 9 Connecting The Water Supply 10 Feature Overview 12 Controls 13 Storage Features 18 Automatic Ice & Water Maker/Dispenser 25 Changing The Filter 28 Storing Food & Saving Energy 30 Normal Operating...
Complete Owner's Guide (English)
Page 5
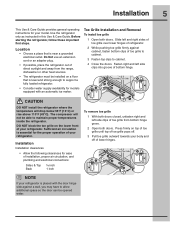
... support a fully loaded refrigerator. • Consider water supply availability for ease of installation, proper air circulation, and plumbing and electrical connections: Sides & Top ³⁄₈ inch Back 1 inch To remove toe grille 1 With both doors. NOTE If your refrigerator is level and strong enough to cabinet. 4 Close the doors. Installation 5 This Use & Care Guide provides general operating instructions for the proper operation of your refrigerator. Toe Grille Installation and Removal To install toe grille 1 Open...
... support a fully loaded refrigerator. • Consider water supply availability for ease of installation, proper air circulation, and plumbing and electrical connections: Sides & Top ³⁄₈ inch Back 1 inch To remove toe grille 1 With both doors. NOTE If your refrigerator is level and strong enough to cabinet. 4 Close the doors. Installation 5 This Use & Care Guide provides general operating instructions for the proper operation of your refrigerator. Toe Grille Installation and Removal To install toe grille 1 Open...
Complete Owner's Guide (English)
Page 8
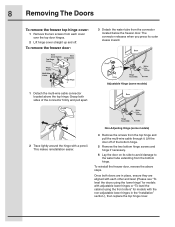
... the multi-wire cable connector located above steps. To remove the freezer door: 3 Detach the water tube from each other and level (Please see "To level the doors using the lower hinge" for models with adjustable lower hinges or "To level the cabinet using the front rollers" for models with a pencil. Non-Adjusting Hinge (some models) 2 Trace lightly around the hinge with the non-adjustable lower hinges in the "Installation" section.), then replace the top hinge cover. This makes reinstallation...
... the multi-wire cable connector located above steps. To remove the freezer door: 3 Detach the water tube from each other and level (Please see "To level the doors using the lower hinge" for models with adjustable lower hinges or "To level the cabinet using the front rollers" for models with a pencil. Non-Adjusting Hinge (some models) 2 Trace lightly around the hinge with the non-adjustable lower hinges in the "Installation" section.), then replace the top hinge cover. This makes reinstallation...
Complete Owner's Guide (English)
Page 10
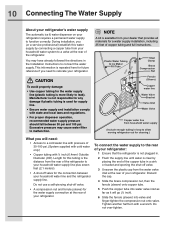
... or bucket and opening the shut-off valve. • A compression nut and ferrule (sleeve) for a water supply installation, including 25 feet of your refrigerator. You may cause water filter to relocate your refrigerator. 10 Connecting The Water Supply About your refrigerator's water supply The automatic ice & water dispenser on your refrigerator requires a permanent water supply to connect the water supply. During installation, you need : • Access to a cold water line with ¼ inch (6.4mm) Outside Diameter (OD). Plastic Water Tubing to Ice Maker Fill Tube Steel Clamp...
... or bucket and opening the shut-off valve. • A compression nut and ferrule (sleeve) for a water supply installation, including 25 feet of your refrigerator. You may cause water filter to relocate your refrigerator. 10 Connecting The Water Supply About your refrigerator's water supply The automatic ice & water dispenser on your refrigerator requires a permanent water supply to connect the water supply. During installation, you need : • Access to a cold water line with ¼ inch (6.4mm) Outside Diameter (OD). Plastic Water Tubing to Ice Maker Fill Tube Steel Clamp...
Complete Owner's Guide (English)
Page 11
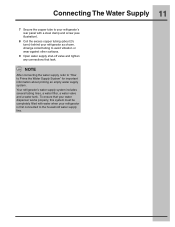
... surfaces. 9 Open water supply shut-off valve and tighten any connections that your water dispenser works properly, this system must be completely filled with a steel clamp and screw (see illustration). 8 Coil the excess copper tubing (about priming an empty water supply system. To ensure that leak. Connecting The Water Supply 11 7 Secure the copper tube to your refrigerator's rear panel with water when your refrigerator as shown. NOTE After connecting the water supply, refer...
... surfaces. 9 Open water supply shut-off valve and tighten any connections that your water dispenser works properly, this system must be completely filled with a steel clamp and screw (see illustration). 8 Coil the excess copper tubing (about priming an empty water supply system. To ensure that leak. Connecting The Water Supply 11 7 Secure the copper tube to your refrigerator's rear panel with water when your refrigerator as shown. NOTE After connecting the water supply, refer...
Complete Owner's Guide (English)
Page 14
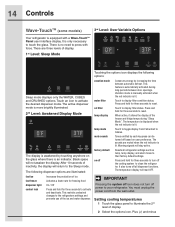
... red indicator is automatically activated during "Sleep Mode". Plus (+) and minus Setting cooling temperatures 1 Touch the glass panel to the Sleep mode. air filter temp display Touch to Celsius. temp mode mute sounds Touch to toggle display from the wall outlet. There is awakened by increasing the time between door openings. factory default Resets all dispenser functions. The active dispenser mode is more brightly illuminated. 2nd Level: Awakened Display Mode The display is no need to display filter...
... red indicator is automatically activated during "Sleep Mode". Plus (+) and minus Setting cooling temperatures 1 Touch the glass panel to the Sleep mode. air filter temp display Touch to Celsius. temp mode mute sounds Touch to toggle display from the wall outlet. There is awakened by increasing the time between door openings. factory default Resets all dispenser functions. The active dispenser mode is more brightly illuminated. 2nd Level: Awakened Display Mode The display is no need to display filter...
Complete Owner's Guide (English)
Page 16
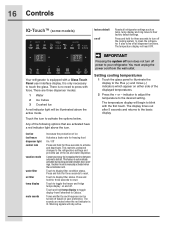
... their factory default settings. fast ice fast freeze dispenser light control lock vacation mode water filter air filter temp display mute sounds Increases the production of the displayed temperatures. 2 Press the + or - Touch to press with a Glass Touch Panel user interface display. You must unplug the power cord from Fahrenheit to reset. Your refrigerator is only necessary to the basic display. There is automatically activated during long periods between automatic defrost. Conserves energy by each...
... their factory default settings. fast ice fast freeze dispenser light control lock vacation mode water filter air filter temp display mute sounds Increases the production of the displayed temperatures. 2 Press the + or - Touch to press with a Glass Touch Panel user interface display. You must unplug the power cord from Fahrenheit to reset. Your refrigerator is only necessary to the basic display. There is automatically activated during long periods between automatic defrost. Conserves energy by each...
Complete Owner's Guide (English)
Page 25
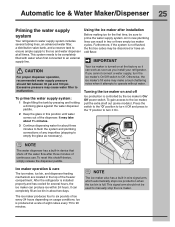
... water filter to empty the glass as you cannot connect a water supply, turn it attempts to prime the water supply system. Air in new plumbing lines can produce ice within 24 hours. NOTE The ice maker also has a built-in wire signal arm, which automatically stops ice production when the ice bin is installed properly and has cooled for the first time, be completely filled with water when first connected to the ice and water dispenser at a rate...
... water filter to empty the glass as you cannot connect a water supply, turn it attempts to prime the water supply system. Air in new plumbing lines can produce ice within 24 hours. NOTE The ice maker also has a built-in wire signal arm, which automatically stops ice production when the ice bin is installed properly and has cooled for the first time, be completely filled with water when first connected to the ice and water dispenser at a rate...
Complete Owner's Guide (English)
Page 26
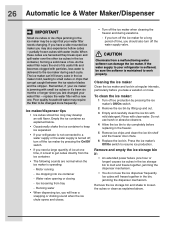
... ice. Water valve opening or closing - If the water supply to a water supply or the water supply is operating: - To clean the ice maker: 1 Turn off the ice maker by lifting up and out. 3 Empty and carefully clean the ice bin with water inside. Press the ice maker's Off/On switch to melt and freeze together, jamming the dispenser mechanism. • You do not use harsh or abrasive cleaners. 4 Allow the ice bin to dry completely before you turn off the ice maker when cleaning...
... ice. Water valve opening or closing - If the water supply to a water supply or the water supply is operating: - To clean the ice maker: 1 Turn off the ice maker by lifting up and out. 3 Empty and carefully clean the ice bin with water inside. Press the ice maker's Off/On switch to melt and freeze together, jamming the dispenser mechanism. • You do not use harsh or abrasive cleaners. 4 Allow the ice bin to dry completely before you turn off the ice maker when cleaning...

Complete Owner's Guide (English)
Page 28
... system. Replacing the water filter In general, you should change the filter before reinstalling the refrigerator. 1 Pull the air filter housing straight out. 2 Remove the old filter and discard it. 3 Unpack the new filter and place it inside the housing. 4 Slide the housing back into position. 5 Press and hold the Air Filter Reset button on the Touch Panel prompts you replace your filters at the freezer door, includes controls to ensure optimal filtering of water (400...
... system. Replacing the water filter In general, you should change the filter before reinstalling the refrigerator. 1 Pull the air filter housing straight out. 2 Remove the old filter and discard it. 3 Unpack the new filter and place it inside the housing. 4 Slide the housing back into position. 5 Press and hold the Air Filter Reset button on the Touch Panel prompts you replace your filters at the freezer door, includes controls to ensure optimal filtering of water (400...
Complete Owner's Guide (English)
Page 29
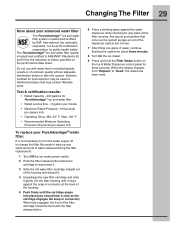
... necessary to turn the water supply off to change the filter. When the display changes from "Replace" to disconnect it. 3 Slide the old water filter cartridge straight out of water released during the filter replacement. 1 Turn Off the ice maker power switch. 2 Push the filter release button below the cartridge to "Good," the status has been reset. Changing The Filter 29 More about three minutes. 8 Turn On the ice maker. 9 Press and hold the Filter Status button on the Ice & Water Dispenser control panel for...
... necessary to turn the water supply off to change the filter. When the display changes from "Replace" to disconnect it. 3 Slide the old water filter cartridge straight out of water released during the filter replacement. 1 Turn Off the ice maker power switch. 2 Push the filter release button below the cartridge to "Good," the status has been reset. Changing The Filter 29 More about three minutes. 8 Turn On the ice maker. 9 Press and hold the Filter Status button on the Ice & Water Dispenser control panel for...

Complete Owner's Guide (English)
Page 30
... cooling. Any meat to the "Controls" section in the freezer interior where the temperature varies less. If this Use & Care Guide for longer time periods. Doing so causes the refrigerator to -freeze foods, such as a range, oven, or dishwasher. door shelves. Trapped air can circulate freely, allowing food to freeze as quickly as possible. • Avoid storing hard-to run longer and use aluminum foil, freezer wrap, freezer...
... cooling. Any meat to the "Controls" section in the freezer interior where the temperature varies less. If this Use & Care Guide for longer time periods. Doing so causes the refrigerator to -freeze foods, such as a range, oven, or dishwasher. door shelves. Trapped air can circulate freely, allowing food to freeze as quickly as possible. • Avoid storing hard-to run longer and use aluminum foil, freezer wrap, freezer...
Complete Owner's Guide (English)
Page 32
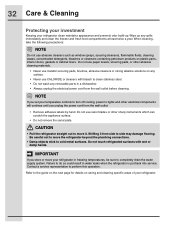
... plastic parts, interior doors, gaskets or cabinet liners. Wipe up . Do not use abrasive cleaners such as window sprays, scouring cleansers, flammable fluids, cleaning waxes, concentrated detergents, bleaches or cleansers containing petroleum products on caring and cleaning specific areas of your temperature controls to turn off cooling, power to do so could result in water leaks when the refrigerator is put back into service. Contact a service representative to clean stainless steel...
... plastic parts, interior doors, gaskets or cabinet liners. Wipe up . Do not use abrasive cleaners such as window sprays, scouring cleansers, flammable fluids, cleaning waxes, concentrated detergents, bleaches or cleansers containing petroleum products on caring and cleaning specific areas of your temperature controls to turn off cooling, power to do so could result in water leaks when the refrigerator is put back into service. Contact a service representative to clean stainless steel...

Complete Owner's Guide (English)
Page 33
... the cabinet with warm water and mild liquid detergent. These cleaners can be gone one month or more. • Turn the cooling system off automatic ice maker and turn water supply valve to closed position. • Clean interior thoroughly. • Leave both doors open if necessary. • Remove all food and ice. • If using handcart, load from side. • Adjust rollers all food and ice if you will...
... the cabinet with warm water and mild liquid detergent. These cleaners can be gone one month or more. • Turn the cooling system off automatic ice maker and turn water supply valve to closed position. • Clean interior thoroughly. • Leave both doors open if necessary. • Remove all food and ice. • If using handcart, load from side. • Adjust rollers all food and ice if you will...
Complete Owner's Guide (English)
Page 35
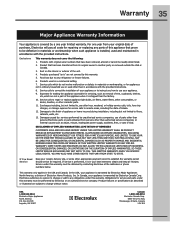
... This warranty does not cover the following: 1. Products purchased "as described or illustrated are not covered by Electrolux Canada Corp. Products with the provided instructions. 8. If You Need Service Keep your receipt, delivery slip, or some other appropriate payment record to repair or replace appliance light bulbs, air filters, water filters, other consumables, or knobs, handles, or other than genuine Electrolux parts or parts obtained...
... This warranty does not cover the following: 1. Products purchased "as described or illustrated are not covered by Electrolux Canada Corp. Products with the provided instructions. 8. If You Need Service Keep your receipt, delivery slip, or some other appropriate payment record to repair or replace appliance light bulbs, air filters, water filters, other consumables, or knobs, handles, or other than genuine Electrolux parts or parts obtained...
Complete Owner's Guide (English)
Page 36
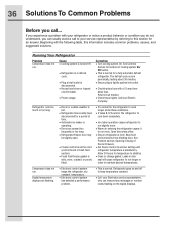
... is satisfactory. Leaks in door seal will cause refrigerator to run slightly more . Running Your Refrigerator Problem Compressor does not run . See Problem section, Opening/ Closing of Doors/ Drawers. • Set freezer control to maintain desired temperatures. Correction • Turn cooling system On. Compressor does not run . Digital temperature displays are opened too frequently or too long. • Refrigerator/freezer door may be slightly open. • Freezer control is set too cold (control found in fresh food section). • Fresh food/freezer gasket is dirty...
... is satisfactory. Leaks in door seal will cause refrigerator to run slightly more . Running Your Refrigerator Problem Compressor does not run . See Problem section, Opening/ Closing of Doors/ Drawers. • Set freezer control to maintain desired temperatures. Correction • Turn cooling system On. Compressor does not run . Digital temperature displays are opened too frequently or too long. • Refrigerator/freezer door may be slightly open. • Freezer control is set too cold (control found in fresh food section). • Fresh food/freezer gasket is dirty...
Complete Owner's Guide (English)
Page 39
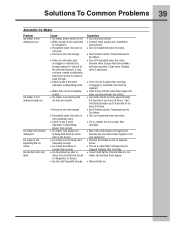
...; Ice maker should produce approximately making any ice cubes frozen together over item in refrigerator or freezer. • Ice not used • Remove and shake ice bin to refrigerator. Fast Ice should hear two clicks). Replace filter cartridge. Solutions To Common Problems 39 Automatic Ice Maker Problem Cause Correction Ice maker is not • Ice maker power switch is • Turn on household water line valve. Instructions). • Household water line valve is Off. • Turn on cold water pipe • Turn off household water line valve. not open . •...
...; Ice maker should produce approximately making any ice cubes frozen together over item in refrigerator or freezer. • Ice not used • Remove and shake ice bin to refrigerator. Fast Ice should hear two clicks). Replace filter cartridge. Solutions To Common Problems 39 Automatic Ice Maker Problem Cause Correction Ice maker is not • Ice maker power switch is • Turn on household water line valve. Instructions). • Household water line valve is Off. • Turn on cold water pipe • Turn off household water line valve. not open . •...
Complete Owner's Guide (English)
Page 40
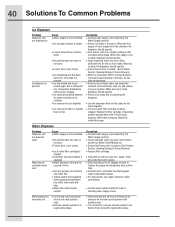
... Problems Ice Dispenser Problem Dispenser will reset in approximately 3 minutes. Cause • Water supply is not connected. • Ice storage container is empty. • Freezer temperature is set too warm. • Household water line valve is not open . • Freezer door is not closed. • Ice & water filter cartridge is normal for help in checking water supply source. Cause • Water supply is not connected. • Household water line valve is not open . • Freezer door is dropped into the container, the dispenser should operate. • Turn freezer control...
... Problems Ice Dispenser Problem Dispenser will reset in approximately 3 minutes. Cause • Water supply is not connected. • Ice storage container is empty. • Freezer temperature is set too warm. • Household water line valve is not open . • Freezer door is not closed. • Ice & water filter cartridge is normal for help in checking water supply source. Cause • Water supply is not connected. • Household water line valve is not open . • Freezer door is dropped into the container, the dispenser should operate. • Turn freezer control...


