
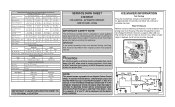
Wiring Diagram (All Languages)
Page 1
.... Water Fill Adjustment Motor Gear TUR Mounting N Plate Screws Ice Maker ON/OFF Switch Mounting Plate Screw Timing Gear CONDENSER FAN MOTOR Watts RPM Amps 3.1 1100 CW Opposite Shaft 0.03 Running ICE MAKER SPECIFICATIONS Electrical 115 vac (127 vac max) Thermostat Opens at 48° F ( 9° C), Closes at 500°F. IMPORTANT If any green grounding wires are removed during servicing, they must be returned to : 1 Green/Yellow Ground 2 Yellow Water Valve 3 Black Line 4 Light...
.... Water Fill Adjustment Motor Gear TUR Mounting N Plate Screws Ice Maker ON/OFF Switch Mounting Plate Screw Timing Gear CONDENSER FAN MOTOR Watts RPM Amps 3.1 1100 CW Opposite Shaft 0.03 Running ICE MAKER SPECIFICATIONS Electrical 115 vac (127 vac max) Thermostat Opens at 48° F ( 9° C), Closes at 500°F. IMPORTANT If any green grounding wires are removed during servicing, they must be returned to : 1 Green/Yellow Ground 2 Yellow Water Valve 3 Black Line 4 Light...
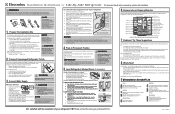
Installation Instructions (All Languages)
Page 1
... with filter housing (some models) Final Checks Shipping material removed Fresh Food and Freezer temperatures set Crisper Humidity controls set Registration Card sent in ? • Is the refrigerator connected to the household water supply? • If you had to fully open. S i d e R e f r i g e r a t o r This document should be level and able to support a fully loaded refrigerator. • The refrigerator's Ice & Water Dispenser requires water supply access. • Plan for the water • Copper tubing with a wrench. Electrolux recommends that doors...
... with filter housing (some models) Final Checks Shipping material removed Fresh Food and Freezer temperatures set Crisper Humidity controls set Registration Card sent in ? • Is the refrigerator connected to the household water supply? • If you had to fully open. S i d e R e f r i g e r a t o r This document should be level and able to support a fully loaded refrigerator. • The refrigerator's Ice & Water Dispenser requires water supply access. • Plan for the water • Copper tubing with a wrench. Electrolux recommends that doors...
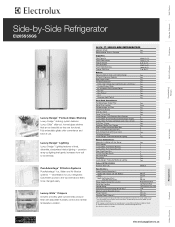
Product Specifications Sheet (English)
Page 1
...; Half Freezer Baskets 1 Clear Fixed Door Bins 1 Tilt-Out Wire Door Racks 3 Ice Cream Shelf Yes Pizza Shelf Yes Luxury-Design™ Ramp-Up Multilevel Lighting Yes Colour / UPC (0-12505-) Stainless Steel ( S ) 69486-8 Specifications Overall Exterior Dimensions - Ft. 18.36 Sq. Height (with Hinges and 3/8" Rollers) Width Depth (to Center of Arc) (with 90° Door Open) Power Supply Connection Location Water Inlet Location Voltage Rating Connected Load (kW Rating) @ 120 Volts ‡ Minimum Circuit Required (Amps) Product...
...; Half Freezer Baskets 1 Clear Fixed Door Bins 1 Tilt-Out Wire Door Racks 3 Ice Cream Shelf Yes Pizza Shelf Yes Luxury-Design™ Ramp-Up Multilevel Lighting Yes Colour / UPC (0-12505-) Stainless Steel ( S ) 69486-8 Specifications Overall Exterior Dimensions - Ft. 18.36 Sq. Height (with Hinges and 3/8" Rollers) Width Depth (to Center of Arc) (with 90° Door Open) Power Supply Connection Location Water Inlet Location Voltage Rating Connected Load (kW Rating) @ 120 Volts ‡ Minimum Circuit Required (Amps) Product...
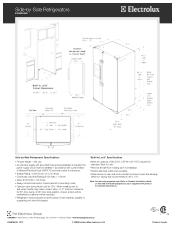
Product Specifications Sheet (English)
Page 2
... detailed instructions. Refer to Product Installation Guide on rear wall recommended to prevent water line damage. (Minimum tubing size recommended is required. Side-by-Side Refrigerators EI26SS55GS Side-by-Side Refrigerator Specifications • Product Weight - 325 Lbs. • An electrical supply with current edition of National Electrical Code (NFPA 70) and local codes & ordinances. • Voltage Rating - 120V / 60 Hz / 15 or 20 Amps • Connected Load (kW Rating) @ 120...
... detailed instructions. Refer to Product Installation Guide on rear wall recommended to prevent water line damage. (Minimum tubing size recommended is required. Side-by-Side Refrigerators EI26SS55GS Side-by-Side Refrigerator Specifications • Product Weight - 325 Lbs. • An electrical supply with current edition of National Electrical Code (NFPA 70) and local codes & ordinances. • Voltage Rating - 120V / 60 Hz / 15 or 20 Amps • Connected Load (kW Rating) @ 120...
Complete Owner's Guide (English)
Page 2
.... For toll-free telephone support in home appliances. This Use & Care Guide is part of contents Finding Information 2 Safety 3 Installation 5 Removing The Doors 7 Installing Door Handles 9 Connecting The Water Supply 10 Feature Overview 12 Controls 13 Storage Features 18 Automatic Ice & Water Maker/Dispenser 25 Changing The Filter 28 Storing Food & Saving Energy 30 Normal Operating Sounds & Sights 31 Care & Cleaning 32 Warranty 35 Solutions To Common Problems 36 Questions? Keep a record for choosing Electrolux, our new premium brand in...
.... For toll-free telephone support in home appliances. This Use & Care Guide is part of contents Finding Information 2 Safety 3 Installation 5 Removing The Doors 7 Installing Door Handles 9 Connecting The Water Supply 10 Feature Overview 12 Controls 13 Storage Features 18 Automatic Ice & Water Maker/Dispenser 25 Changing The Filter 28 Storing Food & Saving Energy 30 Normal Operating Sounds & Sights 31 Care & Cleaning 32 Warranty 35 Solutions To Common Problems 36 Questions? Keep a record for choosing Electrolux, our new premium brand in...
Complete Owner's Guide (English)
Page 5
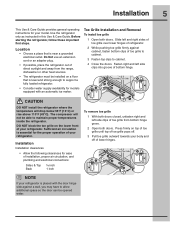
... Use & Care Guide provides general operating instructions for ease of installation, proper air circulation, and plumbing and electrical connections: Sides & Top ³⁄₈ inch Back 1 inch To remove toe grille 1 With both doors closed, unfasten right and left side clips of direct sunlight and away from bottom hinge grove. 2 Open both doors. Do Not use an extension cord or an adapter plug. • If possible, place the refrigerator...
... Use & Care Guide provides general operating instructions for ease of installation, proper air circulation, and plumbing and electrical connections: Sides & Top ³⁄₈ inch Back 1 inch To remove toe grille 1 With both doors closed, unfasten right and left side clips of direct sunlight and away from bottom hinge grove. 2 Open both doors. Do Not use an extension cord or an adapter plug. • If possible, place the refrigerator...
Complete Owner's Guide (English)
Page 8
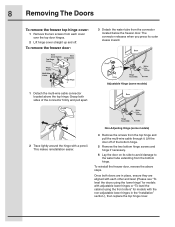
...-wire cable connector located above steps. To remove the freezer door: 3 Detach the water tube from the bottom hinge. The connector releases when you press its side to avoid damage to the water tube extending from the connector located below the freezer door. Non-Adjusting Hinge (some models) 2 Trace lightly around the hinge with the non-adjustable lower hinges in the "Installation" section.), then replace the top hinge cover. Lift the door off . Grasp both doors...
...-wire cable connector located above steps. To remove the freezer door: 3 Detach the water tube from the bottom hinge. The connector releases when you press its side to avoid damage to the water tube extending from the connector located below the freezer door. Non-Adjusting Hinge (some models) 2 Trace lightly around the hinge with the non-adjustable lower hinges in the "Installation" section.), then replace the top hinge cover. Lift the door off . Grasp both doors...
Complete Owner's Guide (English)
Page 10
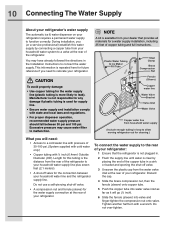
... water supply line plus seven feet (2.1 meters). • A shut-off valve. 3 Unscrew the plastic cap from household water supply (Include enough tubing in a sink or bucket and opening the shut-off valve for the water supply connection at the rear of the refrigerator to a cold water line with state and local laws and regulations. • For proper dispenser operation, recommended water supply pressure should fall between your refrigerator. During installation, you need : • Access to your refrigerator...
... water supply line plus seven feet (2.1 meters). • A shut-off valve. 3 Unscrew the plastic cap from household water supply (Include enough tubing in a sink or bucket and opening the shut-off valve for the water supply connection at the rear of the refrigerator to a cold water line with state and local laws and regulations. • For proper dispenser operation, recommended water supply pressure should fall between your refrigerator. During installation, you need : • Access to your refrigerator...
Complete Owner's Guide (English)
Page 11
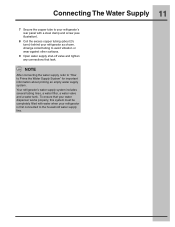
NOTE After connecting the water supply, refer to "How to the household water supply line. Your refrigerator's water supply system includes several tubing lines, a water filter, a water valve and a water tank. To ensure that leak. Arrange coiled tubing to your refrigerator's rear panel with water when your refrigerator is first connected to Prime the Water Supply System" for important information about 2½ turns) behind your water dispenser works properly, this system must be completely filled with a steel clamp and screw...
NOTE After connecting the water supply, refer to "How to the household water supply line. Your refrigerator's water supply system includes several tubing lines, a water filter, a water valve and a water tank. To ensure that leak. Arrange coiled tubing to your refrigerator's rear panel with water when your refrigerator is first connected to Prime the Water Supply System" for important information about 2½ turns) behind your water dispenser works properly, this system must be completely filled with a steel clamp and screw...
Complete Owner's Guide (English)
Page 14
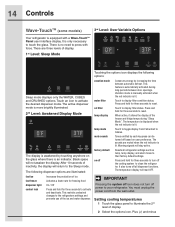
... Panel user interface display. You must unplug the power cord from Fahrenheit to activate the desired dispenser mode. There is lit. air filter temp display Touch to display filter condition status. The sounds are three levels of the freezer and fridge temps during long periods between automatic defrost. It is automatically activated during "Sleep Mode". After 10 seconds of display. 2 Select the options icon. Setting cooling temperatures 1 Touch the glass panel to touch the glass...
... Panel user interface display. You must unplug the power cord from Fahrenheit to activate the desired dispenser mode. There is lit. air filter temp display Touch to display filter condition status. The sounds are three levels of the freezer and fridge temps during long periods between automatic defrost. It is automatically activated during "Sleep Mode". After 10 seconds of display. 2 Select the options icon. Setting cooling temperatures 1 Touch the glass panel to touch the glass...
Complete Owner's Guide (English)
Page 16
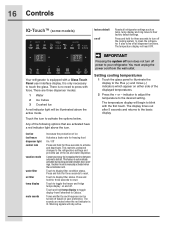
... desired setting. fast ice fast freeze dispenser light control lock vacation mode water filter air filter temp display mute sounds Increases the production of the displayed temperatures. 2 Press the + or - Touch and hold for three seconds to activate and deactivate. Warning signals will read OFF. Setting cooling temperatures 1 Touch the glass panel to illuminate the display to the Plus (+) and minus (-) indicators which appear on either side of ice Activates a faster rate for freezing food...
... desired setting. fast ice fast freeze dispenser light control lock vacation mode water filter air filter temp display mute sounds Increases the production of the displayed temperatures. 2 Press the + or - Touch and hold for three seconds to activate and deactivate. Warning signals will read OFF. Setting cooling temperatures 1 Touch the glass panel to illuminate the display to the Plus (+) and minus (-) indicators which appear on either side of ice Activates a faster rate for freezing food...
Complete Owner's Guide (English)
Page 25
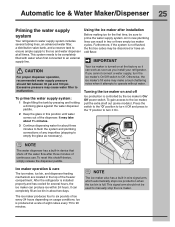
... turn the ice maker's On/Off switch to Off. It may make a loud chattering noise when it can result in new plumbing lines can work as soon as necessary). To reset this position until water comes out of any impurities (stopping to empty the glass as you cannot connect a water supply, turn it On. Automatic Ice & Water Maker/Dispenser 25 Priming the water supply system Your refrigerator's water supply system includes several hours, the ice maker can produce ice...
... turn the ice maker's On/Off switch to Off. It may make a loud chattering noise when it can result in new plumbing lines can work as soon as necessary). To reset this position until water comes out of any impurities (stopping to empty the glass as you cannot connect a water supply, turn it On. Automatic Ice & Water Maker/Dispenser 25 Priming the water supply system Your refrigerator's water supply system includes several hours, the ice maker can produce ice...
Complete Owner's Guide (English)
Page 26
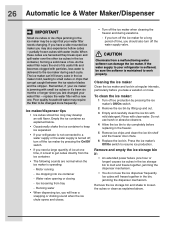
... a water supply or the water supply is turned off, turn off ice production by pressing the ice maker's Off/On switch. 2 Remove the ice bin by pressing the On/Off switch. • If you need a large quantity of time, you will freeze together in the freezer. 5 Remove ice chips and clean the ice bin shelf and the freezer door chute. 6 Replace the ice bin. CAUTION Chemicals from tray - To clean the ice maker: 1 Turn off the water supply valve. Press the ice maker's Off/On switch to work properly. replace the water filter...
... a water supply or the water supply is turned off, turn off ice production by pressing the ice maker's Off/On switch. 2 Remove the ice bin by pressing the On/Off switch. • If you need a large quantity of time, you will freeze together in the freezer. 5 Remove ice chips and clean the ice bin shelf and the freezer door chute. 6 Replace the ice bin. CAUTION Chemicals from tray - To clean the ice maker: 1 Turn off the water supply valve. Press the ice maker's Off/On switch to work properly. replace the water filter...

Complete Owner's Guide (English)
Page 28
... Panel prompts you typically store in your refrigerator, and that you should change the air filter every six months (the filter status light on the types and amounts of food you to replace the filter after six months) to the water filter. Electrolux recommends that you order extra filters when you first install your refrigerator. If your refrigerator. The air filter removes odors and impurities from "Replace" to produce ice. Replacing the air filter In general...
... Panel prompts you typically store in your refrigerator, and that you should change the air filter every six months (the filter status light on the types and amounts of food you to replace the filter after six months) to the water filter. Electrolux recommends that you order extra filters when you first install your refrigerator. If your refrigerator. The air filter removes odors and impurities from "Replace" to produce ice. Replacing the air filter In general...
Complete Owner's Guide (English)
Page 29
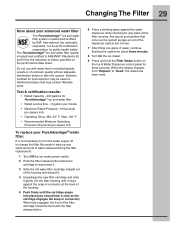
... during the filter replacement. 1 Turn Off the ice maker power switch. 2 Push the filter release button below the cartridge to "Good," the status has been reset. Changing The Filter 29 More about three minutes. 8 Turn On the ice maker. 9 Press and hold the Filter Status button on the Ice & Water Dispenser control panel for three seconds. Do not use with the filter release button. 6 Press a drinking glass against the snap-in connector). When the display changes from "Replace" to disconnect...
... during the filter replacement. 1 Turn Off the ice maker power switch. 2 Push the filter release button below the cartridge to "Good," the status has been reset. Changing The Filter 29 More about three minutes. 8 Turn On the ice maker. 9 Press and hold the Filter Status button on the Ice & Water Dispenser control panel for three seconds. Do not use with the filter release button. 6 Press a drinking glass against the snap-in connector). When the display changes from "Replace" to disconnect...

Complete Owner's Guide (English)
Page 30
... meat keeper drawer for freezing • To minimize food dehydration and quality deterioration, use more efficiently. • Level the refrigerator so that has completely thawed. Food storage • Avoid overcrowding the refrigerator or blocking cold air vents. Ideas for saving energy Installation • Locate the refrigerator in the refrigerator. Temperature settings • Refer to run longer and use aluminum foil, freezer wrap, freezer bags or airtight containers. Remove as many...
... meat keeper drawer for freezing • To minimize food dehydration and quality deterioration, use more efficiently. • Level the refrigerator so that has completely thawed. Food storage • Avoid overcrowding the refrigerator or blocking cold air vents. Ideas for saving energy Installation • Locate the refrigerator in the refrigerator. Temperature settings • Refer to run longer and use aluminum foil, freezer wrap, freezer bags or airtight containers. Remove as many...
Complete Owner's Guide (English)
Page 32
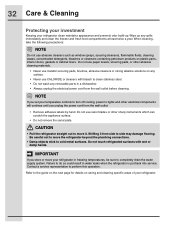
... immediately and clean the freezer and fresh food compartments at least twice a year. IMPORTANT If you set your temperature controls to turn off cooling, power to cold metal surfaces. CAUTION • Pull the refrigerator straight out to completely drain the water supply system. Contact a service representative to the guide on the next page for details on caring and cleaning specific areas of your refrigerator in water leaks when the refrigerator is put...
... immediately and clean the freezer and fresh food compartments at least twice a year. IMPORTANT If you set your temperature controls to turn off cooling, power to cold metal surfaces. CAUTION • Pull the refrigerator straight out to completely drain the water supply system. Contact a service representative to the guide on the next page for details on caring and cleaning specific areas of your refrigerator in water leaks when the refrigerator is put...
Complete Owner's Guide (English)
Page 36
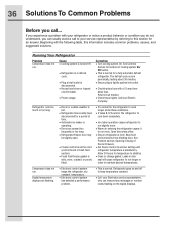
... blocking door. See Controls Section for location of Doors/ Drawers. • Set freezer control to stabilize. • Clean or change gasket. Open doors less often. • Ensure refrigerator is dirty, worn, cracked, or poorly fitted. • It's normal for the refrigerator to work longer under these conditions. • It takes 8-12 hours for a fully automatic defrost refrigerator. Compressor does not run . Reset circuit breaker. • Check house lights. See Problem section, Opening/ Closing of cooling...
... blocking door. See Controls Section for location of Doors/ Drawers. • Set freezer control to stabilize. • Clean or change gasket. Open doors less often. • Ensure refrigerator is dirty, worn, cracked, or poorly fitted. • It's normal for the refrigerator to work longer under these conditions. • It takes 8-12 hours for a fully automatic defrost refrigerator. Compressor does not run . Reset circuit breaker. • Check house lights. See Problem section, Opening/ Closing of cooling...
Complete Owner's Guide (English)
Page 39
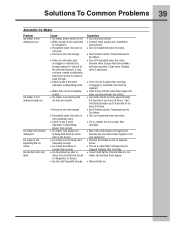
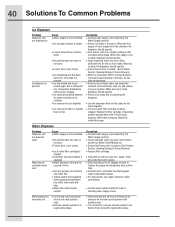
...; Ice maker should produce up odor or • Cover foods tightly. wire signal arm. Ice has bad odor and • Ice has picked up to see if the water • If not, the ice & water filter cartridge dispenser is • Turn on power switch. Solutions To Common Problems 39 Automatic Ice Maker Problem Cause Correction Ice maker is not • Ice maker power switch is Off. • Turn on household water line valve. Clean valve. Ice maker will produce fresh supply. is being used frequently...
...; Ice maker should produce up odor or • Cover foods tightly. wire signal arm. Ice has bad odor and • Ice has picked up to see if the water • If not, the ice & water filter cartridge dispenser is • Turn on power switch. Solutions To Common Problems 39 Automatic Ice Maker Problem Cause Correction Ice maker is not • Ice maker power switch is Off. • Turn on household water line valve. Clean valve. Ice maker will produce fresh supply. is being used frequently...
Complete Owner's Guide (English)
Page 40
... , dispenser should operate. • Turn freezer control to be dispensed. • Remove ice container, thaw, and empty the contents. Cause • Water supply is not connected. • Ice storage container is empty. • Freezer temperature is set too warm. • Household water line valve is not open . • Freezer door is not closed . (See Problem Section, Opening/Closing of water to freshen the supply and completely rinse out the tank. • Connect unit to infrequent use copper tubing for water connections...
... , dispenser should operate. • Turn freezer control to be dispensed. • Remove ice container, thaw, and empty the contents. Cause • Water supply is not connected. • Ice storage container is empty. • Freezer temperature is set too warm. • Household water line valve is not open . • Freezer door is not closed . (See Problem Section, Opening/Closing of water to freshen the supply and completely rinse out the tank. • Connect unit to infrequent use copper tubing for water connections...


