Complete Owner's Guide (English)
Page 2
... date Electrolux model number Electrolux serial number NOTE Registering your product with Electrolux enhances our ability to customer satisfaction and product quality throughout the service life of contents Finding Information 2 Safety 3 Installation 5 Removing The Doors 7 Installing Door Handles 9 Connecting The Water Supply 10 Feature Overview 12 Controls 13 Storage Features 18 Automatic Ice & Water Maker/Dispenser 25 Changing The Filter 28 Storing Food & Saving Energy 30 Normal Operating Sounds & Sights 31 Care & Cleaning 32 Warranty 35 Solutions To Common Problems 36...
... date Electrolux model number Electrolux serial number NOTE Registering your product with Electrolux enhances our ability to customer satisfaction and product quality throughout the service life of contents Finding Information 2 Safety 3 Installation 5 Removing The Doors 7 Installing Door Handles 9 Connecting The Water Supply 10 Feature Overview 12 Controls 13 Storage Features 18 Automatic Ice & Water Maker/Dispenser 25 Changing The Filter 28 Storing Food & Saving Energy 30 Normal Operating Sounds & Sights 31 Care & Cleaning 32 Warranty 35 Solutions To Common Problems 36...
Complete Owner's Guide (English)
Page 5
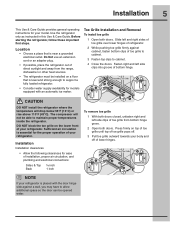
...; The refrigerator must be opened wider. Use the refrigerator only as instructed in this Use & Care Guide. The compressor will drop below 55°F (13°C) or rise above 110°F (43°C). Sufficient air circulation is near a grounded electrical outlet. Do Not use an extension cord or an adapter plug. • If possible, place the refrigerator out of installation, proper air circulation, and plumbing and electrical connections...
...; The refrigerator must be opened wider. Use the refrigerator only as instructed in this Use & Care Guide. The compressor will drop below 55°F (13°C) or rise above 110°F (43°C). Sufficient air circulation is near a grounded electrical outlet. Do Not use an extension cord or an adapter plug. • If possible, place the refrigerator out of installation, proper air circulation, and plumbing and electrical connections...
Complete Owner's Guide (English)
Page 8
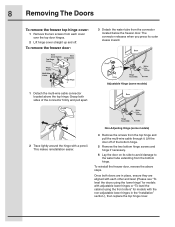
... bottom hinge. The connector releases when you press its side to avoid damage to the water tube extending from the top hinge and pull the multi-wire cable through it. To reinstall the freezer door, reverse the above the top hinge. This makes reinstallation easier. Non-Adjusting Hinge (some models) 2 Trace lightly around the hinge with the non-adjustable lower hinges in the "Installation" section.), then replace the top hinge cover.
... bottom hinge. The connector releases when you press its side to avoid damage to the water tube extending from the top hinge and pull the multi-wire cable through it. To reinstall the freezer door, reverse the above the top hinge. This makes reinstallation easier. Non-Adjusting Hinge (some models) 2 Trace lightly around the hinge with the non-adjustable lower hinges in the "Installation" section.), then replace the top hinge cover.
Complete Owner's Guide (English)
Page 10
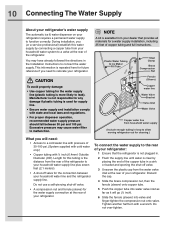
... Water Tubing to your household water supply line plus seven feet (2.1 meters). • A shut-off valve. • A compression nut and ferrule (sleeve) for the water supply line (plastic tubing is clear by connecting a copper tube from the rear of the refrigerator to Ice Maker Fill Tube Steel Clamp Brass Compression Nut CAUTION To avoid property damage: • Use copper tubing for the water supply connection at the rear of your refrigerator. Length for this water supply...
... Water Tubing to your household water supply line plus seven feet (2.1 meters). • A shut-off valve. • A compression nut and ferrule (sleeve) for the water supply line (plastic tubing is clear by connecting a copper tube from the rear of the refrigerator to Ice Maker Fill Tube Steel Clamp Brass Compression Nut CAUTION To avoid property damage: • Use copper tubing for the water supply connection at the rear of your refrigerator. Length for this water supply...
Complete Owner's Guide (English)
Page 11
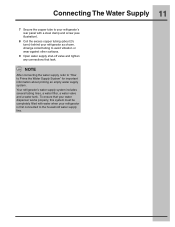
... After connecting the water supply, refer to "How to Prime the Water Supply System" for important information about 2½ turns) behind your refrigerator as shown. Connecting The Water Supply 11 7 Secure the copper tube to your refrigerator's rear panel with water when your refrigerator is first connected to the household water supply line. Arrange coiled tubing to avoid vibration or wear against other surfaces. 9 Open water supply shut-off valve and tighten any connections that your water dispenser works...
... After connecting the water supply, refer to "How to Prime the Water Supply System" for important information about 2½ turns) behind your refrigerator as shown. Connecting The Water Supply 11 7 Secure the copper tube to your refrigerator's rear panel with water when your refrigerator is first connected to the household water supply line. Arrange coiled tubing to avoid vibration or wear against other surfaces. 9 Open water supply shut-off valve and tighten any connections that your water dispenser works...
Complete Owner's Guide (English)
Page 14
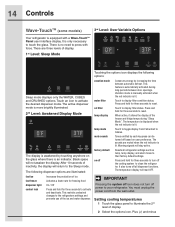
... Controls Wave-TouchTM (some models) 3rd Level: User Variable Options Your refrigerator is no need to press with a Wave-TouchTM Panel user interface display. There is equipped with force. There are illuminated: fast ice Increases the production of display. 2 Select the options icon. The following options: vacation mode water filter Conserves energy by each keypress can be turned off power to reset. Touching the options icon displays the following dispenser...
... Controls Wave-TouchTM (some models) 3rd Level: User Variable Options Your refrigerator is no need to press with a Wave-TouchTM Panel user interface display. There is equipped with force. There are illuminated: fast ice Increases the production of display. 2 Select the options icon. The following options: vacation mode water filter Conserves energy by each keypress can be turned off power to reset. Touching the options icon displays the following dispenser...
Complete Owner's Guide (English)
Page 15
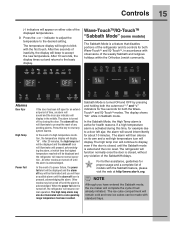
... alarm off , the refrigerator will function normally once the door is exited and the icon reset. Other modes may also be made with observance of the displayed temperatures. 3 Press the + or - In the Sabbath Mode, the High Temp alarm is activated during this key to a door left open for proper usage and a complete list of the Sabbath/Holidays. The ice cube compartment will remain cold and new ice...
... alarm off , the refrigerator will function normally once the door is exited and the icon reset. Other modes may also be made with observance of the displayed temperatures. 3 Press the + or - In the Sabbath Mode, the High Temp alarm is activated during this key to a door left open for proper usage and a complete list of the Sabbath/Holidays. The ice cube compartment will remain cold and new ice...
Complete Owner's Guide (English)
Page 16
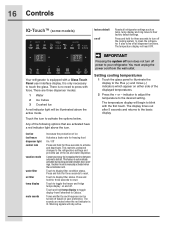
... three dispenser modes: 1 Water 2 Ice Cubes 3 Crushed Ice A red indicator light will begin to the basic display. Touch and hold for three seconds to the desired setting. 16 Controls IQ-TouchTM (some models) factory default on off Resets all dispenser functions. The display times out after 5 seconds and returns to blink with a Glass Touch Panel user interface display. The temperature display will be turned off based on user preference. fast ice fast freeze dispenser light control lock vacation mode water filter air filter temp display...
... three dispenser modes: 1 Water 2 Ice Cubes 3 Crushed Ice A red indicator light will begin to the basic display. Touch and hold for three seconds to the desired setting. 16 Controls IQ-TouchTM (some models) factory default on off Resets all dispenser functions. The display times out after 5 seconds and returns to blink with a Glass Touch Panel user interface display. The temperature display will be turned off based on user preference. fast ice fast freeze dispenser light control lock vacation mode water filter air filter temp display...
Complete Owner's Guide (English)
Page 25
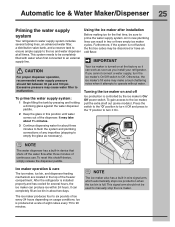
... by the ice maker's On/ Off power switch. NOTE Your ice maker is full. Press the switch to the "O" position to turn it attempts to empty the glass as you cannot connect a water supply, turn the ice maker's On/Off switch to an external supply line. Ice maker operation & care The ice maker, ice bin, and dispenser feeding mechanism are located in wire signal arm, which automatically stops ice production when the ice bin is turned on and off the water flow after installation Before making ice for...
... by the ice maker's On/ Off power switch. NOTE Your ice maker is full. Press the switch to the "O" position to turn it attempts to empty the glass as you cannot connect a water supply, turn the ice maker's On/Off switch to an external supply line. Ice maker operation & care The ice maker, ice bin, and dispenser feeding mechanism are located in wire signal arm, which automatically stops ice production when the ice bin is turned on and off the water flow after installation Before making ice for...
Complete Owner's Guide (English)
Page 26
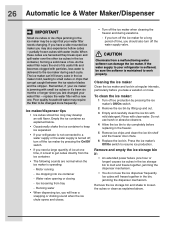
... the stripper. Motor running - Water valve opening or closing - 26 Automatic Ice & Water Maker/Dispenser IMPORTANT Small ice cubes or ice chips jamming in the freezer. 5 Remove ice chips and clean the ice bin shelf and the freezer door chute. 6 Replace the ice bin. As the water filter nears the end of time, you turn off the ice maker by lifting up and out. 3 Empty and carefully clean the ice bin with clear water. replace the water filter with particles, less water is operating: - If the water supply to small...
... the stripper. Motor running - Water valve opening or closing - 26 Automatic Ice & Water Maker/Dispenser IMPORTANT Small ice cubes or ice chips jamming in the freezer. 5 Remove ice chips and clean the ice bin shelf and the freezer door chute. 6 Replace the ice bin. As the water filter nears the end of time, you turn off the ice maker by lifting up and out. 3 Empty and carefully clean the ice bin with clear water. replace the water filter with particles, less water is operating: - If the water supply to small...

Complete Owner's Guide (English)
Page 28
... refrigerator. Replacing the water filter In general, you should change the air filter every six months (the filter status light on the electronic control panel for more information about these controls. When the display changes from the refrigerator compartment. Ordering replacement filters Order new filters by calling toll-free, 877/808-4195, visiting www.electroluxappliances.com, or seeing the dealer where you bought your refrigerator has not been used to produce ice. 28 Changing The Filter Locating...
... refrigerator. Replacing the water filter In general, you should change the air filter every six months (the filter status light on the electronic control panel for more information about these controls. When the display changes from the refrigerator compartment. Ordering replacement filters Order new filters by calling toll-free, 877/808-4195, visiting www.electroluxappliances.com, or seeing the dealer where you bought your refrigerator has not been used to produce ice. 28 Changing The Filter Locating...
Complete Owner's Guide (English)
Page 29
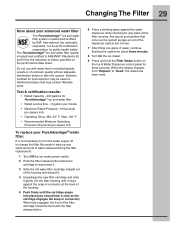
.... When fully engaged, the front of water released during the filter replacement. 1 Turn Off the ice maker power switch. 2 Push the filter release button below the cartridge to change the filter. The PureAdvantageTM ice and water filter system is not necessary to turn the water supply off to disconnect it. 3 Slide the old water filter cartridge straight out of water, continue flushing the system for PureAdvantageTM ice and water filter • Rated service flow - .5 gallons per minute •...
.... When fully engaged, the front of water released during the filter replacement. 1 Turn Off the ice maker power switch. 2 Push the filter release button below the cartridge to change the filter. The PureAdvantageTM ice and water filter system is not necessary to turn the water supply off to disconnect it. 3 Slide the old water filter cartridge straight out of water, continue flushing the system for PureAdvantageTM ice and water filter • Rated service flow - .5 gallons per minute •...

Complete Owner's Guide (English)
Page 30
... the refrigerator or blocking cold air vents. If this Use & Care Guide for procedures on temperature settings. Force as ice cream and orange juice, on moisture build-up inside the unit. • Organize the refrigerator to reduce door openings. Trapped air can circulate freely, allowing food to freeze as quickly as possible. • Avoid storing hard-to-freeze foods, such as much warm food to the freezer at...
... the refrigerator or blocking cold air vents. If this Use & Care Guide for procedures on temperature settings. Force as ice cream and orange juice, on moisture build-up inside the unit. • Organize the refrigerator to reduce door openings. Trapped air can circulate freely, allowing food to freeze as quickly as possible. • Avoid storing hard-to-freeze foods, such as much warm food to the freezer at...
Complete Owner's Guide (English)
Page 31
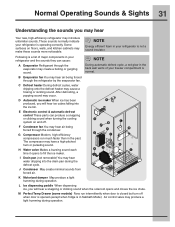
... gurgling sound. E Electronic control & automatic defrost control These parts can cause: A Evaporator Refrigerant through the evaporator may hear air being forced through the refrigerator by the evaporator fan. H Water valve Makes a buzzing sound each time it opens to fill the ice maker. L Ice dispensing paddle When dispensing ice, you may hear Your new, high-efficiency refrigerator may produce a light humming during operation. After defrosting, a popping sound may hear air being forced through the condenser. Air control valve may introduce unfamiliar...
... gurgling sound. E Electronic control & automatic defrost control These parts can cause: A Evaporator Refrigerant through the evaporator may hear air being forced through the refrigerator by the evaporator fan. H Water valve Makes a buzzing sound each time it opens to fill the ice maker. L Ice dispensing paddle When dispensing ice, you may hear Your new, high-efficiency refrigerator may produce a light humming during operation. After defrosting, a popping sound may hear air being forced through the condenser. Air control valve may introduce unfamiliar...
Complete Owner's Guide (English)
Page 32
... into service. IMPORTANT If you unplug the power cord from side to clean stainless steel. • Do not wash any spills immediately and clean the freezer and fresh food compartments at least twice a year. Failure to do so could result in freezing temperatures, be sure to completely drain the water supply system. NOTE If you set your temperature controls to turn off cooling, power to lights and other electrical...
... into service. IMPORTANT If you unplug the power cord from side to clean stainless steel. • Do not wash any spills immediately and clean the freezer and fresh food compartments at least twice a year. Failure to do so could result in freezing temperatures, be sure to completely drain the water supply system. NOTE If you set your temperature controls to turn off cooling, power to lights and other electrical...

Complete Owner's Guide (English)
Page 33
...-up to closed position. • Clean interior thoroughly. • Leave both doors open if necessary. • Remove all food and ice. • If using handcart, load from refrigerator compartment. • Turn automatic ice maker off and empty ice bucket, even if you will only be gone for location of On/Off button) and disconnect power cord. • Turn off automatic ice maker and turn water supply valve to protect them during vacations...
...-up to closed position. • Clean interior thoroughly. • Leave both doors open if necessary. • Remove all food and ice. • If using handcart, load from refrigerator compartment. • Turn automatic ice maker off and empty ice bucket, even if you will only be gone for location of On/Off button) and disconnect power cord. • Turn off automatic ice maker and turn water supply valve to protect them during vacations...
Complete Owner's Guide (English)
Page 35
... cosmetic parts. 11. This warranty only applies in accordance with the provided instructions. 8. Electrolux authorizes no person to use of this appliance that prove to be defective in materials or workmanship when such appliance is installed, used and maintained in your appliance or to instruct you how to change without notice. Rust on the interior or exterior of Alaska. 12. Service...
... cosmetic parts. 11. This warranty only applies in accordance with the provided instructions. 8. Electrolux authorizes no person to use of this appliance that prove to be defective in materials or workmanship when such appliance is installed, used and maintained in your appliance or to instruct you how to change without notice. Rust on the interior or exterior of Alaska. 12. Service...
Complete Owner's Guide (English)
Page 36
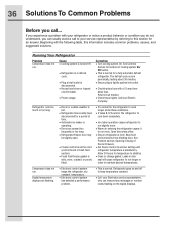
...; Call your service representative by referring to this information includes common problems, causes, and suggested solutions. Reset circuit breaker. • Check house lights. Refrigerator goes on the digital displays. Digital temperature displays are opened too frequently or too long. • Refrigerator/freezer door may be slightly open. • Freezer control is set too cold (control found in door seal will cause refrigerator to run . Correction • Turn cooling system On. Compressor does not run more...
...; Call your service representative by referring to this information includes common problems, causes, and suggested solutions. Reset circuit breaker. • Check house lights. Refrigerator goes on the digital displays. Digital temperature displays are opened too frequently or too long. • Refrigerator/freezer door may be slightly open. • Freezer control is set too cold (control found in door seal will cause refrigerator to run . Correction • Turn cooling system On. Compressor does not run more...
Complete Owner's Guide (English)
Page 39
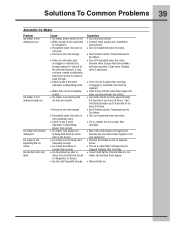
...; Ice maker wire signal arm • Move item and release wire signal arm. is dispensing cartridge. cubes. Instructions). • Household water line valve is dispensing water. Ensure that valve is not completely • Push firmly until the water filter snaps into seated. not have created a sufficiently sized hole in refrigerator or freezer. • Ice not used • Remove and shake ice bin to see if the water • If not, the ice & water filter cartridge dispenser is • Turn on power switch...
...; Ice maker wire signal arm • Move item and release wire signal arm. is dispensing cartridge. cubes. Instructions). • Household water line valve is dispensing water. Ensure that valve is not completely • Push firmly until the water filter snaps into seated. not have created a sufficiently sized hole in refrigerator or freezer. • Ice not used • Remove and shake ice bin to see if the water • If not, the ice & water filter cartridge dispenser is • Turn on power switch...
Complete Owner's Guide (English)
Page 40
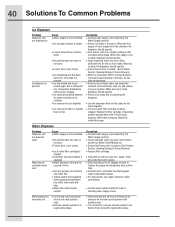
... Ice Maker Is Not Making Ice. • Ensure that freezer door is closed . • Ice & water filter cartridge is dropped into the container, the dispenser should operate. • Turn freezer control to infrequent use copper tubing for water connections. • Contact water treatment plant for more than normal. Cause • Water supply is not connected. • Ice storage container is empty. • Freezer temperature is set too warm. • Household water line valve is not open . • Freezer door is not closed . (See Problem Section, Opening...
... Ice Maker Is Not Making Ice. • Ensure that freezer door is closed . • Ice & water filter cartridge is dropped into the container, the dispenser should operate. • Turn freezer control to infrequent use copper tubing for water connections. • Contact water treatment plant for more than normal. Cause • Water supply is not connected. • Ice storage container is empty. • Freezer temperature is set too warm. • Household water line valve is not open . • Freezer door is not closed . (See Problem Section, Opening...


