Complete Owner's Guide (English)
Page 18
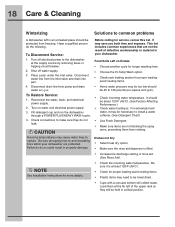
...Choose another cycle for longer washing time. • Choose the Hi-Temp Wash option. • Check rack loading section for service, review this list. This list includes common experiences that are protected. It should be protected from pump and drain water into pan. 4. Disconnect... drain line from freezing. 18 Care & Cleaning Winterizing Solutions to common problems A dishwasher left of the upper rack so they do the following. Have a qualified person do not leak. Disconnect water line from rotating. To...
...Choose another cycle for longer washing time. • Choose the Hi-Temp Wash option. • Check rack loading section for service, review this list. This list includes common experiences that are protected. It should be protected from pump and drain water into pan. 4. Disconnect... drain line from freezing. 18 Care & Cleaning Winterizing Solutions to common problems A dishwasher left of the upper rack so they do the following. Have a qualified person do not leak. Disconnect water line from rotating. To...
Installation Instructions (English)
Page 1
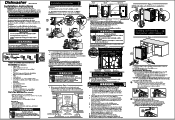
...dimensions as shown in Figure 2. Remove two (2) screws at least 120°F (49°C). height for electrical and plumbing connections. Review dimensions in fire or electric shock. Determine amount of countertop.) 21/ 4" (5,7 cm) 24" (61 cm) 0 °0 Cam... (Not Included) Brass Elbow (Not Included) Electrical Line Connections For Electrical, 4 Water, and Drain Locating the Connections 1. Dishwasher Anchoring 4. OWNER: Read your dishwasher. Installation Preparation 2 NOTE: Put unit on right underside of the option chosen: a. Do not install unit under a cooktop...
...dimensions as shown in Figure 2. Remove two (2) screws at least 120°F (49°C). height for electrical and plumbing connections. Review dimensions in fire or electric shock. Determine amount of countertop.) 21/ 4" (5,7 cm) 24" (61 cm) 0 °0 Cam... (Not Included) Brass Elbow (Not Included) Electrical Line Connections For Electrical, 4 Water, and Drain Locating the Connections 1. Dishwasher Anchoring 4. OWNER: Read your dishwasher. Installation Preparation 2 NOTE: Put unit on right underside of the option chosen: a. Do not install unit under a cooktop...

Installation Instructions (English)
Page 2
...7a. 8. Figure 7a Figure 7b (21 Figure 8 D v. Crr a 9. Turn off water supplyatshut-off valve. 2. Do not connect the dishwasher to follow these items: Water and electrical lines are removed from the rack assembly Checking the Installation 9 Operate the machine through the floor, an air... of kinks, scales, chips, and lubricants. 4. Place a bunched towel over end of leaks. Review Figures 12, 13 and 14 to see the different ways to connect dishwasher to cabinet, dishwasher and floor. 6. Cabinet Seals are positioned properly. See Figure 12. See Figure 11 Drain hose...
...7a. 8. Figure 7a Figure 7b (21 Figure 8 D v. Crr a 9. Turn off water supplyatshut-off valve. 2. Do not connect the dishwasher to follow these items: Water and electrical lines are removed from the rack assembly Checking the Installation 9 Operate the machine through the floor, an air... of kinks, scales, chips, and lubricants. 4. Place a bunched towel over end of leaks. Review Figures 12, 13 and 14 to see the different ways to connect dishwasher to cabinet, dishwasher and floor. 6. Cabinet Seals are positioned properly. See Figure 12. See Figure 11 Drain hose...


