
Use and Care Guide
Page 2
... Automatic Ice & Water Maker/Dispenser 18 Priming the water supply system 18 To prime the water supply system 18 Ice maker operation & care 18 Using the ice maker after installation 18 Turning the ice maker on and off 18 Ice maker/dispenser tips 19 Cleaning the ice maker 19 Changing The Filter 20 Locating the filters 20 Replacing the air filter 20 Replacing the water filter 20 Ordering replacement filters 20 More about your advanced water filter 21 NSF tests & certification results 21 To replace your PureAdvantageTM water filter 21 Storing Food & Saving Energy 22...
... Automatic Ice & Water Maker/Dispenser 18 Priming the water supply system 18 To prime the water supply system 18 Ice maker operation & care 18 Using the ice maker after installation 18 Turning the ice maker on and off 18 Ice maker/dispenser tips 19 Cleaning the ice maker 19 Changing The Filter 20 Locating the filters 20 Replacing the air filter 20 Replacing the water filter 20 Ordering replacement filters 20 More about your advanced water filter 21 NSF tests & certification results 21 To replace your PureAdvantageTM water filter 21 Storing Food & Saving Energy 22...

Use and Care Guide
Page 3
... wall outlet. Please take the precautions listed below. The power cord of the automatic ice maker. • Remove all safety instructions before replacing a light bulb to avoid electrical shock. • Performance may not easily climb inside. • Have refrigerant removed by 10% or more. It must be plugged directly into an outlet controlled by pulling on the power cord. Do not use gasoline, or other flammable liquids...
... wall outlet. Please take the precautions listed below. The power cord of the automatic ice maker. • Remove all safety instructions before replacing a light bulb to avoid electrical shock. • Performance may not easily climb inside. • Have refrigerant removed by 10% or more. It must be plugged directly into an outlet controlled by pulling on the power cord. Do not use gasoline, or other flammable liquids...
Use and Care Guide
Page 4
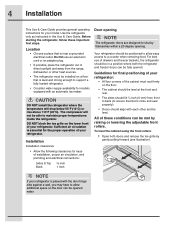
... the door can be able to support a fully loaded refrigerator. • Consider water supply availability for models equipped with the door hinge side against a wall, you may have to allow easy access to shut by gently pulling forward (see illustration). 4 Installation This Use & Care Guide provides general operating instructions for your refrigerator. All of installation, proper air circulation, and plumbing and electrical connections: Sides & Top ³⁄₈ inch Back 1 inch Door opening .
... the door can be able to support a fully loaded refrigerator. • Consider water supply availability for models equipped with the door hinge side against a wall, you may have to allow easy access to shut by gently pulling forward (see illustration). 4 Installation This Use & Care Guide provides general operating instructions for your refrigerator. All of installation, proper air circulation, and plumbing and electrical connections: Sides & Top ³⁄₈ inch Back 1 inch Door opening .

Use and Care Guide
Page 7
... makes reinstallation easier. 3 Detach the water tube from each other and level (Please see "To level the doors using the lower hinge" for models with adjustable lower hinges or "To level the cabinet using the front rollers" for models with a pencil. To remove the freezer door: Adjustable Hinge (some models) 1 Detach the multi-wire cable connector located above steps. To remove the freezer top hinge cover: 1 Remove the two screws from the connector located below the freezer door. Lift the door...
... makes reinstallation easier. 3 Detach the water tube from each other and level (Please see "To level the doors using the lower hinge" for models with adjustable lower hinges or "To level the cabinet using the front rollers" for models with a pencil. To remove the freezer door: Adjustable Hinge (some models) 1 Detach the multi-wire cable connector located above steps. To remove the freezer top hinge cover: 1 Remove the two screws from the connector located below the freezer door. Lift the door...
Use and Care Guide
Page 9
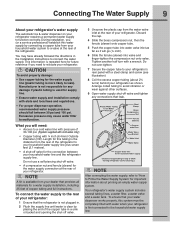
... water dispenser works properly, this system must be completely filled with water when your refrigerator is first connected to your household water supply line plus seven feet (2.1 meters). • A shut-off valve for future reference if you (or a service professional) establish this tubing is the distance from the rear of the refrigerator to the household water supply line. Do not over-tighten. 7 Secure the copper tube to your refrigerator's rear panel...
... water dispenser works properly, this system must be completely filled with water when your refrigerator is first connected to your household water supply line plus seven feet (2.1 meters). • A shut-off valve for future reference if you (or a service professional) establish this tubing is the distance from the rear of the refrigerator to the household water supply line. Do not over-tighten. 7 Secure the copper tube to your refrigerator's rear panel...

Use and Care Guide
Page 12
... allows the display of the ice and water dispenser. The temperature is displayed when the red indicator is lit. The sounds are three levels of display. 2 Select the options icon. It also turns off power to clean the refrigerator. Setting cooling temperatures 1 Touch the glass panel to activate the desired dispenser mode. Touch an icon to illuminate the 2nd level of display. 1st Level: Sleep Mode Sleep mode displays only the water, cubes and crushed options. air filter temp display Touch...
... allows the display of the ice and water dispenser. The temperature is displayed when the red indicator is lit. The sounds are three levels of display. 2 Select the options icon. It also turns off power to clean the refrigerator. Setting cooling temperatures 1 Touch the glass panel to activate the desired dispenser mode. Touch an icon to illuminate the 2nd level of display. 1st Level: Sleep Mode Sleep mode displays only the water, cubes and crushed options. air filter temp display Touch...

Use and Care Guide
Page 14
... of ice fast freeze Activates a faster rate for freezing food dispenser light On / Off control lock Press and hold for three seconds to the refrigerators settings and prevents use of time, an alarm will sound and the door ajar indicator will begin to reset. This restricts undesired changes to activate and deactivate. water filter Touch to reset. Press and hold for three seconds to display filter condition status. Setting cooling temperatures 1 Touch the glass panel...
... of ice fast freeze Activates a faster rate for freezing food dispenser light On / Off control lock Press and hold for three seconds to the refrigerators settings and prevents use of time, an alarm will sound and the door ajar indicator will begin to reset. This restricts undesired changes to activate and deactivate. water filter Touch to reset. Press and hold for three seconds to display filter condition status. Setting cooling temperatures 1 Touch the glass panel...
Use and Care Guide
Page 15
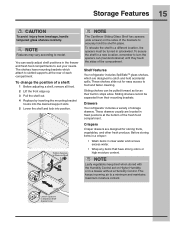
... the Humidity Control set on the sides of the brackets to food and faster cleaning. This keeps incoming air to catch and hold the shelf in the freezer and fresh food compartments to model. You can be separated from breakage, handle tempered glass shelves carefully. NOTE Features may vary according to suit your needs. Tighten Spacers to Remove Shelf 1 2 3 1 NOTE The Cantilever Sliding Glass Shelf has...
... the Humidity Control set on the sides of the brackets to food and faster cleaning. This keeps incoming air to catch and hold the shelf in the freezer and fresh food compartments to model. You can be separated from breakage, handle tempered glass shelves carefully. NOTE Features may vary according to suit your needs. Tighten Spacers to Remove Shelf 1 2 3 1 NOTE The Cantilever Sliding Glass Shelf has...

Use and Care Guide
Page 18
... a side mounted ice maker you may make a loud chattering noise when it On. Otherwise, the ice maker's fill valve may also experience hollow cubes -- To prime the water supply system: 1 Begin filling the tank by the ice maker's On/ Off power switch. To reset this position until water comes out of the freezer compartment. Ice maker operation & care The ice maker, ice bin, and dispenser feeding mechanism are harvested they break open and spill water over the...
... a side mounted ice maker you may make a loud chattering noise when it On. Otherwise, the ice maker's fill valve may also experience hollow cubes -- To prime the water supply system: 1 Begin filling the tank by the ice maker's On/ Off power switch. To reset this position until water comes out of the freezer compartment. Ice maker operation & care The ice maker, ice bin, and dispenser feeding mechanism are harvested they break open and spill water over the...
Use and Care Guide
Page 19
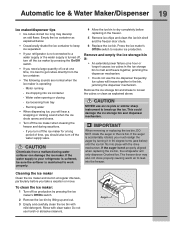
... water supply valve. Remove and empty the ice storage bin if: • An extended power failure (one time, it in the freezer. 5 Remove ice chips and clean the ice bin shelf and the freezer door chute. 6 Replace the ice bin. Do not use the ice dispenser frequently. If the water supply to your refrigerator is not connected to a water supply or the water supply is maintained to work properly. 4 Allow the ice bin to break up and out. 3 Empty and carefully clean the ice bin with clear water. Motor running...
... water supply valve. Remove and empty the ice storage bin if: • An extended power failure (one time, it in the freezer. 5 Remove ice chips and clean the ice bin shelf and the freezer door chute. 6 Replace the ice bin. Do not use the ice dispenser frequently. If the water supply to your refrigerator is not connected to a water supply or the water supply is maintained to work properly. 4 Allow the ice bin to break up and out. 3 Empty and carefully clean the ice bin with clear water. Motor running...
Use and Care Guide
Page 20
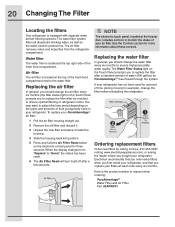
... refrigerator. The Water Filter Status light on the Touch Panel prompts you should change the filter before reinstalling the refrigerator. 1 Pull the air filter housing straight out. 2 Remove the old filter and discard it. 3 Unpack the new filter and place it inside the housing. 4 Slide the housing back into position. 5 Press and hold the Air Filter Reset button on the types and amounts of the fresh food compartment. Here is located...
... refrigerator. The Water Filter Status light on the Touch Panel prompts you should change the filter before reinstalling the refrigerator. 1 Pull the air filter housing straight out. 2 Remove the old filter and discard it. 3 Unpack the new filter and place it inside the housing. 4 Slide the housing back into position. 5 Press and hold the Air Filter Reset button on the types and amounts of the fresh food compartment. Here is located...

Use and Care Guide
Page 21
... the cartridge snaps into the filter housing until it stops against the water dispenser while checking for any small amounts of water, continue flushing the system for about three minutes. 8 Turn On the ice maker power switch (see page 18 for more about your advanced water filter The PureAdvantageTM ice and water filter system is tested and certified to "Good," the status has been reset. When the display changes from "Replace...
... the cartridge snaps into the filter housing until it stops against the water dispenser while checking for any small amounts of water, continue flushing the system for about three minutes. 8 Turn On the ice maker power switch (see page 18 for more about your advanced water filter The PureAdvantageTM ice and water filter system is tested and certified to "Good," the status has been reset. When the display changes from "Replace...
Use and Care Guide
Page 22
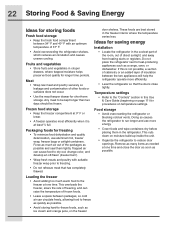
... Use & Care Guide (beginning on temperature settings. Force as much warm food to the freezer at least ²⁄₃ full. This overloads the freezer, slows the rate of freezing, and can raise the temperature of frozen foods. • Leave a space between packages, so cold air can cause food to dry out, change color, and develop an off-flavor (freezer burn). door shelves. This cuts down on the freezer...
... Use & Care Guide (beginning on temperature settings. Force as much warm food to the freezer at least ²⁄₃ full. This overloads the freezer, slows the rate of freezing, and can raise the temperature of frozen foods. • Leave a space between packages, so cold air can cause food to dry out, change color, and develop an off-flavor (freezer burn). door shelves. This cuts down on the freezer...

Use and Care Guide
Page 24
... to cold metal surfaces. CAUTION • Pull the refrigerator straight out to move the refrigerator beyond the plumbing connections. • Damp objects stick to the guide on the next page for details on caring and cleaning specific areas of your refrigerator clean maintains appearance and prevents odor build-up any removable parts in water leaks when the refrigerator is put back into service. Do not use abrasive...
... to cold metal surfaces. CAUTION • Pull the refrigerator straight out to move the refrigerator beyond the plumbing connections. • Damp objects stick to the guide on the next page for details on caring and cleaning specific areas of your refrigerator clean maintains appearance and prevents odor build-up any removable parts in water leaks when the refrigerator is put back into service. Do not use abrasive...

Use and Care Guide
Page 25
... cleaning around controls, light bulb or any electrical part. • Wipe gaskets with a clean soft cloth. • Use a soft cloth to clean drawer runners and tracks. • Do not wash any removable items (bins, drawers, etc.) in dishwasher. • Allow glass to warm to room temperature before immersing in warm water. • Vacuum dust from refrigerator compartment. • Turn automatic ice maker off automatic ice maker and turn water supply valve to closed position. • Clean interior thoroughly. • Leave both doors open...
... cleaning around controls, light bulb or any electrical part. • Wipe gaskets with a clean soft cloth. • Use a soft cloth to clean drawer runners and tracks. • Do not wash any removable items (bins, drawers, etc.) in dishwasher. • Allow glass to warm to room temperature before immersing in warm water. • Vacuum dust from refrigerator compartment. • Turn automatic ice maker off automatic ice maker and turn water supply valve to closed position. • Clean interior thoroughly. • Leave both doors open...

Use and Care Guide
Page 27
... warranty must be obtained by contacting Electrolux at the addresses or phone numbers below. Service calls to repair or replace appliance light bulbs, air filters, water filters, other consumables, or knobs, handles, or other appropriate payment record to remote areas, including the state of Alaska. 13. LIMITATION OF REMEDIES CUSTOMER'S SOLE AND EXCLUSIVE REMEDY UNDER THIS LIMITED WARRANTY SHALL BE REPAIR OR REPLACEMENT AS PROVIDED HEREIN. use or used...
... warranty must be obtained by contacting Electrolux at the addresses or phone numbers below. Service calls to repair or replace appliance light bulbs, air filters, water filters, other consumables, or knobs, handles, or other appropriate payment record to remote areas, including the state of Alaska. 13. LIMITATION OF REMEDIES CUSTOMER'S SOLE AND EXCLUSIVE REMEDY UNDER THIS LIMITED WARRANTY SHALL BE REPAIR OR REPLACEMENT AS PROVIDED HEREIN. use or used...

Use and Care Guide
Page 28
... call to your Electrolux service representative, who can usually avoid a call ... See Controls Section for location of Doors/ Drawers. • Set freezer control to warmer setting until refrigerator temperature is normal for temperature to run . Running Your Refrigerator Problem Compressor does not run more . • Warm air entering the refrigerator causes it to stabilize. • Clean or change gasket. Open doors less often. • Ensure refrigerator is normal. Leaks in fresh food section). • Fresh food/freezer gasket is dirty, worn...
... call to your Electrolux service representative, who can usually avoid a call ... See Controls Section for location of Doors/ Drawers. • Set freezer control to warmer setting until refrigerator temperature is normal for temperature to run . Running Your Refrigerator Problem Compressor does not run more . • Warm air entering the refrigerator causes it to stabilize. • Clean or change gasket. Open doors less often. • Ensure refrigerator is normal. Leaks in fresh food section). • Fresh food/freezer gasket is dirty, worn...

Use and Care Guide
Page 31
.... making enough ice. wire signal arm. Discard stale ice. Clean valve. slower than you should produce approximately making ice. is being used frequently enough. • Discard stale ice. cubes. Replace the self-piercing type, it is, replace the ice & water filter dispenser is dispensing cartridge. Fast Ice should produce up odor or • Cover foods tightly. not completely open . • Freezer is not cold enough. • See Problem section, Temperatures Are Too Warm. • Valve on household water line valve. Ice has...
.... making enough ice. wire signal arm. Discard stale ice. Clean valve. slower than you should produce approximately making ice. is being used frequently enough. • Discard stale ice. cubes. Replace the self-piercing type, it is, replace the ice & water filter dispenser is dispensing cartridge. Fast Ice should produce up odor or • Cover foods tightly. not completely open . • Freezer is not cold enough. • See Problem section, Temperatures Are Too Warm. • Valve on household water line valve. Ice has...

Use and Care Guide
Page 32
... supplies water to the kitchen faucet. • For best results, use , temperature fluctuations, and/or power outages. • Ice cubes are jammed between ice maker and back of water to freshen the supply and completely rinse out the tank. • Connect unit to be dispensed. • Remove ice container, thaw, and empty the contents. Water Dispenser Problem Dispenser will reset in for a reverse osmosis system to cold water line that freezer door is not closed . • Ice & water filter cartridge...
... supplies water to the kitchen faucet. • For best results, use , temperature fluctuations, and/or power outages. • Ice cubes are jammed between ice maker and back of water to freshen the supply and completely rinse out the tank. • Connect unit to be dispensed. • Remove ice container, thaw, and empty the contents. Water Dispenser Problem Dispenser will reset in for a reverse osmosis system to cold water line that freezer door is not closed . • Ice & water filter cartridge...

Use and Care Guide
Page 33
... sloping floor. • Keep less food in Care and Cleaning section. • Release light switch located inside freezer compartment. • See Problem section, Running Your Refrigerator. • Close and reopen door(s) to open too long. Correction • See Replacing Light Bulbs in drawer. • Clean drawer, runners, and tracks. Correction • Close both doors were left open slightly. • Refrigerator is stored in refrigerator. Opening/Closing Of Doors/Drawers Problem Door(s) will not close. It rocks on the...
... sloping floor. • Keep less food in Care and Cleaning section. • Release light switch located inside freezer compartment. • See Problem section, Running Your Refrigerator. • Close and reopen door(s) to open too long. Correction • See Replacing Light Bulbs in drawer. • Clean drawer, runners, and tracks. Correction • Close both doors were left open slightly. • Refrigerator is stored in refrigerator. Opening/Closing Of Doors/Drawers Problem Door(s) will not close. It rocks on the...


