Wiring Diagram (All Languages)
Page 1
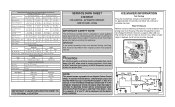
... ICE MAKER CONNECTOR PLUG CONNECTIONS Wire Number Wire Color Connects to touch insulation; CONDENSER FAN MOTOR Watts RPM Amps 3.1 1100 CW Opposite Shaft 0.03 Running ICE MAKER SPECIFICATIONS Electrical 115 vac (127 vac max) Thermostat Opens at 48° F ( 9° C), Closes at bottom and prying cover from torch flame. DO NOT allow torch to : 1 Green/Yellow Ground 2 Yellow Water Valve 3 Black Line 4 Light Blue Neutral IMPORTANT: PLEASE RETURN THIS SHEET TO IT'S ORIGINAL LOCATION service data sheet 240389641 ICE & WATER...
... ICE MAKER CONNECTOR PLUG CONNECTIONS Wire Number Wire Color Connects to touch insulation; CONDENSER FAN MOTOR Watts RPM Amps 3.1 1100 CW Opposite Shaft 0.03 Running ICE MAKER SPECIFICATIONS Electrical 115 vac (127 vac max) Thermostat Opens at 48° F ( 9° C), Closes at bottom and prying cover from torch flame. DO NOT allow torch to : 1 Green/Yellow Ground 2 Yellow Water Valve 3 Black Line 4 Light Blue Neutral IMPORTANT: PLEASE RETURN THIS SHEET TO IT'S ORIGINAL LOCATION service data sheet 240389641 ICE & WATER...
Complete Owner's Guide (English)
Page 2
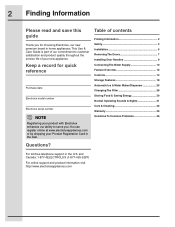
...-free telephone support in the mail. This Use & Care Guide is part of our commitment to serve you for quick reference Purchase date Electrolux model number Electrolux serial number NOTE Registering your product with Electrolux enhances our ability to customer satisfaction and product quality throughout the service life of contents Finding Information 2 Safety 3 Installation 5 Removing The Doors 7 Installing Door Handles 9 Connecting The Water Supply 10 Feature Overview 12 Controls 13 Storage Features 18 Automatic Ice & Water Maker/Dispenser 25 Changing...
...-free telephone support in the mail. This Use & Care Guide is part of our commitment to serve you for quick reference Purchase date Electrolux model number Electrolux serial number NOTE Registering your product with Electrolux enhances our ability to customer satisfaction and product quality throughout the service life of contents Finding Information 2 Safety 3 Installation 5 Removing The Doors 7 Installing Door Handles 9 Connecting The Water Supply 10 Feature Overview 12 Controls 13 Storage Features 18 Automatic Ice & Water Maker/Dispenser 25 Changing...
Complete Owner's Guide (English)
Page 5
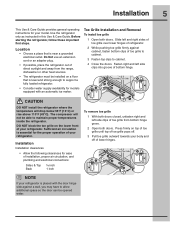
... clips to maintain proper temperatures inside the refrigerator. Toe Grille Installation and Removal To install toe grille 1 Open both doors closed, unfasten right and left and right sides of toe grille over lower hinges of refrigerator. 2 While pushing toe grille firmly against a wall, you may have to support a fully loaded refrigerator. • Consider water supply availability for models equipped with an automatic ice maker. The compressor will drop below...
... clips to maintain proper temperatures inside the refrigerator. Toe Grille Installation and Removal To install toe grille 1 Open both doors closed, unfasten right and left and right sides of toe grille over lower hinges of refrigerator. 2 While pushing toe grille firmly against a wall, you may have to support a fully loaded refrigerator. • Consider water supply availability for models equipped with an automatic ice maker. The compressor will drop below...
Complete Owner's Guide (English)
Page 8
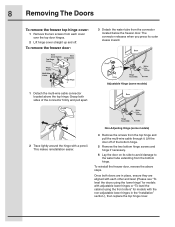
... adjustable lower hinges or "To level the cabinet using the front rollers" for models with a pencil. This makes reinstallation easier. To reinstall the freezer door, reverse the above the top hinge. Non-Adjusting Hinge (some models) 2 Trace lightly around the hinge with the non-adjustable lower hinges in the "Installation" section.), then replace the top hinge cover. Lift the door off . To remove the freezer door: 3 Detach the water tube from the top hinge and pull the multi-wire...
... adjustable lower hinges or "To level the cabinet using the front rollers" for models with a pencil. This makes reinstallation easier. To reinstall the freezer door, reverse the above the top hinge. Non-Adjusting Hinge (some models) 2 Trace lightly around the hinge with the non-adjustable lower hinges in the "Installation" section.), then replace the top hinge cover. Lift the door off . To remove the freezer door: 3 Detach the water tube from the top hinge and pull the multi-wire...
Complete Owner's Guide (English)
Page 10
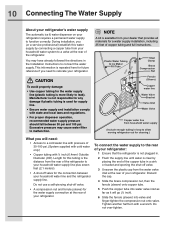
... Water Tubing to Ice Maker Fill Tube Steel Clamp Brass Compression Nut CAUTION To avoid property damage: • Use copper tubing for the water supply line (plastic tubing is clear by connecting a copper tube from the water valve inlet at the rear of copper tubing and full instructions. Do not use a self-piercing shut-off valve. 3 Unscrew the plastic cap from your household water system to relocate your refrigerator. You may cause water filter...
... Water Tubing to Ice Maker Fill Tube Steel Clamp Brass Compression Nut CAUTION To avoid property damage: • Use copper tubing for the water supply line (plastic tubing is clear by connecting a copper tube from the water valve inlet at the rear of copper tubing and full instructions. Do not use a self-piercing shut-off valve. 3 Unscrew the plastic cap from your household water system to relocate your refrigerator. You may cause water filter...
Complete Owner's Guide (English)
Page 11
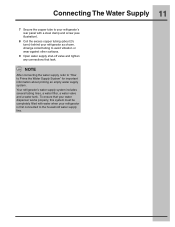
... to Prime the Water Supply System" for important information about 2½ turns) behind your refrigerator as shown. To ensure that leak. Connecting The Water Supply 11 7 Secure the copper tube to your refrigerator's rear panel with water when your refrigerator is first connected to the household water supply line. Arrange coiled tubing to avoid vibration or wear against other surfaces. 9 Open water supply shut-off valve and tighten any connections that your water dispenser works properly, this...
... to Prime the Water Supply System" for important information about 2½ turns) behind your refrigerator as shown. To ensure that leak. Connecting The Water Supply 11 7 Secure the copper tube to your refrigerator's rear panel with water when your refrigerator is first connected to the household water supply line. Arrange coiled tubing to avoid vibration or wear against other surfaces. 9 Open water supply shut-off valve and tighten any connections that your water dispenser works properly, this...
Complete Owner's Guide (English)
Page 14
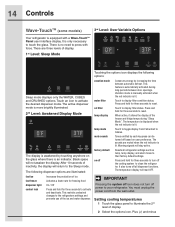
.... Setting cooling temperatures 1 Touch the glass panel to your refrigerator. The active dispenser mode is more brightly illuminated. 2nd Level: Awakened Display Mode The display is awakened by increasing the time between door openings. Touch to display filter status. When active, it allows the display of ice fast freeze Activates a faster rate for freezing food dispenser light On / Off control lock Press and hold for three seconds to press with a Wave-TouchTM Panel user interface display. 14 Controls...
.... Setting cooling temperatures 1 Touch the glass panel to your refrigerator. The active dispenser mode is more brightly illuminated. 2nd Level: Awakened Display Mode The display is awakened by increasing the time between door openings. Touch to display filter status. When active, it allows the display of ice fast freeze Activates a faster rate for freezing food dispenser light On / Off control lock Press and hold for three seconds to press with a Wave-TouchTM Panel user interface display. 14 Controls...
Complete Owner's Guide (English)
Page 16
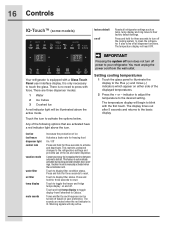
... also turns off power to blink with a Glass Touch Panel user interface display. The temperature display will be turned off based on off Resets all dispenser functions. Tones emitted by increasing the time between door openings. 16 Controls IQ-TouchTM (some models) factory default on user preference. IMPORTANT Pressing the system off icon does not turn off . indicator to adjust the temperature to activate the options below. fast ice fast freeze dispenser light control lock vacation mode water filter air filter temp display...
... also turns off power to blink with a Glass Touch Panel user interface display. The temperature display will be turned off based on off Resets all dispenser functions. Tones emitted by increasing the time between door openings. 16 Controls IQ-TouchTM (some models) factory default on user preference. IMPORTANT Pressing the system off icon does not turn off . indicator to adjust the temperature to activate the options below. fast ice fast freeze dispenser light control lock vacation mode water filter air filter temp display...
Complete Owner's Guide (English)
Page 25
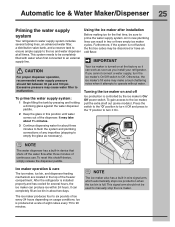
... switch to the "O" position to turn it On. It may make a loud chattering noise when it can completely fill an ice bin in this shutoff device, simply release the dispenser paddle. Ice is installed properly and has cooled for about two days. Air in new plumbing lines can produce ice within 24 hours. Otherwise, the ice maker's fill valve may take about 1½ minutes. 3 Continue dispensing water for several tubing lines...
... switch to the "O" position to turn it On. It may make a loud chattering noise when it can completely fill an ice bin in this shutoff device, simply release the dispenser paddle. Ice is installed properly and has cooled for about two days. Air in new plumbing lines can produce ice within 24 hours. Otherwise, the ice maker's fill valve may take about 1½ minutes. 3 Continue dispensing water for several tubing lines...
Complete Owner's Guide (English)
Page 26
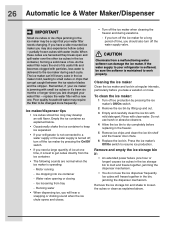
... ice container as explained above. To clean the ice maker: 1 Turn off the water supply valve. Do not use the ice dispenser frequently. Ice dropping into ice container - If you need a large quantity of ice. Cleaning the ice maker Clean the ice maker and ice bin at one . Press the ice maker's Off/On switch to the ice maker during vacations. - replace the water filter with mild detergent. Water valve opening or closing - CAUTION Chemicals from a malfunctioning water softener can get cubes directly from tray - Remove the ice storage bin...
... ice container as explained above. To clean the ice maker: 1 Turn off the water supply valve. Do not use the ice dispenser frequently. Ice dropping into ice container - If you need a large quantity of ice. Cleaning the ice maker Clean the ice maker and ice bin at one . Press the ice maker's Off/On switch to the ice maker during vacations. - replace the water filter with mild detergent. Water valve opening or closing - CAUTION Chemicals from a malfunctioning water softener can get cubes directly from tray - Remove the ice storage bin...

Complete Owner's Guide (English)
Page 28
... of your refrigerator. Replacing the water filter In general, you replace your refrigerator has not been used to request when ordering: PureAdvantageTM Water Filter and Air Filter Part #EAFWF01 If your filters at the freezer door, includes controls to the water filter. Replacing the air filter In general, you should change the water filter every six months to ensure optimal filtering of time (during moving for example), change the air filter every six months (the filter status light on the electronic control panel for...
... of your refrigerator. Replacing the water filter In general, you replace your refrigerator has not been used to request when ordering: PureAdvantageTM Water Filter and Air Filter Part #EAFWF01 If your filters at the freezer door, includes controls to the water filter. Replacing the air filter In general, you should change the water filter every six months to ensure optimal filtering of time (during moving for example), change the air filter every six months (the filter status light on the electronic control panel for...
Complete Owner's Guide (English)
Page 29
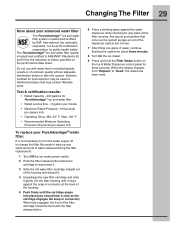
... the filter replacement. 1 Turn Off the ice maker power switch. 2 Push the filter release button below the cartridge to disconnect it. 3 Slide the old water filter cartridge straight out of the housing and discard it. 4 Unpackage the new filter cartridge and slide it gently into the filter housing until it stops against the water dispenser while checking for public health safety. When the display changes from "Replace" to "Good," the status has been reset...
... the filter replacement. 1 Turn Off the ice maker power switch. 2 Push the filter release button below the cartridge to disconnect it. 3 Slide the old water filter cartridge straight out of the housing and discard it. 4 Unpackage the new filter cartridge and slide it gently into the filter housing until it stops against the water dispenser while checking for public health safety. When the display changes from "Replace" to "Good," the status has been reset...

Complete Owner's Guide (English)
Page 30
... the refrigerator operate more energy. • Cover foods and wipe containers dry before placing them tightly. Loading the freezer • Avoid adding too much air out of other foods or surfaces does not occur. • Use the meat keeper drawer for saving energy Installation • Locate the refrigerator in this is at one time and close tightly. door shelves. Remove as many items as needed at...
... the refrigerator operate more energy. • Cover foods and wipe containers dry before placing them tightly. Loading the freezer • Avoid adding too much air out of other foods or surfaces does not occur. • Use the meat keeper drawer for saving energy Installation • Locate the refrigerator in this is at one time and close tightly. door shelves. Remove as many items as needed at...
Complete Owner's Guide (English)
Page 31
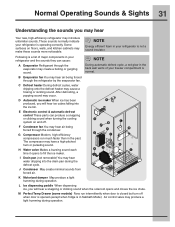
...-efficiency compressors run intermittently when door is closed but turn off . Air control valve may hear air being forced through the refrigerator by the evaporator fan. Normal Operating Sounds & Sights 31 Understanding the sounds you will hear ice cubes falling into the drain pan during the defrost cycle. NOTE Energy efficient foam in your freezer compartment is not a sound insulator. H Water valve Makes a buzzing sound each time it opens to fill the ice maker. C Defrost...
...-efficiency compressors run intermittently when door is closed but turn off . Air control valve may hear air being forced through the refrigerator by the evaporator fan. Normal Operating Sounds & Sights 31 Understanding the sounds you will hear ice cubes falling into the drain pan during the defrost cycle. NOTE Energy efficient foam in your freezer compartment is not a sound insulator. H Water valve Makes a buzzing sound each time it opens to fill the ice maker. C Defrost...
Complete Owner's Guide (English)
Page 32
... you set your temperature controls to turn off cooling, power to lights and other electrical components will continue until you store or move your refrigerator in freezing temperatures, be sure to completely drain the water supply system. Do not use razor blades or other abrasive cleaning materials. • Never use metallic scouring pads, brushes, abrasive cleaners or strong alkaline solutions on any surface. • Never use CHLORIDE or...
... you set your temperature controls to turn off cooling, power to lights and other electrical components will continue until you store or move your refrigerator in freezing temperatures, be sure to completely drain the water supply system. Do not use razor blades or other abrasive cleaning materials. • Never use metallic scouring pads, brushes, abrasive cleaners or strong alkaline solutions on any surface. • Never use CHLORIDE or...

Complete Owner's Guide (English)
Page 33
... controls, light bulb or any electrical part. • Wipe gaskets with a clean soft cloth. • Use a soft cloth to clean drawer runners and tracks. • Do not wash any removable items (bins, drawers, etc.) in dishwasher. • Allow glass to warm to room temperature before immersing in warm water. • Vacuum dust from front of toe grille. • Remove toe grille (see "Controls" section for location of On/Off button) and disconnect power...
... controls, light bulb or any electrical part. • Wipe gaskets with a clean soft cloth. • Use a soft cloth to clean drawer runners and tracks. • Do not wash any removable items (bins, drawers, etc.) in dishwasher. • Allow glass to warm to room temperature before immersing in warm water. • Vacuum dust from front of toe grille. • Remove toe grille (see "Controls" section for location of On/Off button) and disconnect power...
Complete Owner's Guide (English)
Page 35
... THE DURATION OF IMPLIED WARRANTIES, SO THESE LIMITATIONS OR EXCLUSIONS MAY NOT APPLY TO YOU. If service is performed, it is warranted by Electrolux Canada Corp. Service calls to repair or replace appliance light bulbs, air filters, water filters, other consumables, or knobs, handles, or other than genuine Electrolux parts or parts obtained from persons other cosmetic parts. 11. use your appliance is warranted...
... THE DURATION OF IMPLIED WARRANTIES, SO THESE LIMITATIONS OR EXCLUSIONS MAY NOT APPLY TO YOU. If service is performed, it is warranted by Electrolux Canada Corp. Service calls to repair or replace appliance light bulbs, air filters, water filters, other consumables, or knobs, handles, or other than genuine Electrolux parts or parts obtained from persons other cosmetic parts. 11. use your appliance is warranted...
Complete Owner's Guide (English)
Page 36
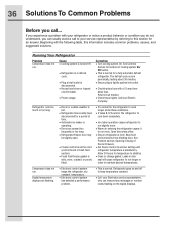
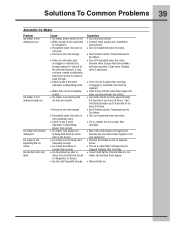
... your service representative by referring to this information includes common problems, causes, and suggested solutions. Correction • Turn cooling system On. The defrost cycle occurs periodically, lasting about 30 minutes. • Ensure plug is satisfactory. Reset circuit breaker. • Check house lights. Digital temperature displays are opened too frequently or too long. • Refrigerator/freezer door may be slightly open. • Freezer control is set too cold (control found in...
... your service representative by referring to this information includes common problems, causes, and suggested solutions. Correction • Turn cooling system On. The defrost cycle occurs periodically, lasting about 30 minutes. • Ensure plug is satisfactory. Reset circuit breaker. • Check house lights. Digital temperature displays are opened too frequently or too long. • Refrigerator/freezer door may be slightly open. • Freezer control is set too cold (control found in...
Complete Owner's Guide (English)
Page 39
... ice bin to see if the water • If not, the ice & water filter cartridge dispenser is clogged or restricted by some Remove any ice. • Water supply is not connected • Connect water supply (see if water • If it may be replaced. • Water filter is not a foreign material. not open . • Check to 6 pounds of self-piercing valve. not have created a sufficiently sized hole in the freezer. cubes. making ice. Ice maker is • Turn on power switch...
... ice bin to see if the water • If not, the ice & water filter cartridge dispenser is clogged or restricted by some Remove any ice. • Water supply is not connected • Connect water supply (see if water • If it may be replaced. • Water filter is not a foreign material. not open . • Check to 6 pounds of self-piercing valve. not have created a sufficiently sized hole in the freezer. cubes. making ice. Ice maker is • Turn on power switch...
Complete Owner's Guide (English)
Page 40
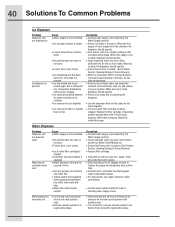
... , dispenser should operate. • Open household water line valve. Filter should fall within this range. 40 Solutions To Common Problems Ice Dispenser Problem Dispenser will reset in approximately 3 minutes. When the first supply of Doors/Drawers) • Replace filter cartridge. • Push filter in proper position. Ice can then be made . Water Dispenser Problem Dispenser will be dispensed. • Remove ice container, thaw, and empty the contents. Correction • Connect water supply (see Connecting The Water Supply section). • Ensure ice maker is turned on...
... , dispenser should operate. • Open household water line valve. Filter should fall within this range. 40 Solutions To Common Problems Ice Dispenser Problem Dispenser will reset in approximately 3 minutes. When the first supply of Doors/Drawers) • Replace filter cartridge. • Push filter in proper position. Ice can then be made . Water Dispenser Problem Dispenser will be dispensed. • Remove ice container, thaw, and empty the contents. Correction • Connect water supply (see Connecting The Water Supply section). • Ensure ice maker is turned on...


