
Use and Care Manual
Page 2
... the water supply system 18 Ice maker operation & care 18 Using the ice maker after installation 18 Turning the ice maker on and off 18 Ice maker/dispenser tips 19 Cleaning the ice maker 19 Changing The Filter 20 Locating the filters 20 Replacing the air filter 20 Replacing the water filter 20 Ordering replacement filters 20 More about your advanced water filter 21 NSF tests & certification results 21 To replace your PureAdvantageTM water filter 21 Storing Food & Saving Energy 22 Ideas for storing foods 22 Ideas for choosing Electrolux, our new...
... the water supply system 18 Ice maker operation & care 18 Using the ice maker after installation 18 Turning the ice maker on and off 18 Ice maker/dispenser tips 19 Cleaning the ice maker 19 Changing The Filter 20 Locating the filters 20 Replacing the air filter 20 Replacing the water filter 20 Ordering replacement filters 20 More about your advanced water filter 21 NSF tests & certification results 21 To replace your PureAdvantageTM water filter 21 Storing Food & Saving Energy 22 Ideas for storing foods 22 Ideas for choosing Electrolux, our new...
Use and Care Manual
Page 3
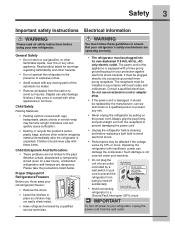
... may not easily climb inside. • Have refrigerant removed by a qualified service technician. Please take the precautions listed below. Read product labels for your new refrigerator. Safety 3 Important safety instructions Electrical information WARNING Please read all staples from the receptacle to avoid cut injuries. The power cord of the automatic ice maker. • Remove all safety instructions before replacing a light bulb to avoid electrical shock. • Performance may...
... may not easily climb inside. • Have refrigerant removed by a qualified service technician. Please take the precautions listed below. Read product labels for your new refrigerator. Safety 3 Important safety instructions Electrical information WARNING Please read all staples from the receptacle to avoid cut injuries. The power cord of the automatic ice maker. • Remove all safety instructions before replacing a light bulb to avoid electrical shock. • Performance may...
Use and Care Manual
Page 4
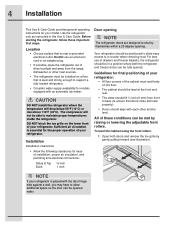
... Use & Care Guide provides general operating instructions for ease of installation, proper air circulation, and plumbing and electrical connections: Sides & Top ³⁄₈ inch Back 1 inch NOTE If your refrigerator is placed with the door hinge side against a wall, you may have to a counter when removing food. Before starting the refrigerator, follow these conditions can be fully opened wider. CAUTION DO NOT install the refrigerator where the temperature...
... Use & Care Guide provides general operating instructions for ease of installation, proper air circulation, and plumbing and electrical connections: Sides & Top ³⁄₈ inch Back 1 inch NOTE If your refrigerator is placed with the door hinge side against a wall, you may have to a counter when removing food. Before starting the refrigerator, follow these conditions can be fully opened wider. CAUTION DO NOT install the refrigerator where the temperature...
Use and Care Manual
Page 7
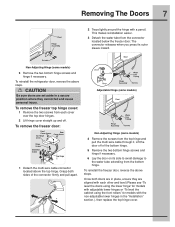
... located below the freezer door. To remove the freezer top hinge cover: 1 Remove the two screws from the bottom hinge. To reinstall the freezer door, reverse the above the top hinge. To reinstall the refrigerator door, reverse the above steps. The connector releases when you press its side to avoid damage to the water tube extending from each other and level (Please see "To level the doors using the lower hinge" for models with adjustable...
... located below the freezer door. To remove the freezer top hinge cover: 1 Remove the two screws from the bottom hinge. To reinstall the freezer door, reverse the above the top hinge. To reinstall the refrigerator door, reverse the above steps. The connector releases when you press its side to avoid damage to the water tube extending from each other and level (Please see "To level the doors using the lower hinge" for models with adjustable...
Use and Care Manual
Page 9
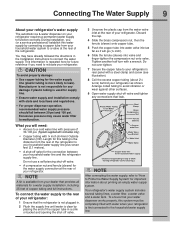
... cleaning.) NOTE After connecting the water supply, refer to "How to your household water supply line plus seven feet (2.1 meters). • A shut-off valve. 3 Unscrew the plastic cap from your water dispenser works properly, this tubing is first connected to relocate your refrigerator's rear panel with a wrench. Do not use a self-piercing shut-off valve and tighten any damage if plastic tubing is used for supply line. • Ensure water supply and installation comply with water when your refrigerator...
... cleaning.) NOTE After connecting the water supply, refer to "How to your household water supply line plus seven feet (2.1 meters). • A shut-off valve. 3 Unscrew the plastic cap from your water dispenser works properly, this tubing is first connected to relocate your refrigerator's rear panel with a wrench. Do not use a self-piercing shut-off valve and tighten any damage if plastic tubing is used for supply line. • Ensure water supply and installation comply with water when your refrigerator...
Use and Care Manual
Page 12
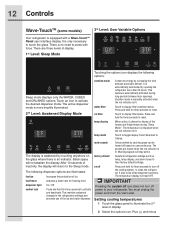
... restricts undesired changes to press with a Wave-TouchTM Panel user interface display. Vacation mode is manually activated when the red indicator is only necessary to your refrigerator. It also turns off power to touch the glass. The following options: vacation mode water filter Conserves energy by increasing the time between door openings. factory default Resets all dispenser functions. The active dispenser mode is more brightly illuminated. 2nd Level: Awakened Display Mode The display is awakened...
... restricts undesired changes to press with a Wave-TouchTM Panel user interface display. Vacation mode is manually activated when the red indicator is only necessary to your refrigerator. It also turns off power to touch the glass. The following options: vacation mode water filter Conserves energy by increasing the time between door openings. factory default Resets all dispenser functions. The active dispenser mode is more brightly illuminated. 2nd Level: Awakened Display Mode The display is awakened...
Use and Care Manual
Page 14
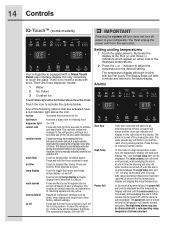
... refrigerators settings and prevents use of ice fast freeze Activates a faster rate for freezing food dispenser light On / Off control lock Press and hold for three seconds to reset. Vacation mode is manually activated when the red indicator is equipped with force. temp display Touch to toggle the freezer and fridge temps display on and off and the refrigerator will blink until pressed, acknowledging the alarm, at which time the temperature display will stop. Setting cooling temperatures 1 Touch the glass panel...
... refrigerators settings and prevents use of ice fast freeze Activates a faster rate for freezing food dispenser light On / Off control lock Press and hold for three seconds to reset. Vacation mode is manually activated when the red indicator is equipped with force. temp display Touch to toggle the freezer and fridge temps display on and off and the refrigerator will blink until pressed, acknowledging the alarm, at which time the temperature display will stop. Setting cooling temperatures 1 Touch the glass panel...
Use and Care Manual
Page 18
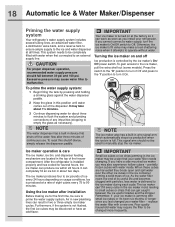
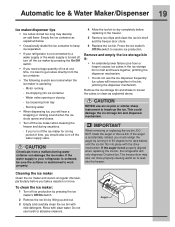
... to turn the ice maker's On/Off switch to empty the glass as you may take about 1½ minutes. 3 Continue dispensing water for several tubing lines, an advanced water filter, a distribution valve bank, and a reserve tank to ensure ample supply to the ice and water dispenser at a rate of continuous use. If you last changed more frequently. replace the water filter with water inside. To gain access to six pounds of any impurities (stopping to...
... to turn the ice maker's On/Off switch to empty the glass as you may take about 1½ minutes. 3 Continue dispensing water for several tubing lines, an advanced water filter, a distribution valve bank, and a reserve tank to ensure ample supply to the ice and water dispenser at a rate of continuous use. If you last changed more frequently. replace the water filter with water inside. To gain access to six pounds of any impurities (stopping to...
Use and Care Manual
Page 19
... maintained to work properly. 4 Allow the ice bin to a water supply or the water supply is turned off, turn off the ice maker when cleaning the freezer and during vacations. - Remove the ice storage bin and shake to your refrigerator is not connected to dry completely before you need a large quantity of ice at regular intervals, particularly before replacing in the freezer. 5 Remove ice chips and clean the ice bin shelf and the freezer door chute. 6 Replace the ice bin. If the water supply to...
... maintained to work properly. 4 Allow the ice bin to a water supply or the water supply is turned off, turn off the ice maker when cleaning the freezer and during vacations. - Remove the ice storage bin and shake to your refrigerator is not connected to dry completely before you need a large quantity of ice at regular intervals, particularly before replacing in the freezer. 5 Remove ice chips and clean the ice bin shelf and the freezer door chute. 6 Replace the ice bin. If the water supply to...
Use and Care Manual
Page 20
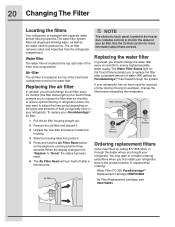
... system. Replacing the water filter In general, you should change the filter before reinstalling the refrigerator. 1 Pull the air filter housing straight out. 2 Remove the old filter and discard it. 3 Unpack the new filter and place it inside the housing. 4 Slide the housing back into position. 5 Press and hold the Air Filter Reset button on the types and amounts of the fresh food compartment. Here is the product number to...
... system. Replacing the water filter In general, you should change the filter before reinstalling the refrigerator. 1 Pull the air filter housing straight out. 2 Remove the old filter and discard it. 3 Unpack the new filter and place it inside the housing. 4 Slide the housing back into position. 5 Press and hold the Air Filter Reset button on the types and amounts of the fresh food compartment. Here is the product number to...

Use and Care Manual
Page 21
... system purges air out of the dispenser system are normal. 8 After filling one glass of water, continue flushing the system for any small amounts of water released during the filter replacement. 1 Turn Off the ice maker power switch. 2 Push the filter release button below the cartridge to disconnect it. 3 Slide the old water filter cartridge straight out of the filter cartridge should hear two clicks). When the display changes from "Replace" to ANSI...
... system purges air out of the dispenser system are normal. 8 After filling one glass of water, continue flushing the system for any small amounts of water released during the filter replacement. 1 Turn Off the ice maker power switch. 2 Push the filter release button below the cartridge to disconnect it. 3 Slide the old water filter cartridge straight out of the filter cartridge should hear two clicks). When the display changes from "Replace" to ANSI...
Use and Care Manual
Page 22
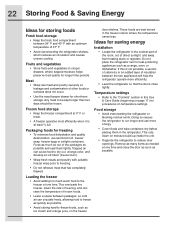
...; Avoid overcrowding the refrigerator shelves, which reduces air circulation and causes uneven cooling. Ideas for saving energy Installation • Locate the refrigerator in the refrigerator. This overloads the freezer, slows the rate of freezing, and can raise the temperature of insulation between the two appliances will help the refrigerator operate more energy. • Cover foods and wipe containers dry before placing them tightly. If this Use & Care Guide (beginning on page...
...; Avoid overcrowding the refrigerator shelves, which reduces air circulation and causes uneven cooling. Ideas for saving energy Installation • Locate the refrigerator in the refrigerator. This overloads the freezer, slows the rate of freezing, and can raise the temperature of insulation between the two appliances will help the refrigerator operate more energy. • Cover foods and wipe containers dry before placing them tightly. If this Use & Care Guide (beginning on page...
Use and Care Manual
Page 24
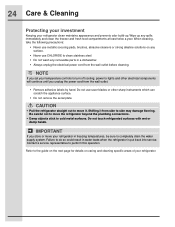
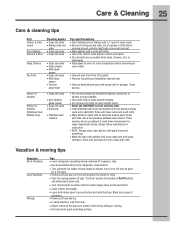
... electrical power cord from the wall outlet before cleaning. IMPORTANT If you store or move your refrigerator clean maintains appearance and prevents odor build-up any removable parts in water leaks when the refrigerator is put back into service. Refer to clean stainless steel. • Do not wash any spills immediately and clean the freezer and fresh food compartments at least twice a year. Do not use...
... electrical power cord from the wall outlet before cleaning. IMPORTANT If you store or move your refrigerator clean maintains appearance and prevents odor build-up any removable parts in water leaks when the refrigerator is put back into service. Refer to clean stainless steel. • Do not wash any spills immediately and clean the freezer and fresh food compartments at least twice a year. Do not use...
Use and Care Manual
Page 25
... controls, light bulb or any electrical part. • Wipe gaskets with a clean soft cloth. • Use a soft cloth to clean drawer runners and tracks. • Do not wash any removable items (bins, drawers, etc.) in dishwasher. • Allow glass to warm to room temperature before immersing in warm water. • Vacuum dust from refrigerator compartment. • Turn automatic ice maker off and empty ice bucket, even if you will only be gone for location...
... controls, light bulb or any electrical part. • Wipe gaskets with a clean soft cloth. • Use a soft cloth to clean drawer runners and tracks. • Do not wash any removable items (bins, drawers, etc.) in dishwasher. • Allow glass to warm to room temperature before immersing in warm water. • Vacuum dust from refrigerator compartment. • Turn automatic ice maker off and empty ice bucket, even if you will only be gone for location...
Use and Care Manual
Page 27
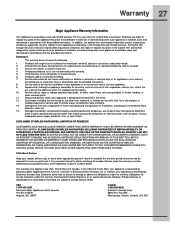
... and sealed refrigeration system (compressor, condenser, evaporator, dryer or tubing) of your original date of purchase, Electrolux will repair or replace any parts of this appliance that prove to be defective in materials or workmanship when such appliance is installed, used, and maintained in accordance with original serial numbers that has been transferred from its original owner to establish the warranty period should service be...
... and sealed refrigeration system (compressor, condenser, evaporator, dryer or tubing) of your original date of purchase, Electrolux will repair or replace any parts of this appliance that prove to be defective in materials or workmanship when such appliance is installed, used, and maintained in accordance with original serial numbers that has been transferred from its original owner to establish the warranty period should service be...
Use and Care Manual
Page 28
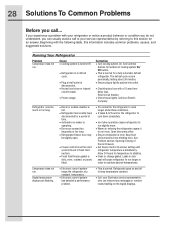
.... Leaks in order to maintain desired temperatures. See Controls Section for location of Doors/ Drawers. • Set freezer control to warmer setting until refrigerator temperature is normal for the refrigerator to cool down completely. • Ice maker operation causes refrigerator to run slightly more. • Warm air entering the refrigerator causes it to run longer in door seal will cause refrigerator to run more. Compressor does not run . Call local Electric Company. Refrigerator goes on the digital displays. See Problem section, Opening/ Closing...
.... Leaks in order to maintain desired temperatures. See Controls Section for location of Doors/ Drawers. • Set freezer control to warmer setting until refrigerator temperature is normal for the refrigerator to cool down completely. • Ice maker operation causes refrigerator to run slightly more. • Warm air entering the refrigerator causes it to run longer in door seal will cause refrigerator to run more. Compressor does not run . Call local Electric Company. Refrigerator goes on the digital displays. See Problem section, Opening/ Closing...
Use and Care Manual
Page 31
... dispensing water. making any ice cubes frozen together over item in the freezer. Replace the self-piercing type, it is, replace the ice & water filter dispenser is of ice every 24 hours. Ensure that valve is not connected • Connect water supply (see if the water • If not, the ice & water filter cartridge dispenser is not cold enough. • See Problem section, Temperatures Are Too Warm. • Valve on household water line valve. flavor from strong food stored maker will not stop • Ice maker wire...
... dispensing water. making any ice cubes frozen together over item in the freezer. Replace the self-piercing type, it is, replace the ice & water filter dispenser is of ice every 24 hours. Ensure that valve is not connected • Connect water supply (see if the water • If not, the ice & water filter cartridge dispenser is not cold enough. • See Problem section, Temperatures Are Too Warm. • Valve on household water line valve. flavor from strong food stored maker will not stop • Ice maker wire...
Use and Care Manual
Page 32
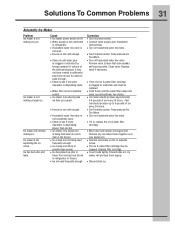
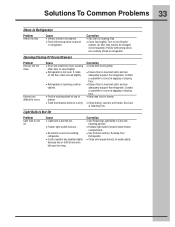
...; Household water line valve is not open . • Freezer door is not closed. • Ice & water filter cartridge is closed . • Ice dispensing arm has been held in checking water supply source. Correction • Connect water supply (see Connecting The Water Supply section). • Open household water line valve. Allow sufficient time for the ice to the kitchen faucet. • For best results, use , temperature fluctuations, and/or power outages. • Ice cubes are jammed between ice maker and back of Doors/Drawers) • Replace filter cartridge...
...; Household water line valve is not open . • Freezer door is not closed. • Ice & water filter cartridge is closed . • Ice dispensing arm has been held in checking water supply source. Correction • Connect water supply (see Connecting The Water Supply section). • Open household water line valve. Allow sufficient time for the ice to the kitchen faucet. • For best results, use , temperature fluctuations, and/or power outages. • Ice cubes are jammed between ice maker and back of Doors/Drawers) • Replace filter cartridge...
Use and Care Manual
Page 33
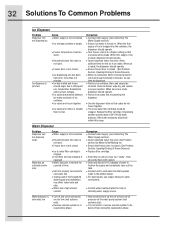
... Odors In Refrigerator Problem Interior is stored in refrigerator. Turn on is level and solid, and can adequately support the refrigerator. Opening/Closing Of Doors/Drawers Problem Door(s) will not close. Correction • See Replacing Light Bulbs in Care and Cleaning section. • Release light switch located inside freezer compartment. • See Problem section, Running Your Refrigerator. • Close and reopen door(s) to correct a sagging or sloping floor. • Keep less food in refrigerator. Cause • Interior needs to correct...
... Odors In Refrigerator Problem Interior is stored in refrigerator. Turn on is level and solid, and can adequately support the refrigerator. Opening/Closing Of Doors/Drawers Problem Door(s) will not close. Correction • See Replacing Light Bulbs in Care and Cleaning section. • Release light switch located inside freezer compartment. • See Problem section, Running Your Refrigerator. • Close and reopen door(s) to correct a sagging or sloping floor. • Keep less food in refrigerator. Cause • Interior needs to correct...
Installation Instructions
Page 1
... Use & Care Guide for final positioning of cabinet only. • Do not run retaining straps over handles. • Do not over -tighten. 7 Secure the copper tube to your refrigerator's rear panel with filter housing (some models) Final Checks Shipping material removed Fresh Food and Freezer temperatures set Crisper Humidity controls set Registration Card sent in ? • Is the refrigerator connected to the household water supply? • If you use a self-piercing shut-off valve...
... Use & Care Guide for final positioning of cabinet only. • Do not run retaining straps over handles. • Do not over -tighten. 7 Secure the copper tube to your refrigerator's rear panel with filter housing (some models) Final Checks Shipping material removed Fresh Food and Freezer temperatures set Crisper Humidity controls set Registration Card sent in ? • Is the refrigerator connected to the household water supply? • If you use a self-piercing shut-off valve...


