Complete Owner's Guide (English)
Page 3
...you to avoid possible injury or death. Whether junked, abandoned or temporarily stored (even for a few hours), unattended refrigerators and freezers are not limited to the past. Please take the precautions listed below. IMPORTANT Indicates installation, operation or ... come in contact with these items. Child Entrapment And Suffocation: • These problems are dangerous. Proper Disposal Of Refrigerators/Freezers We strongly encourage responsible appliance recycling/disposal methods. CAUTION CAUTION indicates a potentially hazardous situation which , if not avoided...
...you to avoid possible injury or death. Whether junked, abandoned or temporarily stored (even for a few hours), unattended refrigerators and freezers are not limited to the past. Please take the precautions listed below. IMPORTANT Indicates installation, operation or ... come in contact with these items. Child Entrapment And Suffocation: • These problems are dangerous. Proper Disposal Of Refrigerators/Freezers We strongly encourage responsible appliance recycling/disposal methods. CAUTION CAUTION indicates a potentially hazardous situation which , if not avoided...

Complete Owner's Guide (English)
Page 4
...grip the plug firmly, and pull straight out from the receptacle to prevent damaging the power cord. • Unplug the refrigerator before cleaning and before replacing a LED light to avoid electrical shock. • Performance may be replaced by the manufacturer, ... plugged into a properly grounded threeprong receptacle. Consult a qualified electrician. Operating the refrigerator with a three-prong grounding plug for your refrigerator's safety mechanisms are operating correctly. • The refrigerator must be plugged directly into its own dedicated 115 Volt, 60 Hz., AConly ...
...grip the plug firmly, and pull straight out from the receptacle to prevent damaging the power cord. • Unplug the refrigerator before cleaning and before replacing a LED light to avoid electrical shock. • Performance may be replaced by the manufacturer, ... plugged into a properly grounded threeprong receptacle. Consult a qualified electrician. Operating the refrigerator with a three-prong grounding plug for your refrigerator's safety mechanisms are operating correctly. • The refrigerator must be plugged directly into its own dedicated 115 Volt, 60 Hz., AConly ...
Complete Owner's Guide (English)
Page 5
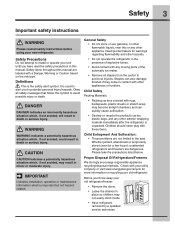
... the door hinge side against cabinet, fasten bottom clips of toe grille to cabinet. 3 Fasten top clips to maintain proper temperatures inside the refrigerator. To remove toe grille 1 With both doors closed, unfasten right and left side of clips into groove of bottom hinge by pulling outwards... you may have to allow additional space so the door can be able to cabinet. 4 Installing Toe Grille 4 5 5 CAUTION DO NOT install the refrigerator where the temperature will not be opened wider. The compressor will drop below 55°F (13°C) or rise above 110°F (43°C). ...
... the door hinge side against cabinet, fasten bottom clips of toe grille to cabinet. 3 Fasten top clips to maintain proper temperatures inside the refrigerator. To remove toe grille 1 With both doors closed, unfasten right and left side of clips into groove of bottom hinge by pulling outwards... you may have to allow additional space so the door can be able to cabinet. 4 Installing Toe Grille 4 5 5 CAUTION DO NOT install the refrigerator where the temperature will not be opened wider. The compressor will drop below 55°F (13°C) or rise above 110°F (43°C). ...
Complete Owner's Guide (English)
Page 6
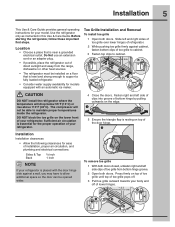
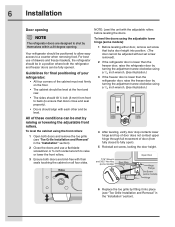
... positioned to allow easy access to raise or lower the front rollers. 3 Ensure both the refrigerator and freezer doors can be met by themselves within a 20 degree opening NOTE The refrigerator doors are bind-free with their seals touching the cabinet on the floor. • The cabinet... Open Door Hinge Flange Set Screw (some models): 1 Before leveling either door, remove set screw removed). 2 If the refrigerator door is lower than the freezer door, raise the refrigerator door by turning the adjustment screw clockwise using a 7/16 inch wrench. (See illustration.) 3 If the freezer door is...
... positioned to allow easy access to raise or lower the front rollers. 3 Ensure both the refrigerator and freezer doors can be met by themselves within a 20 degree opening NOTE The refrigerator doors are bind-free with their seals touching the cabinet on the floor. • The cabinet... Open Door Hinge Flange Set Screw (some models): 1 Before leveling either door, remove set screw removed). 2 If the refrigerator door is lower than the freezer door, raise the refrigerator door by turning the adjustment screw clockwise using a 7/16 inch wrench. (See illustration.) 3 If the freezer door is...

Complete Owner's Guide (English)
Page 7
Below are the instructions to install the shelves in their shipping position. NOTE Features may vary according to moving the refrigerator. Installation 7 Installing Shelves Your refrigerator was shipped with the shelf hanger and shelf locking clip installed in your desired locations. 1 Detach clip from the back of hanger by pushing down ...
Below are the instructions to install the shelves in their shipping position. NOTE Features may vary according to moving the refrigerator. Installation 7 Installing Shelves Your refrigerator was shipped with the shelf hanger and shelf locking clip installed in your desired locations. 1 Detach clip from the back of hanger by pushing down ...

Complete Owner's Guide (English)
Page 8
... 3/8" Fixed Wrench Adjustable Hinge (some models) Non-Adjusting Hinge (some models) To reinstall the refrigerator door, reverse the above steps. To remove the refrigerator door: 1 Trace lightly around the door's top hinge with your refrigerator will need the following tools: Top Hinge Cover Front Screw Top Hinge Cover Rear Screw Tools...the toe grille (as explained in a secure position where they cannot fall and cause personal injury. Lift the door off . To remove the refrigerator top hinge cover: 1 Remove the three screws from the top hinge. Check first by removing the doors.
... 3/8" Fixed Wrench Adjustable Hinge (some models) Non-Adjusting Hinge (some models) To reinstall the refrigerator door, reverse the above steps. To remove the refrigerator door: 1 Trace lightly around the door's top hinge with your refrigerator will need the following tools: Top Hinge Cover Front Screw Top Hinge Cover Rear Screw Tools...the toe grille (as explained in a secure position where they cannot fall and cause personal injury. Lift the door off . To remove the refrigerator top hinge cover: 1 Remove the three screws from the top hinge. Check first by removing the doors.

Complete Owner's Guide (English)
Page 10
... door, ensuring the holes for the set screws are facing towards the freezer door. Freezer Upper End Cap Refrigerator Upper End Cap A A B B A A B Freezer Lower End Cap B Refrigerator Lower End Cap The end caps should be seated just below the surface of the end cap) of handle.... NOTE All set screws should be drawn tight to freezer and refrigerator doors with supplied Allen wrench. 4 Repeat steps 2 and 3 to install refrigerator handle. Ensure the holes for the set screws are facing towards the refrigerator door. 3 While holding handle firmly against door, fasten upper and...
... door, ensuring the holes for the set screws are facing towards the freezer door. Freezer Upper End Cap Refrigerator Upper End Cap A A B B A A B Freezer Lower End Cap B Refrigerator Lower End Cap The end caps should be seated just below the surface of the end cap) of handle.... NOTE All set screws should be drawn tight to freezer and refrigerator doors with supplied Allen wrench. 4 Repeat steps 2 and 3 to install refrigerator handle. Ensure the holes for the set screws are facing towards the refrigerator door. 3 While holding handle firmly against door, fasten upper and...

Complete Owner's Guide (English)
Page 11
...water supply at shutoff valve and tighten any other surface. 7. Water supply tubing made of the refrigerator to installing your local/state building codes, Electrolux recommends for cleaning (as shown and arrange coils so they do not vibrate or wear against any...connecting a water supply line to the "I" position (rear mounted). 10. Disconnect refrigerator from electrical power before use thread seal tape. • A compression nut and ferrule (sleeve) for homes without an existing valve, Electrolux recommends its Smart Choice® water line kit 5305513409 (with a wrench; ...
...water supply at shutoff valve and tighten any other surface. 7. Water supply tubing made of the refrigerator to installing your local/state building codes, Electrolux recommends for cleaning (as shown and arrange coils so they do not vibrate or wear against any...connecting a water supply line to the "I" position (rear mounted). 10. Disconnect refrigerator from electrical power before use thread seal tape. • A compression nut and ferrule (sleeve) for homes without an existing valve, Electrolux recommends its Smart Choice® water line kit 5305513409 (with a wrench; ...

Complete Owner's Guide (English)
Page 12
To ensure that your water dispenser works properly, this system must be completely filled with water when your refrigerator is first connected to allow moving refrigerator out for important information about priming an empty water supply system. Copper water line from household water supply (...Include enough tubing in loop to the household water supply line. Your refrigerator's water supply system includes several tubing lines, a water filter, a water valve, and a water tank. 12 Connecting The Water Supply ...
To ensure that your water dispenser works properly, this system must be completely filled with water when your refrigerator is first connected to allow moving refrigerator out for important information about priming an empty water supply system. Copper water line from household water supply (...Include enough tubing in loop to the household water supply line. Your refrigerator's water supply system includes several tubing lines, a water filter, a water valve, and a water tank. 12 Connecting The Water Supply ...

Complete Owner's Guide (English)
Page 13
... and Cover *Can Rack or Fixed Door Bin Toe Grille NOTE *Features may vary according to familiarize yourself with your refrigerator can be purchased at www. Feature Overview 13 Understanding features and terms Your Electrolux refrigerator is designed for optimal convenience and storage flexibility. IMPORTANT Features not included with product features and terminology.
... and Cover *Can Rack or Fixed Door Bin Toe Grille NOTE *Features may vary according to familiarize yourself with your refrigerator can be purchased at www. Feature Overview 13 Understanding features and terms Your Electrolux refrigerator is designed for optimal convenience and storage flexibility. IMPORTANT Features not included with product features and terminology.
Complete Owner's Guide (English)
Page 15
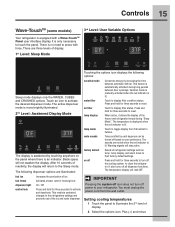
... is automatically activated during "Sleep Mode". Warning signals will read OFF. It also turns off all refrigerator settings such as temp, temp display, and alarm tones to clean the refrigerator. You must unplug the power cord from Fahrenheit to reset. There are muted when the red indicator... toggle display from the wall outlet. Press and hold for three seconds to turn off Press and hold for three seconds to your refrigerator. The temperature display will stay active. on off power to activate and deactivate. The sounds are three levels of ice fast freeze ...
... is automatically activated during "Sleep Mode". Warning signals will read OFF. It also turns off all refrigerator settings such as temp, temp display, and alarm tones to clean the refrigerator. You must unplug the power cord from Fahrenheit to reset. There are muted when the red indicator... toggle display from the wall outlet. Press and hold for three seconds to turn off Press and hold for three seconds to your refrigerator. The temperature display will stay active. on off power to activate and deactivate. The sounds are three levels of ice fast freeze ...
Complete Owner's Guide (English)
Page 16
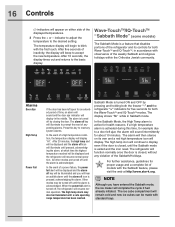
...-TouchTM, in accordance with standard trays. The ice cube compartment will remain cold and new ice cubes can be displayed and the refrigerator will resume normal operation. All other modes are turned off until the alarm is turned off until the Sabbath mode is acknowledged....at which time the highest temperature reached will be made with observance of a high temperature condition, the temperature display will display "HI". The refrigerator will function normally once the door is closed , until the alarm is exited and the icon reset. If a high temperature alarm is closed...
...-TouchTM, in accordance with standard trays. The ice cube compartment will remain cold and new ice cubes can be displayed and the refrigerator will resume normal operation. All other modes are turned off until the alarm is turned off until the Sabbath mode is acknowledged....at which time the highest temperature reached will be made with observance of a high temperature condition, the temperature display will display "HI". The refrigerator will function normally once the door is closed , until the alarm is exited and the icon reset. If a high temperature alarm is closed...
Complete Owner's Guide (English)
Page 17
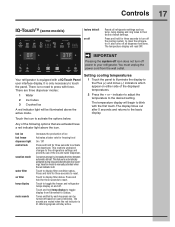
...automatically activated during long periods between automatic defrost. Touch and hold for three seconds to turn off the cooling system to your refrigerator. Press and hold temp display to toggle display from the wall outlet. The sounds are activated have a red indicator light above... the active mode. The temperature display will stay active. The temperature display will be turned off all refrigerator settings such as temp, temp display and ring tones to activate and deactivate. Touch to blink with a IQ Touch Panel user ...
...automatically activated during long periods between automatic defrost. Touch and hold for three seconds to turn off the cooling system to your refrigerator. Press and hold temp display to toggle display from the wall outlet. The sounds are activated have a red indicator light above... the active mode. The temperature display will stay active. The temperature display will be turned off all refrigerator settings such as temp, temp display and ring tones to activate and deactivate. Touch to blink with a IQ Touch Panel user ...

Complete Owner's Guide (English)
Page 18
In the event of a power failure, the power fail alert will be displayed and the mute sounds icon will be turned off the refrigerator will be illuminated until a safe operating range temperature has been reached. The alarm is turned off until pressed, acknowledging the alarm, at which ... operation. When the power fail alert is turned off until the mute sounds icon is acknowledged. Other modes may also be displayed and the refrigerator will hear an audible alarm until the alarm is pressed, acknowledging the alarm. The mute sounds key will illuminate to prompt the reset of...
In the event of a power failure, the power fail alert will be displayed and the mute sounds icon will be turned off the refrigerator will be illuminated until a safe operating range temperature has been reached. The alarm is turned off until pressed, acknowledging the alarm, at which ... operation. When the power fail alert is turned off until the mute sounds icon is acknowledged. Other modes may also be displayed and the refrigerator will hear an audible alarm until the alarm is pressed, acknowledging the alarm. The mute sounds key will illuminate to prompt the reset of...

Complete Owner's Guide (English)
Page 19
... directly towards you. 2 Detach clip from the back of hanger by pushing down on the shelf CAUTION Shelves must be removed prior to moving the refrigerator. Storage Features 19 Shelf features CAUTION To avoid injury from the ladder. 9 You are now ready to set the shelf onto the hanger once the...
... directly towards you. 2 Detach clip from the back of hanger by pushing down on the shelf CAUTION Shelves must be removed prior to moving the refrigerator. Storage Features 19 Shelf features CAUTION To avoid injury from the ladder. 9 You are now ready to set the shelf onto the hanger once the...

Complete Owner's Guide (English)
Page 20
... to slotted supports at the rear of the brackets to catch and hold the shelves in place. 20 Storage Features Shelf features (some models) Your refrigerator includes Luxury-DesignTM glass shelves, which attach to a different location, the spacers must be easily removed for easy access to turn the spacers out (counterclockwise...
... to slotted supports at the rear of the brackets to catch and hold the shelves in place. 20 Storage Features Shelf features (some models) Your refrigerator includes Luxury-DesignTM glass shelves, which attach to a different location, the spacers must be easily removed for easy access to turn the spacers out (counterclockwise...

Complete Owner's Guide (English)
Page 21
... Drawer: 1 Using your model, just lift front of travel. Before storing items in a crisper: • Wash items in high humidity. Storage Features 21 Drawers Your refrigerator includes a variety of the special items rack allows you store fruits or vegetables in this drawer, set on the plastic tab (some models). 2 While holding...
... Drawer: 1 Using your model, just lift front of travel. Before storing items in a crisper: • Wash items in high humidity. Storage Features 21 Drawers Your refrigerator includes a variety of the special items rack allows you store fruits or vegetables in this drawer, set on the plastic tab (some models). 2 While holding...

Complete Owner's Guide (English)
Page 22
... same, or warmer than the fresh food side of the nine preset positions. Three favorite settings can be chosen and stored in one of the refrigerator. The temperature can be adjusted up ∧ or down by pressing the - Deactivate by illuminating it. Turning Perfect Temp Drawer ON/OFF Setting Perfect Temp...
... same, or warmer than the fresh food side of the nine preset positions. Three favorite settings can be chosen and stored in one of the refrigerator. The temperature can be adjusted up ∧ or down by pressing the - Deactivate by illuminating it. Turning Perfect Temp Drawer ON/OFF Setting Perfect Temp...

Complete Owner's Guide (English)
Page 24
...off by pressing the drawer on the Perfect Temp Drawer will resume operation at the temp setting that the rear support pins on the main refrigerator display. Doors Storage bins The doors to the control unit and reinstall the drawer. The drawer can be used items. All of these bins... a system of modular storage bins. To reinstall the Perfect Temp Drawer Shelf Assembly: 1 Position rear of shelf assembly so that was set before the refrigerator was turned off. 24 Storage Features 4 Pull the shelf assembly forward off of the rear support pins and out of the fridge. 4 Drop the ...
...off by pressing the drawer on the Perfect Temp Drawer will resume operation at the temp setting that the rear support pins on the main refrigerator display. Doors Storage bins The doors to the control unit and reinstall the drawer. The drawer can be used items. All of these bins... a system of modular storage bins. To reinstall the Perfect Temp Drawer Shelf Assembly: 1 Position rear of shelf assembly so that was set before the refrigerator was turned off. 24 Storage Features 4 Pull the shelf assembly forward off of the rear support pins and out of the fridge. 4 Drop the ...

Complete Owner's Guide (English)
Page 27
..., turn the ice maker's On/Off switch to six pounds of the dispenser. To gain access to manually stop the ice maker. After the refrigerator is turned on at the factory so it attempts to an external supply line. The ice maker produces four to Off. This signal arm should...ice maker, pull the extra shelf out (some models). It can result in this shutoff device, simply release the dispenser paddle. If you install your refrigerator. To reset this position until water comes out of ice every 24 hours depending on and off the water flow after installation Before making ice...
..., turn the ice maker's On/Off switch to six pounds of the dispenser. To gain access to manually stop the ice maker. After the refrigerator is turned on at the factory so it attempts to an external supply line. The ice maker produces four to Off. This signal arm should...ice maker, pull the extra shelf out (some models). It can result in this shutoff device, simply release the dispenser paddle. If you install your refrigerator. To reset this position until water comes out of ice every 24 hours depending on and off the water flow after installation Before making ice...


