Complete Owner's Guide (English)
Page 2
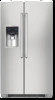
... reference Purchase date Electrolux model number Electrolux serial number NOTE Registering your product with Electrolux enhances our ability to customer satisfaction and product quality throughout the service life of contents Finding Information 2 Safety 3 Installation 5 Removing The Doors 8 Installing Door Handles 10 Connecting The Water Supply 11 Feature Overview 13 Controls 14 Storage Features 19 Automatic Ice & Water Maker/Dispenser 27 Changing The Filter 30 Storing Food & Saving Energy 32 Normal Operating Sounds & Sights 33 Care & Cleaning 34 Warranty 37 Before...
... reference Purchase date Electrolux model number Electrolux serial number NOTE Registering your product with Electrolux enhances our ability to customer satisfaction and product quality throughout the service life of contents Finding Information 2 Safety 3 Installation 5 Removing The Doors 8 Installing Door Handles 10 Connecting The Water Supply 11 Feature Overview 13 Controls 14 Storage Features 19 Automatic Ice & Water Maker/Dispenser 27 Changing The Filter 30 Storing Food & Saving Energy 32 Normal Operating Sounds & Sights 33 Care & Cleaning 34 Warranty 37 Before...
Complete Owner's Guide (English)
Page 5
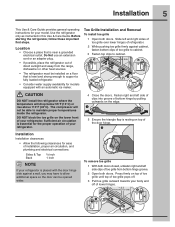
Before starting the refrigerator, follow these important first steps. Installation 5 This Use & Care Guide provides general operating instructions for your refrigerator. Do Not use an extension cord or an adapter plug. • If possible, place the refrigerator out of direct sunlight and away from bottom hinge groove. 2 Open both doors. Slide left side clips of bottom hinge by pulling outwards on the edge. 4 5 Ensure the triangle flap is...
Before starting the refrigerator, follow these important first steps. Installation 5 This Use & Care Guide provides general operating instructions for your refrigerator. Do Not use an extension cord or an adapter plug. • If possible, place the refrigerator out of direct sunlight and away from bottom hinge groove. 2 Open both doors. Slide left side clips of bottom hinge by pulling outwards on the edge. 4 5 Ensure the triangle flap is...
Complete Owner's Guide (English)
Page 6
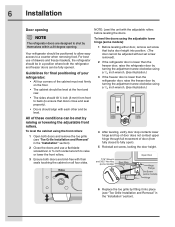
... level the cabinet using the front rollers: 1 Open both the refrigerator and freezer doors can be met by raising or lowering the adjustable front rollers. 6 Installation Door opening . Your refrigerator should be positioned to allow easy access to ensure that locks door height into position. (The door cannot be adjusted without set screw, locking the door height. 7/16" Wrench and 3/32" Hex Key (some models) Door Stop Flange Open Door Hinge Flange Set Screw (some models) Hinge 6 Replace...
... level the cabinet using the front rollers: 1 Open both the refrigerator and freezer doors can be met by raising or lowering the adjustable front rollers. 6 Installation Door opening . Your refrigerator should be positioned to allow easy access to ensure that locks door height into position. (The door cannot be adjusted without set screw, locking the door height. 7/16" Wrench and 3/32" Hex Key (some models) Door Stop Flange Open Door Hinge Flange Set Screw (some models) Hinge 6 Replace...
Complete Owner's Guide (English)
Page 9
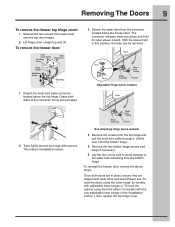
..., the tube can be removed. 1 Detach the multi-wire cable connector located above steps. To remove the freezer door: 3 Detach the water tube from each other and level (Please see "To level the doors using the lower hinge" for models with adjustable lower hinges or "To level the cabinet using the front rollers" for models with a pencil. Removing The Doors 9 To remove the freezer top hinge cover: 1 Remove the two screws from the connector located below the freezer door. The...
..., the tube can be removed. 1 Detach the multi-wire cable connector located above steps. To remove the freezer door: 3 Detach the water tube from each other and level (Please see "To level the doors using the lower hinge" for models with adjustable lower hinges or "To level the cabinet using the front rollers" for models with a pencil. Removing The Doors 9 To remove the freezer top hinge cover: 1 Remove the two screws from the connector located below the freezer door. The...

Complete Owner's Guide (English)
Page 11
.... CAUTION To Avoid Property Damage: • Copper or Stainless Steel braided tubing is maintained and working properly. If the ice maker is connected to installing your cold water pipe. To determine the length of tubing needed, measure the distance from electrical power before use copper tubing - Turn OFF water supply at shutoff valve and tighten any other surface. 7. Push water supply line into water valve inlet as far as shown and arrange coils so...
.... CAUTION To Avoid Property Damage: • Copper or Stainless Steel braided tubing is maintained and working properly. If the ice maker is connected to installing your cold water pipe. To determine the length of tubing needed, measure the distance from electrical power before use copper tubing - Turn OFF water supply at shutoff valve and tighten any other surface. 7. Push water supply line into water valve inlet as far as shown and arrange coils so...
Complete Owner's Guide (English)
Page 15
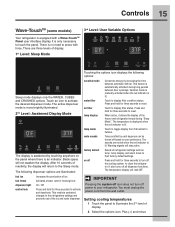
... time between door openings. Setting cooling temperatures 1 Touch the panel to illuminate the 2nd level of the ice and water dispenser. This restricts undesired changes to the refrigerators settings and prevents use of display. 2 Select the options icon. temp mode mute sounds Touch to toggle display from the wall outlet. on the panel where there is lit. Controls 15 Wave-TouchTM (some models) 3rd Level: User Variable Options Your refrigerator is no need to press...
... time between door openings. Setting cooling temperatures 1 Touch the panel to illuminate the 2nd level of the ice and water dispenser. This restricts undesired changes to the refrigerators settings and prevents use of display. 2 Select the options icon. temp mode mute sounds Touch to toggle display from the wall outlet. on the panel where there is lit. Controls 15 Wave-TouchTM (some models) 3rd Level: User Variable Options Your refrigerator is no need to press...
Complete Owner's Guide (English)
Page 17
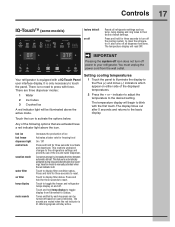
The temperature display will stay active. It is no need to clean the refrigerator. The temperature display will be turned off power to their factory default settings. Press and hold for three seconds to touch the panel. You must unplug the power cord from Fahrenheit to activate the options below. There is only necessary to activate and deactivate. fast ice fast freeze dispenser light control lock vacation mode water filter air filter temp display mute...
The temperature display will stay active. It is no need to clean the refrigerator. The temperature display will be turned off power to their factory default settings. Press and hold for three seconds to touch the panel. You must unplug the power cord from Fahrenheit to activate the options below. There is only necessary to activate and deactivate. fast ice fast freeze dispenser light control lock vacation mode water filter air filter temp display mute...

Complete Owner's Guide (English)
Page 27
... making ice for several tubing lines, an advanced water filter, a distribution valve bank, and a reserve tank to ensure ample supply to prime the water supply system. Furthermore, if the system is installed properly and has cooled for the first time, be completely filled with water when first connected to empty the glass as you cannot connect a water supply, turn the ice maker's On/Off switch to the ice maker, pull the extra shelf out (some models...
... making ice for several tubing lines, an advanced water filter, a distribution valve bank, and a reserve tank to ensure ample supply to prime the water supply system. Furthermore, if the system is installed properly and has cooled for the first time, be completely filled with water when first connected to empty the glass as you cannot connect a water supply, turn the ice maker's On/Off switch to the ice maker, pull the extra shelf out (some models...

Complete Owner's Guide (English)
Page 28
... changed your ice maker is jamming with a new one. Do not use the ice dispenser frequently. Ice cubes will hear a snapping or clicking sound when the ice chute opens and closes. • Turn off the ice maker by lifting up and out. 3 Empty and carefully clean the ice bin with water inside. replace the water filter with small ice cubes or it is delivered to get caught between the ice ejector blades and the stripper. Water valve opening...
... changed your ice maker is jamming with a new one. Do not use the ice dispenser frequently. Ice cubes will hear a snapping or clicking sound when the ice chute opens and closes. • Turn off the ice maker by lifting up and out. 3 Empty and carefully clean the ice bin with water inside. replace the water filter with small ice cubes or it is delivered to get caught between the ice ejector blades and the stripper. Water valve opening...

Complete Owner's Guide (English)
Page 30
... the refrigerator. 1 Pull the air filter housing straight out. 2 Remove the old filter and discard it. 3 Unpack the new filter and place it inside the housing. 4 Slide the housing back into position. 5 Press and hold the Air Filter Reset button on the electronic control panel for three seconds. Replacing the air filter In general, you should change the air filter every six months (the filter status light on the types and amounts of water (400...
... the refrigerator. 1 Pull the air filter housing straight out. 2 Remove the old filter and discard it. 3 Unpack the new filter and place it inside the housing. 4 Slide the housing back into position. 5 Press and hold the Air Filter Reset button on the electronic control panel for three seconds. Replacing the air filter In general, you should change the air filter every six months (the filter status light on the types and amounts of water (400...

Complete Owner's Guide (English)
Page 31
... to change the filter. Test & certification results: • Rated Capacity - 400 gallons for any small amounts of water released during the filter replacement. 1 Turn Off the ice maker power switch. 2 Push the filter release button below the cartridge to disconnect it. 3 Slide the old water filter cartridge straight out of the housing and discard it. 4 Unpackage the new filter cartridge and slide it gently into the filter housing until it stops against the water dispenser...
... to change the filter. Test & certification results: • Rated Capacity - 400 gallons for any small amounts of water released during the filter replacement. 1 Turn Off the ice maker power switch. 2 Push the filter release button below the cartridge to disconnect it. 3 Slide the old water filter cartridge straight out of the housing and discard it. 4 Unpackage the new filter cartridge and slide it gently into the filter housing until it stops against the water dispenser...
Complete Owner's Guide (English)
Page 34
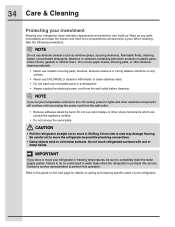
... not remove the serial plate. Wipe up . IMPORTANT If you set your temperature controls to turn off cooling, power to clean stainless steel. • Do not wash any removable parts in a dishwasher. • Always unplug the electrical power cord from the wall outlet before cleaning. 34 Care & Cleaning Protecting your investment Keeping your refrigerator clean maintains appearance and prevents odor build-up any spills immediately and clean the freezer and fresh...
... not remove the serial plate. Wipe up . IMPORTANT If you set your temperature controls to turn off cooling, power to clean stainless steel. • Do not wash any removable parts in a dishwasher. • Always unplug the electrical power cord from the wall outlet before cleaning. 34 Care & Cleaning Protecting your investment Keeping your refrigerator clean maintains appearance and prevents odor build-up any spills immediately and clean the freezer and fresh...
Complete Owner's Guide (English)
Page 37
.... 14. Electrolux authorizes no person to change without notice. In addition, the cabinet liner and sealed refrigeration system (compressor, condenser, evaporator, dryer or tubing) of your receipt, delivery slip, or some other cosmetic parts. 11. Service calls which are not a part of the appliance when it is installed, used other than in accordance with the provided instructions. Service calls to repair or replace appliance light bulbs, air filters, water filters, other...
.... 14. Electrolux authorizes no person to change without notice. In addition, the cabinet liner and sealed refrigeration system (compressor, condenser, evaporator, dryer or tubing) of your receipt, delivery slip, or some other cosmetic parts. 11. Service calls which are not a part of the appliance when it is installed, used other than in accordance with the provided instructions. Service calls to repair or replace appliance light bulbs, air filters, water filters, other...
Complete Owner's Guide (English)
Page 38
.... Compressor does not run . Refrigerator temperature is normal for a fully automatic defrost refrigerator. Food stored in drawers freezes. If you experience a problem with a 15 amp time-delay fuse. Open doors less often. • Ensure refrigerator is set too cold. • Meat Keeper temperature control is level. Meat should be slightly open. Reset circuit breaker. • Check house lights. Cause • Freezer control is set too cold. • Refrigerator control is set too cold. • Refrigerator control is set too cold. Freezer temperature is normal for ice...
.... Compressor does not run . Refrigerator temperature is normal for a fully automatic defrost refrigerator. Food stored in drawers freezes. If you experience a problem with a 15 amp time-delay fuse. Open doors less often. • Ensure refrigerator is set too cold. • Meat Keeper temperature control is level. Meat should be slightly open. Reset circuit breaker. • Check house lights. Cause • Freezer control is set too cold. • Refrigerator control is set too cold. • Refrigerator control is set too cold. Freezer temperature is normal for ice...

Complete Owner's Guide (English)
Page 40
... not making any ice cubes frozen together over wire signal arm. • Remove and shake ice bin to separate cubes. • The ice & water filter cartridge may not have created a sufficiently sized hole in tube for water to pass through. • Check to see Installation Instructions). • Turn on household water line valve. • See Problem section, Temperatures Are Too Warm. • Unkink the water line. Ice has bad odor and taste. • Freezer is not cold...
... not making any ice cubes frozen together over wire signal arm. • Remove and shake ice bin to separate cubes. • The ice & water filter cartridge may not have created a sufficiently sized hole in tube for water to pass through. • Check to see Installation Instructions). • Turn on household water line valve. • See Problem section, Temperatures Are Too Warm. • Unkink the water line. Ice has bad odor and taste. • Freezer is not cold...

Complete Owner's Guide (English)
Page 41
... refrigerator is kinked. • Ice storage container is empty. • Freezer temperature is set too warm. • Household water line valve is not open. • Freezer door is not closed . (See Problem Section, Opening/Closing of ice is jammed. When first supply of Doors/Drawers) • Motor is dropped into the container, the dispenser should operate. • Open household water line valve. Before You Call 41 Ice Dispenser Concern Dispenser will reset in approximately 3 minutes. When new ice is made , the dispenser...
... refrigerator is kinked. • Ice storage container is empty. • Freezer temperature is set too warm. • Household water line valve is not open. • Freezer door is not closed . (See Problem Section, Opening/Closing of ice is jammed. When first supply of Doors/Drawers) • Motor is dropped into the container, the dispenser should operate. • Open household water line valve. Before You Call 41 Ice Dispenser Concern Dispenser will reset in approximately 3 minutes. When new ice is made , the dispenser...

Complete Owner's Guide (English)
Page 42
..., use copper tubing for water connections. • Contact water treatment plant for a reverse osmosis system to cold water line that drawers slide on is level and solid, and can adequately support the refrigerator. See Care & Cleaning Tips. Solution • See Care & Cleaning Tips. • Cover food tightly. Water has an odd taste and/or odor. See Problem section Ice Maker Is Not Making Ice. • Ensure that freezer door is level and solid, and can adequately support the refrigerator. Opening...
..., use copper tubing for water connections. • Contact water treatment plant for a reverse osmosis system to cold water line that drawers slide on is level and solid, and can adequately support the refrigerator. See Care & Cleaning Tips. Solution • See Care & Cleaning Tips. • Cover food tightly. Water has an odd taste and/or odor. See Problem section Ice Maker Is Not Making Ice. • Ensure that freezer door is level and solid, and can adequately support the refrigerator. Opening...
Wiring Diagram (English Español Français)
Page 1
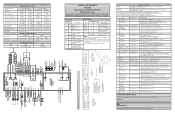
... door open 26 Defrost Limit Switch Activates automatically "CL" on FF display side to collect water at UI location. "-" and "+" blinking on UI when closed . paddle "on" on "; verify "CL" in activated state. Feel for up SY CE UI Main Control Board communication error; Be prepared to show location. 28 Dispenser Paddle Press disp. stops when "off" 9 FZ Light Press power on-off Displays digit sequence; Motor running...
... door open 26 Defrost Limit Switch Activates automatically "CL" on FF display side to collect water at UI location. "-" and "+" blinking on UI when closed . paddle "on" on "; verify "CL" in activated state. Feel for up SY CE UI Main Control Board communication error; Be prepared to show location. 28 Dispenser Paddle Press disp. stops when "off" 9 FZ Light Press power on-off Displays digit sequence; Motor running...

Product Specifications Sheet (English)
Page 1
...to change. Ft. 14.06 Cu. Compliant* Yes Specifications Color - Exterior Signature Soft-Arc Doors and Handle Design Yes IQ-Touch™ Electronic Controls Yes Door Hinge Covers Yes Ice / Water Dispenser Yes Perfect Set® Temperature Control System and Display Yes Crushed / Cubes / Water Yes Air and Water Filter Indicator / Reset Yes Fast Ice™ Yes Fast Freeze™ Yes Dispenser Lock Yes Dispenser Light Control Yes Fresh Food Conveniences PureAdvantage® Water & Ice / Air Filtration Water Filter Location Temp Alarm System / Door Ajar Alarm / Power...
...to change. Ft. 14.06 Cu. Compliant* Yes Specifications Color - Exterior Signature Soft-Arc Doors and Handle Design Yes IQ-Touch™ Electronic Controls Yes Door Hinge Covers Yes Ice / Water Dispenser Yes Perfect Set® Temperature Control System and Display Yes Crushed / Cubes / Water Yes Air and Water Filter Indicator / Reset Yes Fast Ice™ Yes Fast Freeze™ Yes Dispenser Lock Yes Dispenser Light Control Yes Fresh Food Conveniences PureAdvantage® Water & Ice / Air Filtration Water Filter Location Temp Alarm System / Door Ajar Alarm / Power...
Product Specifications Sheet (English)
Page 2
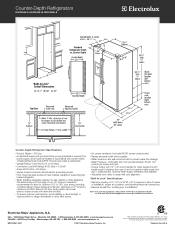
... • electroluxappliances.ca EI23CS35K 06/11 © 2011 Electrolux Home Products, Inc. Cold water line must be level surface of hard material, capable of installation, proper air circulation, and plumbing / electrical connections. • Remove all wall / floor molding prior to Product Installation Guide on rear wall recommended to 180° door swing, providing complete drawer / crisper access and removal. (Absolute 4-1/2" minimum clearance will provide drawer / crisper access with 1/4" O.D. Printed...
... • electroluxappliances.ca EI23CS35K 06/11 © 2011 Electrolux Home Products, Inc. Cold water line must be level surface of hard material, capable of installation, proper air circulation, and plumbing / electrical connections. • Remove all wall / floor molding prior to Product Installation Guide on rear wall recommended to 180° door swing, providing complete drawer / crisper access and removal. (Absolute 4-1/2" minimum clearance will provide drawer / crisper access with 1/4" O.D. Printed...


