Complete Owner's Guide (English)
Page 2
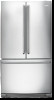
...; House power turned on all connections Ice maker is part of our commitment to customer satisfaction and product quality throughout the service life of contents Finding Information 2 Safety 3 Feature Overview 5 Installation 6 Removing the Doors 10 Purchase date Installing Door Handles 12 Connecting the Water Supply 13 Electrolux model number Controls 14 Automatic Ice Maker 16 Electrolux serial number NOTE Registering your product with filter housing (select models) Final Checks Shipping material removed Fresh food and freezer temperatures set and...
...; House power turned on all connections Ice maker is part of our commitment to customer satisfaction and product quality throughout the service life of contents Finding Information 2 Safety 3 Feature Overview 5 Installation 6 Removing the Doors 10 Purchase date Installing Door Handles 12 Connecting the Water Supply 13 Electrolux model number Controls 14 Automatic Ice Maker 16 Electrolux serial number NOTE Registering your product with filter housing (select models) Final Checks Shipping material removed Fresh food and freezer temperatures set and...
Complete Owner's Guide (English)
Page 3
... is used to alert you to potential personal injury hazards. IMPORTANT Indicates installation, operation, or maintenance information which , if not avoided, will result in the presence of your old refrigerator/ freezer: • Remove the doors. • Leave the shelves and baskets in place so children may become airtight chambers and can also damage finishes if they come in this manual...
... is used to alert you to potential personal injury hazards. IMPORTANT Indicates installation, operation, or maintenance information which , if not avoided, will result in the presence of your old refrigerator/ freezer: • Remove the doors. • Leave the shelves and baskets in place so children may become airtight chambers and can also damage finishes if they come in this manual...
Complete Owner's Guide (English)
Page 5
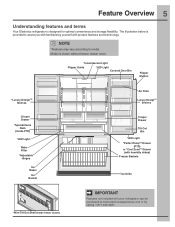
... 5 Understanding features and terms Your Electrolux refrigerator is provided to model. Model is shown without freezer drawer cover. *Incandescent Light Flipper Guide *LED Light Covered Door Bin Flipper Mullion *Luxury-DesignTM Shelves Crisper Drawer *Special Items Rack (inside PTD) *LED Light Water Filter *Adjustable Hinges Ice Maker Ice Bucket *Wire Tilt-Out Shelf (inside freezer drawer) Air Filter *Luxury-DesignTM Shelves Crisper Drawer Tilt-Out Bin *LED Light *Perfect TempTM Drawer (PTD) or *Cool ZoneTM Drawer (with humidity slides) Freezer Baskets Toe Grille IMPORTANT Features...
... 5 Understanding features and terms Your Electrolux refrigerator is provided to model. Model is shown without freezer drawer cover. *Incandescent Light Flipper Guide *LED Light Covered Door Bin Flipper Mullion *Luxury-DesignTM Shelves Crisper Drawer *Special Items Rack (inside PTD) *LED Light Water Filter *Adjustable Hinges Ice Maker Ice Bucket *Wire Tilt-Out Shelf (inside freezer drawer) Air Filter *Luxury-DesignTM Shelves Crisper Drawer Tilt-Out Bin *LED Light *Perfect TempTM Drawer (PTD) or *Cool ZoneTM Drawer (with humidity slides) Freezer Baskets Toe Grille IMPORTANT Features...
Complete Owner's Guide (English)
Page 6
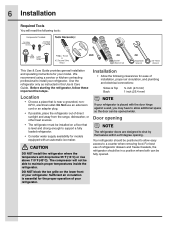
... kitchen contracting professional to install your refrigerator is level and strong enough to support a fully loaded refrigerator. • Consider water supply availability for models equipped with the door hinge against a wall, you may have to allow easy access to allow additional space so the door can be opened . Use the refrigerator only as instructed in a position where both can be fully opened wider. Do Not use of refrigerator drawers and freezer...
... kitchen contracting professional to install your refrigerator is level and strong enough to support a fully loaded refrigerator. • Consider water supply availability for models equipped with the door hinge against a wall, you may have to allow easy access to allow additional space so the door can be opened . Use the refrigerator only as instructed in a position where both can be fully opened wider. Do Not use of refrigerator drawers and freezer...
Complete Owner's Guide (English)
Page 10
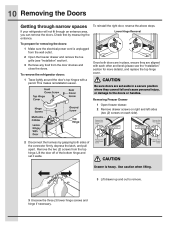
... outlet. 2 Open the freezer drawer and remove the toe grille (see the "Installation" section for removing the doors: 1 Make sure the electrical power cord is heavy. CAUTION Be sure doors are set it aside. Removing Freezer Drawer 1 Open freezer drawer. 2 Remove drawer screws on right and left sides (two (2) screws on each other and level (please see "Installation" section). 3 Remove any food from the top hinge. This makes reinstallation easier. To reinstall the right door, reverse the above...
... outlet. 2 Open the freezer drawer and remove the toe grille (see the "Installation" section for removing the doors: 1 Make sure the electrical power cord is heavy. CAUTION Be sure doors are set it aside. Removing Freezer Drawer 1 Open freezer drawer. 2 Remove drawer screws on right and left sides (two (2) screws on each other and level (please see "Installation" section). 3 Remove any food from the top hinge. This makes reinstallation easier. To reinstall the right door, reverse the above...
Complete Owner's Guide (English)
Page 13
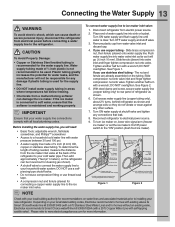
... moving refrigerator out for cleaning.) Figure 1 Figure 2 NOTE Check with your local building authority for homes with existing valves its Smart Choice water® line kit 5305510264 (with a 20 ft. To connect water supply line to your local/state building codes, Electrolux recommends for recommendations on , lower wire signal arm (freezer ice maker) or set the ice maker's On/Off power switch to the refrigerator. Depending on the tubing. If you use stainless steel tubing - Turn ON water supply...
... moving refrigerator out for cleaning.) Figure 1 Figure 2 NOTE Check with your local building authority for homes with existing valves its Smart Choice water® line kit 5305510264 (with a 20 ft. To connect water supply line to your local/state building codes, Electrolux recommends for recommendations on , lower wire signal arm (freezer ice maker) or set the ice maker's On/Off power switch to the refrigerator. Depending on the tubing. If you use stainless steel tubing - Turn ON water supply...
Complete Owner's Guide (English)
Page 14
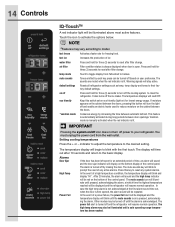
... high temp alarm is open for an extended period of ice water filter Press and hold for three (3) seconds to model. Press and hold for freezing food. The sounds are muted when the red indicator is turned off by increasing the time between door openings. Setting cooling temperatures Press the + or - NOTE *Features may be illuminated above most active features. air filter Filter condition status is always displayed when door...
... high temp alarm is open for an extended period of ice water filter Press and hold for three (3) seconds to model. Press and hold for freezing food. The sounds are muted when the red indicator is turned off by increasing the time between door openings. Setting cooling temperatures Press the + or - NOTE *Features may be illuminated above most active features. air filter Filter condition status is always displayed when door...
Complete Owner's Guide (English)
Page 15
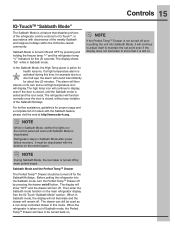
... main control board. Then enter the Sabbath mode function on its controls for IQ-TouchTM, in Sabbath Mode, neither the lights nor the control panel will display. Sabbath Mode is activated during this mode. Sabbath Mode and the Perfect TempTM Drawer The Perfect TempTM Drawer should be turned back on. If a high temperature alarm is turned ON and OFF by pressing and holding the freezer temp "-" and the refrigerator temp "+" indicators for...
... main control board. Then enter the Sabbath mode function on its controls for IQ-TouchTM, in Sabbath Mode, neither the lights nor the control panel will display. Sabbath Mode is activated during this mode. Sabbath Mode and the Perfect TempTM Drawer The Perfect TempTM Drawer should be turned back on. If a high temperature alarm is turned ON and OFF by pressing and holding the freezer temp "-" and the refrigerator temp "+" indicators for...
Complete Owner's Guide (English)
Page 16
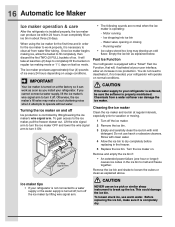
... work as soon as explained below. Water valve opening or closing - Empty the ice bin as you cannot connect a water supply, lift the ice maker's wire signal arm to completely fill the bucket on usage conditions. CAUTION If the water supply to loosen the cubes or clean as explained above. To loosen stuck ice, use harsh or abrasive cleaners. Before replacing the ice bin, make a loud chattering noise when it off the ice maker. 2 Remove...
... work as soon as explained below. Water valve opening or closing - Empty the ice bin as you cannot connect a water supply, lift the ice maker's wire signal arm to completely fill the bucket on usage conditions. CAUTION If the water supply to loosen the cubes or clean as explained above. To loosen stuck ice, use harsh or abrasive cleaners. Before replacing the ice bin, make a loud chattering noise when it off the ice maker. 2 Remove...

Complete Owner's Guide (English)
Page 18
.... 4 Once an option is changed. 7 The control buttons can be frozen. Deactivate by pressing the + or - Cool ZoneTM Drawer (select models) Some models are best kept in this drawer, set and store personal temperature selections. Leafy vegetables and unpackaged fruits are equipped with a meat keeper drawer for short-term storage of the refrigerator. Removing Crisper Drawer Special items rack (select models) The innovative design of the...
.... 4 Once an option is changed. 7 The control buttons can be frozen. Deactivate by pressing the + or - Cool ZoneTM Drawer (select models) Some models are best kept in this drawer, set and store personal temperature selections. Leafy vegetables and unpackaged fruits are equipped with a meat keeper drawer for short-term storage of the refrigerator. Removing Crisper Drawer Special items rack (select models) The innovative design of the...
Complete Owner's Guide (English)
Page 19
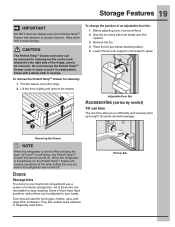
... to your needs. Do not immerse the Perfect TempTM Drawer cover in place. Removing the Drawer NOTE When the refrigerator is turned back on /off button, the Perfect TempTM Drawer will resume operations at the temp setting that was set before the refrigerator was turned off . Storage Features 19 IMPORTANT DO NOT clean the display area of the Perfect TempTM Drawer with a damp cloth or sponge. Adjustable Door Bin Accessories (varies...
... to your needs. Do not immerse the Perfect TempTM Drawer cover in place. Removing the Drawer NOTE When the refrigerator is turned back on /off button, the Perfect TempTM Drawer will resume operations at the temp setting that was set before the refrigerator was turned off . Storage Features 19 IMPORTANT DO NOT clean the display area of the Perfect TempTM Drawer with a damp cloth or sponge. Adjustable Door Bin Accessories (varies...

Complete Owner's Guide (English)
Page 22
... procedures on moisture build-up inside the unit. • Organize the refrigerator to prevent leaks and contamination of 37° F. • Avoid overcrowding the refrigerator shelves, which reduces air circulation and causes uneven cooling. 22 Storing Food and Saving Energy Ideas for short-term storage. This overloads the freezer, slows the rate of freezing, and can raise the temperature of frozen foods. •...
... procedures on moisture build-up inside the unit. • Organize the refrigerator to prevent leaks and contamination of 37° F. • Avoid overcrowding the refrigerator shelves, which reduces air circulation and causes uneven cooling. 22 Storing Food and Saving Energy Ideas for short-term storage. This overloads the freezer, slows the rate of freezing, and can raise the temperature of frozen foods. •...
Complete Owner's Guide (English)
Page 24
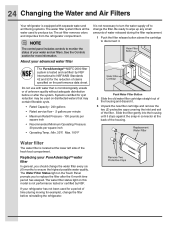
.... 3 Unpack the new filter cartridge and remove the two (2) protective caps covering the inlet and exit of the filter. The Water Filter Status light on this model is not performance tested or certified by NSF International to disconnect it stops against the snap-in connector at the lower left side of water released during moving for more information. 24 Changing the Water and Air Filters Your refrigerator is equipped...
.... 3 Unpack the new filter cartridge and remove the two (2) protective caps covering the inlet and exit of the filter. The Water Filter Status light on this model is not performance tested or certified by NSF International to disconnect it stops against the snap-in connector at the lower left side of water released during moving for more information. 24 Changing the Water and Air Filters Your refrigerator is equipped...

Complete Owner's Guide (English)
Page 25
... located under the utility bin. Replacing your PureAdvantageTM air filter To ensure optimal filtering of ice. Once ice maker begins making mode or 1 1/2 days on the control panel for three (3) seconds. Ordering replacement filters Order new filters by calling 877-808-4195, online at least two (2) days to completely fill the bucket on the control panel for three (3)seconds. Reinstall Water Filter 5 Press and hold the Air Filter Reset button on fast ice mode. When the display changes from "Replace...
... located under the utility bin. Replacing your PureAdvantageTM air filter To ensure optimal filtering of ice. Once ice maker begins making mode or 1 1/2 days on the control panel for three (3) seconds. Ordering replacement filters Order new filters by calling 877-808-4195, online at least two (2) days to completely fill the bucket on the control panel for three (3)seconds. Reinstall Water Filter 5 Press and hold the Air Filter Reset button on fast ice mode. When the display changes from "Replace...
Complete Owner's Guide (English)
Page 26
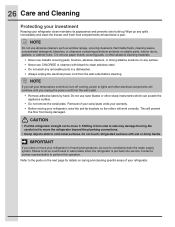
... guide on the next page for details on caring and cleaning specific areas of your serial plate voids your warranty. • Before moving your refrigerator clean maintains its appearance and prevents odor build-up any removable parts in water leaks when the refrigerator is put back into service. This will prevent the floor from the wall outlet before cleaning. Refer to perform this operation. 26 Care and Cleaning...
... guide on the next page for details on caring and cleaning specific areas of your serial plate voids your warranty. • Before moving your refrigerator clean maintains its appearance and prevents odor build-up any removable parts in water leaks when the refrigerator is put back into service. This will prevent the floor from the wall outlet before cleaning. Refer to perform this operation. 26 Care and Cleaning...
Complete Owner's Guide (English)
Page 27
... any electrical part. • Wipe gaskets with a clean soft cloth. • Use a soft cloth to clean drawer runners and tracks. • Do not wash any removable items (bins, drawers, etc.) in dishwasher. • Allow glass to warm to room temperature before immersing in warm water. • Remove toe grille (see "Controls" section for location of On/Off button) and disconnect power cord. • Turn water supply valve to closed position. • Clean interior thoroughly. • Leave doors open...
... any electrical part. • Wipe gaskets with a clean soft cloth. • Use a soft cloth to clean drawer runners and tracks. • Do not wash any removable items (bins, drawers, etc.) in dishwasher. • Allow glass to warm to room temperature before immersing in warm water. • Remove toe grille (see "Controls" section for location of On/Off button) and disconnect power cord. • Turn water supply valve to closed position. • Clean interior thoroughly. • Leave doors open...
Complete Owner's Guide (English)
Page 29
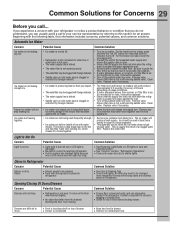
... water inside). Replace valve if necessary. • Ice maker wire signal arm is being held down by referring to this information includes concerns, potential causes, and common solutions. The ice maker will not stop making ice. Potential Cause • Light bulb is burned out or LED light is damaged. • No electric current is reaching refrigerator. • Control system has disabled lights because one or both doors were left open in the freezer...
... water inside). Replace valve if necessary. • Ice maker wire signal arm is being held down by referring to this information includes concerns, potential causes, and common solutions. The ice maker will not stop making ice. Potential Cause • Light bulb is burned out or LED light is damaged. • No electric current is reaching refrigerator. • Control system has disabled lights because one or both doors were left open in the freezer...
Complete Owner's Guide (English)
Page 30
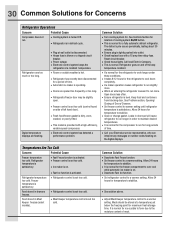
... Doors/ Drawers. • Set freezer control to a warmer setting. Allow 24 hours for temperature to maintain desired temperatures. • It is on the digital displays. Common Solution • Turn cooling system On. The defrost cycle occurs periodically, lasting about 30 minutes. • Ensure plug is satisfactory. Leaks in door seal will cause refrigerator to run longer in order to stabilize. • Clean or change gasket. Refrigerator goes on . Refrigerator temperature too cold. Digital temperature displays are opened...
... Doors/ Drawers. • Set freezer control to a warmer setting. Allow 24 hours for temperature to maintain desired temperatures. • It is on the digital displays. Common Solution • Turn cooling system On. The defrost cycle occurs periodically, lasting about 30 minutes. • Ensure plug is satisfactory. Leaks in door seal will cause refrigerator to run longer in order to stabilize. • Clean or change gasket. Refrigerator goes on . Refrigerator temperature too cold. Digital temperature displays are opened...
Complete Owner's Guide (English)
Page 32
.... 2. Service calls to repair or replace appliance light bulbs, air filters, water filters, other consumables, or knobs, handles, or other appropriate payment record to establish the warranty period should service be defective in materials or workmanship when such appliance is installed, used other than in a commercial setting. 7. or external causes such as described or illustrated are subject to change or add to any obligations under this warranty. ELECTROLUX...
.... 2. Service calls to repair or replace appliance light bulbs, air filters, water filters, other consumables, or knobs, handles, or other appropriate payment record to establish the warranty period should service be defective in materials or workmanship when such appliance is installed, used other than in a commercial setting. 7. or external causes such as described or illustrated are subject to change or add to any obligations under this warranty. ELECTROLUX...
Wiring Diagram (English Español Français)
Page 1
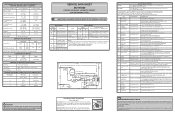
... open ; CONDENSER FAN MOTOR Watts RPM Amps 3.1 (Energy Star, some models) 1100 CW Opposite Shaft 0.03 Running FREEZER ICE MAKER SPECIFICATIONS Electrical 115 vac (127 vac max) Thermostat Opens at 48°F (9°C), Closes at bottom and prying cover from "LO" to Service Manual for pin back-outs, pinched or damaged wires before replacing main control board. • Refer to "HI". 22 Damper Press power on-off FF door must be closed . AUTOMATIC DEFROST...
... open ; CONDENSER FAN MOTOR Watts RPM Amps 3.1 (Energy Star, some models) 1100 CW Opposite Shaft 0.03 Running FREEZER ICE MAKER SPECIFICATIONS Electrical 115 vac (127 vac max) Thermostat Opens at 48°F (9°C), Closes at bottom and prying cover from "LO" to Service Manual for pin back-outs, pinched or damaged wires before replacing main control board. • Refer to "HI". 22 Damper Press power on-off FF door must be closed . AUTOMATIC DEFROST...


