Complete Owner's Guide (English)
Page 2
... occur, refer to record key product information. All ice makers require a connection to improper installation. In the event you require assistance, please contact the dealer where you purchased your unit and on the inside wall of a relationship. Please record the purchase date of your Electrolux unit and your purchase as the beginning of your...
... occur, refer to record key product information. All ice makers require a connection to improper installation. In the event you require assistance, please contact the dealer where you purchased your unit and on the inside wall of a relationship. Please record the purchase date of your Electrolux unit and your purchase as the beginning of your...
Complete Owner's Guide (English)
Page 3
... 3 Safety 4 Important Safety Instructions 4 Safety Precautions 4 Definitions 4 General Precautions 4 Installation 5 Installation Dimensions 5 Installing the Drain 5 Gravity Drain 5 Connecting a Drain Pump 6 Site Preparation 7 Preparing ...Installation / Start-Up 13 Installing a Built-In 13 Initial Start-Up 13 Blackout Mode 13 Normal Operating Sounds 13 Operation 14 Normal Operation 14 Ice Cube Thickness 14 Ice Dispenser Operation and Care 14 Ice Cube Thickness Adjustment 15 Drain Pump 15 Maintenance 16 Special Considerations 16 Maintaining and Cleaning Your Ice Maker...
... 3 Safety 4 Important Safety Instructions 4 Safety Precautions 4 Definitions 4 General Precautions 4 Installation 5 Installation Dimensions 5 Installing the Drain 5 Gravity Drain 5 Connecting a Drain Pump 6 Site Preparation 7 Preparing ...Installation / Start-Up 13 Installing a Built-In 13 Initial Start-Up 13 Blackout Mode 13 Normal Operating Sounds 13 Operation 14 Normal Operation 14 Ice Cube Thickness 14 Ice Dispenser Operation and Care 14 Ice Cube Thickness Adjustment 15 Drain Pump 15 Maintenance 16 Special Considerations 16 Maintaining and Cleaning Your Ice Maker...
Complete Owner's Guide (English)
Page 4
... door handle. Be sure front grille is important but not hazard related. 4 Safety Important Safety Instructions Safety Precautions Do not attempt to install or operate your unit until the electricity has been disconnected. • Altering, cutting of power cord, removal of power cord, removal ... unit to your ice maker, unplug the power cord from ice maker mold, damage the unit, and may void the warranty. • Allow unit temperature to stabilize for 24 hours before use. • Never use any type of heater to defrost. • Use only genuine Electrolux replacement parts.
... door handle. Be sure front grille is important but not hazard related. 4 Safety Important Safety Instructions Safety Precautions Do not attempt to install or operate your unit until the electricity has been disconnected. • Altering, cutting of power cord, removal of power cord, removal ... unit to your ice maker, unplug the power cord from ice maker mold, damage the unit, and may void the warranty. • Allow unit temperature to stabilize for 24 hours before use. • Never use any type of heater to defrost. • Use only genuine Electrolux replacement parts.
Complete Owner's Guide (English)
Page 5
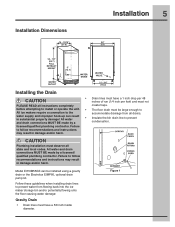
.... • Drain lines must have a 5/8 inch inside diameter. Installation 5 Installation Dimensions 14 - 15/16" 24" (37.9) (61) 34 - 1/8" (86.7) FULL RETRACT HEIGHT 5" (12.7) WATER OUTLET WATER DRAIN WATER VALVE 21 - 3/4" (55.2) Installing the Drain CAUTION PLEASE READ all instructions completely before attempting to accommodate drainage from flowing back into the ice maker storage bin and/or potentially...
.... • Drain lines must have a 5/8 inch inside diameter. Installation 5 Installation Dimensions 14 - 15/16" 24" (37.9) (61) 34 - 1/8" (86.7) FULL RETRACT HEIGHT 5" (12.7) WATER OUTLET WATER DRAIN WATER VALVE 21 - 3/4" (55.2) Installing the Drain CAUTION PLEASE READ all instructions completely before attempting to accommodate drainage from flowing back into the ice maker storage bin and/or potentially...

Complete Owner's Guide (English)
Page 6
...the above listed specifications, could result in substantial water leakage and pooling with complete installation instructions. If a pump other than the Electrolux EIMP60 drain pump is available through your Dealer, or direct from Electrolux with severe and costly water damage and related consequential damages and harm. CAUTION ...to 110°F (10°C to the ice maker in the discharge line to prevent waste water return to the pump. • It must have an overflow protection control which will shut off power to 43°C). The Electrolux EIMP60 drain pump is to be used, it ...
...the above listed specifications, could result in substantial water leakage and pooling with complete installation instructions. If a pump other than the Electrolux EIMP60 drain pump is available through your Dealer, or direct from Electrolux with severe and costly water damage and related consequential damages and harm. CAUTION ...to 110°F (10°C to the ice maker in the discharge line to prevent waste water return to the pump. • It must have an overflow protection control which will shut off power to 43°C). The Electrolux EIMP60 drain pump is to be used, it ...
Complete Owner's Guide (English)
Page 7
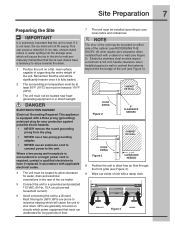
... have a tendency to shut down. If it is not level, the ice mold will cause the ice in the rear of the ice maker. 5 Connect the unit to a grounded and polarized 115 VAC, 60 Hz, 15 A circuit (normal household current). 6 Avoid connecting the unit to your ...the Site IMPORTANT It is extremely important that extends beyond the front edge of the unit (see Figure 3). Electrolux stainless steel models require a minimum 2-3/4 inch handle clearance when installed against possible shock hazards. • NEVER remove the round grounding prong from the plug. • NEVER use...
... have a tendency to shut down. If it is not level, the ice mold will cause the ice in the rear of the ice maker. 5 Connect the unit to a grounded and polarized 115 VAC, 60 Hz, 15 A circuit (normal household current). 6 Avoid connecting the unit to your ...the Site IMPORTANT It is extremely important that extends beyond the front edge of the unit (see Figure 3). Electrolux stainless steel models require a minimum 2-3/4 inch handle clearance when installed against possible shock hazards. • NEVER remove the round grounding prong from the plug. • NEVER use...
Complete Owner's Guide (English)
Page 8
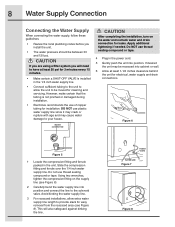
...the water and recheck water and drain connection for electrical, water supply and drain connections. This will need to have at least 1-1/2 inches clearance behind the unit for leaks. Do not use plastic water supply line since it may crack or rupture with age and may be... pressure should be recessed into cabinet or wall. 6 Allow at least 20 psi for 3 minutes every 15 minutes. • Make certain a SHUT-OFF VALVE is not pinched or damaged during installation. • Electrolux recommends the use thread sealing compound or tape. 4 Plug in the power cord. 5 Gently push the...
...the water and recheck water and drain connection for electrical, water supply and drain connections. This will need to have at least 1-1/2 inches clearance behind the unit for leaks. Do not use plastic water supply line since it may crack or rupture with age and may be... pressure should be recessed into cabinet or wall. 6 Allow at least 20 psi for 3 minutes every 15 minutes. • Make certain a SHUT-OFF VALVE is not pinched or damaged during installation. • Electrolux recommends the use thread sealing compound or tape. 4 Plug in the power cord. 5 Gently push the...

Complete Owner's Guide (English)
Page 11
...UL319 Door Reversal 11 4 Remove the two door closer inserts from the 7 Holding door upright with top of door tilted existing bottom hinge and install as shown on forward, place hole of door pivot plate on the closers align with holes in step 2. Figure 17 Figure 19 DOOR CLOSER ...opposite side of door (see Figure 19). Remove hinge screw pin. 6 With bottom of door into position in top hinge and install top hinge screw pin. 9 In empty hinge holes, install plastic screw plugs (3 top and 3 bottom) and door hole plug (1,door top) removed in hinge and hinge plate. BOSS CLRCO008...
...UL319 Door Reversal 11 4 Remove the two door closer inserts from the 7 Holding door upright with top of door tilted existing bottom hinge and install as shown on forward, place hole of door pivot plate on the closers align with holes in step 2. Figure 17 Figure 19 DOOR CLOSER ...opposite side of door (see Figure 19). Remove hinge screw pin. 6 With bottom of door into position in top hinge and install top hinge screw pin. 9 In empty hinge holes, install plastic screw plugs (3 top and 3 bottom) and door hole plug (1,door top) removed in hinge and hinge plate. BOSS CLRCO008...

Complete Owner's Guide (English)
Page 12
12 Door Adjustment Adjusting the Door Your door is installed. Even when level, the top edge of the door will correct for up to move up or down) needed. 2 Remove the top hinge pivot pin ... to move down , loosen but do not remove the two hinge plate screws. 1/8" 4 If door edge opposite the hinges needs to 1/4" alignment. Mount door and install top hinge pivot pin. The following procedure will be 1/8" below the top of adjustment (up , move plate toward outside of the cabinet.
12 Door Adjustment Adjusting the Door Your door is installed. Even when level, the top edge of the door will correct for up to move up or down) needed. 2 Remove the top hinge pivot pin ... to move down , loosen but do not remove the two hinge plate screws. 1/8" 4 If door edge opposite the hinges needs to 1/4" alignment. Mount door and install top hinge pivot pin. The following procedure will be 1/8" below the top of adjustment (up , move plate toward outside of the cabinet.
Complete Owner's Guide (English)
Page 13
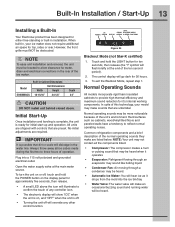
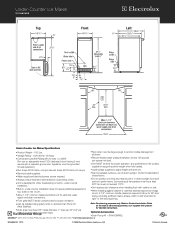
...Model EI15IM55GS Built-In Cabinet Dimensions Unit Dimensions Width Height 14-15/16" 34-1/8" Depth 24" CAUTION DO NOT install unit behind closed doors. IMPORTANT It is possible that may be heard. • Automatic Ice Maker: ...ice maker. To exit the Blackout Mode, repeat step 1. Normal Operating Sounds All models incorporate rigid foam insulated cabinets to provide high thermal efficiency and maximum sound reduction for it drops from the mold into a 115 volt polarized and grounded electrical outlet. Built-In Installation / Start-Up 13 Installing a Built-In Your Electrolux...
...Model EI15IM55GS Built-In Cabinet Dimensions Unit Dimensions Width Height 14-15/16" 34-1/8" Depth 24" CAUTION DO NOT install unit behind closed doors. IMPORTANT It is possible that may be heard. • Automatic Ice Maker: ...ice maker. To exit the Blackout Mode, repeat step 1. Normal Operating Sounds All models incorporate rigid foam insulated cabinets to provide high thermal efficiency and maximum sound reduction for it drops from the mold into a 115 volt polarized and grounded electrical outlet. Built-In Installation / Start-Up 13 Installing a Built-In Your Electrolux...
Complete Owner's Guide (English)
Page 16
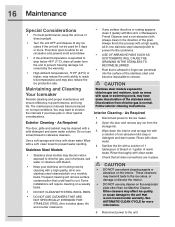
...may reduce the unit's ability to the ice maker. 2 Open the door and remove any ice from chlorine gas is expected to linger can penetrate into the surface of any ice cubes if the unit will remove surface...tablespoon of bleach in place. Stainless Steel Models • Stainless steel models may have pets or other than Ice Machine Cleaner. Always clean in -one stainless steel cleaner/polish on a monthly basis. Rinse thoroughly with spas ... on the evaporator plate other special considerations. Some installations will ensure efficiency, top performance, and long life.
...may reduce the unit's ability to the ice maker. 2 Open the door and remove any ice from chlorine gas is expected to linger can penetrate into the surface of any ice cubes if the unit will remove surface...tablespoon of bleach in place. Stainless Steel Models • Stainless steel models may have pets or other than Ice Machine Cleaner. Always clean in -one stainless steel cleaner/polish on a monthly basis. Rinse thoroughly with spas ... on the evaporator plate other special considerations. Some installations will ensure efficiency, top performance, and long life.

Complete Owner's Guide (English)
Page 21
.... Unit produces shallow or incomplete cubes, or the ice fill pattern on the evaporator is blank with door x A display function has changed. x Hot incoming water. Remedy x Consult a qualified plumber to inlet valve properly. See Installation. Water leaking from whom the unit was purchased. ...x Supply line leaking. x Bin drain leaking. See Connecting the Water Supply. x Check connection at www. Ice storage bin full of bin drain hose and clamp. ...
.... Unit produces shallow or incomplete cubes, or the ice fill pattern on the evaporator is blank with door x A display function has changed. x Hot incoming water. Remedy x Consult a qualified plumber to inlet valve properly. See Installation. Water leaking from whom the unit was purchased. ...x Supply line leaking. x Bin drain leaking. See Connecting the Water Supply. x Check connection at www. Ice storage bin full of bin drain hose and clamp. ...
Complete Owner's Guide (English)
Page 22
...YEAR WARRANTY One year from the factory. 5. In Canada, your appliance is warranted by Electrolux Home Products, Inc. 22 Warranty Information ICE MAKER WARRANTY Your ice maker is warranted by Electrolux Canada Corp. Our obligations for pick up and delivery of the appliance required because of light...Some states do not involve malfunction or defects in workmanship or material, or for appliances not in accordance with respect to finish after installation. 6. and Puerto Rico, and Canada. Costs for such service calls. 3. In the U.S.A., your appliance is protected by this ...
...YEAR WARRANTY One year from the factory. 5. In Canada, your appliance is warranted by Electrolux Home Products, Inc. 22 Warranty Information ICE MAKER WARRANTY Your ice maker is warranted by Electrolux Canada Corp. Our obligations for pick up and delivery of the appliance required because of light...Some states do not involve malfunction or defects in workmanship or material, or for appliances not in accordance with respect to finish after installation. 6. and Puerto Rico, and Canada. Costs for such service calls. 3. In the U.S.A., your appliance is protected by this ...
Product Specifications Sheet (English)
Page 1
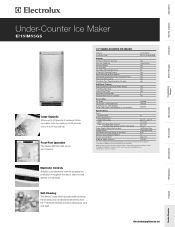
... to. 15" UNDER-COUNTER ICE MAKER Capacity Installation Type Up to change. NOTE: Always consult local and / or national electric codes. Specifications subject to 30 Lbs. Microwaves Vent Hoods Dishwashers Refrigerators Freezers Electronic Controls Simple-to Product Installation Guide for... safe operation. Stainless Steel S Product Dimensions - Wall Ovens Warmer Drawers Cooktops Built-In Ranges Freestanding Ranges Under-Counter Ice Maker EI15IM55GS Large Capacity Stores up to meet specific ice demands. Built In /...
... to. 15" UNDER-COUNTER ICE MAKER Capacity Installation Type Up to change. NOTE: Always consult local and / or national electric codes. Specifications subject to 30 Lbs. Microwaves Vent Hoods Dishwashers Refrigerators Freezers Electronic Controls Simple-to Product Installation Guide for... safe operation. Stainless Steel S Product Dimensions - Wall Ovens Warmer Drawers Cooktops Built-In Ranges Freestanding Ranges Under-Counter Ice Maker EI15IM55GS Large Capacity Stores up to meet specific ice demands. Built In /...
Product Specifications Sheet (English)
Page 2
...Leveling legs supplied to ensure optimum performance. Under-Counter Ice Maker EI15IM55GS Under-Counter Ice Maker Specifications • Product Weight - 100 Lbs. • Voltage Rating - 120V / 60 Hz / 15 Amps • Connected Load (kW Rating) @ ...ON L5V 3E4 • 1-800-265-8352 • electroluxappliances.ca EI15IM55GS 12/10 © 2008 Electrolux Major Appliances, NA Printed in direct sunlight to adjust height and ...large enough to Product Installation Guide on flat surface, capable of run and must have 5/8" inside diameter, 1" drop per 48" (1/4" per square inch (psi). •...
...Leveling legs supplied to ensure optimum performance. Under-Counter Ice Maker EI15IM55GS Under-Counter Ice Maker Specifications • Product Weight - 100 Lbs. • Voltage Rating - 120V / 60 Hz / 15 Amps • Connected Load (kW Rating) @ ...ON L5V 3E4 • 1-800-265-8352 • electroluxappliances.ca EI15IM55GS 12/10 © 2008 Electrolux Major Appliances, NA Printed in direct sunlight to adjust height and ...large enough to Product Installation Guide on flat surface, capable of run and must have 5/8" inside diameter, 1" drop per 48" (1/4" per square inch (psi). •...