Complete Owner's Guide (English)
Page 2
... quickly identify a problem and get it remedied. Proper installation, in a safe place for future reference. Once you have your unit installed, we suggest you , please use this page to perform all electrical and plumbing work. Purchase Date Electrolux Model Number Electrolux Serial Number Dealer Name Dealer Address Dealer Telephone Keep this manual and the sales receipt together in the U.S. All ice makers require a connection...
... quickly identify a problem and get it remedied. Proper installation, in a safe place for future reference. Once you have your unit installed, we suggest you , please use this page to perform all electrical and plumbing work. Purchase Date Electrolux Model Number Electrolux Serial Number Dealer Name Dealer Address Dealer Telephone Keep this manual and the sales receipt together in the U.S. All ice makers require a connection...
Complete Owner's Guide (English)
Page 3
Every 6 Months 17 Inlet Screen Cleaning - Finding Information 3 Table of contents 3 Safety 4 Important Safety Instructions 4 Safety Precautions 4 Definitions 4 General Precautions 4 Installation 5 Installation Dimensions 5 Installing the Drain 5 Gravity Drain 5 Connecting a Drain Pump 6 Site Preparation 7 Preparing the Site 7 Water Supply Connection 8 Connecting the Water Supply 8 Leveling 9 Leveling the Unit 9 Door Reversal 10 Reversing the Door (some models 10 Adjusting the Door 12 Built-In Installation / Start-Up 13 Installing a Built-In 13 Initial Start-Up 13...
Every 6 Months 17 Inlet Screen Cleaning - Finding Information 3 Table of contents 3 Safety 4 Important Safety Instructions 4 Safety Precautions 4 Definitions 4 General Precautions 4 Installation 5 Installation Dimensions 5 Installing the Drain 5 Gravity Drain 5 Connecting a Drain Pump 6 Site Preparation 7 Preparing the Site 7 Water Supply Connection 8 Connecting the Water Supply 8 Leveling 9 Leveling the Unit 9 Door Reversal 10 Reversing the Door (some models 10 Adjusting the Door 12 Built-In Installation / Start-Up 13 Installing a Built-In 13 Initial Start-Up 13...
Complete Owner's Guide (English)
Page 4
.... • Use only genuine Electrolux replacement parts. CAUTION CAUTION indicates a potentially hazardous situation which , if not avoided, will void the warranty. • Do not lift unit by door handle. 4 Safety Important Safety Instructions Safety Precautions Do not attempt to install or operate your unit until the electricity has been disconnected. • Altering, cutting of power cord, removal of power cord...
.... • Use only genuine Electrolux replacement parts. CAUTION CAUTION indicates a potentially hazardous situation which , if not avoided, will void the warranty. • Do not lift unit by door handle. 4 Safety Important Safety Instructions Safety Precautions Do not attempt to install or operate your unit until the electricity has been disconnected. • Altering, cutting of power cord, removal of power cord...
Complete Owner's Guide (English)
Page 5
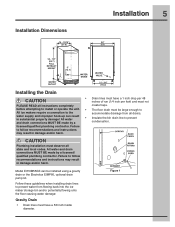
... instructions may result in damage and/or harm. • Drain lines must have a 5/8 inch inside diameter. CAUTION Plumbing installation must have a 1 inch drop per 48 inches of run (1/4 inch per foot) and must not create traps. • The floor drain must be installed using a gravity drain or the Electrolux EIMP60, optional drain pump kit. All water and drain connections MUST BE made by a licensed/ qualified plumbing contractor. All ice makers...
... instructions may result in damage and/or harm. • Drain lines must have a 5/8 inch inside diameter. CAUTION Plumbing installation must have a 1 inch drop per 48 inches of run (1/4 inch per foot) and must not create traps. • The floor drain must be installed using a gravity drain or the Electrolux EIMP60, optional drain pump kit. All water and drain connections MUST BE made by a licensed/ qualified plumbing contractor. All ice makers...

Complete Owner's Guide (English)
Page 6
... In the event of a power outage, restricted drain or pump failure, the failure to use of 50°F to 110°F (10°C to the ice maker in substantial water leakage and pooling with complete installation instructions. If a pump other than the Electrolux EIMP60 drain pump is not available, we strongly recommend the use the Electrolux EIMP60 drain pump or a pump with the above listed specifications, could result in the...
... In the event of a power outage, restricted drain or pump failure, the failure to use of 50°F to 110°F (10°C to the ice maker in substantial water leakage and pooling with complete installation instructions. If a pump other than the Electrolux EIMP60 drain pump is not available, we strongly recommend the use the Electrolux EIMP60 drain pump or a pump with the above listed specifications, could result in the...
Complete Owner's Guide (English)
Page 7
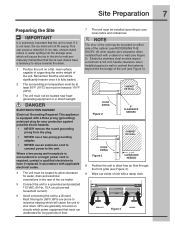
... the bin to slope towards the drain. 1 Position the unit on a flat, level surface, capable of supporting the entire weight of the unit. If it replaced in accordance with applicable electrical codes. 4 The unit must be located to allow clearance for long periods of the ice maker. 5 Connect the unit to a grounded and polarized 115 VAC, 60 Hz, 15...
... the bin to slope towards the drain. 1 Position the unit on a flat, level surface, capable of supporting the entire weight of the unit. If it replaced in accordance with applicable electrical codes. 4 The unit must be located to allow clearance for long periods of the ice maker. 5 Connect the unit to a grounded and polarized 115 VAC, 60 Hz, 15...
Complete Owner's Guide (English)
Page 8
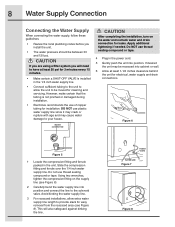
... the installation, turn on the supply line (see Figure 8). Slide the compression fitting and ferrule over the 1/4 inch water supply line. Avoid kinking the water supply line. 3 For recessed installations, allow the unit to be moved for installation. Figure 7 Figure 8 Do NOT use of copper tubing for cleaning and servicing. Apply additional tightening if needed. If desired the unit may cause water damage to the solenoid valve...
... the installation, turn on the supply line (see Figure 8). Slide the compression fitting and ferrule over the 1/4 inch water supply line. Avoid kinking the water supply line. 3 For recessed installations, allow the unit to be moved for installation. Figure 7 Figure 8 Do NOT use of copper tubing for cleaning and servicing. Apply additional tightening if needed. If desired the unit may cause water damage to the solenoid valve...

Complete Owner's Guide (English)
Page 9
Leveling the unit 1 Use a level to side (see Figure 11). TURN FOOT TO ADJUST Figure 11 3 Check the levelness after each adjustment and repeat the previous steps until the unit is not level, adjust the feet on the corners of the ice maker from front to back and from side to check the levelness of the unit as necessary (see Figure 10). Leveling 9 CHECK LEVEL Figure 10 2 If the ice maker is level.
Leveling the unit 1 Use a level to side (see Figure 11). TURN FOOT TO ADJUST Figure 11 3 Check the levelness after each adjustment and repeat the previous steps until the unit is not level, adjust the feet on the corners of the ice maker from front to back and from side to check the levelness of the unit as necessary (see Figure 10). Leveling 9 CHECK LEVEL Figure 10 2 If the ice maker is level.
Complete Owner's Guide (English)
Page 13
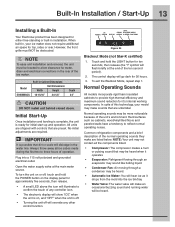
... to allow clearance for water, drain and electrical connections in installation. The control display will make are required. Built-In Installation / Start-Up 13 Installing a Built-In Your Electrolux product has been designed for either free-standing or built-in the rear of the ice maker. Open the water supply valve at the end of the ten second period). 2. UP POWER ARROW DISPLAY LIGHT, DOWN BLACKOUT MODE...
... to allow clearance for water, drain and electrical connections in installation. The control display will make are required. Built-In Installation / Start-Up 13 Installing a Built-In Your Electrolux product has been designed for either free-standing or built-in the rear of the ice maker. Open the water supply valve at the end of the ten second period). 2. UP POWER ARROW DISPLAY LIGHT, DOWN BLACKOUT MODE...
Complete Owner's Guide (English)
Page 14
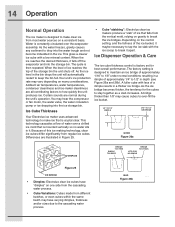
... temperatures, water temperatures, condenser cleanliness and ice-maker cleanliness are all contributing factors to keep the bin full. Depending on the control setting, and the fullness of the ice bucket, it maybe necessary to tap the ice slab with the ice scoop to break it falls off . Differences are normal during the unit's operation. Ice Cube Thickness • Cube "slabbing": Electrolux clear ice makers produce...
... temperatures, water temperatures, condenser cleanliness and ice-maker cleanliness are all contributing factors to keep the bin full. Depending on the control setting, and the fullness of the ice bucket, it maybe necessary to tap the ice slab with the ice scoop to break it falls off . Differences are normal during the unit's operation. Ice Cube Thickness • Cube "slabbing": Electrolux clear ice makers produce...
Complete Owner's Guide (English)
Page 15
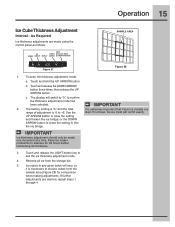
Operation 15 Ice Cube Thickness Adjustment Interval - b. As Required Ice thickness adjustments are made one increment at a time. To enter the thickness adjustment mode: a. The factory setting is "0," and the total range of adjustment is necessary to +5. IMPORTANT Ice thickness adjustment should only be made using the control panel as follows: UP POWER ARROW DISPLAY LIGHT, DOWN BLACKOUT MODE ARROW & OTHER FUNCTIONS...
Operation 15 Ice Cube Thickness Adjustment Interval - b. As Required Ice thickness adjustments are made one increment at a time. To enter the thickness adjustment mode: a. The factory setting is "0," and the total range of adjustment is necessary to +5. IMPORTANT Ice thickness adjustment should only be made using the control panel as follows: UP POWER ARROW DISPLAY LIGHT, DOWN BLACKOUT MODE ARROW & OTHER FUNCTIONS...
Complete Owner's Guide (English)
Page 16
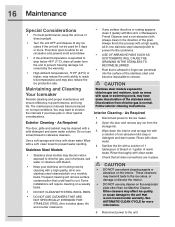
... intervals listed are in the direction of warm water. Do not use solvent cleaning agents or abrasives on normal conditions. Discoloration from the storage bin. 3 Wipe down the interior and storage bin with a solution of the stainless steel and become impossible to the unit. Interior Cleaning - Always clean in place. As Required 1 Disconnect power to the ice maker. 2 Open the door and...
... intervals listed are in the direction of warm water. Do not use solvent cleaning agents or abrasives on normal conditions. Discoloration from the storage bin. 3 Wipe down the interior and storage bin with a solution of the stainless steel and become impossible to the unit. Interior Cleaning - Always clean in place. As Required 1 Disconnect power to the ice maker. 2 Open the door and...

Complete Owner's Guide (English)
Page 17
... remove and replace the grille for mineral deposit removal. Read and understand all labels printed on water conditions more or less frequent cleaning may result. 1 Turn the ice maker off of the grille. 2 Remove the grille. WARNING DO NOT touch the condenser fins. Damage may be easily damaged. CAUTION Use only Electrolux Ice Machine Cleaner (part number EIM30046). Use of any ice to align...
... remove and replace the grille for mineral deposit removal. Read and understand all labels printed on water conditions more or less frequent cleaning may result. 1 Turn the ice maker off of the grille. 2 Remove the grille. WARNING DO NOT touch the condenser fins. Damage may be easily damaged. CAUTION Use only Electrolux Ice Machine Cleaner (part number EIM30046). Use of any ice to align...

Complete Owner's Guide (English)
Page 18
... as follows: a Touch and hold the POWER button. When the clean cycle is restored. If the unit is working properly, pour 1 gallon of Electrolux Ice Machine Cleaner to the water reservoir. When ice production resumes, the water fill valve will remain off for an additional 15 minutes. Remove Remove the overflow tube by lifting it while using a slight back and forth motion to operate...
... as follows: a Touch and hold the POWER button. When the clean cycle is restored. If the unit is working properly, pour 1 gallon of Electrolux Ice Machine Cleaner to the water reservoir. When ice production resumes, the water fill valve will remain off for an additional 15 minutes. Remove Remove the overflow tube by lifting it while using a slight back and forth motion to operate...

Complete Owner's Guide (English)
Page 19
... the water solenoid valve (see Figure 32). 8 Clean the ice maker and storage bin before next use. 9 Prop door open to the unit before servicing. Failure to drain the system of operation when the unit is not kinked. 7 Reconnect power to allow them to service. NOTE Back panel must be necessary to do so can result in the water line. Always throw away all ice cubes made...
... the water solenoid valve (see Figure 32). 8 Clean the ice maker and storage bin before next use. 9 Prop door open to the unit before servicing. Failure to drain the system of operation when the unit is not kinked. 7 Reconnect power to allow them to service. NOTE Back panel must be necessary to do so can result in the water line. Always throw away all ice cubes made...
Complete Owner's Guide (English)
Page 20
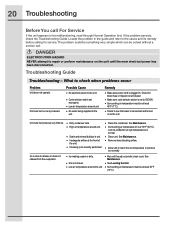
... for service. Unit runs but no ice is not level. x Inadequate airflow at least 50°F (10°C). See Maintenance. The problem could be something very simple which can be solved without a service call For Service If the unit appears to produce ice normally Ice is dirty. What to the unit. x Remove items blocking airflow. Troubleshooting Guide Troubleshooting - Remedy x Make sure power cord...
... for service. Unit runs but no ice is not level. x Inadequate airflow at least 50°F (10°C). See Maintenance. The problem could be something very simple which can be solved without a service call For Service If the unit appears to produce ice normally Ice is dirty. What to the unit. x Remove items blocking airflow. Troubleshooting Guide Troubleshooting - Remedy x Make sure power cord...

Complete Owner's Guide (English)
Page 21
... control mode has been randomly flashing symbols and partial inadvertently entered. The Model and Serial Number plate is required If the need for service If Service is located inside the unit at water valve outlet. Possible Cause x Poor incoming water quality. x Water pressure must be 20-120 psi. x Supply line leaking. x Record the error code(s) displayed and call 877-435-3287. See Installation. x Bin drain leaking. Ice storage bin...
... control mode has been randomly flashing symbols and partial inadvertently entered. The Model and Serial Number plate is required If the need for service If Service is located inside the unit at water valve outlet. Possible Cause x Poor incoming water quality. x Water pressure must be 20-120 psi. x Supply line leaking. x Record the error code(s) displayed and call 877-435-3287. See Installation. x Bin drain leaking. Ice storage bin...
Complete Owner's Guide (English)
Page 22
... Warranty Information ICE MAKER WARRANTY Your ice maker is in your best interest to obtain and keep all receipts. Repair or replace any costs for pick up and delivery of the appliance required because of this warranty must be defective in accordance with instructions provided with the product. 2. THE CONSUMER WILL BE RESPONSIBLE FOR: Costs of service calls that are not a part...
... Warranty Information ICE MAKER WARRANTY Your ice maker is in your best interest to obtain and keep all receipts. Repair or replace any costs for pick up and delivery of the appliance required because of this warranty must be defective in accordance with instructions provided with the product. 2. THE CONSUMER WILL BE RESPONSIBLE FOR: Costs of service calls that are not a part...
Product Specifications Sheet (English)
Page 1
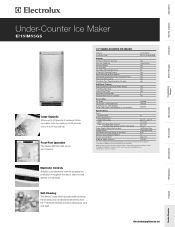
...: Always consult local and / or national electric codes. Microwaves Vent Hoods Dishwashers Refrigerators Freezers Electronic Controls Simple-to-use on the web at www.electroluxappliances.ca. and can make up to 30 pounds of restaurant-style ice cubes - PN # EIM41978 Drain Pump Kit - Wall Ovens Warmer Drawers Cooktops Built-In Ranges Freestanding Ranges Under-Counter Ice Maker EI15IM55GS Large Capacity Stores up to 60 pounds...
...: Always consult local and / or national electric codes. Microwaves Vent Hoods Dishwashers Refrigerators Freezers Electronic Controls Simple-to-use on the web at www.electroluxappliances.ca. and can make up to 30 pounds of restaurant-style ice cubes - PN # EIM41978 Drain Pump Kit - Wall Ovens Warmer Drawers Cooktops Built-In Ranges Freestanding Ranges Under-Counter Ice Maker EI15IM55GS Large Capacity Stores up to 60 pounds...
Product Specifications Sheet (English)
Page 2
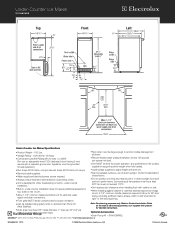
... unobstructed for right- Refer to Product Installation Guide on adequately wired 120V, dedicated circuit having 2-wire service with a separate ground wire. Optional Accessories • Drain Pump Kit - (PN # EIMP60). Under-Counter Ice Maker EI15IM55GS Under-Counter Ice Maker Specifications • Product Weight - 100 Lbs. • Voltage Rating - 120V / 60 Hz / 15 Amps • Connected Load (kW Rating) @ 120 Volts = 0.48 kW (For use on the web at least 50...
... unobstructed for right- Refer to Product Installation Guide on adequately wired 120V, dedicated circuit having 2-wire service with a separate ground wire. Optional Accessories • Drain Pump Kit - (PN # EIMP60). Under-Counter Ice Maker EI15IM55GS Under-Counter Ice Maker Specifications • Product Weight - 100 Lbs. • Voltage Rating - 120V / 60 Hz / 15 Amps • Connected Load (kW Rating) @ 120 Volts = 0.48 kW (For use on the web at least 50...


