EFLW417SIW Reversible Door - Electrolux
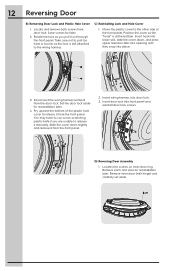
EFLW417SIW Reversible Door
View Results Below
Free Electrolux EFLW417SIW manuals!
Problems with Electrolux EFLW417SIW?
Ask a Question
Free Electrolux EFLW417SIW manuals!
Problems with Electrolux EFLW417SIW?
Ask a Question
Related Manual Pages


Similar Questions

What Do I Do If The Door To My Washer Will
What do i do if the door will not open on my eletrolux perfect steam washer?
What do i do if the door will not open on my eletrolux perfect steam washer?
(Posted by jweems 9 years ago)

Washing Maschine Suddenly Stop And Wont Start, Cannot Open Door
(Posted by yahnawi 11 years ago)

Door Hard To Open
I just switched the washer door opening direction and now the doo is hard to open
I just switched the washer door opening direction and now the doo is hard to open
(Posted by rmpaugh 11 years ago)