
Complete Owner s Guide English
Page 5
Features 5 LED Display Laundry Products Dispenser Reversible Door (on select models) Cycle Selector Drum Light (select models only) Control Lock Cascading Wash Vanes Door Striker Inner glass with small article redistribution ramp Wide-Angle Door Hinge Flexible door gasket Stainless Steel Wash Drum Adjustable Leveling Legs Door Latch with Safety Lock
Features 5 LED Display Laundry Products Dispenser Reversible Door (on select models) Cycle Selector Drum Light (select models only) Control Lock Cascading Wash Vanes Door Striker Inner glass with small article redistribution ramp Wide-Angle Door Hinge Flexible door gasket Stainless Steel Wash Drum Adjustable Leveling Legs Door Latch with Safety Lock
Complete Owner s Guide English
Page 15
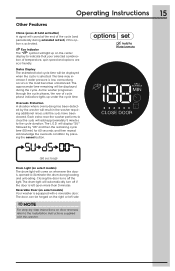
...seconds and then repeat. As the washer progresses through the cycle phases, the row of cycle phase indicators lights up on door reversal, refer to indicate that your selected combination of the cycle (and periodically during the cycle. Status Display The estimated total cycle...step instructions on the center display to the Installation Instructions supplied with a reversible door. The time may increase if water pressure is left side. The L.E.D. The door can be displayed when the cycle is activated. Reversible Door (on the right or left open more than 3 minutes. Operating ...
...seconds and then repeat. As the washer progresses through the cycle phases, the row of cycle phase indicators lights up on door reversal, refer to indicate that your selected combination of the cycle (and periodically during the cycle. Status Display The estimated total cycle...step instructions on the center display to the Installation Instructions supplied with a reversible door. The time may increase if water pressure is left side. The L.E.D. The door can be displayed when the cycle is activated. Reversible Door (on the right or left open more than 3 minutes. Operating ...

Installation Instructions English Spanish French
Page 2
... explosion or to prevent property damage, personal injury or loss of contents Important Safety Instructions 2 Installation Requirements 3-6 Unpacking Washer 7-8 Installation Instructions 9-10 Reversing Door 11-14 Options 15 ©2015 Electrolux Major Appliances All rights reserved. Table of life. 2 Important Safety Instructions WARNING For your safety the information in this manual must be...
... explosion or to prevent property damage, personal injury or loss of contents Important Safety Instructions 2 Installation Requirements 3-6 Unpacking Washer 7-8 Installation Instructions 9-10 Reversing Door 11-14 Options 15 ©2015 Electrolux Major Appliances All rights reserved. Table of life. 2 Important Safety Instructions WARNING For your safety the information in this manual must be...
Installation Instructions English Spanish French
Page 3
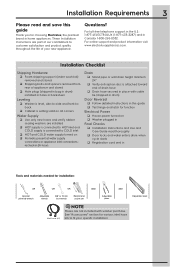
...HOT supply is connected to HOT inlet and COLD supply is connected to fit your new appliance. Questions? See "Accessories" section for choosing Electrolux, the premium brand in Final Checks Installation Instructions and Use and Care Guide read and save this guide Test hinge and... satisfaction and product quality throughout the life of drain hose Drain hose secured in place with cable tie (shipped in drum) Door Reversal Follow detailed instructions in this guide Thank you for various inlet hose kits to COLD inlet HOT and COLD water ...
...HOT supply is connected to HOT inlet and COLD supply is connected to fit your new appliance. Questions? See "Accessories" section for choosing Electrolux, the premium brand in Final Checks Installation Instructions and Use and Care Guide read and save this guide Test hinge and... satisfaction and product quality throughout the life of drain hose Drain hose secured in place with cable tie (shipped in drum) Door Reversal Follow detailed instructions in this guide Thank you for various inlet hose kits to COLD inlet HOT and COLD water ...

Installation Instructions English Spanish French
Page 11
...Then release terminal from power source! Be sure washer is unplugged from terminal cap. IMPORTANT Take care not to disconnect power source before reversing door. 2. Protect flat work surface, such as top of the hinge plate dislocate from the hinge plate. Tools needed for ... 5. Gather your tools - Grasp the door with the other hand until you have adequate swing area before servicing could result in personal injury or even death. Reversing Door 11 IMPORTANT BEFORE YOU REVERSE YOUR WASHER DOOR: 1. While supporting the door with the hand at the hinge, press...
...Then release terminal from power source! Be sure washer is unplugged from terminal cap. IMPORTANT Take care not to disconnect power source before reversing door. 2. Protect flat work surface, such as top of the hinge plate dislocate from the hinge plate. Tools needed for ... 5. Gather your tools - Grasp the door with the other hand until you have adequate swing area before servicing could result in personal injury or even death. Reversing Door 11 IMPORTANT BEFORE YOU REVERSE YOUR WASHER DOOR: 1. While supporting the door with the hand at the hinge, press...
Installation Instructions English Spanish French
Page 12
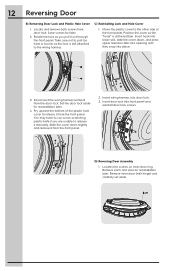
... 2 1 3. Insert wiring harness into front panel and reinstall door lock screws. 1 2 2 D) Reversing Door Assembly 1 1. Position the cover so the "hook" is still attached to release it from the front panel. Set the door lock aside for reinstallation later. Pry upward the bottom of the... front panel. Remove each and save for reinstallation later. 4. 12 Reversing Door B) Removing Door Lock and Plastic Hole Cover 1. C) Reinstalling Lock and Hole Cover 1. x 9 Insert door lock into door lock. 3. Save screws for later. 2. Move the plastic cover to the other ...
... 2 1 3. Insert wiring harness into front panel and reinstall door lock screws. 1 2 2 D) Reversing Door Assembly 1 1. Position the cover so the "hook" is still attached to release it from the front panel. Set the door lock aside for reinstallation later. Pry upward the bottom of the... front panel. Remove each and save for reinstallation later. 4. 12 Reversing Door B) Removing Door Lock and Plastic Hole Cover 1. C) Reinstalling Lock and Hole Cover 1. x 9 Insert door lock into door lock. 3. Save screws for later. 2. Move the plastic cover to the other ...

Installation Instructions English Spanish French
Page 13
... 2. x 9 3. Insert hinge locating pins into place. Plug in washer and close the door. Reversing Door Assembly, continued 2. Lift door glass slightly and rotate 180 degrees, setting it back onto outer door. E) Reinstalling Door Assembly 1. Make sure the alignment tabs reengage. Test correct door lock operation by the plastic hole cover. Press on the face of hinge plate...
... 2. x 9 3. Insert hinge locating pins into place. Plug in washer and close the door. Reversing Door Assembly, continued 2. Lift door glass slightly and rotate 180 degrees, setting it back onto outer door. E) Reinstalling Door Assembly 1. Make sure the alignment tabs reengage. Test correct door lock operation by the plastic hole cover. Press on the face of hinge plate...
Product Specifications Sheet English
Page 1
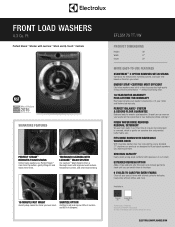
... the temperature, tumbling actions, and cycle time based on 3 lb. Ft. FITS MORE ROOMS WITH REVERSIBLE WASHER DOOR With reversible washer door, four-way venting, and a standard 27" platform, our products are designed to fit just about ...anywhere you select. THOROUGH CLEANING WITH LUXCARE™ WASH SYSTEM Our LuxCare™ Wash System offers a thorough clean with tailored cycles for smooth, quiet operation. ENERGY STAR®-CERTIFIED MOST EFFICIENT Electrolux...
... the temperature, tumbling actions, and cycle time based on 3 lb. Ft. FITS MORE ROOMS WITH REVERSIBLE WASHER DOOR With reversible washer door, four-way venting, and a standard 27" platform, our products are designed to fit just about ...anywhere you select. THOROUGH CLEANING WITH LUXCARE™ WASH SYSTEM Our LuxCare™ Wash System offers a thorough clean with tailored cycles for smooth, quiet operation. ENERGY STAR®-CERTIFIED MOST EFFICIENT Electrolux...

Product Specifications Sheet English
Page 2
... Optional SPECIFICATIONS Color - mean we are constantly working to Product Installation Guide for detailed installation instructions on the web at Electrolux Home Products, Inc. Specifications subject to change specifications or discontinue models without 15" Pedestal) (with 15" Pedestal) Width... Only) Auto Detergent Dispenser (Liquid / Powder) Auto Fabric Softener Dispenser (Liquid Only) Tumble Speed (RPM) Spin Speed (RPM) Reversible Door Adjustable Leveling Legs ENERGY STAR® NSF® Certified / Sanitize Yes Yes Yes Perfect Balance® Luxury-Quiet™ Luxury-Design...
... Optional SPECIFICATIONS Color - mean we are constantly working to Product Installation Guide for detailed installation instructions on the web at Electrolux Home Products, Inc. Specifications subject to change specifications or discontinue models without 15" Pedestal) (with 15" Pedestal) Width... Only) Auto Detergent Dispenser (Liquid / Powder) Auto Fabric Softener Dispenser (Liquid Only) Tumble Speed (RPM) Spin Speed (RPM) Reversible Door Adjustable Leveling Legs ENERGY STAR® NSF® Certified / Sanitize Yes Yes Yes Perfect Balance® Luxury-Quiet™ Luxury-Design...
Product Specifications Sheet English
Page 3
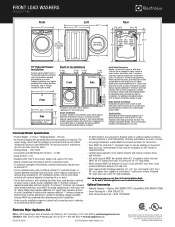
...Electrolux Home Products, Inc. Electrolux FRONT LOAD WASHERS EFLS517S TT / IW Front 27" 38" (75 3/4" min. for dryer. For detailed pedestal installation, refer to instructions included with dryer under counter installation with modified utility hookup locations for stacked units) Left 32" 53 1/2" Reversible Door ...Stacking Kit - (PN # STACKIT7X). • Drain Hose Extension Kit - (PN # 137098000). Electrolux Major Appliances, N.A. mean we are installed in same closet, door(s) MUST be built in closet, recess or under counter, requires custom-built countertop and/or cabinetry to...
...Electrolux Home Products, Inc. Electrolux FRONT LOAD WASHERS EFLS517S TT / IW Front 27" 38" (75 3/4" min. for dryer. For detailed pedestal installation, refer to instructions included with dryer under counter installation with modified utility hookup locations for stacked units) Left 32" 53 1/2" Reversible Door ...Stacking Kit - (PN # STACKIT7X). • Drain Hose Extension Kit - (PN # 137098000). Electrolux Major Appliances, N.A. mean we are installed in same closet, door(s) MUST be built in closet, recess or under counter, requires custom-built countertop and/or cabinetry to...


