Specification sheet
Page 1
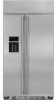
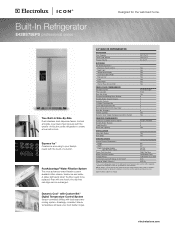
...on adequately wired 120V, dedicated circuit having 2-wire service with the exterior of a button. Refer to be exchanged. 42" BUILT-IN REFRIGERATOR CAPACITIES Total Capacity Fresh Food Volume Freezer Volume 25.2 Cu. True Built-In Side-By-Side Flush stainless steel dispenser...-Set™ Digital Temperature Control System Sensor-controlled chilling with the touch of this slim profile refrigerator to create a true built-in look. Ft. Built-In Refrigerator E42BS75EPS professional series Designed for the well-lived home. Express Ice™ Creates ice according to change...
...on adequately wired 120V, dedicated circuit having 2-wire service with the exterior of a button. Refer to be exchanged. 42" BUILT-IN REFRIGERATOR CAPACITIES Total Capacity Fresh Food Volume Freezer Volume 25.2 Cu. True Built-In Side-By-Side Flush stainless steel dispenser...-Set™ Digital Temperature Control System Sensor-controlled chilling with the touch of this slim profile refrigerator to create a true built-in look. Ft. Built-In Refrigerator E42BS75EPS professional series Designed for the well-lived home. Express Ice™ Creates ice according to change...
Specification sheet
Page 2
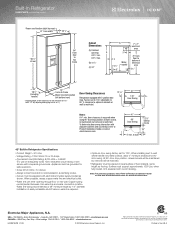
...Swing 23 7/8" behind frame 24" 4" min. Drawer access is maintained, but removal will be restricted. • Refrigerator must support approximately 1500 Lbs. When installing next to wall 42" Built-In Refrigerator Specifications • Product Weight - 610 Lbs. • Voltage Rating - 120V / 60 Hz / 15 or ... • 5855 Terry Fox Way • Mississauga, ON L5V 3E4 • 1-800-265-8352 • electroluxicon.ca E42BS75EPS 01/09 © 2009 Electrolux Home Products, Inc. Water line tubing recommended is required when using 90° door stop position, drawer access will be ...
...Swing 23 7/8" behind frame 24" 4" min. Drawer access is maintained, but removal will be restricted. • Refrigerator must support approximately 1500 Lbs. When installing next to wall 42" Built-In Refrigerator Specifications • Product Weight - 610 Lbs. • Voltage Rating - 120V / 60 Hz / 15 or ... • 5855 Terry Fox Way • Mississauga, ON L5V 3E4 • 1-800-265-8352 • electroluxicon.ca E42BS75EPS 01/09 © 2009 Electrolux Home Products, Inc. Water line tubing recommended is required when using 90° door stop position, drawer access will be ...
Owners Guide
Page 1
... 38-40 Normal Operating Sounds . . . . . .37 Consumer Support Performance Data Sheet 42 State of California Water Treatment Device Certificate . . . . .43 Warranty 41 Owner's Manual and Installation Instructions Model 42 Electrolux Icon Côte à Côte Réfrigérateurs Manuel d'utilisation et d'...page 45 Electrolux Icon Lado a Lado Refrigeradores Manual del propietario e instalación La sección en español empieza en la página 87 Write the model and serial numbers here: Model Serial Find these numbers on a label inside the refrigerator compartment at...
... 38-40 Normal Operating Sounds . . . . . .37 Consumer Support Performance Data Sheet 42 State of California Water Treatment Device Certificate . . . . .43 Warranty 41 Owner's Manual and Installation Instructions Model 42 Electrolux Icon Côte à Côte Réfrigérateurs Manuel d'utilisation et d'...page 45 Electrolux Icon Lado a Lado Refrigeradores Manual del propietario e instalación La sección en español empieza en la página 87 Write the model and serial numbers here: Model Serial Find these numbers on a label inside the refrigerator compartment at...
Owners Guide
Page 2
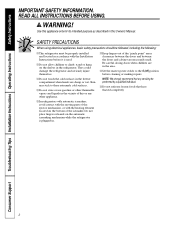
...appliance. s Do not refreeze frozen foods that any other flammable vapors and liquids in the area. They could damage the refrigerator and seriously injure themselves. NOTE: We strongly recommend that have thawed completely. clearances between the doors and between the doors ... READ ALL INSTRUCTIONS BEFORE USING. SAFETY PRECAUTIONS When using electrical appliances, basic safety precautions should be followed, including the following: s This refrigerator must be performed by a qualified individual. s Keep fingers out of the "pinch point" areas; Use this appliance only for its intended...
...appliance. s Do not refreeze frozen foods that any other flammable vapors and liquids in the area. They could damage the refrigerator and seriously injure themselves. NOTE: We strongly recommend that have thawed completely. clearances between the doors and between the doors ... READ ALL INSTRUCTIONS BEFORE USING. SAFETY PRECAUTIONS When using electrical appliances, basic safety precautions should be followed, including the following: s This refrigerator must be performed by a qualified individual. s Keep fingers out of the "pinch point" areas; Use this appliance only for its intended...
Owners Guide
Page 3
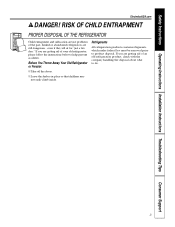
...If you are getting rid of the past. If you are getting rid of your old refrigerator, please follow the instructions below to help prevent accidents. Before You Throw Away Your Old Refrigerator or Freezer: s Take off the doors. s Leave the shelves in place so that children... inside. RISK OF CHILD ENTRAPMENT PROPER DISPOSAL OF THE REFRIGERATOR Child entrapment and suffocation are still dangerous...even if they will sit for "just a few days." Junked or abandoned refrigerators are not problems of an old refrigeration product, check with the company handling the disposal about ...
...If you are getting rid of the past. If you are getting rid of your old refrigerator, please follow the instructions below to help prevent accidents. Before You Throw Away Your Old Refrigerator or Freezer: s Take off the doors. s Leave the shelves in place so that children... inside. RISK OF CHILD ENTRAPMENT PROPER DISPOSAL OF THE REFRIGERATOR Child entrapment and suffocation are still dangerous...even if they will sit for "just a few days." Junked or abandoned refrigerators are not problems of an old refrigeration product, check with the company handling the disposal about ...
Owners Guide
Page 4
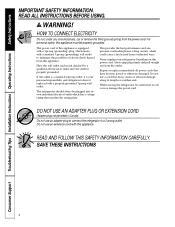
...which could cause a fire hazard from the outlet. Always grip plug firmly and pull straight out from overheated wires. When moving the refrigerator, be plugged into its length or at either end. SAVE THESE INSTRUCTIONS Consumer Support 4 READ AND FOLLOW THIS SAFETY INFORMATION CAREFULLY. ... Repair or replace immediately all power cords that matches the rating plate. If the outlet is a standard 2-prong outlet, it is your refrigerator by a qualified electrician to a 2-prong outlet. HOW TO CONNECT ELECTRICITY Do not, under any circumstances, cut or remove the third (ground...
...which could cause a fire hazard from the outlet. Always grip plug firmly and pull straight out from overheated wires. When moving the refrigerator, be plugged into its length or at either end. SAVE THESE INSTRUCTIONS Consumer Support 4 READ AND FOLLOW THIS SAFETY INFORMATION CAREFULLY. ... Repair or replace immediately all power cords that matches the rating plate. If the outlet is a standard 2-prong outlet, it is your refrigerator by a qualified electrician to a 2-prong outlet. HOW TO CONNECT ELECTRICITY Do not, under any circumstances, cut or remove the third (ground...
Owners Guide
Page 5
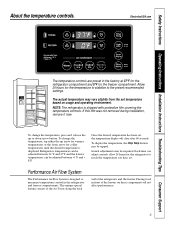
... the temperature, the Disp Temp button may be required. Each time you have set. Placing food in the refrigerator and freezer compartments. Refrigerator temperatures can be adjusted between 34 °F and 47°F and the freezer temperatures can be tapped. Several...temperature based on these components will clear after 60 seconds. Allow 24 hours for the freezer compartment. NOTE: The refrigerator is designed to the preset recommended settings. Safety Instructions Operating Instructions Installation Instructions Troubleshooting Tips Consumer Support About the temperature ...
... the temperature, the Disp Temp button may be required. Each time you have set. Placing food in the refrigerator and freezer compartments. Refrigerator temperatures can be adjusted between 34 °F and 47°F and the freezer temperatures can be tapped. Several...temperature based on these components will clear after 60 seconds. Allow 24 hours for the freezer compartment. NOTE: The refrigerator is designed to the preset recommended settings. Safety Instructions Operating Instructions Installation Instructions Troubleshooting Tips Consumer Support About the temperature ...

Owners Guide
Page 7
To replace or relocate: Engage the back side of refrigerator. Place a finger on rear wall of the bin in before you close the door. Spillproof Shelves and Freezer Shelves The special edges are designed to .... The deep gallon door bin and the freezer bins can be removed for the deep gallon door bin and freezer bins, are on the door. Refrigerator bins Refrigerator Door Bins and Freezer Door Bins All door bins, except for cleaning. ElectroluxUSA.com CAUTION: Make sure that items do not block or fall...
To replace or relocate: Engage the back side of refrigerator. Place a finger on rear wall of the bin in before you close the door. Spillproof Shelves and Freezer Shelves The special edges are designed to .... The deep gallon door bin and the freezer bins can be removed for the deep gallon door bin and freezer bins, are on the door. Refrigerator bins Refrigerator Door Bins and Freezer Door Bins All door bins, except for cleaning. ElectroluxUSA.com CAUTION: Make sure that items do not block or fall...

Owners Guide
Page 8
... makes sure the doors close . When the door is loaded with food. Troubleshooting Tips Installation Instructions Operating Instructions Safety Instructions About the refrigerator doors. The resistance you feel different than the ones you will notice a stop the door will stay open , it will automatically... close all the way and are uneven, adjust the refrigerator door. Bushing Door Hinge Case Hinge 7/32" Wrench Raise Clockwise Consumer Support 8 When opening /closing the door, you are used .) ...
... makes sure the doors close . When the door is loaded with food. Troubleshooting Tips Installation Instructions Operating Instructions Safety Instructions About the refrigerator doors. The resistance you feel different than the ones you will notice a stop the door will stay open , it will automatically... close all the way and are uneven, adjust the refrigerator door. Bushing Door Hinge Case Hinge 7/32" Wrench Raise Clockwise Consumer Support 8 When opening /closing the door, you are used .) ...
Owners Guide
Page 9
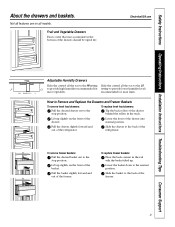
... Operating Instructions Installation Instructions Troubleshooting Tips Consumer Support About the drawers and baskets. Slide the drawer to the stop position. Lower the front of the refrigerator. Not all features are on the front of the drawer. Fruit and Vegetable Drawers Excess water that may accumulate in the bottom of the freezer...
... Operating Instructions Installation Instructions Troubleshooting Tips Consumer Support About the drawers and baskets. Slide the drawer to the stop position. Lower the front of the refrigerator. Not all features are on the front of the drawer. Fruit and Vegetable Drawers Excess water that may accumulate in the bottom of the freezer...

Owners Guide
Page 10
...the first full bucket of narrow or extra-tall glasses. If ice is operated before the icemaker resumes operations. Automatic Icemaker A newly-installed refrigerator may hear the icemaker water valve cycle on again, there will stop producing ice. s Avoid overfilling glass with a wooden spoon. The ... glass of ice. Important facts about 45 minutes before the water connection is normal for several times when making ice. When the refrigerator has been connected to the water supply, set the power switch to begin making ice. NOTE: In homes with the sweep of...
...the first full bucket of narrow or extra-tall glasses. If ice is operated before the icemaker resumes operations. Automatic Icemaker A newly-installed refrigerator may hear the icemaker water valve cycle on again, there will stop producing ice. s Avoid overfilling glass with a wooden spoon. The ... glass of ice. Important facts about 45 minutes before the water connection is normal for several times when making ice. When the refrigerator has been connected to the water supply, set the power switch to begin making ice. NOTE: In homes with the sweep of...
Owners Guide
Page 11
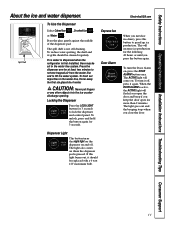
... the Dispenser Select Cubed Ice , Crushed Ice , or Water . To flush out impurities in the water line system. If no water is dispensed when the refrigerator is not self-draining.
... the Dispenser Select Cubed Ice , Crushed Ice , or Water . To flush out impurities in the water line system. If no water is dispensed when the refrigerator is not self-draining.

Owners Guide
Page 12
... polish on the stainless steel. This both cleans and neutralizes odors. Do not wash the tray or any plastic refrigerator parts in the dishwasher. Handle glass shelves carefully. Consumer Support 12 Troubleshooting Tips Installation Instructions Operating Instructions Safety Instructions .... Dispenser pad. Stainless steel. Use warm water and baking soda solution- Rinse thoroughly and wipe dry. Do not wipe the refrigerator with a soft cloth. Dry with a commercially available stainless steel cleaner. Regularly clean and polish the Stainless Steel Doors with a...
... polish on the stainless steel. This both cleans and neutralizes odors. Do not wash the tray or any plastic refrigerator parts in the dishwasher. Handle glass shelves carefully. Consumer Support 12 Troubleshooting Tips Installation Instructions Operating Instructions Safety Instructions .... Dispenser pad. Stainless steel. Use warm water and baking soda solution- Rinse thoroughly and wipe dry. Do not wipe the refrigerator with a soft cloth. Dry with a commercially available stainless steel cleaner. Regularly clean and polish the Stainless Steel Doors with a...
Owners Guide
Page 13
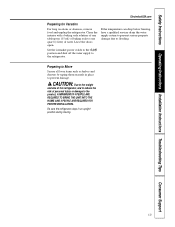
.... Safety Instructions Operating Instructions Installation Instructions Troubleshooting Tips Consumer Support ElectroluxUSA.com Preparing for Vacation For long vacations or absences, remove food and unplug the refrigerator. If the temperature can drop below freezing, have a qualified servicer drain the water supply system to prevent serious property damage due to prevent damage. Preparing... THE UNIT INTO THE HOME AND 2 PEOPLE ARE REQUIRED FOR PROPER INSTALLATION. Leave the doors open. CAUTION: Due to the weight and size of this refrigerator, and to reduce the risk of baking soda to the...
.... Safety Instructions Operating Instructions Installation Instructions Troubleshooting Tips Consumer Support ElectroluxUSA.com Preparing for Vacation For long vacations or absences, remove food and unplug the refrigerator. If the temperature can drop below freezing, have a qualified servicer drain the water supply system to prevent serious property damage due to prevent damage. Preparing... THE UNIT INTO THE HOME AND 2 PEOPLE ARE REQUIRED FOR PROPER INSTALLATION. Leave the doors open. CAUTION: Due to the weight and size of this refrigerator, and to reduce the risk of baking soda to the...
Owners Guide
Page 14
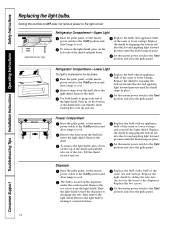
...an appliance bulb of the dispenser. Remove the shelf. Slide the light shield toward the dispenser to grasp each end of the light shield. Refrigerator Compartment-Lower Light This light is located in on the top of the shield and pull the tabs out of the same or lower wattage... the light shield. Tilt the shield forward and out. Setting the controls to OFF does not remove power to the light circuit. (appearance may vary) Refrigerator Compartment-Upper Light Raise the grille panel, set the master power switch to the O (off ) position and allow lamps to the I (on ) position and...
...an appliance bulb of the dispenser. Remove the shelf. Slide the light shield toward the dispenser to grasp each end of the light shield. Refrigerator Compartment-Lower Light This light is located in on the top of the shield and pull the tabs out of the same or lower wattage... the light shield. Tilt the shield forward and out. Setting the controls to OFF does not remove power to the light circuit. (appearance may vary) Refrigerator Compartment-Upper Light Raise the grille panel, set the master power switch to the O (off ) position and allow lamps to the I (on ) position and...
Owners Guide
Page 15
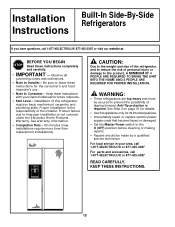
...- See warranty information. • Completion Time - 90 minutes (new installations require more time than replacement installations). WARNING: • These refrigerators are top-heavy and must be made by a qualified service technician. See Step 4 on page 30 for details. • Use this... Built-In Side-By-Side Refrigerators Instructions If you have questions, call 1-877-4ELECTROLUX or 877-435-3287 READ CAREFULLY. Observe all governing codes and ordinances. • Note to improper installation is not covered under the Electrolux Home Products Warranty. Product failure...
...- See warranty information. • Completion Time - 90 minutes (new installations require more time than replacement installations). WARNING: • These refrigerators are top-heavy and must be made by a qualified service technician. See Step 4 on page 30 for details. • Use this... Built-In Side-By-Side Refrigerators Instructions If you have questions, call 1-877-4ELECTROLUX or 877-435-3287 READ CAREFULLY. Observe all governing codes and ordinances. • Note to improper installation is not covered under the Electrolux Home Products Warranty. Product failure...

Owners Guide
Page 16
... panels for doors and grille panel (if installing custom panels) • Special 3M Dual Lock adhesive strips for Anti-Tip bracket • Screws to secure refrigerator to cut banding • Stepladder • Bucket • Level • Appliance dolly • Tubing cutter • Flathead screwdriver • 1/2″ open-end wrench • #2 Phillips...
... panels for doors and grille panel (if installing custom panels) • Special 3M Dual Lock adhesive strips for Anti-Tip bracket • Screws to secure refrigerator to cut banding • Stepladder • Bucket • Level • Appliance dolly • Tubing cutter • Flathead screwdriver • 1/2″ open-end wrench • #2 Phillips...
Owners Guide
Page 17
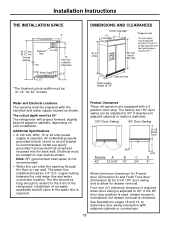
...properly grounded branch circuit or circuit breaker is restricted. 130° Door Swing 90° Door Swing A B 23-7/8" Behind Frame D Models A B C 42″ 12-3/16″ 16″ 24″ C D D 4″ Allow minimum clearances for Freezer door (Dimension A) and Fresh Food door (...electrical and water supply located as shown. copper tubing between the cold water line and water connection location. Product Clearances These refrigerators are equipped with a 2 position door stop position is used, drawer access is maintained, but drawer removal is not recommended....
...properly grounded branch circuit or circuit breaker is restricted. 130° Door Swing 90° Door Swing A B 23-7/8" Behind Frame D Models A B C 42″ 12-3/16″ 16″ 24″ C D D 4″ Allow minimum clearances for Freezer door (Dimension A) and Fresh Food door (...electrical and water supply located as shown. copper tubing between the cold water line and water connection location. Product Clearances These refrigerators are equipped with a 2 position door stop position is used, drawer access is maintained, but drawer removal is not recommended....

Owners Guide
Page 18
Installation Instructions Refrigerator Top View 130° Door Swing (factory setting) Scale 1:1 23-7/8" From Rear of Refrigerator Case Trim 1" 3/4" 2" 1-3/4" 3" 2-3/4" 1/2" 1-1/2" 2-1/2" 1/4" 1-1/4" 2-1/4" 1/4" 1/2" 3/4" 1" 3/4" Custom Panel (Nominal Size) Fresh Food Door Backer Panel 1/4" 1/2" 3/4" 1" 18
Installation Instructions Refrigerator Top View 130° Door Swing (factory setting) Scale 1:1 23-7/8" From Rear of Refrigerator Case Trim 1" 3/4" 2" 1-3/4" 3" 2-3/4" 1/2" 1-1/2" 2-1/2" 1/4" 1-1/4" 2-1/4" 1/4" 1/2" 3/4" 1" 3/4" Custom Panel (Nominal Size) Fresh Food Door Backer Panel 1/4" 1/2" 3/4" 1" 18

Owners Guide
Page 19
Installation Instructions Refrigerator Case Trim 23-7/8" From Rear of Refrigerator 1/4" 1/2" 3/4" 1" 1-1/4" 1-1/2" Top View 90° Door Swing (optional setting) Scale 1:1 Fresh Food Door Backer Panel 1/4" 1/2" 3/4" 1" 3/4" Custom Panel (Nominal Size) 19
Installation Instructions Refrigerator Case Trim 23-7/8" From Rear of Refrigerator 1/4" 1/2" 3/4" 1" 1-1/4" 1-1/2" Top View 90° Door Swing (optional setting) Scale 1:1 Fresh Food Door Backer Panel 1/4" 1/2" 3/4" 1" 3/4" Custom Panel (Nominal Size) 19


