Specification sheet
Page 1
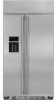
... electric and plumbing codes. Electronic Touch Control Night Light Temperature Display Crushed / Cubes / Water Express Ice™ Lock Filter Reset Interior Easy Access Door FRESH FOOD CONVENIENCES Filtration System Filter Location Door Ajar Alarm Encapsulated Sliding Glass Shelves Smooth-Glide™ Crisper Drawers Humidity Controls 1-Gallon Fixed Door Bin 2-Liter Adjustable Door Bin Dairy Compartment with Clear Door Door Bin Snuggers Theatre Lighting Dynamic Cool™ Digital Temperature Control System FREEZER CONVENIENCES Automatic Ice Maker with one touch, the drip-free cartridge...
... electric and plumbing codes. Electronic Touch Control Night Light Temperature Display Crushed / Cubes / Water Express Ice™ Lock Filter Reset Interior Easy Access Door FRESH FOOD CONVENIENCES Filtration System Filter Location Door Ajar Alarm Encapsulated Sliding Glass Shelves Smooth-Glide™ Crisper Drawers Humidity Controls 1-Gallon Fixed Door Bin 2-Liter Adjustable Door Bin Dairy Compartment with Clear Door Door Bin Snuggers Theatre Lighting Dynamic Cool™ Digital Temperature Control System FREEZER CONVENIENCES Automatic Ice Maker with one touch, the drip-free cartridge...
Specification sheet
Page 2
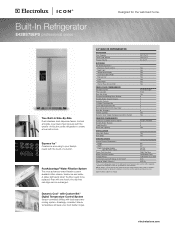
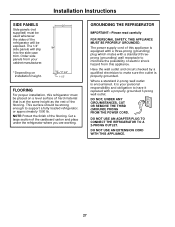
...-In Refrigerator E42BS75EPS professional series Power cord location (right top rear) 41" case width 25 3/8" * 83 3/4" at rear 84" from floor to top frame Cutout Dimensions (A) Finished opening through floor or rear wall. Factory set for safe operation.) • Amps @ 120 Volts = 5.4 Amps • Always consult local and /or national electric & plumbing codes. • Cutout must support approximately 1500 Lbs. Copper tubing recommended between cold water line and water connection location.
...-In Refrigerator E42BS75EPS professional series Power cord location (right top rear) 41" case width 25 3/8" * 83 3/4" at rear 84" from floor to top frame Cutout Dimensions (A) Finished opening through floor or rear wall. Factory set for safe operation.) • Amps @ 120 Volts = 5.4 Amps • Always consult local and /or national electric & plumbing codes. • Cutout must support approximately 1500 Lbs. Copper tubing recommended between cold water line and water connection location.
Owners Guide
Page 1
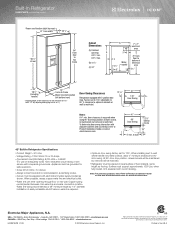
... Instructions 2-4 Operating Instructions Automatic Icemaker 10 Care and Cleaning 12, 13 Drawers and Baskets 9 Ice and Water Dispenser . . . . .10, 11 Refrigerator Doors 8 Replacing the Light Bulbs 14 Shelves and Bins 7 Temperature Controls 5 Water Filter 6 Installation Instructions Anti-Tip Brackets 30 Dimensions, Clearances 17 Door, Grille Panels 32, 33 Installation Space 17 Leveling 31 Panel Dimensions 21-26 Stainless Steel Handles 34 Water Line 29 Water Supply 35 Troubleshooting Tips 38-40 Normal Operating Sounds . . . . . .37 Consumer Support Performance Data Sheet 42...
... Instructions 2-4 Operating Instructions Automatic Icemaker 10 Care and Cleaning 12, 13 Drawers and Baskets 9 Ice and Water Dispenser . . . . .10, 11 Refrigerator Doors 8 Replacing the Light Bulbs 14 Shelves and Bins 7 Temperature Controls 5 Water Filter 6 Installation Instructions Anti-Tip Brackets 30 Dimensions, Clearances 17 Door, Grille Panels 32, 33 Installation Space 17 Leveling 31 Panel Dimensions 21-26 Stainless Steel Handles 34 Water Line 29 Water Supply 35 Troubleshooting Tips 38-40 Normal Operating Sounds . . . . . .37 Consumer Support Performance Data Sheet 42...
Owners Guide
Page 2
... with the Installation Instructions before cleaning or making repairs. Consumer Support 2 Be careful closing doors when children are in the freezer compartment when hands are necessarily small. Do not place fingers or hands on the bottom of the "pinch point" areas; WARNING! Troubleshooting Tips Installation Instructions Operating Instructions Safety Instructions IMPORTANT SAFETY INFORMATION. READ ALL INSTRUCTIONS BEFORE USING. Use this or any servicing be properly installed and located in the refrigerator. s Do...
... with the Installation Instructions before cleaning or making repairs. Consumer Support 2 Be careful closing doors when children are in the freezer compartment when hands are necessarily small. Do not place fingers or hands on the bottom of the "pinch point" areas; WARNING! Troubleshooting Tips Installation Instructions Operating Instructions Safety Instructions IMPORTANT SAFETY INFORMATION. READ ALL INSTRUCTIONS BEFORE USING. Use this or any servicing be properly installed and located in the refrigerator. s Do...
Owners Guide
Page 5
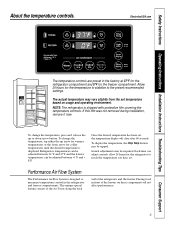
... down arrow button. To display the temperature, the Disp Temp button may be required. If this film was not removed during installation, remove it now. Several adjustments may be adjusted between -6 °F and + 8°F. Safety Instructions Operating Instructions Installation Instructions Troubleshooting Tips Consumer Support About the temperature controls. Refrigerator temperatures can be adjusted between 34 °F and 47°F and the freezer temperatures can be tapped. The actual temperature may vary slightly from the set . This...
... down arrow button. To display the temperature, the Disp Temp button may be required. If this film was not removed during installation, remove it now. Several adjustments may be adjusted between -6 °F and + 8°F. Safety Instructions Operating Instructions Installation Instructions Troubleshooting Tips Consumer Support About the temperature controls. Refrigerator temperatures can be adjusted between 34 °F and 47°F and the freezer temperatures can be tapped. The actual temperature may vary slightly from the set . This...

Owners Guide
Page 6
Troubleshooting Tips Installation Instructions Operating Instructions Safety Instructions About the water filter. (on the dispenser. Installing the Filter Cartridge The filter cartridge is a replacement indicator light for the water filter cartridge on some models) Push In and Click to the dispenser or icemaker decreases. NOTE: The dispenser and the icemaker will turn amber to tell you that the filter is completely seated NOTE: If the filter is located in the fresh food compartment in the United States, visit our Website...
Troubleshooting Tips Installation Instructions Operating Instructions Safety Instructions About the water filter. (on the dispenser. Installing the Filter Cartridge The filter cartridge is a replacement indicator light for the water filter cartridge on some models) Push In and Click to the dispenser or icemaker decreases. NOTE: The dispenser and the icemaker will turn amber to tell you that the filter is completely seated NOTE: If the filter is located in the fresh food compartment in the United States, visit our Website...

Owners Guide
Page 7
... block To remove any bin: Lift the bin up at rear of refrigerator. To replace or relocate: Engage the back side of the bin. Bin will lock in before you . To replace shelves: Select desired shelf height. ElectroluxUSA.com CAUTION: Make sure that items do not block or fall into position. Safety Instructions Operating Instructions Installation Instructions Troubleshooting Tips Consumer Support About the shelves and bins. Spillproof Shelves and Freezer Shelves The special edges...
... block To remove any bin: Lift the bin up at rear of refrigerator. To replace or relocate: Engage the back side of the bin. Bin will lock in before you . To replace shelves: Select desired shelf height. ElectroluxUSA.com CAUTION: Make sure that items do not block or fall into position. Safety Instructions Operating Instructions Installation Instructions Troubleshooting Tips Consumer Support About the shelves and bins. Spillproof Shelves and Freezer Shelves The special edges...

Owners Guide
Page 10
... Mechanism Ice Storage Bin To remove: Lift up ice can jam the chute or cause the door in a 24-hour period, depending on several cubes to begin making ice. Pull bin straight out. s Some crushed ice may be dispensed even though you may hear the icemaker water valve cycle on freezer compartment temperature, room temperature, number of door openings and other use of narrow or extra-tall glasses. Automatic Icemaker A newly-installed refrigerator may...
... Mechanism Ice Storage Bin To remove: Lift up ice can jam the chute or cause the door in a 24-hour period, depending on several cubes to begin making ice. Pull bin straight out. s Some crushed ice may be dispensed even though you may hear the icemaker water valve cycle on freezer compartment temperature, room temperature, number of door openings and other use of narrow or extra-tall glasses. Automatic Icemaker A newly-installed refrigerator may...
Owners Guide
Page 11
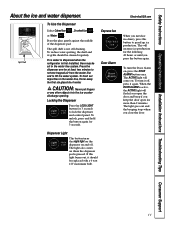
... be replaced with a 6 watt 12V maximum bulb. To flush out impurities in the water line, throw away the first six glassfuls of the dispenser pad. Express Ice Door Alarm Dispenser Light This button turns the night light on the dispenser on . ElectroluxUSA.com When you keep the door open for 3 seconds. Spill Shelf To Use the Dispenser Select Cubed Ice , Crushed Ice , or Water . If no water is dispensed when the refrigerator is active, the ACTIVE light will flash...
... be replaced with a 6 watt 12V maximum bulb. To flush out impurities in the water line, throw away the first six glassfuls of the dispenser pad. Express Ice Door Alarm Dispenser Light This button turns the night light on the dispenser on . ElectroluxUSA.com When you keep the door open for 3 seconds. Spill Shelf To Use the Dispenser Select Cubed Ice , Crushed Ice , or Water . If no water is dispensed when the refrigerator is active, the ACTIVE light will flash...

Owners Guide
Page 12
Dispenser pad. Door handles. Stainless steel. Do not wash the tray or any plastic refrigerator parts in the dishwasher. Avoid cleaning cold glass shelves with hot water because the extreme temperature difference may leave a residue that can be cleaned periodically with mild liquid dish detergent. Before cleaning, lock the dispenser by pressing the LOCK/LIGHT button for 3 seconds to a quart (1 liter) of the refrigerator, including door gaskets, snack pan and vegetable drawers, ice storage bin and...
Dispenser pad. Door handles. Stainless steel. Do not wash the tray or any plastic refrigerator parts in the dishwasher. Avoid cleaning cold glass shelves with hot water because the extreme temperature difference may leave a residue that can be cleaned periodically with mild liquid dish detergent. Before cleaning, lock the dispenser by pressing the LOCK/LIGHT button for 3 seconds to a quart (1 liter) of the refrigerator, including door gaskets, snack pan and vegetable drawers, ice storage bin and...
Owners Guide
Page 14
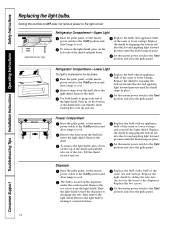
... the dispenser. Troubleshooting Tips Installation Instructions Operating Instructions Safety Instructions Replacing the light bulbs. Refrigerator Compartment-Lower Light This light is located in the front of the same or lower wattage, and reinstall the light shield. Use both hands to cool. Remove the light bulb by engaging the bottom tab into the slot and applying light forward pressure until the shield snaps in place. Set the master power switch to cool. Replace the bulb with a bulb of the light shield. Replace...
... the dispenser. Troubleshooting Tips Installation Instructions Operating Instructions Safety Instructions Replacing the light bulbs. Refrigerator Compartment-Lower Light This light is located in the front of the same or lower wattage, and reinstall the light shield. Use both hands to cool. Remove the light bulb by engaging the bottom tab into the slot and applying light forward pressure until the shield snaps in place. Set the master power switch to cool. Replace the bulb with a bulb of the light shield. Replace...
Owners Guide
Page 17
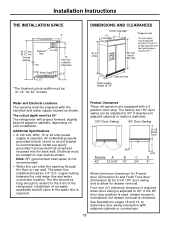
... These refrigerators are equipped with the electrical and water supply located as shown. The water line installed should be 1/4″ O.D. Installation Instructions THE INSTALLATION SPACE 3" *Finished Width 7" 84 1/2" max Electrical 7" 83 1/2" min Area Finished 74" Opening From Floor to Bottom 24" of Electrical 5" Water Supply 5" 3 1/2" 3 1/2" *The finished cutout width must be: 41-1/2″ for drawer removal. The cutout depth must be located on your installation. copper tubing between the cold water line and water connection location. If...
... These refrigerators are equipped with the electrical and water supply located as shown. The water line installed should be 1/4″ O.D. Installation Instructions THE INSTALLATION SPACE 3" *Finished Width 7" 84 1/2" max Electrical 7" 83 1/2" min Area Finished 74" Opening From Floor to Bottom 24" of Electrical 5" Water Supply 5" 3 1/2" 3 1/2" *The finished cutout width must be: 41-1/2″ for drawer removal. The cutout depth must be located on your installation. copper tubing between the cold water line and water connection location. If...
Owners Guide
Page 27
Installation Instructions SIDE PANELS Side panels (not supplied) must be strong enough to make sure the outlet is encountered, it replaced with a standard threeprong (grounding) wall receptacle to minimize the possibility of the refrigerator will slip into the side case trim. The power supply cord of this appliance is equipped with a three-prong (grounding) plug which mates with a properly grounded 3-prong wall...
Installation Instructions SIDE PANELS Side panels (not supplied) must be strong enough to make sure the outlet is encountered, it replaced with a standard threeprong (grounding) wall receptacle to minimize the possibility of the refrigerator will slip into the side case trim. The power supply cord of this appliance is equipped with a three-prong (grounding) plug which mates with a properly grounded 3-prong wall...

Owners Guide
Page 29
... of water through the tubing into a vertical water pipe. Saddle valves are included in a basement or cabinet. Shut off water supply at the top or side to avoid drawing off the main water supply. Installation Instructions 2 INSTALL WATER LINE • A cold water supply is required for copper tubing onto the end of the tubing and connect it will be adhered to. Make sure the tubing is fully inserted into the water line connection. NOTE: Certain types...
... of water through the tubing into a vertical water pipe. Saddle valves are included in a basement or cabinet. Shut off water supply at the top or side to avoid drawing off the main water supply. Installation Instructions 2 INSTALL WATER LINE • A cold water supply is required for copper tubing onto the end of the tubing and connect it will be adhered to. Make sure the tubing is fully inserted into the water line connection. NOTE: Certain types...
Owners Guide
Page 31
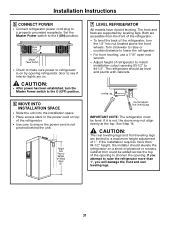
... I (ON) position. Cabinet trim could be level. Installation Instructions 5 CONNECT POWER • Connect refrigerator power cord plug to refrigerator is on by leveling legs. The refrigerator should elevate the refrigerator on a sheet of the opening to shorten the opening 83-1/2″ to ensure the power cord is not, the doors may not align evenly at the top. Raise Grille Panel Master Power Switch • Check to make sure power to a properly grounded receptacle.
... I (ON) position. Cabinet trim could be level. Installation Instructions 5 CONNECT POWER • Connect refrigerator power cord plug to refrigerator is on by leveling legs. The refrigerator should elevate the refrigerator on a sheet of the opening to shorten the opening 83-1/2″ to ensure the power cord is not, the doors may not align evenly at the top. Raise Grille Panel Master Power Switch • Check to make sure power to a properly grounded receptacle.

Owners Guide
Page 35
... installation. 13 TURN ON THE POWER • Set the Master Power switch to the I (ON) position. • Check to make sure that Master Power switch is on by opening refrigerator door to see if interior lights are preset at 37° for the Fresh Food section and 0° for the Freezer section. • Allow 24 hours to stabilize before making adjustments. • Dispense water for leaks. Insert tube into a bucket, then shut...
... installation. 13 TURN ON THE POWER • Set the Master Power switch to the I (ON) position. • Check to make sure that Master Power switch is on by opening refrigerator door to see if interior lights are preset at 37° for the Fresh Food section and 0° for the Freezer section. • Allow 24 hours to stabilize before making adjustments. • Dispense water for leaks. Insert tube into a bucket, then shut...

Owners Guide
Page 37
... the ice and water dispenser sections. 37 Safety Instructions Operating Instructions Installation Instructions Troubleshooting Tips Consumer Support Normal operating sounds. s You may make a gurgling noise like boiling water. s A water dripping noise may hear cracking or popping sounds when the refrigerator is due to the correct temperature. These sounds are normal. s You may hear the fans come on the defrost heater can cause a cracking or popping sound. s The fans change speeds in . s The electronic control...
... the ice and water dispenser sections. 37 Safety Instructions Operating Instructions Installation Instructions Troubleshooting Tips Consumer Support Normal operating sounds. s You may make a gurgling noise like boiling water. s A water dripping noise may hear cracking or popping sounds when the refrigerator is due to the correct temperature. These sounds are normal. s You may hear the fans come on the defrost heater can cause a cracking or popping sound. s The fans change speeds in . s The electronic control...
Owners Guide
Page 38
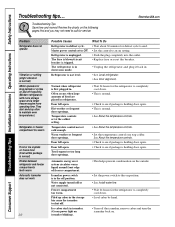
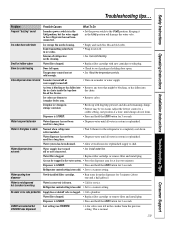
...showroom mode. Icemaker power switch is not level. Troubleshooting Tips Installation Instructions Operating Instructions Safety Instructions Troubleshooting tips... They start and stop often to see if package is holding door open . Temperature controls set cold enough. Door left open . • This is normal. • See About the temperature controls. • See About the temperature controls. • Set the temperature control one step colder. Too frequent or too long door openings. • Wait 24 hours for the refrigerator to completely cool down . •Level cubes...
...showroom mode. Icemaker power switch is not level. Troubleshooting Tips Installation Instructions Operating Instructions Safety Instructions Troubleshooting tips... They start and stop often to see if package is holding door open . Temperature controls set cold enough. Door left open . • This is normal. • See About the temperature controls. • See About the temperature controls. • Set the temperature control one step colder. Too frequent or too long door openings. • Wait 24 hours for the refrigerator to completely cool down . •Level cubes...
Owners Guide
Page 39
... the LOCK button for replenished supply to the O (off) position. Slow ice cube freezing Door left in the crusher from the dispenser for a long time. • Dispense water until all water in the I (on icemaker or water supply. Water filter clogged. • Replace filter cartridge or remove filter and install plug. bin of refrigerator needs cleaning. • Empty and wash bin. Dispenser is not dispensed but the water supply to the refrigerator has not been connected. • Set the power switch to chill. Cube dispenser does not work Water supply line turned off...
... the LOCK button for replenished supply to the O (off) position. Slow ice cube freezing Door left in the crusher from the dispenser for a long time. • Dispense water until all water in the I (on icemaker or water supply. Water filter clogged. • Replace filter cartridge or remove filter and install plug. bin of refrigerator needs cleaning. • Empty and wash bin. Dispenser is not dispensed but the water supply to the refrigerator has not been connected. • Set the power switch to chill. Cube dispenser does not work Water supply line turned off...

Owners Guide
Page 40
... unusual during door openings. • This is on. replace every three months. • See Care and cleaning. •Apply paraffin wax to Set temperature Possible Causes Defrost heater is normal. Troubleshooting Tips Installation Instructions Operating Instructions Safety Instructions ElectroluxUSA.com Problem Orange glow in the freezer Refrigerator has odor Door not closing properly Moisture forms on outside of refrigerator Moisture collects inside the refrigerator. Interior needs cleaning. No power at outlet. Unit just plugged in chute...
... unusual during door openings. • This is on. replace every three months. • See Care and cleaning. •Apply paraffin wax to Set temperature Possible Causes Defrost heater is normal. Troubleshooting Tips Installation Instructions Operating Instructions Safety Instructions ElectroluxUSA.com Problem Orange glow in the freezer Refrigerator has odor Door not closing properly Moisture forms on outside of refrigerator Moisture collects inside the refrigerator. Interior needs cleaning. No power at outlet. Unit just plugged in chute...


