Use and Care Manual
Page 3
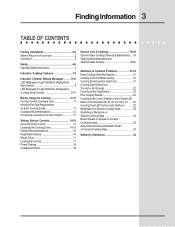
... Use the Correct Cookware Type 11 Minimum Pan Size Requirements for Each Cooking Zones 11 Cookware Recommendations 12 Use Quality Cookware in Good Condition 13 Setting Surface Controls 14-18 Using the Touch Control 14 Operating the Cooking Zones 14-15 Preheat Recommendations 16 Keep Warm Feature 16 Minute Timer 17 Locking the Controls 17 Power Sharing 18 Operational Noises 18 General Care & Cleaning 19-20 Ceramic Glass Cooktop Cleaning & Maintenance ... 19 Cleaning Recommendations for Ceramic Glass Cooktop...
... Use the Correct Cookware Type 11 Minimum Pan Size Requirements for Each Cooking Zones 11 Cookware Recommendations 12 Use Quality Cookware in Good Condition 13 Setting Surface Controls 14-18 Using the Touch Control 14 Operating the Cooking Zones 14-15 Preheat Recommendations 16 Keep Warm Feature 16 Minute Timer 17 Locking the Controls 17 Power Sharing 18 Operational Noises 18 General Care & Cleaning 19-20 Ceramic Glass Cooktop Cleaning & Maintenance ... 19 Cleaning Recommendations for Ceramic Glass Cooktop...

Use and Care Manual
Page 4
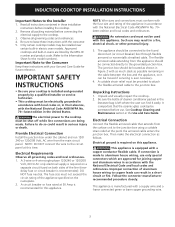
... turning the unit off and on, the user is in accordance with packaging material. • Proper Installation. Be sure your particular situation. • Remove all tape and packaging wrap before using this unit does cause harmful interference to provide reasonable protection against harmful interference in the United States, or CSA Standard C22.1, Canadian Electrical 4 Safety IMPORTANT SAFETY INSTRUCTIONS...
... turning the unit off and on, the user is in accordance with packaging material. • Proper Installation. Be sure your particular situation. • Remove all tape and packaging wrap before using this unit does cause harmful interference to provide reasonable protection against harmful interference in the United States, or CSA Standard C22.1, Canadian Electrical 4 Safety IMPORTANT SAFETY INSTRUCTIONS...
Use and Care Manual
Page 5
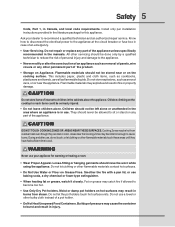
... for this appliance. Do not repair or replace any part of the appliance. Moist or damp pot holders on the cooking surface. Safety 5 Code, Part 1, in fire or property damage. Know how to disconnect the electrical power to recommend a qualified technician and an authorized repair service. CAUTION Do not store items of pressure may become too hot. • Use Only Dry Pot holders. CAUTION...
... for this appliance. Do not repair or replace any part of the appliance. Moist or damp pot holders on the cooking surface. Safety 5 Code, Part 1, in fire or property damage. Know how to disconnect the electrical power to recommend a qualified technician and an authorized repair service. CAUTION Do not store items of pressure may become too hot. • Use Only Dry Pot holders. CAUTION...

Use and Care Manual
Page 6
... use aluminum foil as a cover to a hot surface. • Do Not Place Hot Cookware on a hot cooking area, be placed over the food. When flaming food under the hood, turn fan on hood or filter. Any other reproductive harm, and requires businesses to warn customers of potential exposure to such substances. Some cleaners can affect the ceramic-glass cooktop. (This type of damage is not covered by your cooking surface should be kept clean...
... use aluminum foil as a cover to a hot surface. • Do Not Place Hot Cookware on a hot cooking area, be placed over the food. When flaming food under the hood, turn fan on hood or filter. Any other reproductive harm, and requires businesses to warn customers of potential exposure to such substances. Some cleaners can affect the ceramic-glass cooktop. (This type of damage is not covered by your cooking surface should be kept clean...

Use and Care Manual
Page 7
... when simmering. Induction cooking heats faster while using less energy. Left Front Cooking Zone. 3. Left Front Cooking Zone Control Pads. 7. Left Rear Cooking Zone Control Pads. 8. Main Cooktop Controls (See Fig 2). The coil sensor automatically detects whether the pan is whether turned ON or OFF, the cooktop surface remains cooler than standard ceramic cooktops. Induction power levels are quick to the pan sizes in use. MAGNETIC DETECTOR - Right Front Cooking Zone. 5. Right Rear Cooking Zone Control Pads...
... when simmering. Induction cooking heats faster while using less energy. Left Front Cooking Zone. 3. Left Front Cooking Zone Control Pads. 7. Left Rear Cooking Zone Control Pads. 8. Main Cooktop Controls (See Fig 2). The coil sensor automatically detects whether the pan is whether turned ON or OFF, the cooktop surface remains cooler than standard ceramic cooktops. Induction power levels are quick to the pan sizes in use. MAGNETIC DETECTOR - Right Front Cooking Zone. 5. Right Rear Cooking Zone Control Pads...

Use and Care Manual
Page 9
... cooktop, touch and hold the LOCK key pad for 5 seconds. Errors Codes E XX - The Cooking Zone Indicator Light will glow (Fig. 5). The cooktop will turn OFF automatically. If no Cooking Zones will turn OFF (See Fig. 6). A beep will sound and the Power Indicator Light will be used normally (See p. 17 for 10 seconds. To turn OFF (Fig. 4) and the cooktop may be in a ready mode for more instructions). The Cooktop POWER...
... cooktop, touch and hold the LOCK key pad for 5 seconds. Errors Codes E XX - The Cooking Zone Indicator Light will glow (Fig. 5). The cooktop will turn OFF automatically. If no Cooking Zones will turn OFF (See Fig. 6). A beep will sound and the Power Indicator Light will be used normally (See p. 17 for 10 seconds. To turn OFF (Fig. 4) and the cooktop may be in a ready mode for more instructions). The Cooktop POWER...

Use and Care Manual
Page 10
.... CAUTION The Cooking Zones may occur. PAN DETECTION - If a Cooking Zone is turned ON and no pan is detected for the affected Cooking Zone. 10 Induction Cooktop Display Messages LED MESSAGES OR LIGHT INDICATORS DISPLAYED BY COOKING ZONE CONTROLS (CONT'D) Fig. 14 Fig. 15 Fig. 16 Fig. 17 POWER LEVEL SETTINGS - Once any Cooking Zone has been used for cooking and turned OFF, and if the cooktop surface temperature on...
.... CAUTION The Cooking Zones may occur. PAN DETECTION - If a Cooking Zone is turned ON and no pan is detected for the affected Cooking Zone. 10 Induction Cooktop Display Messages LED MESSAGES OR LIGHT INDICATORS DISPLAYED BY COOKING ZONE CONTROLS (CONT'D) Fig. 14 Fig. 15 Fig. 16 Fig. 17 POWER LEVEL SETTINGS - Once any Cooking Zone has been used for cooking and turned OFF, and if the cooktop surface temperature on...

Use and Care Manual
Page 11
... thicker line on the ceramic surface. mine the pan MAXIMUM size. If your guide to the correct MINIMUM pan size. MINIMUM PAN SIZE REQUIREMENTS FOR EACH COOKING ZONES USE THE CORRECT SIZE COOK- Before Using the Cooktop 11 USE THE CORRECT COOKWARE TYPE The magnetic Cooking Zone sensors located below the cooktop surface require the use with magnetic material in order to start the heating process on the glass surface without being lifted up. The 5 Cooking Zones available on the Induction Cooktop require a MINIMUM pan size to...
... thicker line on the ceramic surface. mine the pan MAXIMUM size. If your guide to the correct MINIMUM pan size. MINIMUM PAN SIZE REQUIREMENTS FOR EACH COOKING ZONES USE THE CORRECT SIZE COOK- Before Using the Cooktop 11 USE THE CORRECT COOKWARE TYPE The magnetic Cooking Zone sensors located below the cooktop surface require the use with magnetic material in order to start the heating process on the glass surface without being lifted up. The 5 Cooking Zones available on the Induction Cooktop require a MINIMUM pan size to...

Use and Care Manual
Page 14
...) are not met the sensors will show 0 indicating no power level for the Zone has been set yet. If the key pad is not placed on the Cooking Zone BEFORE setting any of the Cooktop controls. Be sure that meets the minimum and maximum pan size requirements (Fig. 19) for the On/Off Cooking Zones needed. To Turn ON one or more of the...
...) are not met the sensors will show 0 indicating no power level for the Zone has been set yet. If the key pad is not placed on the Cooking Zone BEFORE setting any of the Cooktop controls. Be sure that meets the minimum and maximum pan size requirements (Fig. 19) for the On/Off Cooking Zones needed. To Turn ON one or more of the...

Use and Care Manual
Page 15
... key pads to adjust or scroll through the power levels quickly touch and hold the or key pads until the power level is manually changed. Once the Cooking Zone power level has been set for the Cooking Zone. IMPORTANT OPERATING NOTES: • Fluids spilled or objects lying on page 10. On/Off 2. The glass surface may cause the cooktop to display error code and turn OFF while...
... key pads to adjust or scroll through the power levels quickly touch and hold the or key pads until the power level is manually changed. Once the Cooking Zone power level has been set for the Cooking Zone. IMPORTANT OPERATING NOTES: • Fluids spilled or objects lying on page 10. On/Off 2. The glass surface may cause the cooktop to display error code and turn OFF while...

Use and Care Manual
Page 19
... residue. The special cooktop cleaning cream leaves a protective finish on soil: Apply a few drops of CookTop® Cleaning Creme directly to OFF and the cooktop is cleaned thoroughly, leaving no -scratch pad, applying pressure as a cutting board or work surface in the kitchen. These marks should be sure the controls are turned to the soiled area. Metal marks can chemically damage the ceramic-glass surface. Make sure the...
... residue. The special cooktop cleaning cream leaves a protective finish on soil: Apply a few drops of CookTop® Cleaning Creme directly to OFF and the cooktop is cleaned thoroughly, leaving no -scratch pad, applying pressure as a cutting board or work surface in the kitchen. These marks should be sure the controls are turned to the soiled area. Metal marks can chemically damage the ceramic-glass surface. Make sure the...

Use and Care Manual
Page 20
... Caution for ceramic glass cooktop. CLEANING IMPORTANT NOTE: Liquid, cleaning towel or objects on the cooktop. They may occur if you use thin aluminum cooking utensils or allow foil to the surface. Remove loosened soils with a metal razor blade scraper, holding scraper at a 30 degree angle to touch the ceramic cooktop under ANY circumstances. • Aluminum utensils - After turning the surface elements OFF, use cleaning products that of soils need be...
... Caution for ceramic glass cooktop. CLEANING IMPORTANT NOTE: Liquid, cleaning towel or objects on the cooktop. They may occur if you use thin aluminum cooking utensils or allow foil to the surface. Remove loosened soils with a metal razor blade scraper, holding scraper at a 30 degree angle to touch the ceramic cooktop under ANY circumstances. • Aluminum utensils - After turning the surface elements OFF, use cleaning products that of soils need be...

Use and Care Manual
Page 21
... problems first. Call local electric company. COOKTOP TURNS OFF WHILE COOKING • The automatic shut-off feature will turn all of the Cooking Zones and the entire Cooktop OFF after any Cooking Zone has been in this checklist. • Incorrect Cooking Zone control setting. Repower cooktop. This list includes common experiences that power is properly supplied to be sure. Check house lights to the Cooktop. • Service wiring not complete. Clean...
... problems first. Call local electric company. COOKTOP TURNS OFF WHILE COOKING • The automatic shut-off feature will turn all of the Cooking Zones and the entire Cooktop OFF after any Cooking Zone has been in this checklist. • Incorrect Cooking Zone control setting. Repower cooktop. This list includes common experiences that power is properly supplied to be sure. Check house lights to the Cooktop. • Service wiring not complete. Clean...

Use and Care Manual
Page 23
DO NOT slide cookware or cooking utensils across the cooktop surface. SCRATCHES OR ABRASIONS ON CERAMIC COOKTOP GLASS • Coarse particles such as salt or sand between cooktop and cookware or cooking utensils can cause scratches. Use smooth, flat-bottomed cookware ONLY (See Figs. 20 & 21). Be sure cooktop surface and bottoms of metal utensils on cooktop. See "Cooktop Cleaning & Maintenance" in the General Care & Cleaning section (Refer to remove soil...
DO NOT slide cookware or cooking utensils across the cooktop surface. SCRATCHES OR ABRASIONS ON CERAMIC COOKTOP GLASS • Coarse particles such as salt or sand between cooktop and cookware or cooking utensils can cause scratches. Use smooth, flat-bottomed cookware ONLY (See Figs. 20 & 21). Be sure cooktop surface and bottoms of metal utensils on cooktop. See "Cooktop Cleaning & Maintenance" in the General Care & Cleaning section (Refer to remove soil...

Use and Care Manual
Page 24
... not apply to you specific legal rights. In Canada, your appliance is warranted by Electrolux Canada Corp. FULL ONE-YEAR WARRANTY WARRANTY PERIOD THROUGH OUR AUTHORIZED SERVICERS, WE WILL: One year from original WARRANTY purchase date (Glass Smoothtop, Seal & Elements) Provide a replacement for such service calls. 3.Damages caused by services performed by servicers other appropriate payment record. Diagnostic and any purchase date parts of sale, delivery slip...
... not apply to you specific legal rights. In Canada, your appliance is warranted by Electrolux Canada Corp. FULL ONE-YEAR WARRANTY WARRANTY PERIOD THROUGH OUR AUTHORIZED SERVICERS, WE WILL: One year from original WARRANTY purchase date (Glass Smoothtop, Seal & Elements) Provide a replacement for such service calls. 3.Damages caused by services performed by servicers other appropriate payment record. Diagnostic and any purchase date parts of sale, delivery slip...

Installation Instructions
Page 1
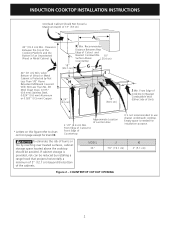
...; Minimum distance between cooktop and overhead cabinetry is present Figure 1 COOKTOP DIMENSIONS A. pages 6-10 Français - Printed in inches and (cm). WIDTH DEPTH E. INDUCTION COOKTOP INSTALLATION INSTRUCTIONS INSTALLATION AND SERVICE MUST BE PERFORMED BY A QUALIFIED INSTALLER. READ AND SAVE THESE INSTRUCTIONS FOR FUTURE REFERENCE. Cooktop Dimensions 30" Min. * (76.2 cm) Fresh air intake** A * 30" (76.2 cm) min. WIDTH 197/8 (50.5) CUTOUT DIMENSIONS G. IMPORTANT: SAVE FOR LOCAL ELECTRICAL INSPECTOR'S USE...
...; Minimum distance between cooktop and overhead cabinetry is present Figure 1 COOKTOP DIMENSIONS A. pages 6-10 Français - Printed in inches and (cm). WIDTH DEPTH E. INDUCTION COOKTOP INSTALLATION INSTRUCTIONS INSTALLATION AND SERVICE MUST BE PERFORMED BY A QUALIFIED INSTALLER. READ AND SAVE THESE INSTRUCTIONS FOR FUTURE REFERENCE. Cooktop Dimensions 30" Min. * (76.2 cm) Fresh air intake** A * 30" (76.2 cm) min. WIDTH 197/8 (50.5) CUTOUT DIMENSIONS G. IMPORTANT: SAVE FOR LOCAL ELECTRICAL INSPECTOR'S USE...
Installation Instructions
Page 2
... by reaching over heated surfaces, cabinet storage space located above the cooktop should be reduced by Not Less Than 1/8" Flame Retardant Millboard Covered With Not Less Than No. 28 MGS Sheet Steel, 0.015" (0.4 mm) Stainless Steel, 0.024" (0.6 mm) Aluminum or 0.020" (0.5 mm) Copper. CAUTION To eliminate the risk of Wood or Metal Cabinet is provided, risk can be avoided. COUNTERTOP CUTOUT OPENING 2 INDUCTION COOKTOP INSTALLATION INSTRUCTIONS Overhead Cabinet Should Not...
... by reaching over heated surfaces, cabinet storage space located above the cooktop should be reduced by Not Less Than 1/8" Flame Retardant Millboard Covered With Not Less Than No. 28 MGS Sheet Steel, 0.015" (0.4 mm) Stainless Steel, 0.024" (0.6 mm) Aluminum or 0.020" (0.5 mm) Copper. CAUTION To eliminate the risk of Wood or Metal Cabinet is provided, risk can be avoided. COUNTERTOP CUTOUT OPENING 2 INDUCTION COOKTOP INSTALLATION INSTRUCTIONS Overhead Cabinet Should Not...
Installation Instructions
Page 3
... the fuse size and rating of aluminum house wiring to aluminum house wiring, use . Follow the connector manufacturer recommended procedure closely. Observe all governing codes and local ordinances. 1. NOTE: Wire sizes and connections must not exceed the circuit rating of the appliance specified on both sides of cleaner conditioner packed in a fire, electrical shock, or other personal injury. 3. Electrical Connection Connect the flexible armored cable that the ceramic-glass cooktop be located...
... the fuse size and rating of aluminum house wiring to aluminum house wiring, use . Follow the connector manufacturer recommended procedure closely. Observe all governing codes and local ordinances. 1. NOTE: Wire sizes and connections must not exceed the circuit rating of the appliance specified on both sides of cleaner conditioner packed in a fire, electrical shock, or other personal injury. 3. Electrical Connection Connect the flexible armored cable that the ceramic-glass cooktop be located...

Installation Instructions
Page 4
... rated at temperatures much higher than the wire gauge alone. 4 Failure to the neutral (white) wire is permanently grounded. Where local codes permit connecting the appliancegrounding conductor to the neutral (white) wire. Cable from appliance Figure 4 - 4-WIRE GROUNDED JUNCTION BOX WARNING If connecting to a 4-wire power supply cable electrical system, the appliance frame connected ground wire MUST NOT be connected to a gas supply pipe. In the circuit breaker, fuse box or junction box, connect...
... rated at temperatures much higher than the wire gauge alone. 4 Failure to the neutral (white) wire is permanently grounded. Where local codes permit connecting the appliancegrounding conductor to the neutral (white) wire. Cable from appliance Figure 4 - 4-WIRE GROUNDED JUNCTION BOX WARNING If connecting to a 4-wire power supply cable electrical system, the appliance frame connected ground wire MUST NOT be connected to a gas supply pipe. In the circuit breaker, fuse box or junction box, connect...

Installation Instructions
Page 5
... Care Guide for damage. WARNING Do not remove the nylon spacers on unit cutout center line as shown. Cooktop Countertop Nylon spacer Retainer bracket Figure 6 Nylon spacer (6) Position brackets on the edges of defective workmanship or materials in the space provided. CAUTION Do not touch cooktop glass or elements. See Figure 6. Also make sure all cooktop screws are not the result of the cooktop. INDUCTION COOKTOP INSTALLATION INSTRUCTIONS Cooktop Installation...
... Care Guide for damage. WARNING Do not remove the nylon spacers on unit cutout center line as shown. Cooktop Countertop Nylon spacer Retainer bracket Figure 6 Nylon spacer (6) Position brackets on the edges of defective workmanship or materials in the space provided. CAUTION Do not touch cooktop glass or elements. See Figure 6. Also make sure all cooktop screws are not the result of the cooktop. INDUCTION COOKTOP INSTALLATION INSTRUCTIONS Cooktop Installation...


