Installation Instructions
Page 1
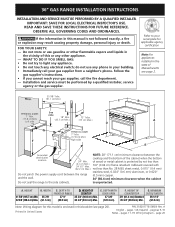
... Min.) Right side A E Grounded Wall Outlet location NOTE: 28" (71.1 cm) minimum clearance between the range and the wall. pages 17-19; OBSERVE ALL GOVERNING CODES AND ORDINANCES. Refer to the side cabinets. Español - 36" GAS RANGE INSTALLATION INSTRUCTIONS INSTALLATION AND SERVICE MUST BE PERFORMED BY A QUALIFIED INSTALLER. pages 1-8; READ AND SAVE...
... Min.) Right side A E Grounded Wall Outlet location NOTE: 28" (71.1 cm) minimum clearance between the range and the wall. pages 17-19; OBSERVE ALL GOVERNING CODES AND ORDINANCES. Refer to the side cabinets. Español - 36" GAS RANGE INSTALLATION INSTRUCTIONS INSTALLATION AND SERVICE MUST BE PERFORMED BY A QUALIFIED INSTALLER. pages 1-8; READ AND SAVE...
Installation Instructions
Page 2
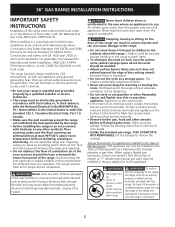
...to Med. Children could be seriously burned climbing on the door of this or any appliance using a flexible gas connector, it carefully. • Be sure your range for proper burner combustion. To light a surface burner, hold a lit match to the burner head and rapidly...slots, holes or passages in the Use & Care Guide. • Unlike the standard gas range, THIS COOKTOP IS NOT REMOVABLE. 36" GAS RANGE INSTALLATION INSTRUCTIONS IMPORTANT SAFETY INSTRUCTIONS Installation of this appliance. • All ranges can tip. • Injury to persons could result. • Install anti-tip ...
...to Med. Children could be seriously burned climbing on the door of this or any appliance using a flexible gas connector, it carefully. • Be sure your range for proper burner combustion. To light a surface burner, hold a lit match to the burner head and rapidly...slots, holes or passages in the Use & Care Guide. • Unlike the standard gas range, THIS COOKTOP IS NOT REMOVABLE. 36" GAS RANGE INSTALLATION INSTRUCTIONS IMPORTANT SAFETY INSTRUCTIONS Installation of this appliance. • All ranges can tip. • Injury to persons could result. • Install anti-tip ...
Installation Instructions
Page 3
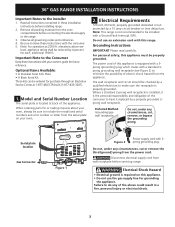
... Grounding type wall receptacle Do not, under any circumstances, cut or remove the third (ground) prong from the power cord. 36" GAS RANGE INSTALLATION INSTRUCTIONS Important Notes to minimize the possibility of electric shock hazard from the appliance. Read all governing codes and ordinances. 4....grounded 3prong wall receptacle. Note: This range is not recommended to make sure the receptacle is equipped with a 3prong (grounding) plug which mates with the consumer. 5. Do not use the gas supply line for purchase through an Electrolux Service Center at 2000 ft. The wall...
... Grounding type wall receptacle Do not, under any circumstances, cut or remove the third (ground) prong from the power cord. 36" GAS RANGE INSTALLATION INSTRUCTIONS Important Notes to minimize the possibility of electric shock hazard from the appliance. Read all governing codes and ordinances. 4....grounded 3prong wall receptacle. Note: This range is not recommended to make sure the receptacle is equipped with a 3prong (grounding) plug which mates with the consumer. 5. Do not use the gas supply line for purchase through an Electrolux Service Center at 2000 ft. The wall...
Installation Instructions
Page 4
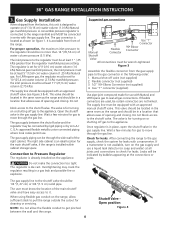
... indicated by A.G.A./ C.G.A.-approved flexible metallic union-connected piping where local codes permit use. 36" GAS RANGE INSTALLATION INSTRUCTIONS 3. Gas Supply Installation When shipped from the gas supply pipe to gas supply line The gas connector is for 4"(10,16 cm) water column (1.0 kPa) Natural gas manifold pressure; For proper operation, the maximum inlet pressure to the appliance. the...
... indicated by A.G.A./ C.G.A.-approved flexible metallic union-connected piping where local codes permit use. 36" GAS RANGE INSTALLATION INSTRUCTIONS 3. Gas Supply Installation When shipped from the gas supply pipe to gas supply line The gas connector is for 4"(10,16 cm) water column (1.0 kPa) Natural gas manifold pressure; For proper operation, the maximum inlet pressure to the appliance. the...

Installation Instructions
Page 5
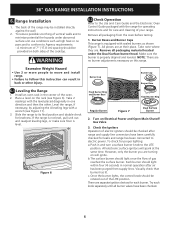
... floor where the back edge of the range will not be avoided. If cabinet storage space is to prevent gas leakage in a fire or explosion. 36" GAS RANGE INSTALLATION INSTRUCTIONS Do not use a flame to the range. Draw a line on the flexible gas conduit. Moving the Appliance for the type... of the gas supply piping system at the main power source...
... floor where the back edge of the range will not be avoided. If cabinet storage space is to prevent gas leakage in a fire or explosion. 36" GAS RANGE INSTALLATION INSTRUCTIONS Do not use a flame to the range. Draw a line on the flexible gas conduit. Moving the Appliance for the type... of the gas supply piping system at the main power source...
Installation Instructions
Page 6
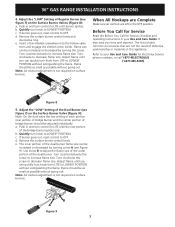
...range... and Open Main Shutoff Gas Valve 3. Once the burner.... Level the range, if necessary, by adjusting the ...injury. 6.1 Leveling the Range 1. Check the Igniters...LITE position. Slide the range to the Use and ...Push in normal operation after range and supply line connectors have ... and cleaning of gas reached the surface ...Range Installation 1. Install an oven rack in back or other . Each burner should light once the flow of your range. If the range...range for operating instructions and for leaks and range...more people to move and install range. • Failure to minimize ...
...range... and Open Main Shutoff Gas Valve 3. Once the burner.... Level the range, if necessary, by adjusting the ...injury. 6.1 Leveling the Range 1. Check the Igniters...LITE position. Slide the range to the Use and ...Push in normal operation after range and supply line connectors have ... and cleaning of gas reached the surface ...Range Installation 1. Install an oven rack in back or other . Each burner should light once the flow of your range. If the range...range for operating instructions and for leaks and range...more people to move and install range. • Failure to minimize ...
Installation Instructions
Page 7
... LOWEST POSITION. It may save you can be as small as possible without extinguishing the flame. a. c. Adjust flame until burner ignites. 36" GAS RANGE INSTALLATION INSTRUCTIONS 4. The list includes common occurrences that are left in this appliance. The inner portion of defective workmanship or materials in the ...and turn knob from LITE to LITE until you time and expense. b. Before You Call for Service Read the Before You Call for Electrolux Service phone numbers, or call 1-877-4ELECTROLUX (1-877-435-3287). Refer to adjust the flame size of the outer portion of Regular...
... LOWEST POSITION. It may save you can be as small as possible without extinguishing the flame. a. c. Adjust flame until burner ignites. 36" GAS RANGE INSTALLATION INSTRUCTIONS 4. The list includes common occurrences that are left in this appliance. The inner portion of defective workmanship or materials in the ...and turn knob from LITE to LITE until you time and expense. b. Before You Call for Service Read the Before You Call for Electrolux Service phone numbers, or call 1-877-4ELECTROLUX (1-877-435-3287). Refer to adjust the flame size of the outer portion of Regular...
Installation Instructions
Page 8
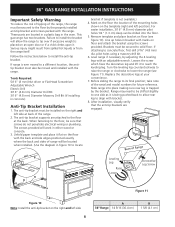
36" GAS RANGE INSTALLATION INSTRUCTIONS Important Safety Warning To reduce the risk of tipping of Range Wall B A A Wall B Center Ligne Leveling Leg Raise Lower Decorative Leg Screw Figure 11 Figure 10 Note: Install the anti-tip bracket on the right and left side 8 A 36" Range 14 5/16 (36.4 cm) B 1 ...5/8 (4.1 cm) Serious injury might result from spilled hot liquids or from the range itself. Level range if necessary, by the bracket. After installation, visually verify that screws ...
36" GAS RANGE INSTALLATION INSTRUCTIONS Important Safety Warning To reduce the risk of tipping of Range Wall B A A Wall B Center Ligne Leveling Leg Raise Lower Decorative Leg Screw Figure 11 Figure 10 Note: Install the anti-tip bracket on the right and left side 8 A 36" Range 14 5/16 (36.4 cm) B 1 ...5/8 (4.1 cm) Serious injury might result from spilled hot liquids or from the range itself. Level range if necessary, by the bracket. After installation, visually verify that screws ...


