Installation Instructions
Page 1
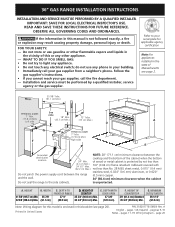
... vapors and liquids in the state of the cabinet when the bottom 24" Min. HEIGHT OF COOKTOP 35 3/4" (90.8 cm) Min. 36 3/4" (93.3 cm) Max. HEIGHT OF COUNTERTOP 36" (91.4 cm) Standard 35 3/4" (90.8 cm) Min. P/N 318201778 (0809) Rev. páginas 9-16 Notes - Wiring Diagram -.... (17.8 cm Min.) Right side A E Grounded Wall Outlet location NOTE: 28" (71.1 cm) minimum clearance between the range and the wall. A Printed in this model is protected by a qualified installer, service agency or the gas supplier. READ AND SAVE THESE INSTRUCTIONS FOR FUTURE REFERENCE. WHAT TO DO IF YOU SMELL...
... vapors and liquids in the state of the cabinet when the bottom 24" Min. HEIGHT OF COOKTOP 35 3/4" (90.8 cm) Min. 36 3/4" (93.3 cm) Max. HEIGHT OF COUNTERTOP 36" (91.4 cm) Standard 35 3/4" (90.8 cm) Min. P/N 318201778 (0809) Rev. páginas 9-16 Notes - Wiring Diagram -.... (17.8 cm Min.) Right side A E Grounded Wall Outlet location NOTE: 28" (71.1 cm) minimum clearance between the range and the wall. A Printed in this model is protected by a qualified installer, service agency or the gas supplier. READ AND SAVE THESE INSTRUCTIONS FOR FUTURE REFERENCE. WHAT TO DO IF YOU SMELL...
Installation Instructions
Page 3
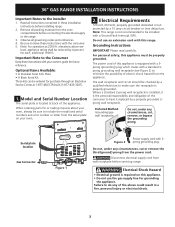
... to have it replaced by a qualified electrician to the Consumer Keep these installation instructions before installing range. 2. 36" GAS RANGE INSTALLATION INSTRUCTIONS Important Notes to include the model and serial numbers and a lot number or letter from the appliance. For personal safety, this ... about your oven. 2. Do not use the gas supply line for purchase through an Electrolux Service Center at 2000 ft. Grounding Instructions IMPORTANT Please read carefully. The power cord of this range. Serial plate location Gas Connector Figure 1 Figure 2 Power supply cord with...
... to have it replaced by a qualified electrician to the Consumer Keep these installation instructions before installing range. 2. 36" GAS RANGE INSTALLATION INSTRUCTIONS Important Notes to include the model and serial numbers and a lot number or letter from the appliance. For personal safety, this ... about your oven. 2. Do not use the gas supply line for purchase through an Electrolux Service Center at 2000 ft. Grounding Instructions IMPORTANT Please read carefully. The power cord of this range. Serial plate location Gas Connector Figure 1 Figure 2 Power supply cord with...
Installation Instructions
Page 8
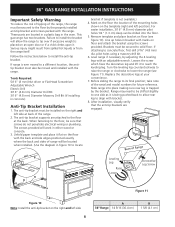
... on the template (right and left side at back of the range. 2. Brackets must be secured to the floor by the bracket. 36" GAS RANGE INSTALLATION INSTRUCTIONS Important Safety Warning To reduce the risk of tipping of the range, the range must be secured to solid floor. If attaching to install the ...bracket with the back and side edges positioned exactly where the back and sides of the serial and model numbers for future reference. Before sliding the range to reach the leveling leg. Range may need to be shifted slightly to one side as it . Loosen the screw which fixes the...
... on the template (right and left side at back of the range. 2. Brackets must be secured to the floor by the bracket. 36" GAS RANGE INSTALLATION INSTRUCTIONS Important Safety Warning To reduce the risk of tipping of the range, the range must be secured to solid floor. If attaching to install the ...bracket with the back and side edges positioned exactly where the back and sides of the serial and model numbers for future reference. Before sliding the range to reach the leveling leg. Range may need to be shifted slightly to one side as it . Loosen the screw which fixes the...


