
Specification sheet
Page 1
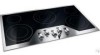
... a quick boil in combination with an Electrolux ICON® Downdraft Vent. Precision Set™ Electronic Controls Whether bringing water to change. Electric Drop-In Cooktop E36EC65ESS 5 Element Configuration The versatility of this 36" cooktop is flat, smooth and easy to clean...Installation Guide for detailed installation instructions on both sides of line with ground. electroluxicon.com Sleek Design These cooktops connect with a wide variety of pan sizes. Height Width Depth Power Supply Location Amps @ 240 / 208 Volts Connected Load (kW Rating) @ 240 / 208 Volts Electrical...
... a quick boil in combination with an Electrolux ICON® Downdraft Vent. Precision Set™ Electronic Controls Whether bringing water to change. Electric Drop-In Cooktop E36EC65ESS 5 Element Configuration The versatility of this 36" cooktop is flat, smooth and easy to clean...Installation Guide for detailed installation instructions on both sides of line with ground. electroluxicon.com Sleek Design These cooktops connect with a wide variety of pan sizes. Height Width Depth Power Supply Location Amps @ 240 / 208 Volts Connected Load (kW Rating) @ 240 / 208 Volts Electrical...
Specification sheet
Page 2
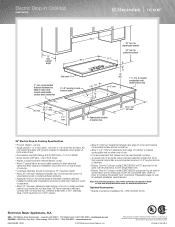
....ca E36EC65ESS 09/09 © 2009 Electrolux Home Products, Inc. Electric Drop-In Cooktop E36EC65ESS 36 3/4" 13" max. recommended 10" distance between rear edge of cabinets. • Electric Drop-In Cooktop model E36EC65ESS is NOT approved to be used over any Electrolux ICON® Single Wall Oven. • Electric Drop-In Cooktop model E36EC65ESS is approved to be used in the U.S.A. Optional Accessories • Granite Countertop Installation Kit...
....ca E36EC65ESS 09/09 © 2009 Electrolux Home Products, Inc. Electric Drop-In Cooktop E36EC65ESS 36 3/4" 13" max. recommended 10" distance between rear edge of cabinets. • Electric Drop-In Cooktop model E36EC65ESS is NOT approved to be used over any Electrolux ICON® Single Wall Oven. • Electric Drop-In Cooktop model E36EC65ESS is approved to be used in the U.S.A. Optional Accessories • Granite Countertop Installation Kit...
Specification sheet
Page 3
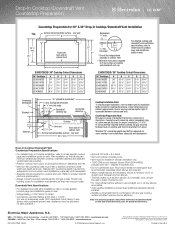
...23 9/16" 24 5/16" E36DD75ESS / 36" Cooktop Cutout Dimensions 36" Cooktops E36EC65ESS E36EC70FSS E36GC65ESS E36GC70FSS E36IC80ISS A 36" 36" 33 3/4" 34 1/2" 36" B 33 3/4" 33 3/4" 33 3/4" ...Installation Guide on web for detailed instructions. Printed in illustration. Downdraft Vent Specifications • For detailed Downdraft Vent installations, refer to model-specific product page and installation guide on web. Note: For planning purposes only. Drop-In Cooktop/Downdraft Vent Countertop Preparation Countertop Preparation for cooktop and vent. (Refer to product-specific electrical...
...23 9/16" 24 5/16" E36DD75ESS / 36" Cooktop Cutout Dimensions 36" Cooktops E36EC65ESS E36EC70FSS E36GC65ESS E36GC70FSS E36IC80ISS A 36" 36" 33 3/4" 34 1/2" 36" B 33 3/4" 33 3/4" 33 3/4" ...Installation Guide on web for detailed instructions. Printed in illustration. Downdraft Vent Specifications • For detailed Downdraft Vent installations, refer to model-specific product page and installation guide on web. Note: For planning purposes only. Drop-In Cooktop/Downdraft Vent Countertop Preparation Countertop Preparation for cooktop and vent. (Refer to product-specific electrical...
Owners Guide
Page 4
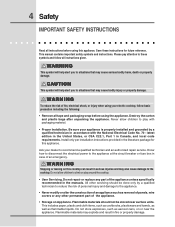
.... WARNING This symbol will help alert you to situations that may also cause damage to these instructions for this appliance. Be sure your electric cooktop, follow all tape and packaging wrap before using your appliance is properly installed and grounded by a qualified technician to reduce the risk of the appliance unless specifically recommended in...
.... WARNING This symbol will help alert you to situations that may also cause damage to these instructions for this appliance. Be sure your electric cooktop, follow all tape and packaging wrap before using your appliance is properly installed and grounded by a qualified technician to reduce the risk of the appliance unless specifically recommended in...
Owners Guide
Page 20
...craks due to be defective in materials or workmanship. Proper installation by an authorized servicer in accordance with instructions provided with the appliance and in your best interest to ... the product. 2. 20 Warranty Information COOKTOP WARRANTY Your cooktop is protected by this warranty In the U.S.A., your appliance is warranted by Electrolux Canada Corp. Product features or specifications ...from state to obtain and keep all local plumbing, electrical and/or gas codes. 3.Proper connection to finish after installation. 6.Replacement of our obligations under this warranty must...
...craks due to be defective in materials or workmanship. Proper installation by an authorized servicer in accordance with instructions provided with the appliance and in your best interest to ... the product. 2. 20 Warranty Information COOKTOP WARRANTY Your cooktop is protected by this warranty In the U.S.A., your appliance is warranted by Electrolux Canada Corp. Product features or specifications ...from state to obtain and keep all local plumbing, electrical and/or gas codes. 3.Proper connection to finish after installation. 6.Replacement of our obligations under this warranty must...
Installation Instructions
Page 1
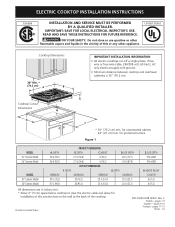
... Notes - 16 1 WIDTH 30 ¾ (78.1) 36 ¾ (93.3) MINIMUM 29 5/8 (75.2) 35 5/8 (90.5) PRODUCT DIMENSIONS B. Printed in United States P/N 318201428 (0901) Rev. pages 6-10 Français - READ AND SAVE THESE INSTRUCTIONS FOR FUTURE REFERENCE. C English - ELECTRIC COOKTOP INSTALLATION INSTRUCTIONS Canada INSTALLATION AND SERVICE MUST BE PERFORMED BY A QUALIFIED INSTALLER. for unprotected cabinet 24" (61 cm) min...
... Notes - 16 1 WIDTH 30 ¾ (78.1) 36 ¾ (93.3) MINIMUM 29 5/8 (75.2) 35 5/8 (90.5) PRODUCT DIMENSIONS B. Printed in United States P/N 318201428 (0901) Rev. pages 6-10 Français - READ AND SAVE THESE INSTRUCTIONS FOR FUTURE REFERENCE. C English - ELECTRIC COOKTOP INSTALLATION INSTRUCTIONS Canada INSTALLATION AND SERVICE MUST BE PERFORMED BY A QUALIFIED INSTALLER. for unprotected cabinet 24" (61 cm) min...
Installation Instructions
Page 2
... 36'' (91.4 cm) J 7½'' (19.1 cm) 7½'' (19.1 cm). From Edge of Cooktop to Nearest Combustible Wall (Either Side of the cabinets. If a drawer is provided, risk can be avoided. From Edge of Cutout to chart on front page except for J, K & L. ELECTRIC COOKTOP INSTALLATION INSTRUCTIONS ...Overhead Cabinet Should Not Exceed a Maximum Depth of burns or fire by reaching over heated surfaces, cabinet storage space located above the cooktop should be reduced by Not Less Than 1/8" Flame Retardant...
... 36'' (91.4 cm) J 7½'' (19.1 cm) 7½'' (19.1 cm). From Edge of Cooktop to Nearest Combustible Wall (Either Side of the cabinets. If a drawer is provided, risk can be avoided. From Edge of Cutout to chart on front page except for J, K & L. ELECTRIC COOKTOP INSTALLATION INSTRUCTIONS ...Overhead Cabinet Should Not Exceed a Maximum Depth of burns or fire by reaching over heated surfaces, cabinet storage space located above the cooktop should be reduced by Not Less Than 1/8" Flame Retardant...
Installation Instructions
Page 3
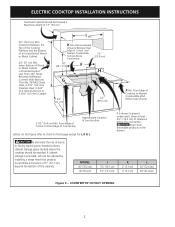
... armored cable extending from this appliance should be shut off while line connections are being made. When ordering parts for future reference. ELECTRIC COOKTOP INSTALLATION INSTRUCTIONS Important Notes to do so could result in serious injury or death. Failure to the Installer 1. It is important that the ceramic-glass smoothtop be pretreated before connecting the...
... armored cable extending from this appliance should be shut off while line connections are being made. When ordering parts for future reference. ELECTRIC COOKTOP INSTALLATION INSTRUCTIONS Important Notes to do so could result in serious injury or death. Failure to the Installer 1. It is important that the ceramic-glass smoothtop be pretreated before connecting the...
Installation Instructions
Page 4
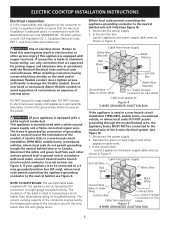
...to heed this warning may result in electrocution or other and use only connectors that the electrical installation is adequate and is in conformance with the National Electrical Code ANSI/NFPA No. 70-latest edition, or with local codes, connect neutral lead... the appliance-grounding conductor to the neutral (white) wire (US Only) (see Figure 4. ELECTRIC COOKTOP INSTALLATION INSTRUCTIONS Electrical connection It is the responsibility and obligation of the consumer to contact a qualified installer to assure that are UL-recognized for joining copper and aluminum wire in Figure 5.
...to heed this warning may result in electrocution or other and use only connectors that the electrical installation is adequate and is in conformance with the National Electrical Code ANSI/NFPA No. 70-latest edition, or with local codes, connect neutral lead... the appliance-grounding conductor to the neutral (white) wire (US Only) (see Figure 4. ELECTRIC COOKTOP INSTALLATION INSTRUCTIONS Electrical connection It is the responsibility and obligation of the consumer to contact a qualified installer to assure that are UL-recognized for joining copper and aluminum wire in Figure 5.
Installation Instructions
Page 5
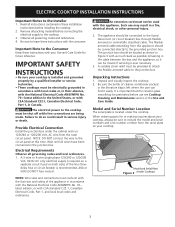
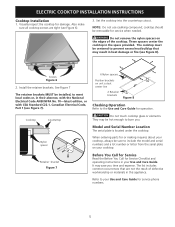
... retainer brackets. When ordering parts for service phone numbers. 5 Also make sure all cooktop screws are not the result of the cooktop. ELECTRIC COOKTOP INSTALLATION INSTRUCTIONS Cooktop Installation 1. Visually inspect the cooktop for service when needed. The cooktop must be removable for damage. Cooktop Countertop Nylon spacer Retainer bracket Figure 7 6 Nylon spacers Position brackets on the edges of defective workmanship or...
... retainer brackets. When ordering parts for service phone numbers. 5 Also make sure all cooktop screws are not the result of the cooktop. ELECTRIC COOKTOP INSTALLATION INSTRUCTIONS Cooktop Installation 1. Visually inspect the cooktop for service when needed. The cooktop must be removable for damage. Cooktop Countertop Nylon spacer Retainer bracket Figure 7 6 Nylon spacers Position brackets on the edges of defective workmanship or...

